您好,登錄后才能下訂單哦!
您好,登錄后才能下訂單哦!
今天小編給大家分享一下Golang并發編程之main goroutine的創建與調度的方法是什么的相關知識點,內容詳細,邏輯清晰,相信大部分人都還太了解這方面的知識,所以分享這篇文章給大家參考一下,希望大家閱讀完這篇文章后有所收獲,下面我們一起來了解一下吧。
接上文,在runtime/asm_amd64.s文件的runtime·rt0_go中,在執行完runtime.schedinit函數進行調度器的初始化后,就開始創建main goroutine了。
// create a new goroutine to start program
MOVQ $runtime·mainPC(SB), AX // entry // mainPC是runtime.main
PUSHQ AX // 將runtime.main函數地址入棧,作為參數
CALL runtime·newproc(SB) // 創建main goroutine,入參就是runtime.main
POPQ AX
以上代碼創建了一個新的協程(在Go中,go func()之類的相當于調用runtime.newproc),這個協程就是main goroutine,那我們就看看runtime·newproc函數做了什么。
// Create a new g running fn.
// Put it on the queue of g's waiting to run.
// The compiler turns a go statement into a call to this.
func newproc(fn *funcval) {
   gp := getg()         // 獲取正在運行的g,初始化時是m0.g0
   pc := getcallerpc()  // 返回的是調用newproc函數時由call指令壓棧的函數的返回地址,即上面匯編語言的第5行`POPQ AX`這條指令的地址
   systemstack(func() { // systemstack函數的作用是切換到系統棧來執行其參數函數,也就是`g0`棧,這里當然就是m0.g0,所以基本不需要做什么
      newg := newproc1(fn, gp, pc)

      _p_ := getg().m.p.ptr()
      runqput(_p_, newg, true)

      if mainStarted {
         wakep()
      }
   })
}所以以上代碼的重點就是調用newproc1函數進行協程的創建。
// Create a new g in state _Grunnable, starting at fn. callerpc is the
// address of the go statement that created this. The caller is responsible
// for adding the new g to the scheduler.
func newproc1(fn *funcval, callergp *g, callerpc uintptr) *g {
   _g_ := getg() // _g_ = g0,即m0.g0

   if fn == nil {
      _g_.m.throwing = -1 // do not dump full stacks
      throw("go of nil func value")
   }
   acquirem() // disable preemption because it can be holding p in a local var

   _p_ := _g_.m.p.ptr()
   newg := gfget(_p_)  // 從本地的已經廢棄的g列表中獲取一個g先,此時才剛初始化,所以肯定返回nil
   if newg == nil {
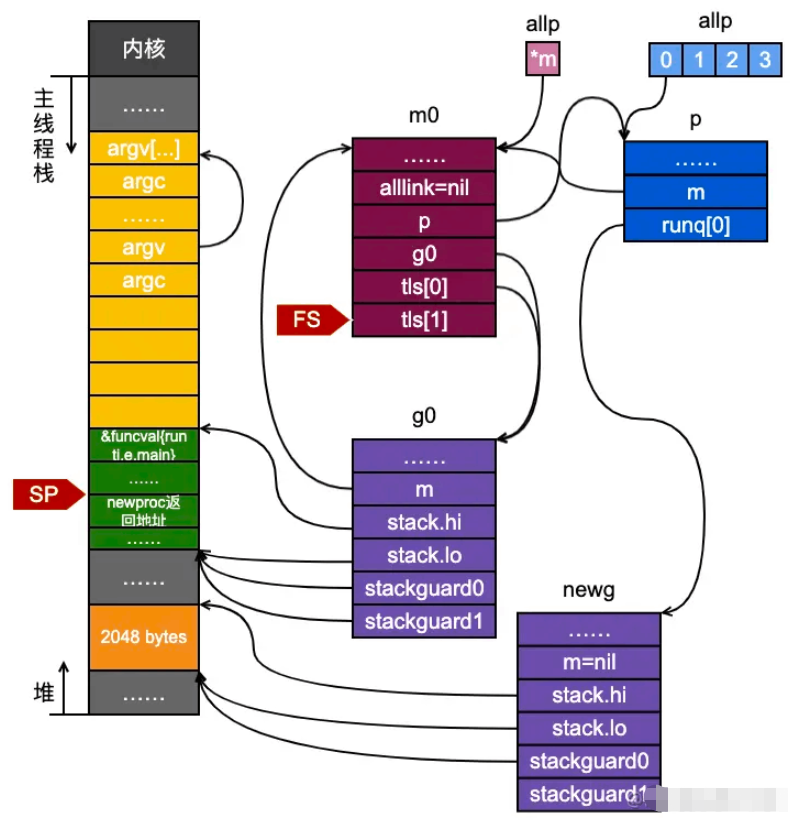
      newg = malg(_StackMin) // new一個g的結構體對象,然后在堆上分配2k的棧大小,并設置stack和stackguard0/1
      casgstatus(newg, _Gidle, _Gdead)
      allgadd(newg) // publishes with a g->status of Gdead so GC scanner doesn't look at uninitialized stack.
   }
   if newg.stack.hi == 0 {
      throw("newproc1: newg missing stack")
   }

   if readgstatus(newg) != _Gdead {
      throw("newproc1: new g is not Gdead")
   }

   // 調整棧頂指針
   totalSize := uintptr(4*goarch.PtrSize + sys.MinFrameSize) // extra space in case of reads slightly beyond frame
   totalSize = alignUp(totalSize, sys.StackAlign)
   sp := newg.stack.hi - totalSize
   spArg := sp
   if usesLR {
      // caller's LR
      *(*uintptr)(unsafe.Pointer(sp)) = 0
      prepGoExitFrame(sp)
      spArg += sys.MinFrameSize
   }
   ...
}上述代碼從堆上分配了一個g的結構體,并且在堆上為其分配了一個2k大小的棧,并設置了好了newg的stack等相關參數。此時,newg的狀態如圖所示:

接著我們繼續分析newproc1函數:
memclrNoHeapPointers(unsafe.Pointer(&newg.sched), unsafe.Sizeof(newg.sched))
newg.sched.sp = sp // 設置newg的棧頂
newg.stktopsp = sp
// newg.sched.pc表示當newg運行起來時的運行起始位置,下面一段是類似于代碼注入,就好像每個go func()
// 函數都是由goexit函數引起的一樣,以便后面當newg結束后,
// 完成newg的回收(當然這里main goroutine結束后進程就結束了,不會被回收)。
newg.sched.pc = abi.FuncPCABI0(goexit) + sys.PCQuantum // +PCQuantum so that previous instruction is in same function
newg.sched.g = guintptr(unsafe.Pointer(newg))
gostartcallfn(&newg.sched, fn) // 調整sched成員和newg的棧
newg.gopc = callerpc
newg.ancestors = saveAncestors(callergp)
newg.startpc = fn.fn
if isSystemGoroutine(newg, false) {
   atomic.Xadd(&sched.ngsys, +1)
} else {
   // Only user goroutines inherit pprof labels.
   if _g_.m.curg != nil {
      newg.labels = _g_.m.curg.labels
   }
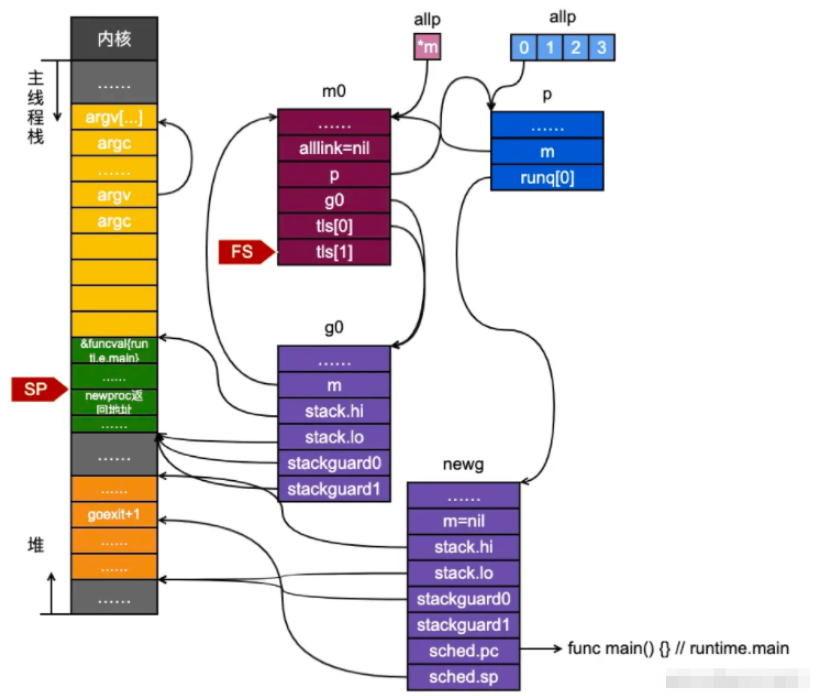
}以上代碼對newg的sched成員進行初始化,其中newg.sched.sp表示其被調度起來后應該使用的棧頂,newg.sched.pc表示其被調度起來從這個地址開始運行,但是這個值被設置成了goexit函數的下一條指令,所以我們看看,在gostartcallfn函數中,到底做了什么才能實現此功能:
// adjust Gobuf as if it executed a call to fn
// and then stopped before the first instruction in fn.
func gostartcallfn(gobuf *gobuf, fv *funcval) {
   var fn unsafe.Pointer
   if fv != nil {
      fn = unsafe.Pointer(fv.fn)
   } else {
      fn = unsafe.Pointer(abi.FuncPCABIInternal(nilfunc))
   }
   gostartcall(gobuf, fn, unsafe.Pointer(fv))
}

// sys_x86.go
// adjust Gobuf as if it executed a call to fn with context ctxt
// and then stopped before the first instruction in fn.
func gostartcall(buf *gobuf, fn, ctxt unsafe.Pointer) {
   sp := buf.sp
   sp -= goarch.PtrSize
   *(*uintptr)(unsafe.Pointer(sp)) = buf.pc // 插入goexit的第二條指令,返回時可以調用
   buf.sp = sp
   buf.pc = uintptr(fn)                     // 此時才是真正地設置pc
   buf.ctxt = ctxt
}
以上操作的目的就是:
調整newg的棧空間,把goexit函數的第二條指令的地址入棧,偽造成goexit函數調用了fn,從而使fn執行完成后執行ret指令時返回到goexit繼續執行完成最后的清理工作;
重新設置newg.buf.pc 為需要執行的函數的地址,即fn,此場景為runtime.main函數的地址。
接下來會設置newg的狀態為runnable;最后別忘了newproc函數中還有幾行:
newg := newproc1(fn, gp, pc)

_p_ := getg().m.p.ptr()
runqput(_p_, newg, true)

if mainStarted {
   wakep()
}在創建完newg后,將其放到此線程的g0(這里是m0.g0)所在的runq隊列,并且優先插入到隊列的前端(runqput第三個參數為true),做完這些后,我們可以得出以下的關系:

上一節我們分析了main goroutine的創建過程,這一節我們討論一下,調度器如何把main goroutine調度到CPU上去運行。讓我們繼續回到runtime/asm_amd64.s中,在完成runtime.newproc創建完main goroutine之后,正式執行runtime·mstart來執行,而runtime·mstart最終會調用go寫的runtime·mstart0函數。
// start this M
CALL runtime·mstart(SB)
CALL runtime·abort(SB) // mstart should never return
RET
TEXT runtime·mstart(SB),NOSPLIT|TOPFRAME,$0
CALL runtime·mstart0(SB)
RET // not reached
runtime·mstart0函數如下:
func mstart0() {
   _g_ := getg() // _g_ = &g0

   osStack := _g_.stack.lo == 0
   if osStack { // g0的stack.lo已經初始化,所以不會走以下邏輯
      // Initialize stack bounds from system stack.
      // Cgo may have left stack size in stack.hi.
      // minit may update the stack bounds.
      //
      // Note: these bounds may not be very accurate.
      // We set hi to &size, but there are things above
      // it. The 1024 is supposed to compensate this,
      // but is somewhat arbitrary.
      size := _g_.stack.hi
      if size == 0 {
         size = 8192 * sys.StackGuardMultiplier
      }
      _g_.stack.hi = uintptr(noescape(unsafe.Pointer(&size)))
      _g_.stack.lo = _g_.stack.hi - size + 1024
   }
   // Initialize stack guard so that we can start calling regular
   // Go code.
   _g_.stackguard0 = _g_.stack.lo + _StackGuard
   // This is the g0, so we can also call go:systemstack
   // functions, which check stackguard1.
   _g_.stackguard1 = _g_.stackguard0
   mstart1()

   // Exit this thread.
   if mStackIsSystemAllocated() {
      // Windows, Solaris, illumos, Darwin, AIX and Plan 9 always system-allocate
      // the stack, but put it in _g_.stack before mstart,
      // so the logic above hasn't set osStack yet.
      osStack = true
   }
   mexit(osStack)
}以上代碼設置了一些棧信息之后,調用runtime.mstart1函數:
func mstart1() {
   _g_ := getg() // _g_ = &g0

   if _g_ != _g_.m.g0 { // _g_ = &g0
      throw("bad runtime·mstart")
   }

   // Set up m.g0.sched as a label returning to just
   // after the mstart1 call in mstart0 above, for use by goexit0 and mcall.
   // We're never coming back to mstart1 after we call schedule,
   // so other calls can reuse the current frame.
   // And goexit0 does a gogo that needs to return from mstart1
   // and let mstart0 exit the thread.
   _g_.sched.g = guintptr(unsafe.Pointer(_g_))
   _g_.sched.pc = getcallerpc() // getcallerpc()獲取mstart1執行完的返回地址
   _g_.sched.sp = getcallersp() // getcallersp()獲取調用mstart1時的棧頂地址

   asminit()
   minit() // 信號相關初始化

   // Install signal handlers; after minit so that minit can
   // prepare the thread to be able to handle the signals.
   if _g_.m == &m0 {
      mstartm0()
   }

   if fn := _g_.m.mstartfn; fn != nil {
      fn()
   }

   if _g_.m != &m0 {
      acquirep(_g_.m.nextp.ptr())
      _g_.m.nextp = 0
   }
   schedule()
}可以看到mstart1函數保存額調度相關的信息,特別是保存了正在運行的g0的下一條指令和棧頂地址, 這些調度信息對于goroutine而言是很重要的。

接下來就是golang調度系統的核心函數runtime.schedule了:
func schedule() {
   _g_ := getg() // _g_ 是每個工作線程的m的m0,在初始化的場景就是m0.g0

   ...

   var gp *g
   var inheritTime bool

   ...

   if gp == nil {
      // 為了保證調度的公平性,每進行61次調度就需要優先從全局隊列中獲取goroutine
      // Check the global runnable queue once in a while to ensure fairness.
      // Otherwise two goroutines can completely occupy the local runqueue
      // by constantly respawning each other.
      if _g_.m.p.ptr().schedtick%61 == 0 && sched.runqsize > 0 {
         lock(&sched.lock)
         gp = globrunqget(_g_.m.p.ptr(), 1)
         unlock(&sched.lock)
      }
   }
   if gp == nil { // 從p本地的隊列中獲取goroutine
      gp, inheritTime = runqget(_g_.m.p.ptr())
      // We can see gp != nil here even if the M is spinning,
      // if checkTimers added a local goroutine via goready.
   }
   if gp == nil { // 如果以上兩者都沒有,那么就需要從其他p哪里竊取goroutine
      gp, inheritTime = findrunnable() // blocks until work is available
   }

   ...

   execute(gp, inheritTime)
}以上我們節選了一些和調度相關的代碼,意圖簡化我們的理解,調度中獲取goroutine的規則是:
每調度61次就需要從全局隊列中獲取goroutine;
其次優先從本P所在隊列中獲取goroutine;
如果還沒有獲取到,則從其他P的運行隊列中竊取goroutine;
最后調用runtime.excute函數運行代碼:
func execute(gp *g, inheritTime bool) {
   _g_ := getg()

   // Assign gp.m before entering _Grunning so running Gs have an
   // M.
   _g_.m.curg = gp
   gp.m = _g_.m
   casgstatus(gp, _Grunnable, _Grunning) // 設置gp的狀態
   gp.waitsince = 0
   gp.preempt = false
   gp.stackguard0 = gp.stack.lo + _StackGuard

   ...

   gogo(&gp.sched)
}在完成gp運行前的準備工作后,excute函數調用gogo函數完成從g0到gp的轉換:
讓出CPU的執行權;
棧的切換;
gogo函數是用匯編語言編寫的精悍的一段代碼,這里就不詳細分析了,其主要做了兩件事:
把gp.sched的成員恢復到CPU的寄存器完成狀態以及棧的切換;
跳轉到gp.sched.pc所指的指令地址(runtime.main)處執行。
func main() {
   g := getg() // _g_ = main_goroutine

   // Racectx of m0->g0 is used only as the parent of the main goroutine.
   // It must not be used for anything else.
   g.m.g0.racectx = 0

   // golang棧的最大值
   // Max stack size is 1 GB on 64-bit, 250 MB on 32-bit.
   // Using decimal instead of binary GB and MB because
   // they look nicer in the stack overflow failure message.
   if goarch.PtrSize == 8 {
      maxstacksize = 1000000000
   } else {
      maxstacksize = 250000000
   }

   // An upper limit for max stack size. Used to avoid random crashes
   // after calling SetMaxStack and trying to allocate a stack that is too big,
   // since stackalloc works with 32-bit sizes.
   maxstackceiling = 2 * maxstacksize

   // Allow newproc to start new Ms.
   mainStarted = true

   // 需要切換到g0棧去執行newm
   // 創建監控線程,該線程獨立于調度器,無需與P關聯
   if GOARCH != "wasm" { // no threads on wasm yet, so no sysmon
      systemstack(func() {
         newm(sysmon, nil, -1)
      })
   }

   // Lock the main goroutine onto this, the main OS thread,
   // during initialization. Most programs won't care, but a few
   // do require certain calls to be made by the main thread.
   // Those can arrange for main.main to run in the main thread
   // by calling runtime.LockOSThread during initialization
   // to preserve the lock.
   lockOSThread()

   if g.m != &m0 {
      throw("runtime.main not on m0")
   }

   // Record when the world started.
   // Must be before doInit for tracing init.
   runtimeInitTime = nanotime()
   if runtimeInitTime == 0 {
      throw("nanotime returning zero")
   }

   if debug.inittrace != 0 {
      inittrace.id = getg().goid
      inittrace.active = true
   }

   // runtime包的init
   doInit(&runtime_inittask) // Must be before defer.

   // Defer unlock so that runtime.Goexit during init does the unlock too.
   needUnlock := true
   defer func() {
      if needUnlock {
         unlockOSThread()
      }
   }()

   gcenable()

   main_init_done = make(chan bool)
   if iscgo {
      if _cgo_thread_start == nil {
         throw("_cgo_thread_start missing")
      }
      if GOOS != "windows" {
         if _cgo_setenv == nil {
            throw("_cgo_setenv missing")
         }
         if _cgo_unsetenv == nil {
            throw("_cgo_unsetenv missing")
         }
      }
      if _cgo_notify_runtime_init_done == nil {
         throw("_cgo_notify_runtime_init_done missing")
      }
      // Start the template thread in case we enter Go from
      // a C-created thread and need to create a new thread.
      startTemplateThread()
      cgocall(_cgo_notify_runtime_init_done, nil)
   }

   doInit(&main_inittask) // main包的init,會遞歸調用import的包的初始化函數

   // Disable init tracing after main init done to avoid overhead
   // of collecting statistics in malloc and newproc
   inittrace.active = false

   close(main_init_done)

   needUnlock = false
   unlockOSThread()

   if isarchive || islibrary {
      // A program compiled with -buildmode=c-archive or c-shared
      // has a main, but it is not executed.
      return
   }
   fn := main_main // make an indirect call, as the linker doesn't know the address of the main package when laying down the runtime
   fn() // 執行main函數
   if raceenabled {
      racefini()
   }

   // Make racy client program work: if panicking on
   // another goroutine at the same time as main returns,
   // let the other goroutine finish printing the panic trace.
   // Once it does, it will exit. See issues 3934 and 20018.
   if atomic.Load(&runningPanicDefers) != 0 {
      // Running deferred functions should not take long.
      for c := 0; c < 1000; c++ {
         if atomic.Load(&runningPanicDefers) == 0 {
            break
         }
         Gosched()
      }
   }
   if atomic.Load(&panicking) != 0 {
      gopark(nil, nil, waitReasonPanicWait, traceEvGoStop, 1)
   }

   exit(0)
   for {
      var x *int32
      *x = 0
   }
}runtime.main函數的主要工作是:
啟動一個sysmon系統監控線程,該線程負責程序的gc、搶占調度等;
執行runtime包和所有包的初始化;
執行main.main函數;
最后調用exit系統調用退出進程,之前提到的注入goexit程序對main goroutine不起作用,是為了其他線程的回收而做的。
以上就是“Golang并發編程之main goroutine的創建與調度的方法是什么”這篇文章的所有內容,感謝各位的閱讀!相信大家閱讀完這篇文章都有很大的收獲,小編每天都會為大家更新不同的知識,如果還想學習更多的知識,請關注億速云行業資訊頻道。
免責聲明:本站發布的內容(圖片、視頻和文字)以原創、轉載和分享為主,文章觀點不代表本網站立場,如果涉及侵權請聯系站長郵箱:is@yisu.com進行舉報,并提供相關證據,一經查實,將立刻刪除涉嫌侵權內容。