您好,登錄后才能下訂單哦!
您好,登錄后才能下訂單哦!
這篇文章主要介紹“JSP增刪改查實例代碼分析”的相關知識,小編通過實際案例向大家展示操作過程,操作方法簡單快捷,實用性強,希望這篇“JSP增刪改查實例代碼分析”文章能幫助大家解決問題。
JSP,Java Server Pages,指的是 Java 服務端頁面,是一種動態的網頁技術,其中既可以定義 HTML,CSS,JavaScript 靜態內容,也可以使用 Java 代碼定義動態內容。通俗的說,JSP = HTML + Java 。下面就是一個最簡單的 JSP 代碼:
<html>
    <head>
        <title>title</title>
    </head>
    <body>
        <h2>HelloWorld</h2>
        <%
              System.out.println("HelloWorld!");
        %>
    </body>
</html>
上面的例子中,html 里面的內容會在瀏覽器渲染,而 Java 代碼的輸出語句會打印在 idea 控制臺。
那么 JSP 到底是用來做什么的?我們如何實現不同用戶登錄網頁顯示不同的信息呢?例如,在頁面上顯示登錄的用戶名:

在 Servlet 中,我們使用 write 對象向瀏覽器寫數據,html 標簽可以作為字符串傳入 write() 方法中。但是,當向頁面寫出大量數據時,代碼顯得十分的混亂不堪,并且后期后期維護成本極大。而 JSP 就結局了這個問題,在 JSP 代碼中可以直接使用 html 標簽,動態數據也可以使用 Java 代碼展示,大大的簡化了開發,避免了在 Servlet 中直接輸出 html 標簽。
在 idea 中創建一個 Maven Web 項目,項目結構如下:
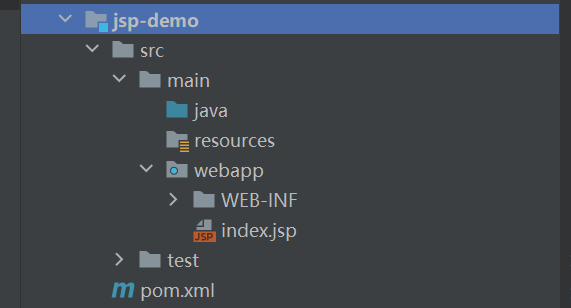
在 pom.xml 添加 Servlet 的依賴坐標和 TomCat 插件坐標,如下:
<project xmlns="http://maven.apache.org/POM/4.0.0" xmlns:xsi="http://www.w3.org/2001/XMLSchema-instance"
  xsi:schemaLocation="http://maven.apache.org/POM/4.0.0 http://maven.apache.org/maven-v4_0_0.xsd">
  <modelVersion>4.0.0</modelVersion>
  <groupId>org.chengzi</groupId>
  <artifactId>jsp-demo</artifactId>
  <packaging>war</packaging>
  <version>1.0-SNAPSHOT</version>
  <name>jsp-demo Maven Webapp</name>
  <url>http://maven.apache.org</url>
  <dependencies>
    <dependency>
      <groupId>junit</groupId>
      <artifactId>junit</artifactId>
      <version>3.8.1</version>
      <scope>test</scope>
    </dependency>
    <dependency>
      <groupId>javax.servlet</groupId>
      <artifactId>javax.servlet-api</artifactId>
      <version>3.1.0</version>
      <scope>provided</scope>
    </dependency>

  </dependencies>

  <build>
    <plugins>
      <plugin>
        <groupId>org.apache.tomcat.maven</groupId>
        <artifactId>tomcat7-maven-plugin</artifactId>
        <version>2.2</version>
      </plugin>
    </plugins>
    <finalName>jsp-demo</finalName>
  </build>
</project>
在 pom.xml 中添加 JSP 的依賴坐標,如下:
<dependency>
    <groupId>javax.servlet.jsp</groupId>
    <artifactId>jsp-api</artifactId>
    <version>2.2</version>
    <scope>provided</scope>
</dependency>
在項目的 webapps 文件目錄下創建 jsp 頁面,如圖:

通過上面的操作創建一個名為 hello.jsp 的頁面。
在 hello.jsp 中書寫 HTML 標簽和 Java 代碼,如下:
<%@ page contentType="text/html;charset=UTF-8" language="java" %>
<html>
<head>
    <title>Title</title>
</head>
<body>
    <h2>HelloWorld</h2>
<%
    System.out.println("helloWorld!");
%>
</body>
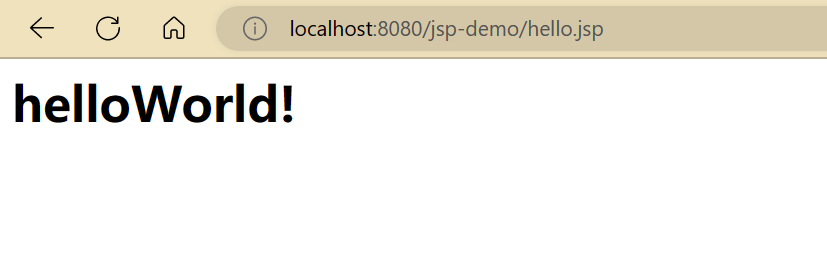
</html>啟動 Tomcat 服務器,在瀏覽器訪問 http://localhost:8080/jsp-demo/hello.jsp,結果如下:
之前,我們在 jsp 中不僅編寫了 html 標簽,還編寫了 Java 代碼,為什么呢?其實,JSP 本質上就是一個 Servlet。要弄明白這個問題,我們就要研究 jsp 的執行流程。
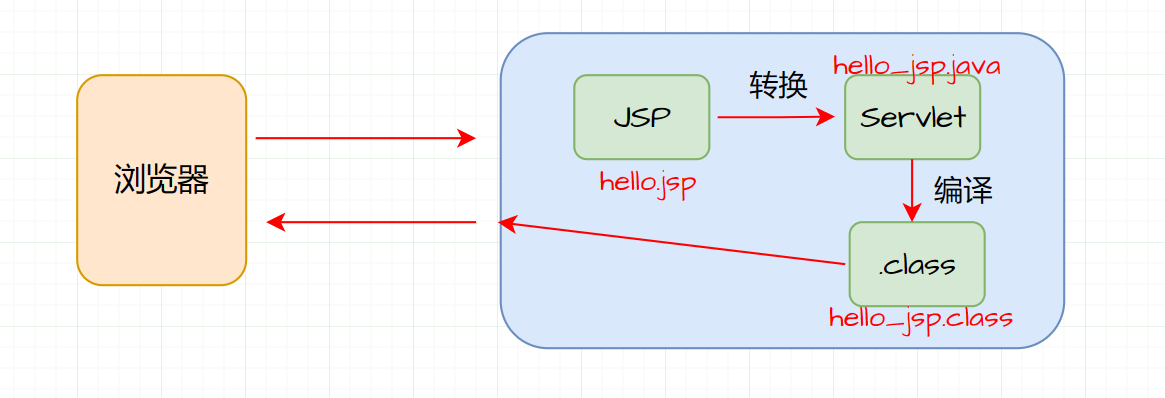
在上面的例子中,瀏覽器第一次訪問 heelo.jsp 頁面時,Tomcat 會將 hello.jsp 裝換為名為 hello_jsp.java 的一個Servlet, 然后 這個 Servlet 會被 TomCat 編譯為字節碼文件 hello_jsp.class 。TomCat 會執行該字節碼文件向外提供服務。
此時在項目磁盤目錄下找到 target\tomcat\work\Tomcat\localhost\jsp-demo\org\apache\jsp ,在這個文件目錄下就可以看到裝換后的 Servlet 和編譯后的 .class 文件。如圖:

打開 hello_jsp.java 文件查看源碼,如圖:

可以發現轉換后的 hello_jsp 類繼承自 HttpJspBase ,其實 HttpJspBase 類是繼承自 HttpServlet 的,我們可以查看 TomCat 源碼,所以 hello_jsp 類間接繼承了 HttpServlet ,也就是說,JSP 容器將 JSP 文件裝換成了一個 Servlet。
在 hello_jsp 類中還有一個 _jspService() 方法,該方法和 Servlet 中的 service 方法類似,在每次訪問警示牌 jsp 時自動執行。如圖:

在 _jspService() 方法中可以看到完瀏覽器中寫的標簽和 Java 代碼,如下:
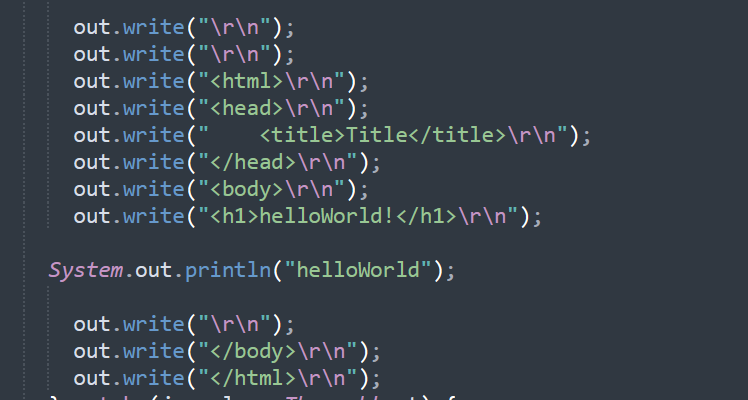
不難看出,在 <%...%> 中的 Java 代碼被放到了 _jspService() 方法中,這段 Java 代碼被稱為 JSP 腳本。
JSP 腳本用于在 JSP 頁面內定義 Java 代碼,之前案例中使用到的 Java 代碼就是定義在 JSP 腳本中的,JSP 腳本一共分為 3 類:
<%…%> 內容會直接放到 _jspService() 方法中
<%=…%> 內容或被放到 out.print() 中,作為該的方法的參數
<%!..%> 內容會被放到 _jspService() 方法之外,被類直接包括
代碼演示:
第一步:在 hello.jsp 中編寫代碼:
<%
    System.out.println("hello");
    int i = 3;
%>
通過瀏覽器訪問該資源,查看轉換后的 hello_jsp.java 源代碼,不難發現 i 變量被定義在 _jspService() 方法中,如圖:
第二步:在 hello.jsp 中編寫代碼:
<%="hello"%> <%=i%>
通過瀏覽器訪問該資源,查看轉換后的 hello_jsp.java 源代碼,不難發現 i 變量成為了 out.print() 方法的參數,并且這兩個數據被發送到了瀏覽器展示給用戶,如圖:

第三步:在 hello.jsp 中編寫代碼:
<%!
    void  show(){}
    String name = "zhangsan";
%>
通過瀏覽器訪問該資源,查看轉換后的 hello_jsp.java 源代碼,不難發現該部分被放到了類的成員部分,如圖:

使用 JSP 在瀏覽器以表格的形式展示學生信息的數據,這里的數據應該使用 MyBatis 在數據庫中查找,但是這里只是簡單的演示 JSP 的使用,所以我們省略了對數據庫的操作,直接將數據封裝到 Student 對象中并存放在集合中。
首先我們在 org.chengzi.pojo 包下創建一個實體類 Student 。在 Java 文件目錄右擊 new / Java class ,創建包和類。如下:
public class Student {
    private int id;
    private String name;
    private String gender;
    private  int scoreEnglish;
    private int scoreMath;

    //省略了getter和setter方法以及重寫的Object類的toString方法
}
在項目 webapps 目錄下創建 student.jsp,在此文件中寫 html 標簽和 Java 代碼,我們可以先將數據寫死,方便展示在瀏覽器。如下:
<%@ page contentType="text/html;charset=UTF-8" language="java" %>
<!DOCTYPE html>
<html lang="en">
<head>
    <meta charset="UTF-8">
    <title>Title</title>
</head>
<body>
<input type="button" value="新增"><br>
<hr>
<table border="1" cellspacing="0" width="800">
    <tr>
        <th>序號</th>
        <th>姓名</th>
        <th>性別</th>
        <th>英語成績</th>
        <th>數學成績</th>
        <th>操作</th>
    </tr>
    <tr align="center">
        <td>1</td>
        <td>張三</td>
        <td>男</td>
        <td>100</td>
        <td>100</td>
        <td><a href="#" rel="external nofollow"  rel="external nofollow"  rel="external nofollow"  rel="external nofollow"  rel="external nofollow"  rel="external nofollow"  rel="external nofollow"  rel="external nofollow" >修改</a> <a href="#" rel="external nofollow"  rel="external nofollow"  rel="external nofollow"  rel="external nofollow"  rel="external nofollow"  rel="external nofollow"  rel="external nofollow"  rel="external nofollow" >刪除</a></td>
    </tr>

    <tr align="center">
        <td>2</td>
        <td>李四</td>
        <td>男</td>
        <td>100</td>
        <td>100</td>

        <td><a href="#" rel="external nofollow"  rel="external nofollow"  rel="external nofollow"  rel="external nofollow"  rel="external nofollow"  rel="external nofollow"  rel="external nofollow"  rel="external nofollow" >修改</a> <a href="#" rel="external nofollow"  rel="external nofollow"  rel="external nofollow"  rel="external nofollow"  rel="external nofollow"  rel="external nofollow"  rel="external nofollow"  rel="external nofollow" >刪除</a></td>
    </tr>

    <tr align="center">
        <td>3</td>
        <td>王五</td>
        <td>女</td>
        <td>100</td>
        <td>100</td>

        <td><a href="#" rel="external nofollow"  rel="external nofollow"  rel="external nofollow"  rel="external nofollow"  rel="external nofollow"  rel="external nofollow"  rel="external nofollow"  rel="external nofollow" >修改</a> <a href="#" rel="external nofollow"  rel="external nofollow"  rel="external nofollow"  rel="external nofollow"  rel="external nofollow"  rel="external nofollow"  rel="external nofollow"  rel="external nofollow" >刪除</a></td>
    </tr>
</table>
</body>
</html>
在瀏覽器訪問該資源,效果如下:

準備需要動態展示到瀏覽器的數據,這里省略了從數據庫查詢數據,我們直接將數據封裝在 Student 對象中,并將所有對象放在集合中。例如:
<%
    // 查詢數據庫
    List<Student> brands = new ArrayList<Student>();
    brands.add(new Student(1,小張,女,85,89));
    brands.add(new Student(2,小樊,女,98,87));
    brands.add(new Student(3,小李,男,100,99));
%>
上面我們使用固定的數據發送到瀏覽器展示,為了動態的展示數據,我們要使用 Java 代碼來動態的獲取數據,而在 JSP 頁面中,Java 代碼要寫在 JSP 腳本中,如下:
<%@ page import="org.chengzi.pojo.Student" %>
<%@ page import="java.util.ArrayList" %>
<%@ page import="java.util.List" %>

<%@ page contentType="text/html;charset=UTF-8" language="java" %>
<%
    // 查詢數據庫
    List<Student> students = new ArrayList<Student>();
    students.add(new Student(1, "小張", "男", 80, 85));
    students.add(new Student(2, "小李", "女", 98, 87));
    students.add(new Student(3, "小樊", "女", 98, 100));
%>

<!DOCTYPE html>
<html lang="en">
<head>
    <meta charset="UTF-8">
    <title>Title</title>
</head>
<body>
<input type="button" value="新增"><br>
<hr>
<table border="1" cellspacing="0" width="800">
    <tr>
        <th>序號</th>
        <th>姓名</th>
        <th>性別</th>
        <th>英語成績</th>
        <th>數學成績</th>
        <th>操作</th>
    </tr>

    <%
        for (int i = 0; i < students.size(); i++) {
            //獲取集合中的 每一個 Brand 對象
            Student student = students.get(i);

    %>

    <tr align="center">
        <td><%=student.getId()%>
        </td>
        <td><%=student.getName()%>
        </td>
        <td><%=student.getGender()%>
        </td>
        <td><%=student.getScoreEnglish()%>
        </td>
        <td><%=student.getScoreMath()%>
        </td>
        <td><a href="#" rel="external nofollow"  rel="external nofollow"  rel="external nofollow"  rel="external nofollow"  rel="external nofollow"  rel="external nofollow"  rel="external nofollow"  rel="external nofollow" >修改</a> <a href="#" rel="external nofollow"  rel="external nofollow"  rel="external nofollow"  rel="external nofollow"  rel="external nofollow"  rel="external nofollow"  rel="external nofollow"  rel="external nofollow" >刪除</a></td>
    </tr>
    <%
        }
    %>

</table>
</body>
</html>
此時,數據就會被動態的展示到瀏覽器頁面,不難看出,其實 JSP 腳本標簽就是在分割 Java 代碼,在標簽內是 Java 代碼,在標簽外則是 html 語句,如圖:
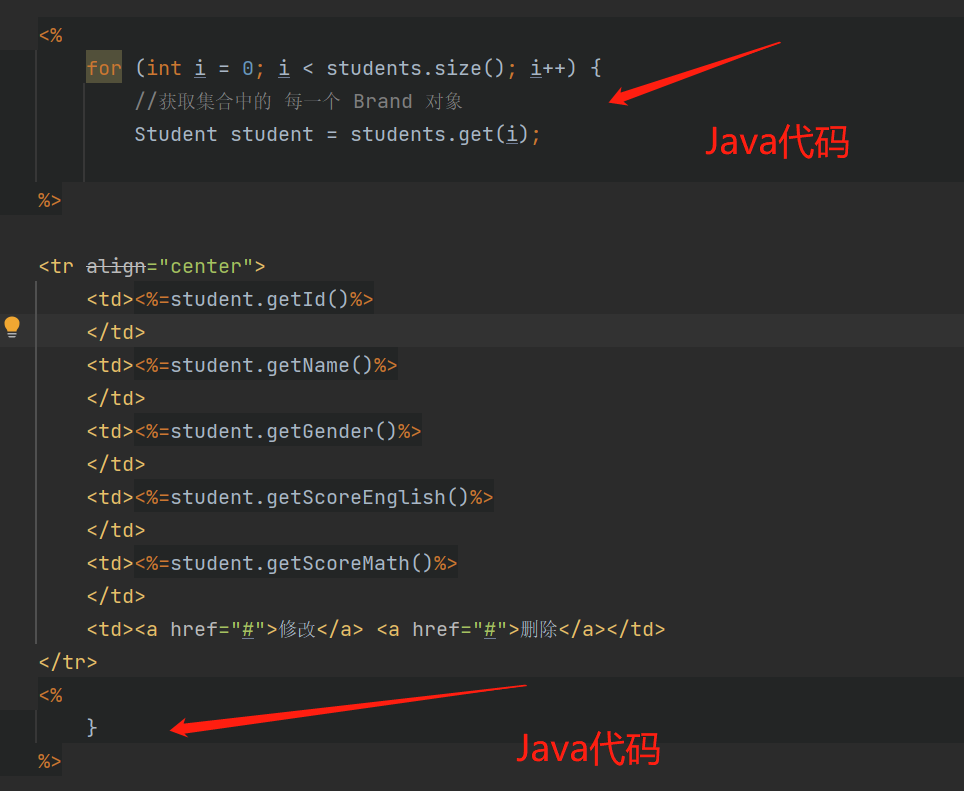
不難看出,JSP 開發還是有很多的缺點的,首先,既然在 jsp 文件中既可以寫 html 標簽,有可以寫 Java 代碼,導致了書寫麻煩和閱讀麻煩的問題。并且其運行要依賴各種環境,例如 jre,jsp 容器,JavaEE 等等,導致其程序變得十分復雜。
JSP 會自動生成 .java 文件和 .class 文件占用了磁盤空間,而運行 .class 文件占用內存。在程序出錯以后,我們一般要找到自動生成的 .java 文件進行調試,導致了調試困難的問題。
另外,把 Java 代碼和 html 代碼混在一個文件中是非常不利于團隊開發的,如果頁面出現問題,首先前端開發工程師修改靜態頁面,然后由后端開發來將該頁面修改為 JSP 頁面,這不是我們想看到的合作開發方式。
由于 JSP 存在著很多的確定,并且隨著軟件技術的發展,JSP 已經逐漸退出歷史的舞臺了,后面我們會學習新的技術 AJAX 來替代前面的方式,有了這個技術以后,前端工程師只負責前端頁面的開發,而后端工程師只負責后端代碼的開發,職責單一高效。
當然,我們并不是說后端開發就不用學習前端的知識,即使你是專注于后端開發,前端的知識你同樣要了解,任何一個說后端不用了解前端知識的說法都是不負責任大額。
下面我們看一下服務器頁面技術的發展過程,聊聊為什么 JSP 既然已經被淘汰,為什么我們還要學習呢?

第一階段:
使用 Servlet 技術實現邏輯代碼的編寫,也對頁面進行拼接。
第二階段:
隨著技術的發展,出現了 JSP,JSP 確實使用比 Servlet 方便了很多,但是隨著時間的發展,JSP 的很多確定都暴露出來了。
第三階段:
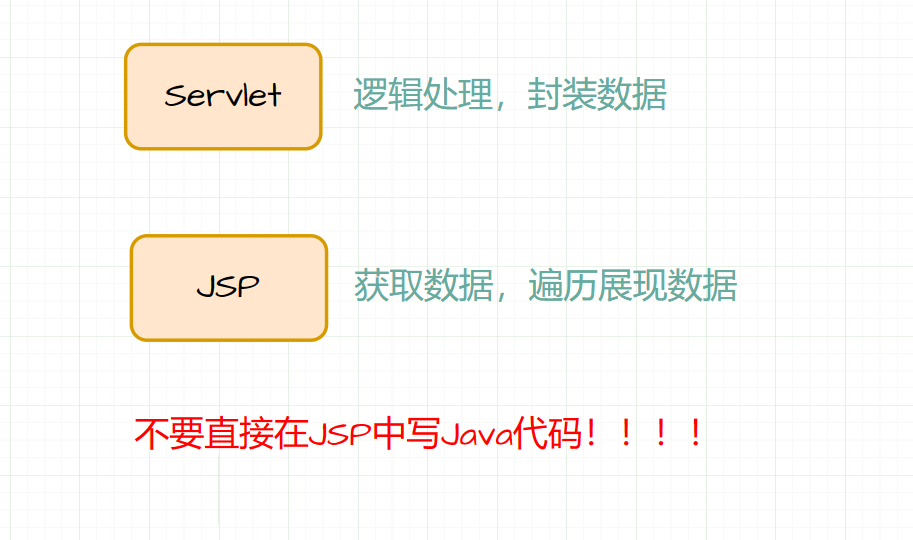
使用 Servlet 進行邏輯開發,使用 JSP 進行數據的展示。
第四階段:
使用 Servlet 進行后端邏輯代碼的開發,使用 HTML 進行數據的展示,html 是靜態頁面,為了展示動態數據,出現了新的技術 AJAX。
現在我們學習 JSP 時,大概有兩個原因,一是一些公司的老項目仍然使用了 JSP,所以為了項目的維護,我們不得不學習,另外,學習技術是一個循序漸進的過程,我們必須一步一步的學習,雖然 JSP 老舊過時,但是其中的編程思想使我們學習編程過程中應該了解的。
前面說到,使用 Servlet 進行邏輯開發,使用 JSP 來獲取數據,遍歷展現數據,這樣的方式解決了 JSP 頁面中 Java 代碼混亂的問題,接下來看一看如何使用 EL 表達式和 JSTL 標簽庫來替代 JSP 頁面中的 Java 代碼。
EL ,Expression Language,稱為表達式語言,用于簡化 JSP 頁面內的 Java 代碼。EL 表達式的主要作用是獲取數據,期數就是從域對象中獲取數據,然后將數據展示在頁面上。
EL 表達式的語法比較簡單,使用${expression},例如 ${student} 就是獲取域對象中存儲的 key 為 student 的數據。
定義一個 Servlet,在 Servlet 中封裝數據并存儲到 request 域對象中并轉發到 el-demo.jsp 頁面。
@WebServlet("/demo")
public class ServletDemo extends HttpServlet {
    @Override
    protected void doGet(HttpServletRequest request, HttpServletResponse response) throws ServletException, IOException {

        //準備數據
        List<Student> students = new ArrayList<Student>();
        students.add(new Student(1,"張三","男",100,100));
        students.add(new Student(2,"李四","女",98,98));

        //存儲到request域對象中(使用request轉發,將request作為域對象)
        request.setAttribute("students",students);

        //發送到 el-demo.jsp 頁面
        request.getRequestDispatcher("/el-demo.jsp").forward(request,response);
    }

    @Override
    protected void doPost(HttpServletRequest request, HttpServletResponse response) throws ServletException, IOException {
        this.doGet(request, response);
    }
}
在 el-demo.jsp 中通過 EL 表達式來獲取數據,EL 表示式后面不需要加分號。例如:
<%@ page contentType="text/html;charset=UTF-8" language="java" isELIgnored="false" %>
<html>
<head>
    <title>Title</title>
</head>
<body>
    ${students}
</body>
</html>
如果 JSP 中沒有接收到 Servlet 共享的數據,如圖:

解決方法:在 JSP 代碼中添加:
isELIgnored="false"
添加位置在:
<%@ page contentType="text/html;charset=UTF-8" language="java" isELIgnored="false" %>
上面我們在 Servlet 中使用轉發將 request 作為域對象進行數據共享,那么什么是域對象?域對象有哪些呢?
在 JavaWeb 中,一共有四大域對象,分別是:
page:當前頁有效
request:當前請求有效
session:當前會話有效(后面聊什么是會話)
application:當前應用有效
如圖所示:
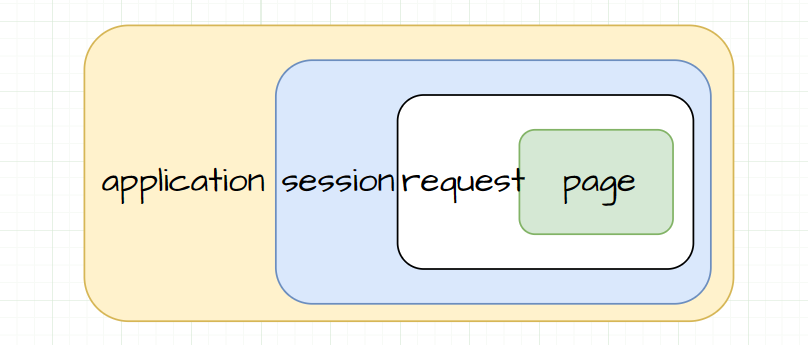
EL 表達式獲取數據,會一次從四個域中尋找,知道找到為止。
例如,例如 EL 表達式 ${students} 會先從 page 域對象中獲取數據,如果沒有找到,再去 request 域對象中獲取數據,一次尋找,直到找到數據。
前端開發工程師每天都在和標簽打交道,他們對標簽是更加敏感的,所以出現了 JSTL 標準標簽庫,使用標簽替代了 JSP 頁面中的 Java 代碼,提高了代碼的可讀性。如下:
<c:if test="${flag == 1}">
    男
</c:if>
<c:if test="${flag == 2}">
    女
</c:if>
JSTL,Jsp Standarded Tag Library,JSP 標準標簽庫,其中提供了豐富的標簽用于取代 JSP 頁面中的 Java 代碼,例如:
| 標簽 | 描述 |
|---|---|
| <c:out> | 用于在JSP中顯示數據,就像<%= … > |
| <c:set> | 用于保存數據 |
| <c:remove> | 用于刪除數據 |
| <c:catch> | 用來處理產生錯誤的異常狀況,并且將錯誤信息儲存起來 |
| <c:if> | 與我們在一般程序中用的if一樣 |
| <c:choose> | 本身只當做<c:when>和<c:otherwise>的父標簽 |
| <c:when> | <c:choose>的子標簽,用來判斷條件是否成立 |
| <c:otherwise> | <c:choose>的子標簽,接在<c:when>標簽后,當<c:when>標簽判斷為false時被執行 |
| <c:import> | 檢索一個絕對或相對 URL,然后將其內容暴露給頁面 |
| <c:forEach> | 基礎迭代標簽,接受多種集合類型 |
| <c:forTokens> | 根據指定的分隔符來分隔內容并迭代輸出 |
| <c:param> | 用來給包含或重定向的頁面傳遞參數 |
| <c:redirect> | 重定向至一個新的URL. |
| <c:url> | 使用可選的查詢參數來創造一個URL |
使用 JSTL 之前要先導入依賴和引入標簽庫,例如在 pom.xml 中添加依賴坐標:
<dependency>
    <groupId>jstl</groupId>
    <artifactId>jstl</artifactId>
    <version>1.2</version>
</dependency>
<dependency>
    <groupId>taglibs</groupId>
    <artifactId>standard</artifactId>
    <version>1.1.2</version>
</dependency>
在 JSP 頁面中引入 JSTL 標簽庫:
<%@ taglib prefix="c" uri="http://java.sun.com/jsp/jstl/core" %>
下面舉例練習幾個常用的標簽。
<c:if>標簽相當于 Java 中的if判斷語句,示例:定義一個 Servlet,在 Servlet 中向 request 域對象中添加鍵為 status,值為 1 的數據。
    @Override
    protected void doGet(HttpServletRequest request, HttpServletResponse response) throws ServletException, IOException {
        //存儲數據到request域對象中
        request.setAttribute("status",1);

        //發送到 jstl.jsp頁面
        request.getRequestDispatcher("/jstl.jsp").forward(request,response);
    }
定義 jstl.jsp 頁面,使用 <c:if> 標簽進行判斷:
<%@ page contentType="text/html;charset=UTF-8" language="java" isELIgnored="false" %>
<%@ taglib prefix="c" uri="http://java.sun.com/jsp/jstl/core" %>
<html>
<head>
    <title>Title</title>
</head>
<body>
<%--
        c:if:來完成邏輯判斷,替換java  if else
    --%>
<c:if test="${status ==1}">
    啟用
</c:if>

<c:if test="${status ==0}">
    禁用
</c:if>
</body>
</html>
<forEach>標簽相當于 Java 中的 for 循環,Java 中有普通 for 循環和增強 for 循環,其實在 JSTL 中的循環標簽也有兩種用法:
第一種用法類似于 Java 中的普通 for 循環,其中主要使用到的屬性有:
begin:開始數
end:結束數
step:步長
var:循環變量
示例:
<c:forEach begin="0" end="10" step="1" var="i"> ${i} </c:forEach>第二種用法類似于 Java 中的增強 for 循環,主要使用的屬性有:
items:被遍歷的容器
var:遍歷產生的零時變量
varStatus:遍歷狀態對象
示例:
<c:forEach items="${students}" var="student">
    <tr align="center">
        <td>${student.id}</td>
        <td>${student.brandName}</td>
        <td>${student.companyName}</td>
        <td>${student.description}</td>
    </tr>
</c:forEach>
上面例子中,首先從域對象中獲取了 students 數據,該數據是一個集合,遍歷結合,并給集合中每一個對象起名為 student ,在循環中使用了 EL 表達式獲取每一個 Student 對象的屬性值。

關于“JSP增刪改查實例代碼分析”的內容就介紹到這里了,感謝大家的閱讀。如果想了解更多行業相關的知識,可以關注億速云行業資訊頻道,小編每天都會為大家更新不同的知識點。
免責聲明:本站發布的內容(圖片、視頻和文字)以原創、轉載和分享為主,文章觀點不代表本網站立場,如果涉及侵權請聯系站長郵箱:is@yisu.com進行舉報,并提供相關證據,一經查實,將立刻刪除涉嫌侵權內容。