您好,登錄后才能下訂單哦!
您好,登錄后才能下訂單哦!
這篇“SpringBoot怎么使用druid配置多數據源”文章的知識點大部分人都不太理解,所以小編給大家總結了以下內容,內容詳細,步驟清晰,具有一定的借鑒價值,希望大家閱讀完這篇文章能有所收獲,下面我們一起來看看這篇“SpringBoot怎么使用druid配置多數據源”文章吧。
使用spring boot配置多數據源,數據源分別為postgresql、mysql
spring boot——2.5.4
druid——1.2.11
postgresql——12
mysql——8.0.16
maven——3.0
idea——2019
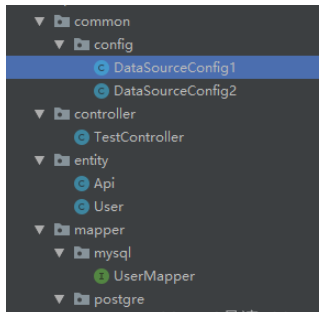
java package目錄

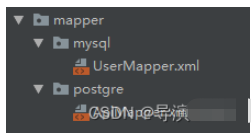
resource目錄存放mapper.xml文件,按照數據源創建package

        <dependency>
            <groupId>org.springframework.boot</groupId>
            <artifactId>spring-boot-starter-data-jpa</artifactId>
        </dependency>
        <dependency>
            <groupId>org.springframework.boot</groupId>
            <artifactId>spring-boot-starter-test</artifactId>
            <scope>test</scope>
        </dependency>
        <dependency>
            <groupId>org.springframework.boot</groupId>
            <artifactId>spring-boot-starter-web</artifactId>
        </dependency>
        <!-- https://mvnrepository.com/artifact/com.alibaba/fastjson -->
        <dependency>
            <groupId>com.alibaba</groupId>
            <artifactId>fastjson</artifactId>
            <version>2.0.4</version>
        </dependency>
        <!-- https://mvnrepository.com/artifact/com.alibaba/druid-spring-boot-starter -->
        <dependency>
            <groupId>com.alibaba</groupId>
            <artifactId>druid-spring-boot-starter</artifactId>
            <version>1.2.11</version>
        </dependency>
        <dependency>
            <groupId>org.mybatis.spring.boot</groupId>
            <artifactId>mybatis-spring-boot-starter</artifactId>
            <version>1.3.2</version>
        </dependency>
        <dependency>
            <groupId>org.postgresql</groupId>
            <artifactId>postgresql</artifactId>
            <scope>runtime</scope>
        </dependency>
        <!-- MySql驅動 -->
        <dependency>
            <groupId>mysql</groupId>
            <artifactId>mysql-connector-java</artifactId>
        </dependency>
server:
  port: 8081
spring:
  datasource:
    type: com.alibaba.druid.pool.DruidDataSource
    druid:
      web-stat-filter:
        enabled: true #是否啟用StatFilter默認值true
        url-pattern: /*
        exclusions: /druid/*,*.js,*.gif,*.jpg,*.bmp,*.png,*.css,*.ico
        session-stat-enable: true
        session-stat-max-count: 10
      stat-view-servlet:
        enabled: true #是否啟用StatViewServlet默認值true
        url-pattern: /druid/*
        reset-enable: true
        login-username: admin
        login-password: admin
        allow:

      db1:
        username: postgres
        password: localhost
        url: jdbc:postgresql://localhost:5432/test
        driver-class-name: org.postgresql.Driver
        initial-size: 5  # 初始化大小
        min-idle: 5  # 最小
        max-active: 100  # 最大
        max-wait: 60000  # 配置獲取連接等待超時的時間
        validation-query: select version()
        time-between-eviction-runs-millis: 60000  # 配置間隔多久才進行一次檢測,檢測需要關閉的空閑連接,單位是毫秒
        min-evictable-idle-time-millis: 300000  # 指定一個空閑連接最少空閑多久后可被清除,單位是毫秒
        filters: config,wall,stat  # 配置監控統計攔截的filters,去掉后監控界面sql無法統計,'wall'用于防火墻
        # 通過connectProperties屬性來打開mergeSql功能;慢SQL記錄
        connectionProperties: druid.stat.slowSqlMillis=200;druid.stat.logSlowSql=true;config.decrypt=false
        test-while-idle: true
        test-on-borrow: true
        test-on-return: false
        # 是否緩存preparedStatement,也就是PSCache  官方建議MySQL下建議關閉   個人建議如果想用SQL防火墻 建議打開
        pool-prepared-statements: true
        max-pool-prepared-statement-per-connection-size: 20

      db2:
        username: root
        password: localhost
        url: jdbc:mysql://localhost:3306/springboot?characterEncoding=utf8&useUnicode=true&useSSL=false&serverTimezone=Asia/Shanghai
        driver-class-name: com.mysql.cj.jdbc.Driver
        initial-size: 5  # 初始化大小
        min-idle: 5  # 最小
        max-active: 100  # 最大
        max-wait: 60000  # 配置獲取連接等待超時的時間
        validation-query: select 'x'
        time-between-eviction-runs-millis: 60000  # 配置間隔多久才進行一次檢測,檢測需要關閉的空閑連接,單位是毫秒
        min-evictable-idle-time-millis: 300000  # 指定一個空閑連接最少空閑多久后可被清除,單位是毫秒
        filters: config,wall,stat  # 配置監控統計攔截的filters,去掉后監控界面sql無法統計,'wall'用于防火墻
        # 通過connectProperties屬性來打開mergeSql功能;慢SQL記錄
        connectionProperties: druid.stat.slowSqlMillis=200;druid.stat.logSlowSql=true;config.decrypt=false
        test-while-idle: true
        test-on-borrow: true
        test-on-return: false
        # 是否緩存preparedStatement,也就是PSCache  官方建議MySQL下建議關閉   個人建議如果想用SQL防火墻 建議打開
        pool-prepared-statements: true
        max-pool-prepared-statement-per-connection-size: 20

mybatis:
  mapper-locations: classpath:com/demo/mapper/*.xml
  type-aliases-package: com.demo.entity
  configuration:
    log-impl:
    mapUnderscoreToCamelCase: true

#showSql
logging:
  level:
    java.sql: debug
    org.apache.ibatis: debug
    com.demo.mapper: debug
  config: classpath:logback-spring.xml
@Configuration
@MapperScan(basePackages = "com.demo.mapper.postgre.**", sqlSessionFactoryRef = "oneSqlSessionFactory")
public class DataSourceConfig1 {
    // 將這個對象放入Spring容器中
    @Bean(name = "oneDataSource")
    // 表示這個數據源是默認數據源
    @Primary
    // 讀取application.properties中的配置參數映射成為一個對象
    // prefix表示參數的前綴
    @ConfigurationProperties(prefix = "spring.datasource.druid.db1")
    public DataSource getDateSource1() {
        return DataSourceBuilder.create().type(DruidDataSource.class).build();
    }

    @Bean(name = "oneSqlSessionFactory")
    // 表示這個數據源是默認數據源
    @Primary
    // @Qualifier表示查找Spring容器中名字為oneDataSource的對象
    public SqlSessionFactory oneSqlSessionFactory(@Qualifier("oneDataSource") DataSource datasource)
            throws Exception {
        SqlSessionFactoryBean bean = new SqlSessionFactoryBean();
        bean.setDataSource(datasource);
        bean.setMapperLocations(
                // 設置mybatis的xml所在位置
                new PathMatchingResourcePatternResolver().getResources("classpath*:com.demo.mapper.postgre/*.xml"));
        return bean.getObject();
    }

    @Bean("oneSqlSessionTemplate")
    // 表示這個數據源是默認數據源
    @Primary
    public SqlSessionTemplate oneSqlSessionTemplate(
            @Qualifier("oneSqlSessionFactory") SqlSessionFactory sessionFactory) {
        return new SqlSessionTemplate(sessionFactory);
    }

}
@Configuration
@MapperScan(basePackages = "com.demo.mapper.mysql", sqlSessionFactoryRef = "twoSqlSessionFactory")
public class DataSourceConfig2 {
// 將這個對象放入Spring容器中
@Bean(name = "twoDataSource")
// 讀取application.properties中的配置參數映射成為一個對象
// prefix表示參數的前綴
@ConfigurationProperties(prefix = "spring.datasource.druid.db2")
public DataSource getDateSource1() {
return DataSourceBuilder.create().type(DruidDataSource.class).build();
}
@Bean(name = "twoSqlSessionFactory")
// 表示這個數據源是默認數據源
//@Primary
// @Qualifier表示查找Spring容器中名字為oneDataSource的對象
public SqlSessionFactory oneSqlSessionFactory(@Qualifier("twoDataSource") DataSource datasource)
throws Exception {
SqlSessionFactoryBean bean = new SqlSessionFactoryBean();
bean.setDataSource(datasource);
bean.setMapperLocations(
// 設置mybatis的xml所在位置
new PathMatchingResourcePatternResolver().getResources("classpath*:com.demo.mapper.mysql/*.xml"));
return bean.getObject();
}
@Bean("twoSqlSessionTemplate")
// 表示這個數據源是默認數據源
//@Primary
public SqlSessionTemplate oneSqlSessionTemplate(
@Qualifier("twoSqlSessionFactory") SqlSessionFactory sessionFactory) {
return new SqlSessionTemplate(sessionFactory);
}
}關鍵點:去除 exclude = {DataSourceAutoConfiguration.class} 及掃描 com.demo.mapper目錄
@MapperScan("com.demo.mapper")
@SpringBootApplication(exclude = {DataSourceAutoConfiguration.class})
public class DemoApplication {

    public static void main(String[] args) {
        SpringApplication.run(DemoApplication .class, args);
    }
}輸入地址 localhost://8081/druid,輸入 admin/admin
以上就是關于“SpringBoot怎么使用druid配置多數據源”這篇文章的內容,相信大家都有了一定的了解,希望小編分享的內容對大家有幫助,若想了解更多相關的知識內容,請關注億速云行業資訊頻道。
免責聲明:本站發布的內容(圖片、視頻和文字)以原創、轉載和分享為主,文章觀點不代表本網站立場,如果涉及侵權請聯系站長郵箱:is@yisu.com進行舉報,并提供相關證據,一經查實,將立刻刪除涉嫌侵權內容。