您好,登錄后才能下訂單哦!
您好,登錄后才能下訂單哦!
本篇內容介紹了“Flutter高級玩法Flow位置怎么自定義”的有關知識,在實際案例的操作過程中,不少人都會遇到這樣的困境,接下來就讓小編帶領大家學習一下如何處理這些情況吧!希望大家仔細閱讀,能夠學有所成!
Flow布局是一個超級強大的布局,但應該很少有人用,因為入手的門檻還是有的
Flow的屬性很簡單,只有FlowDelegate類型的delegate和組件列表children,
可能很多人看到delegate就揮揮手:臣妾做不到,今天就來掰扯一下這個FlowDelegate.
class Flow extends MultiChildRenderObjectWidget {
  Flow({
    Key key,
    @required this.delegate,
    List<Widget> children = const <Widget>[],
}) : assert(delegate != null),我們的第一個舞臺是一個200*200的灰色 box,由FlowDemo組件出當主角

void main() => runApp(MyApp());
class MyApp extends StatelessWidget {
  @override
  Widget build(BuildContext context) {
    return MaterialApp(
        title: 'Flutter Demo',
        theme: ThemeData(
          primarySwatch: Colors.blue,
        ),
        home: Scaffold(
          appBar: AppBar(),
          body: Center(child: HomePage()),
        ));
  }
}
class HomePage extends StatelessWidget {
  @override
  Widget build(BuildContext context) {
    return Container(
      width: 200,
      height: 200,
      color: Colors.grey.withAlpha(66),
      alignment: Alignment.center,
      child: FlowDemo(),
    );
  }
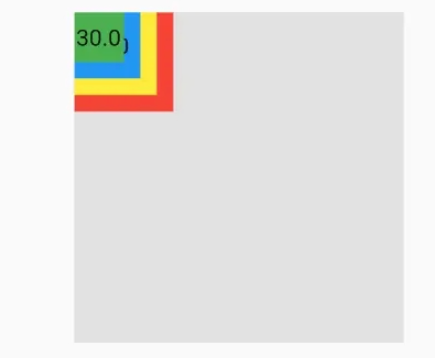
}FlowDemo中使用Flow組件,包含四個box
四個box變成依次是60.0(紅), 50.0(黃), 40.0(藍), 30.0(綠)
class FlowDemo extends StatelessWidget {
  final sides = [60.0, 50.0, 40.0, 30.0];
  final colors = [Colors.red,Colors.yellow,Colors.blue,Colors.green];
  @override
  Widget build(BuildContext context) {
    return Flow(
      delegate: _Delegate(),
      children: sides.map((e) => _buildItem(e)).toList(),
    );
  }
  Widget _buildItem(double e) {
    return Container(
      width: e,
      alignment: Alignment.center,
      height: e,
      color: colors[sides.indexOf(e)],
      child: Text('$e'),
    );
  }
}Flow布局需要一個FlowDelegate類型的delegate對象
但是Flutter中并沒有其實現類,所以想玩Flow,只有一條路:自定義
class _Delegate extends FlowDelegate {
  @override
  void paintChildren(FlowPaintingContext context) {
  }
  @override
  bool shouldRepaint(FlowDelegate oldDelegate) {
    return true;
  }
}paintChildren顧名思義是用來畫孩子的
FlowPaintingContext也就是繪制的上下文,即繪制的信息
那就輕輕的瞄一眼FlowPaintingContext里面有啥吧:
一共有四個東西: size、childCount、getChildSize、paintChild
---->[源碼:flutter/lib/src/rendering/flow.dart:23]----
abstract class FlowPaintingContext {
  Size get size;//父親尺寸
  int get childCount;//孩子個數
  Size getChildSize(int i);//第i個孩子尺寸
  //繪制孩子
  void paintChild(int i, { Matrix4 transform, double opacity = 1.0 });
}
接下來用代碼測試一下這幾個屬性看看,不出所料
默認是繪制在父容器的左上角。
class _Delegate extends FlowDelegate {
  @override
  void paintChildren(FlowPaintingContext context) {
    print("父容器尺寸:${context.size}");
    print("孩子個數:${context.childCount}");
    for(int i=0;i<context.childCount;i++){
      print("第$i個孩子尺寸:${context.getChildSize(i)}");
    }
  }

前面只是將組件排在了左上角,那如何對進行其他排布呢?
在paintChild時可以傳入transform的Matrix4對象進行變換
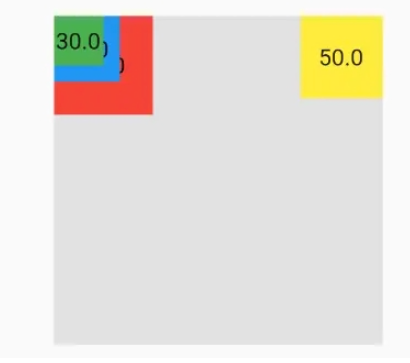
在這里基本上只用了Matrix4的平移translationValues功能,至于Matrix4的具體用法,那又是一個故事了 這里讓黃色的box移到右上角,即X方向平移(父寬-己寬):

  @override
  void paintChildren(FlowPaintingContext context) {
    var size = context.size;
    for (int i = 0; i < context.childCount; i++) {
      if (i == 1) {
        var tr = context.getChildSize(i);
        context.paintChild(i,
            transform:
                Matrix4.translationValues(size.width - tr.width, 0, 0.0));
      } else {
        context.paintChild(i);
      }
    }
  }
現在讓四個組件排布在父親的四角,如下:

class _AngleDelegate extends FlowDelegate {
  Matrix4 m4;
  @override
  void paintChildren(FlowPaintingContext context) {
    var size = context.size;
    for (int i = 0; i < context.childCount; i++) {
      var cSize = context.getChildSize(i);
      if (i == 1) {
        m4 = Matrix4.translationValues(size.width - cSize.width, 0, 0.0);
      } else if (i == 2) {
        m4 = Matrix4.translationValues(0, size.height - cSize.height, 0.0);
      } else if (i == 3) {
        m4 = Matrix4.translationValues(size.width - cSize.width, size.height - cSize.height, 0.0);
      }
      context.paintChild(i, transform: m4);
    }
  }
  @override
  bool shouldRepaint(FlowDelegate oldDelegate) {
    return true;
  }
}如果需要一個排布四角的組件,可以基于上面的Delegate做一個組件
雖然用處很有限,但原來了解一下Flow還是挺好的。
class AngleFlow extends StatelessWidget {
  final List<Widget> children;
  AngleFlow({@required this.children}) : assert(children.length == 4);
  @override
  Widget build(BuildContext context) {
    return Flow(
      delegate: _AngleDelegate(),
      children: children,
    );
  }
}
class _AngleDelegate extends FlowDelegate {
  Matrix4 m4;
  @override
  void paintChildren(FlowPaintingContext context) {
    var size = context.size;
    for (int i = 0; i < context.childCount; i++) {
      var cSize = context.getChildSize(i);
      if (i == 1) {
        m4 = Matrix4.translationValues(size.width - cSize.width, 0, 0.0);
      } else if (i == 2) {
        m4 = Matrix4.translationValues(0, size.height - cSize.height, 0.0);
      } else if (i == 3) {
        m4 = Matrix4.translationValues(
            size.width - cSize.width, size.height - cSize.height, 0.0);
      }
      context.paintChild(i, transform: m4);
    }
  }
  @override
  bool shouldRepaint(FlowDelegate oldDelegate) {
    return true;
  }
}其實可以看出,Flow的核心就是根據信息來計算位置
所以,所有的布局都可以通過Flow進行實現。
除此之外對應一些特定情況的布局,使用Flow會非常簡單,比如:
class CircleFlow extends StatelessWidget {
  final List<Widget> children;
  CircleFlow({@required this.children});
  @override
  Widget build(BuildContext context) {
    return Flow(
      delegate: _CircleFlowDelegate(),
      children: children,
    );
  }
}
class _CircleFlowDelegate extends FlowDelegate {
  @override //繪制孩子的方法
  void paintChildren(FlowPaintingContext context) {
    double radius = context.size.shortestSide / 2;
    var count = context.childCount;
    var perRad = 2 * pi / count;
    for (int i = 0; i < count; i++) {
      print(i);
      var cSizeX = context.getChildSize(i).width / 2;
      var cSizeY = context.getChildSize(i).height / 2;
      var offsetX = (radius - cSizeX) * cos(i * perRad) + radius;
      var offsetY = (radius - cSizeY) * sin(i * perRad) + radius;
      context.paintChild(i,
          transform: Matrix4.translationValues(
              offsetX - cSizeX, offsetY - cSizeY, 0.0));
    }
  }
  @override
  bool shouldRepaint(FlowDelegate oldDelegate) {
    return true;
  }
}全面說Flow最重要的就是進行定位,而動畫的本質是若干個變動的數字
那么兩者自然是郎才女貌,情投意合
前面圓形布局靠的是計算某個組件偏轉的角度
那么想要實現旋轉是非常簡單的,由于有角度的狀態,所以StatefulWidget
class CircleFlow extends StatefulWidget {
  final List<Widget> children;
  CircleFlow({@required this.children});
  @override
  _CircleFlowState createState() => _CircleFlowState();
}
class _CircleFlowState extends State<CircleFlow>
    with SingleTickerProviderStateMixin {
  AnimationController _controller;
  double rad = 0.0;
  @override
  void initState() {
    _controller =
        AnimationController(duration: Duration(milliseconds: 3000), vsync: this)
          ..addListener(() => setState(() =>
              rad = _controller.value*pi*2));
    _controller.forward();
    super.initState();
  }
  @override
  void dispose() {
    _controller.dispose();
    super.dispose();
  }
  @override
  Widget build(BuildContext context) {
    return  Flow(
        delegate: _CircleFlowDelegate(rad),
        children: widget.children,
    );
  }
}
在構造_CircleFlowDelegate時傳入角度,在offsetX、offsetY 時加上角度就行了
class _CircleFlowDelegate extends FlowDelegate {
  final double rad;
  _CircleFlowDelegate(this.rad);
  @override //繪制孩子的方法
  void paintChildren(FlowPaintingContext context) {
    double radius = context.size.shortestSide / 2;
    var count = context.childCount;
    var perRad = 2 * pi / count ;
    for (int i = 0; i < count; i++) {
      print(i);
      var cSizeX = context.getChildSize(i).width / 2;
      var cSizeY = context.getChildSize(i).height / 2;
      var offsetX = (radius - cSizeX) * cos(i * perRad+ rad) + radius;
      var offsetY = (radius - cSizeY) * sin(i * perRad+ rad) + radius;
      context.paintChild(i,
          transform: Matrix4.translationValues(
              offsetX - cSizeX, offsetY - cSizeY, 0.0));
    }
  }
  @override
  bool shouldRepaint(FlowDelegate oldDelegate) {
    return true;
  }
}能實現出來我還是蠻激動的。定義了menu為中間的組件
children為周圍的組件,點擊中間組件,執行動畫,
在進行定位時,讓offsetX和offsetY乘以分率后加半徑,這樣就會向中心靠攏,
反之擴散,我取名為BurstFlow,意為綻放
class BurstFlow extends StatefulWidget {
  final List<Widget> children;
  final Widget menu;
  BurstFlow({@required this.children, @required this.menu});
  @override
  _BurstFlowState createState() => _BurstFlowState();
}
class _BurstFlowState extends State<BurstFlow>
    with SingleTickerProviderStateMixin {
  AnimationController _controller;
  double _rad = 0.0;
  bool _closed = true;
  @override
  void initState() {
    _controller =
        AnimationController(duration: Duration(milliseconds: 1000), vsync: this)
          ..addListener(() => setState(() =>    _rad = (_closed ? (_controller.value) :1- _controller.value)))
          ..addStatusListener((status) {
            if (status == AnimationStatus.completed) {
              _closed = !_closed;
            }
          });
    super.initState();
  }
  @override
  void dispose() {
    _controller.dispose();
    super.dispose();
  }
  @override
  Widget build(BuildContext context) {
    return Flow(
      delegate: _CircleFlowDelegate(_rad),
      children: [
        ...widget.children,
        InkWell(
            onTap: () {
              _controller.reset();
              _controller.forward();
            },
            child: widget.menu)
      ],
    );
  }
}
class _CircleFlowDelegate extends FlowDelegate {
  final double rad;
  _CircleFlowDelegate(this.rad);
  @override //繪制孩子的方法
  void paintChildren(FlowPaintingContext context) {
    double radius = context.size.shortestSide / 2;
    var count = context.childCount - 1;
    var perRad = 2 * pi / count;
    for (int i = 0; i < count; i++) {
      print(i);
      var cSizeX = context.getChildSize(i).width / 2;
      var cSizeY = context.getChildSize(i).height / 2;
      var offsetX = rad * (radius - cSizeX) * cos(i * perRad) + radius;
      var offsetY = rad * (radius - cSizeY) * sin(i * perRad) + radius;
      context.paintChild(i,
          transform: Matrix4.translationValues(
              offsetX - cSizeX, offsetY - cSizeY, 0.0));
    }
    context.paintChild(context.childCount - 1,
        transform: Matrix4.translationValues(
            radius - context.getChildSize(context.childCount - 1).width / 2,
            radius - context.getChildSize(context.childCount - 1).height / 2,
            0.0));
  }
  @override
  bool shouldRepaint(FlowDelegate oldDelegate) {
    return true;
  }
}
另外可以對周圍的組件排布進行設計,可以是半圓弧收方放、
四分之一圓弧收方、甚至是指定角度弧排列
周圍的組件也可以進行透明度的漸變,這些都是可以優化的點
這里就不再說了,跟你們一些空間,各位可以自行優化。
“Flutter高級玩法Flow位置怎么自定義”的內容就介紹到這里了,感謝大家的閱讀。如果想了解更多行業相關的知識可以關注億速云網站,小編將為大家輸出更多高質量的實用文章!
免責聲明:本站發布的內容(圖片、視頻和文字)以原創、轉載和分享為主,文章觀點不代表本網站立場,如果涉及侵權請聯系站長郵箱:is@yisu.com進行舉報,并提供相關證據,一經查實,將立刻刪除涉嫌侵權內容。