您好,登錄后才能下訂單哦!
您好,登錄后才能下訂單哦!
本篇內容主要講解“Dubbo初始問題怎么解決”,感興趣的朋友不妨來看看。本文介紹的方法操作簡單快捷,實用性強。下面就讓小編來帶大家學習“Dubbo初始問題怎么解決”吧!
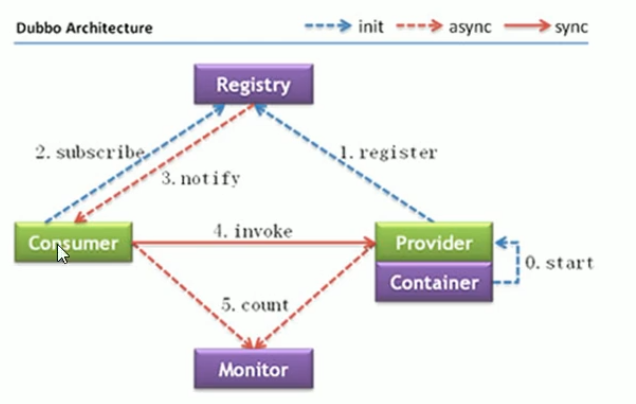
消費者:調用提供者,但是不能直接調,需要借助注冊中心
Provider:暴露服務的服務提供方
Container: 服務運行容器
Consumer: 調用遠程服務的服務消費方
Registry:服務注冊與發現的注冊中心
Monitor:統計服務的調用次數和調用時間的監控中心
0start:服務的提供者要運行在一個容器里面,比如運行在tomcat里面,需要將tomcat啟動起來。
1注冊:啟動起來之后,該服務就會注冊到注冊中心里(將服務調用的ip、端口、服務發布url放到注冊中心里面去。)。
2.subscribe:我想調用提供者提供的服務,我這時去找注冊中心去找(告訴服務中心將服務的相關信息給消費者)
3.notify:消費者要一次服務,注冊中心給一次。
這時消費者拿到服務的信息
4.invoke:就是rpc的過程,進行調用。不用我們管,dubbo內部自動實現。
5.Monitor:服務監控。統計某個服務調用了多少次。
asyn:異步。sync:同步。只有rpc調用時同步的,其他的都是異步的。
先安裝java1.8
解壓,進入配置文件夾,復制配置文件,并修改里面的配置使其生效。復制會話窗口,創建目錄,將該目錄復制修改到配置文件里面。啟動zk
zk默認端口為2181
Mode:standalone(當前沒有搭建集群,是單節點在運行)
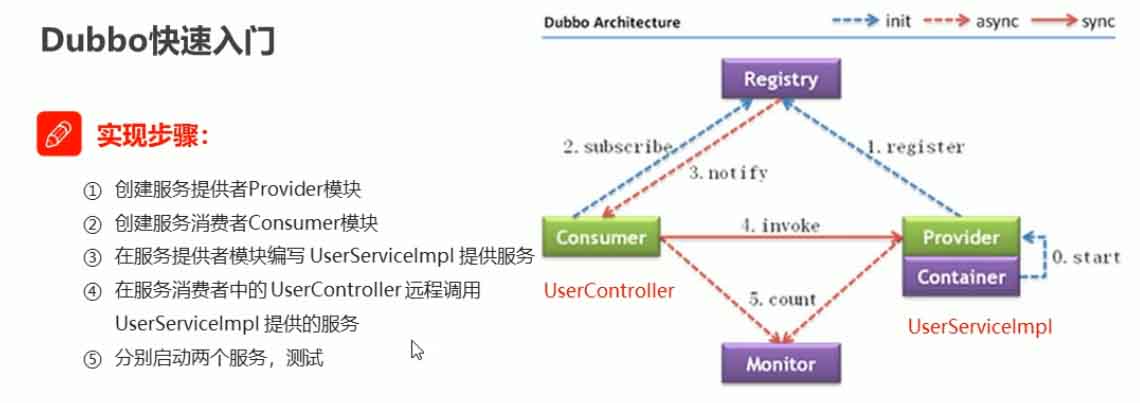
注意這里的controller調用service是遠程調用,是兩個工程分別部署在兩臺機器上。
        <!--Dubbo的起步依賴,版本2.7之后統一為rg.apache.dubb -->
        <dependency>
            <groupId>org.apache.dubbo</groupId>
            <artifactId>dubbo</artifactId>
            <version>${dubbo.version}</version>
        </dependency>
        <!--ZooKeeper客戶端實現 -->
        <dependency>
            <groupId>org.apache.curator</groupId>
            <artifactId>curator-framework</artifactId>
            <version>${zookeeper.version}</version>
        </dependency>
        <!--ZooKeeper客戶端實現 -->
        <dependency>
            <groupId>org.apache.curator</groupId>
            <artifactId>curator-recipes</artifactId>
            <version>${zookeeper.version}</version>
        </dependency>
<?xml version="1.0" encoding="UTF-8"?>
<beans xmlns="http://www.springframework.org/schema/beans"
      xmlns:xsi="http://www.w3.org/2001/XMLSchema-instance"
      xmlns:dubbo="http://dubbo.apache.org/schema/dubbo" xmlns:context="http://www.springframework.org/schema/context"
      xsi:schemaLocation="http://www.springframework.org/schema/beans http://www.springframework.org/schema/beans/spring-beans.xsd
        http://dubbo.apache.org/schema/dubbo http://dubbo.apache.org/schema/dubbo/dubbo.xsd http://www.springframework.org/schema/context https://www.springframework.org/schema/context/spring-context.xsd">

   <!--spring包掃描-->
   <!--<context:component-scan base-package="com.itheima.service"/>-->

   <!--dubbo的配置-->
   <!--1、配置項目的名稱,唯一-->
   <dubbo:application name="dubbo-service"/>
   <!--2、配置注冊中心的地址-->
   <dubbo:registry address="zookeeper://101.42.248.44:2181"/>
   <!--3、配置dubbo包掃描-->
   <dubbo:annotation package="com.itheima.service.impl"/>


</beans>
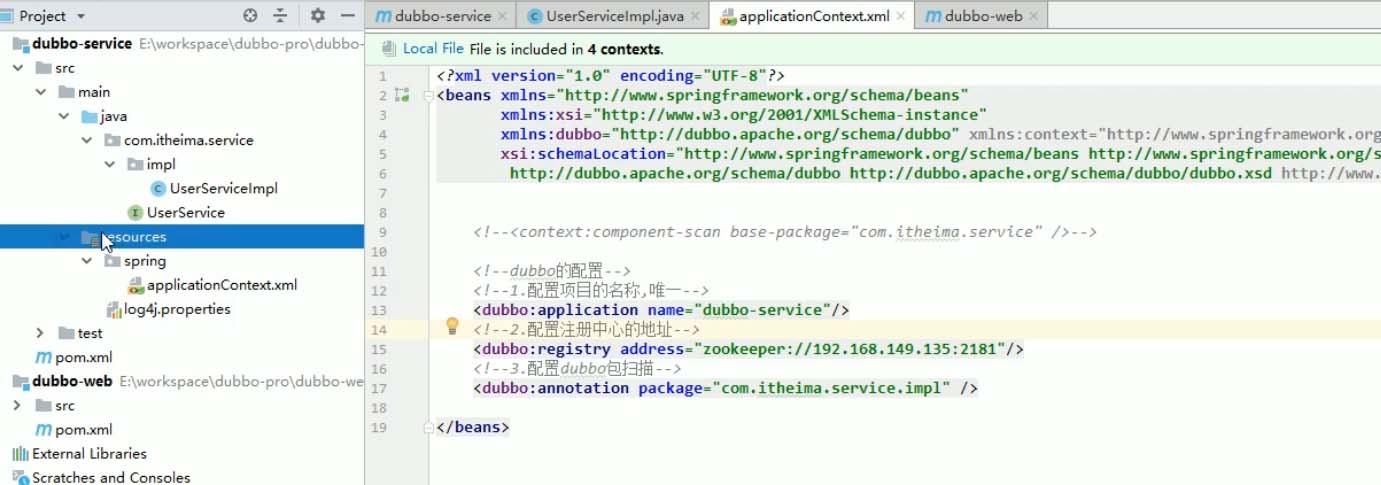
添加spring的配置,讓其掃描加載剛在配置dubbo的配置文件applicationContext.xml
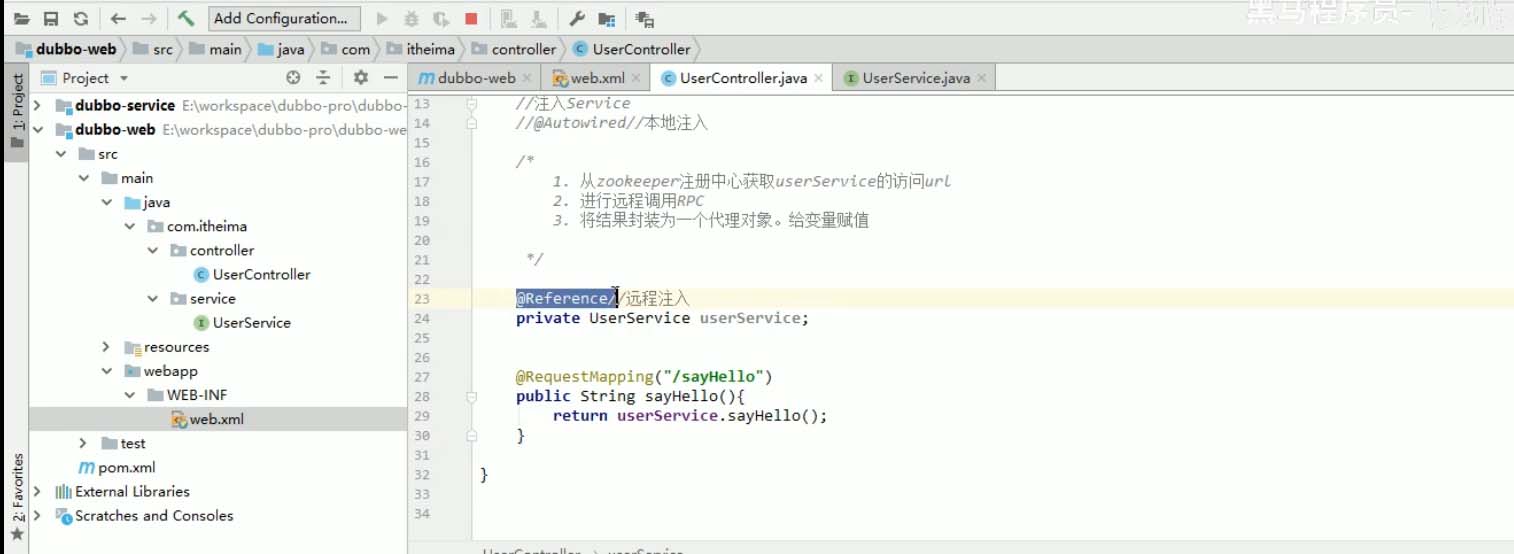
上面的掃描時掃面springmvc的注解
<?xml version="1.0" encoding="UTF-8"?>
<beans xmlns="http://www.springframework.org/schema/beans"
       xmlns:xsi="http://www.w3.org/2001/XMLSchema-instance"
       xmlns:dubbo="http://dubbo.apache.org/schema/dubbo"
       xmlns:mvc="http://www.springframework.org/schema/mvc"
       xmlns:context="http://www.springframework.org/schema/context"
       xsi:schemaLocation="http://www.springframework.org/schema/beans http://www.springframework.org/schema/beans/spring-beans.xsd
        http://www.springframework.org/schema/mvc http://www.springframework.org/schema/mvc/spring-mvc.xsd
         http://dubbo.apache.org/schema/dubbo http://dubbo.apache.org/schema/dubbo/dubbo.xsd http://www.springframework.org/schema/context https://www.springframework.org/schema/context/spring-context.xsd">

    <!--打開注解驅動-->
    <mvc:annotation-driven/>
    <!--掃描包-->
    <context:component-scan base-package="com.itheima.controller"/>

    <!--dubbo的配置-->
    <!--1、配置項目的名稱,唯一-->
    <dubbo:application name="dubbo-web">
        <dubbo:parameter key="qos.port" value="33333"/>
    </dubbo:application>
    <!--2、配置注冊中心的地址-->
    <dubbo:registry address="zookeeper://101.42.248.44:2181"/>
    <!--3、配置dubbo包掃描-->
    <dubbo:annotation package="com.itheima.controller"/>
</beans>
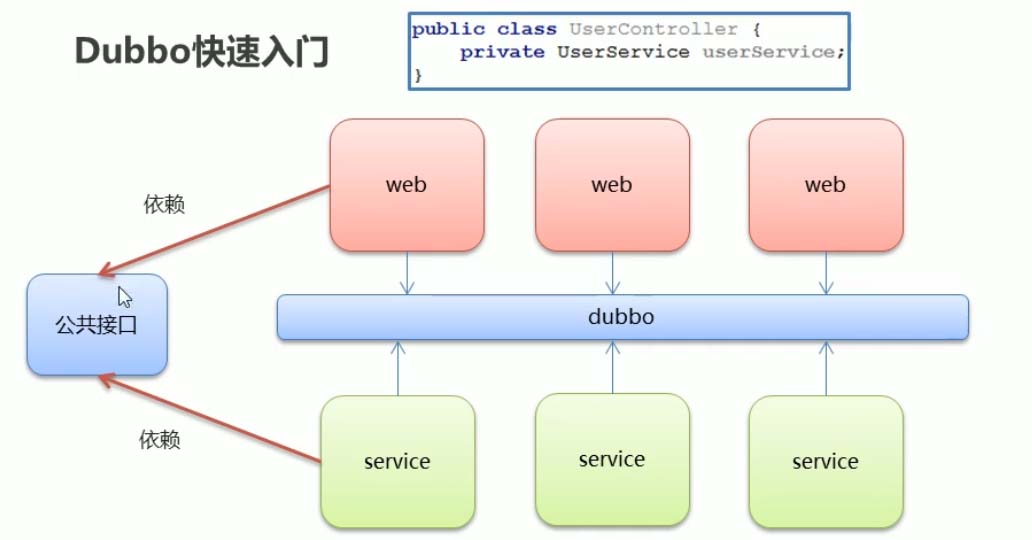
創建一個公共接口模塊,減少重復代碼開發,易于接口調用
到此,相信大家對“Dubbo初始問題怎么解決”有了更深的了解,不妨來實際操作一番吧!這里是億速云網站,更多相關內容可以進入相關頻道進行查詢,關注我們,繼續學習!
免責聲明:本站發布的內容(圖片、視頻和文字)以原創、轉載和分享為主,文章觀點不代表本網站立場,如果涉及侵權請聯系站長郵箱:is@yisu.com進行舉報,并提供相關證據,一經查實,將立刻刪除涉嫌侵權內容。