您好,登錄后才能下訂單哦!
您好,登錄后才能下訂單哦!
這篇文章主要講解了“怎么利用Python進行客戶分群分析”,文中的講解內容簡單清晰,易于學習與理解,下面請大家跟著小編的思路慢慢深入,一起來研究和學習“怎么利用Python進行客戶分群分析”吧!
import pandas as pd
import matplotlib.pyplot as plt
import seaborn as sns
df = pd.read_csv('sales_2018-01-01_2019-12-31.csv')
df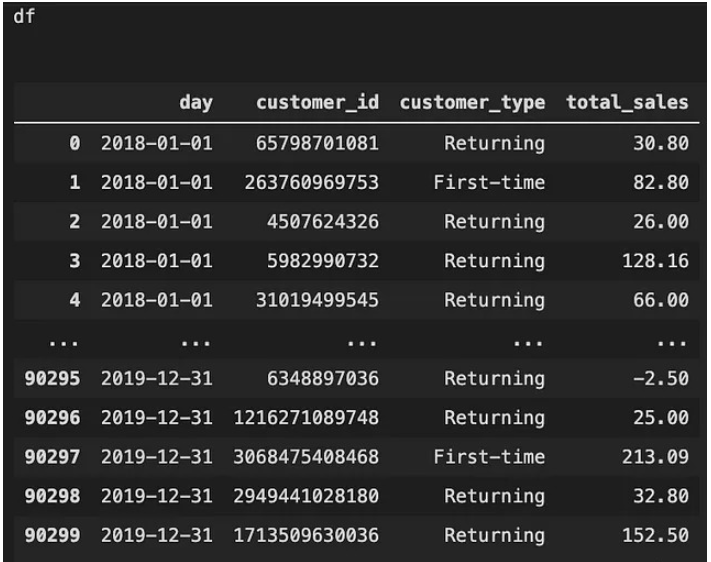
first_time = df.loc[df['customer_type'] == 'First-time',]
final = df.loc[df['customer_id'].isin(first_time['customer_id'].values)]
在這里,不能簡單地選擇df.loc[df['customer_type']],因為在這個數據中,在customer_type列下,First_time指的是新客戶,而Returning指的是老客戶。因此,如果我在2019年12月31日第一次購買,數據會顯示我在2019年12月31日是新客戶,但在我第二次、第三次…時是返回客戶。同期群分析著眼于新客戶和他們的后續購買行為。因此,如果我們簡單地使用df.loc[df['customer_type']=='First-time',],我們就會忽略新客戶的后續購買,這不是分析同期群行為的正確方法。
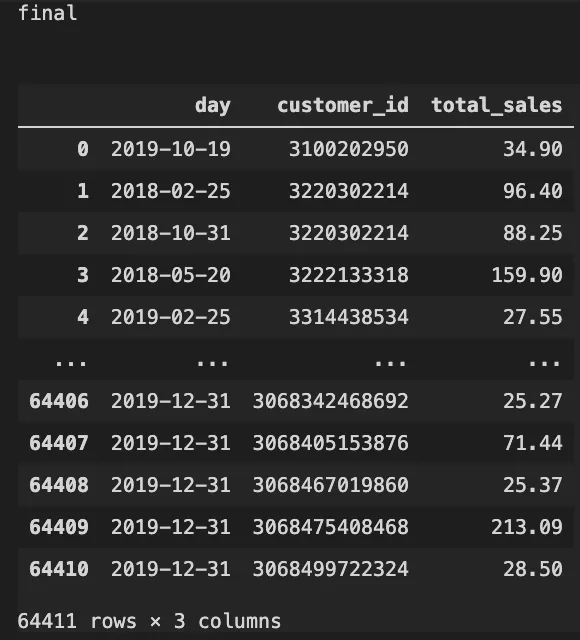
因此,這里所需要做的是,首先創建一個所有第一次的客戶列表,并將其存儲為first_time。然后從原始客戶數據框df中只選擇那些ID在first_time客戶組內的客戶。通過這樣做,我們可以確保我們獲得的數據只有第一次的客戶和他們后來的購買行為。
現在,我們刪除customer_type列,因為它已經沒有必要了。同時,將日期列轉換成正確的日期時間格式
final = final.drop(columns = ['customer_type'])
final['day']= pd.to_datetime(final['day'], dayfirst=True)
final = final.drop(columns = ['customer_type'])
final['day']= pd.to_datetime(final['day'], dayfirst=True)
def purchase_rate(customer_id):
    purchase_rate = [1]
    counter = 1
    for i in range(1,len(customer_id)):
          if customer_id[i] != customer_id[i-1]:
                 purchase_rate.append(1)
                 counter = 1
          else:
                 counter += 1
                 purchase_rate.append(counter)
    return purchase_rate
def join_date(date, purchase_rate):
    join_date = list(range(len(date)))
    for i in range(len(purchase_rate)):
          if purchase_rate[i] == 1:
                 join_date[i] = date[i]
          else:
                 join_date[i] = join_date[i-1]
    return join_date
def age_by_month(purchase_rate, month, year, join_month, join_year):
    age_by_month = list(range(len(year)))
    for i in range(len(purchase_rate)):
          if purchase_rate[i] == 1:
              age_by_month[i] = 0
          else:
              if year[i] == join_year[i]:
                 age_by_month[i] = month[i] - join_month[i]
              else:
                 age_by_month[i] = month[i] - join_month[i] + 12*(year[i]-join_year[i])
     return age_by_month
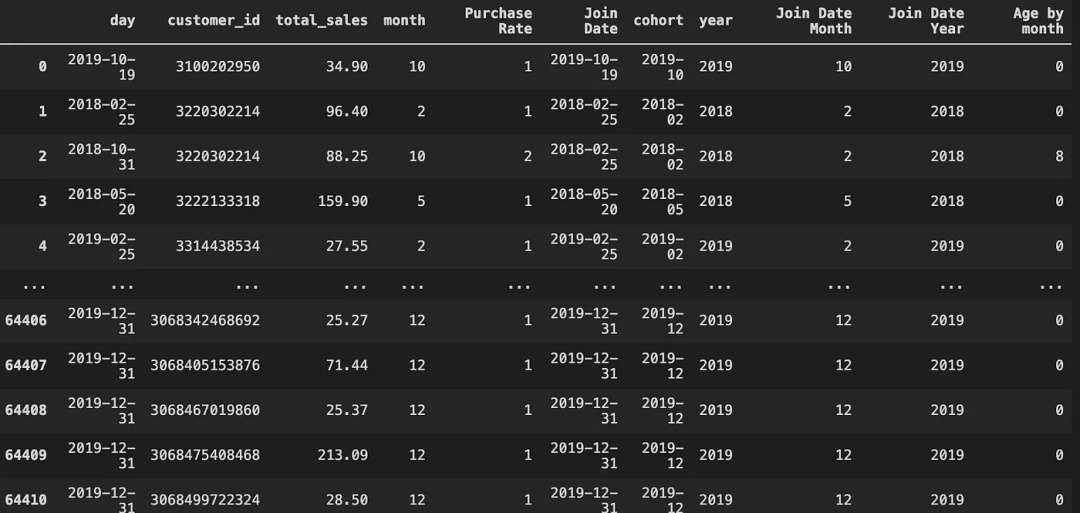
purchase_rate函數將決定這是否是每個客戶的第二次、第三次、第四次購買。
join_date函數允許確定客戶加入的日期。
age_by_month函數提供了從客戶當前購買到第一次購買的多少個月。
現在輸入已經準備好了,接下來創建群組。
final['month'] =pd.to_datetime(final['day']).dt.month
final['Purchase Rate'] = purchase_rate(final['customer_id'])
final['Join Date'] = join_date(final['day'], final['Purchase Rate'])
final['Join Date'] = pd.to_datetime(final['Join Date'], dayfirst=True)
final['cohort'] = pd.to_datetime(final['Join Date']).dt.strftime('%Y-%m')
final['year'] = pd.to_datetime(final['day']).dt.year
final['Join Date Month'] = pd.to_datetime(final['Join Date']).dt.month
final['Join Date Year'] = pd.to_datetime(final['Join Date']).dt.year
final['Age by month'] = age_by_month(final['Purchase Rate'],
                                     final['month'],
                                     final['year'],
                                     final['Join Date Month'],
                                     final['Join Date Year'])
cohorts = final.groupby(['cohort','Age by month']).nunique()
cohorts = cohorts.customer_id.to_frame().reset_index()   # convert series to frame
cohorts = pd.pivot_table(cohorts, values = 'customer_id',index = 'cohort', columns= 'Age by month')
cohorts.replace(np.nan, '',regex=True)
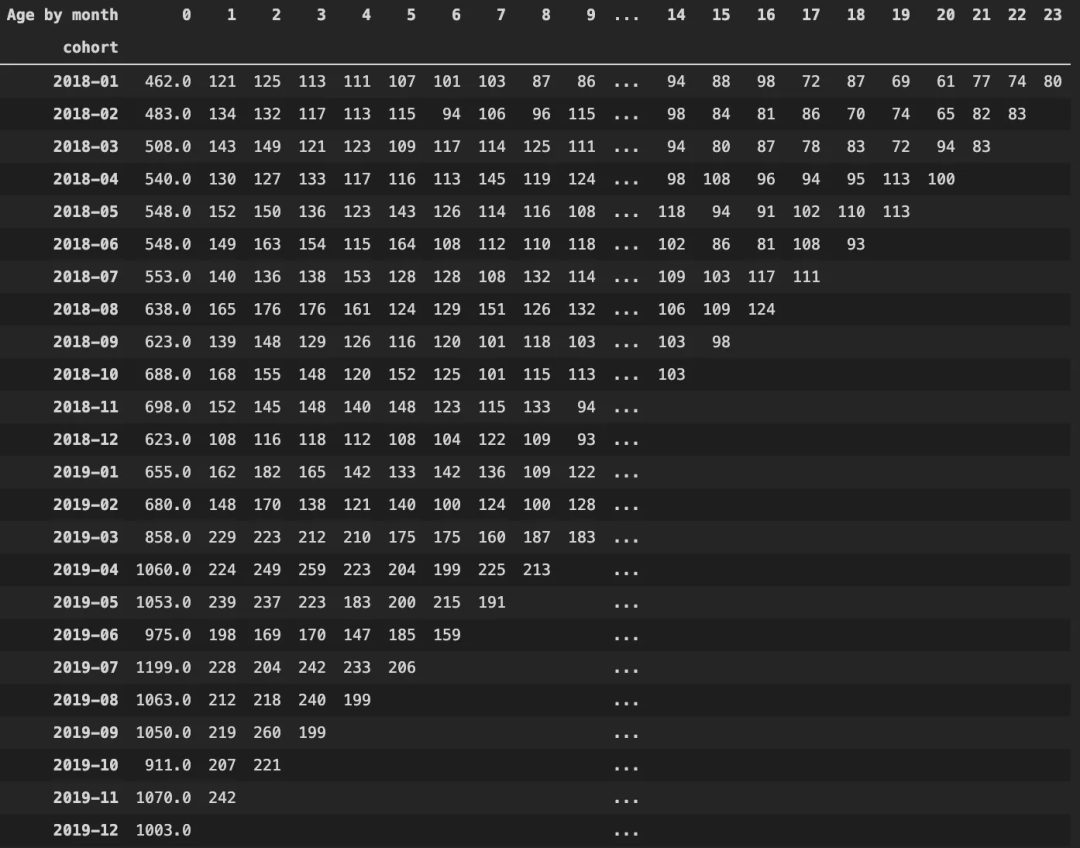
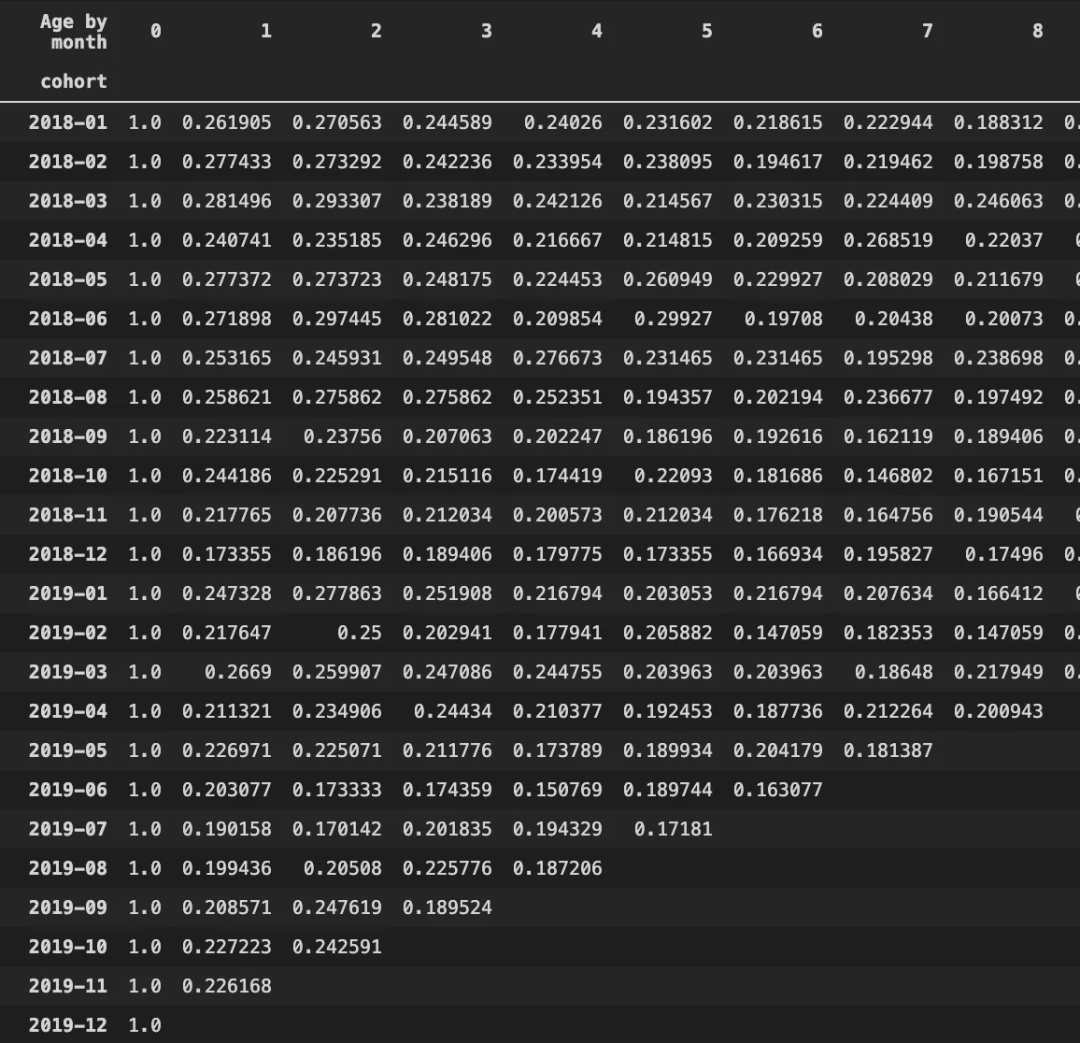
**如何解釋這個表格:**以群組2018-01為例。在2018年1月,有462名新客戶。在這462人中,121名客戶在2018年2月回來購買,125名在2018年3月購買,以此類推。
for i in range(len(cohorts)-1):
    cohorts[i+1] = cohorts[i+1]/cohorts[0]
cohorts[0] = cohorts[0]/cohorts[0]
cohorts_t = cohorts.transpose()
cohorts_t[cohorts_t.columns].plot(figsize=(10,5))
sns.set(style='whitegrid')
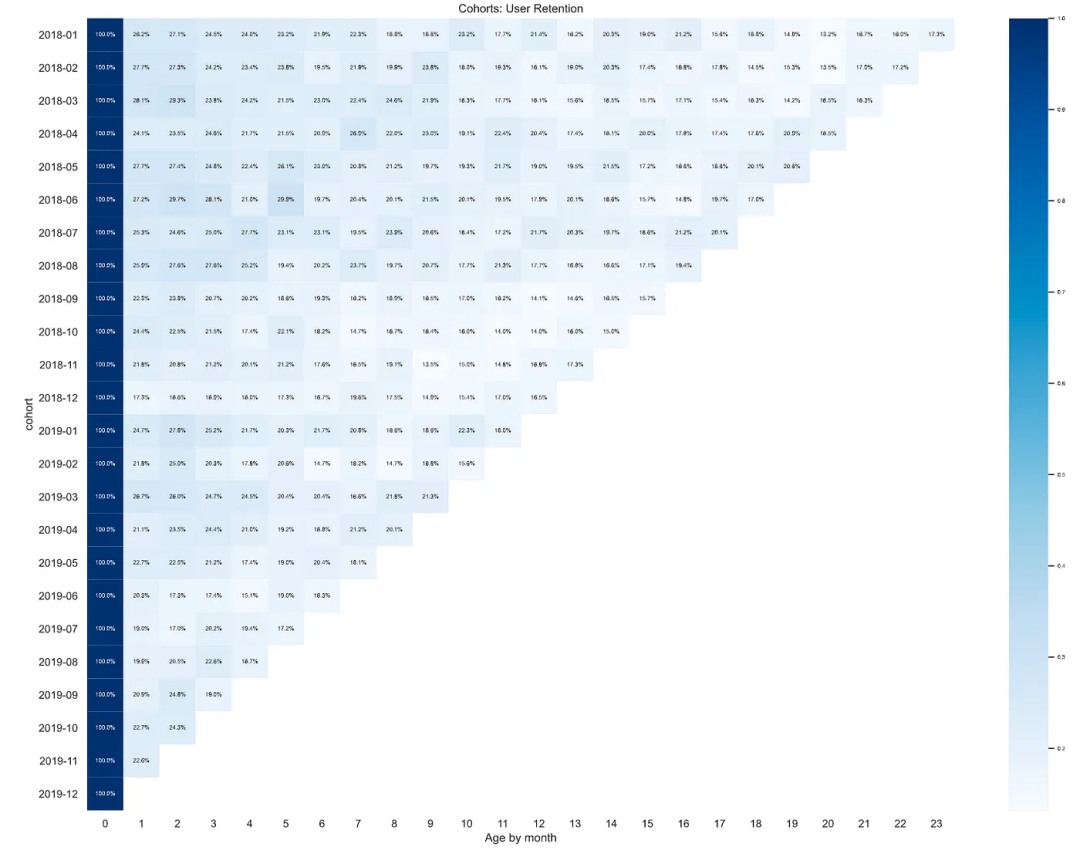
plt.figure(figsize=(20, 15))
plt.title('Cohorts: User Retention')
sns.set(font_scale = 0.5) # font size
sns.heatmap(cohorts, mask=cohorts.isnull(),
cmap="Blues",
annot=True, fmt='.01%')
plt.show()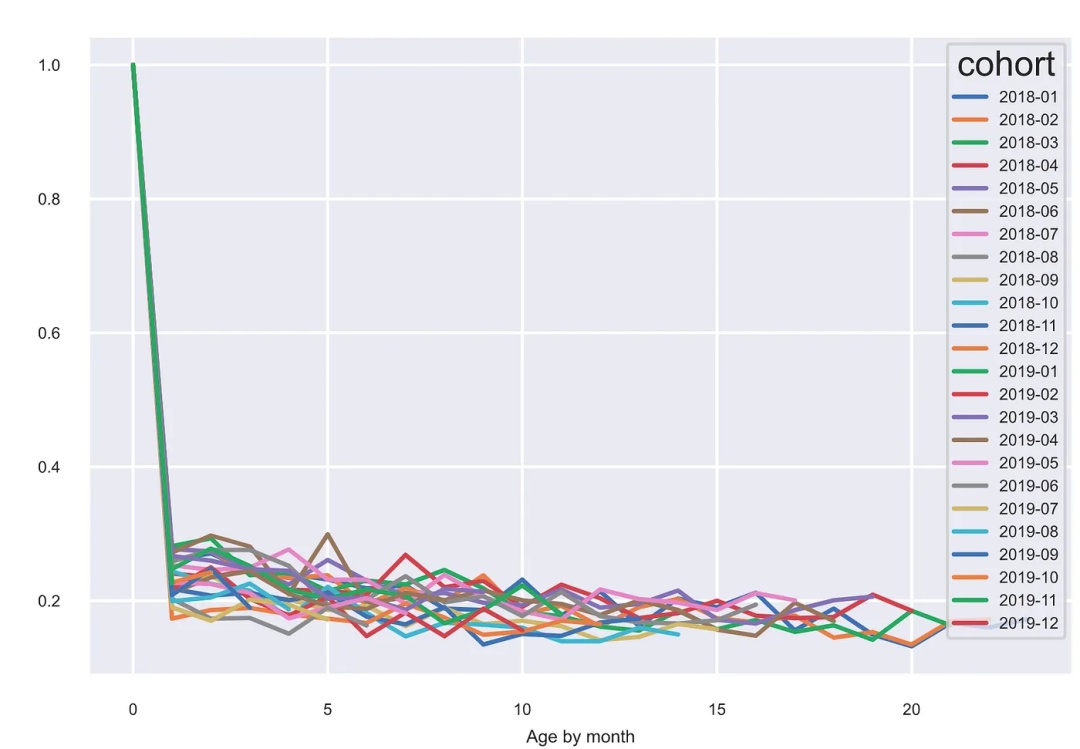
感謝各位的閱讀,以上就是“怎么利用Python進行客戶分群分析”的內容了,經過本文的學習后,相信大家對怎么利用Python進行客戶分群分析這一問題有了更深刻的體會,具體使用情況還需要大家實踐驗證。這里是億速云,小編將為大家推送更多相關知識點的文章,歡迎關注!
免責聲明:本站發布的內容(圖片、視頻和文字)以原創、轉載和分享為主,文章觀點不代表本網站立場,如果涉及侵權請聯系站長郵箱:is@yisu.com進行舉報,并提供相關證據,一經查實,將立刻刪除涉嫌侵權內容。