您好,登錄后才能下訂單哦!
您好,登錄后才能下訂單哦!
這篇文章主要講解了“javascript怎么使用alert實現一個精美的彈窗”,文中的講解內容簡單清晰,易于學習與理解,下面請大家跟著小編的思路慢慢深入,一起來研究和學習“javascript怎么使用alert實現一個精美的彈窗”吧!
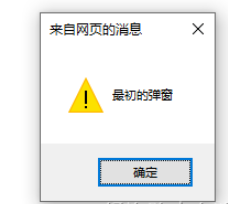
其實最初使用alert還是一個常態,包括現在很多B端平臺還在直接使用alert。人們不再使用alert,大概也是因為在不同瀏覽器下他的表現形式是不同的,給用戶體驗帶來了不太好的影響。但由于美工缺失或者是使用便捷易上手,當時被人們奉為法寶啊。
// js片段
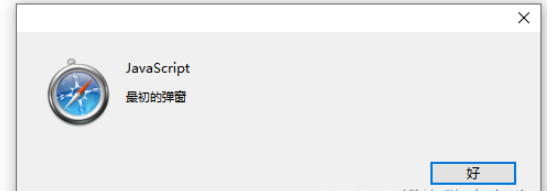
alert('最初的彈窗');
不同瀏覽器的表現形式大概是這樣:


其實還有很多瀏覽器,對于這個原生的老古董alert方法的表現形式完全不一樣,慢慢的人們發現用戶體驗是一個必須提升的事項,所以慢慢拋棄了alert方法。
慢慢的,人們工作量加重,開始重視工作效率了,自己寫代碼工作效率低,于是開始使用各種各樣的第三方組件,extjs easysui elementui ant 等等,既然人家提供了第三方的組件,使用快速且方便,最重要的是在每個瀏覽器的表現形式還是一致的,所以誰還會用alert呢。

既然alert有了以上缺點,又出現了各種各樣符合當代技術棧的UI組件庫,人們也逐漸產生了一個共有的意識,代碼里不寫alert,不寫confirm,上線不寫console.log。甚至很多授課老師也產生了這個意識,很多開始學前端的最初不知道有這個alert全局方法,老師覺得教了沒有意義,以后反正也不讓用了跳過吧。于是就真的把alert這個方法變成老古董了。
為了表示對alert的懷念,我今天就想著用alert實現一個各瀏覽器表現都一致的彈框吧,希望還有很多人看了這篇博客能夠記起這個曾經的伙伴。
首先需要實現一下你需要展示的彈窗,可以看到很多被大家所熟知的彈窗組件包含頭部,身體,以及底部按鈕部分,這些都是可以用一些簡單的div p span等標簽布局的,代碼如下:
<div class="box">
   <p class="title">標題</p>
   <div class="body">這里是一個彈窗</div>
   <div class="bottom">
       <span onclick="hideAlert()">確定</span>
   </div>
</div>
這里基本就是模擬那些組件庫做一個彈窗的樣式,例如加一個圓角邊框啦,設置一下標題區域的寬高居中啦,中間文案區域的樣式等,底部還有一個確定按鈕,這部分整體來說比較加單,代碼如下:
* {
    margin: 0;
    padding: 0;
}
.box {
     display: none;
     margin: 100px;
     width: 396px;
     height: 180px;
     border:1px solid #EEE;
     border-radius: 10px;
}
.title {
     height: 40px;
     padding-left: 20px;
     font-size: 18px;
     font-weight: bold;
     line-height: 40px;
     background: #0052d9;
     border-radius: 10px 10px 0 0;
     color: #FFF;
}
.body {
     height: 100px;
     background: url(./bg.gif) repeat;
     text-align: center;
     color: #FFF;
     line-height: 100px;
}
.bottom {
     height: 40px;
     text-align: center;
}
.bottom span {
    margin-top: 5px;
    display: inline-block;
    width: 100px;
    height: 30px;
    border-radius: 10px;
    text-align: center;
    line-height: 30px;
}這里重點還是對alert方法的覆蓋,意思就是我還是調用alert()方法,但卻可以彈出讓每個瀏覽器表現一致的彈框,這里需要對alert方法進行重寫;
同時彈框的按鈕要具有移除彈框的功能,意思就是點擊確定按鈕,我們需要把彈框隱藏掉,這些是需要使用js來實現的,代碼如下:
let alertBox = document.querySelector('.box');
function alert() {
    alertBox.style.display = 'block';
}
alert();

function hideAlert() {
    alertBox.style.display = 'none';
}
<!DOCTYPE html>
<html lang="en">
<head>
    <meta charset="UTF-8">
    <title>alert彈窗</title>
    <style>
        * {
            margin: 0;
            padding: 0;
        }
        .box {
            display: none;
            margin: 100px;
            width: 396px;
            height: 180px;
            border:1px solid #EEE;
            border-radius: 10px;
        }
        .title {
            height: 40px;
            padding-left: 20px;
            font-size: 18px;
            font-weight: bold;
            line-height: 40px;
            background: #0052d9;
            border-radius: 10px 10px 0 0;
            color: #FFF;
        }
        .body {
            height: 100px;
            background: url(./bg.gif) repeat;
            text-align: center;
            color: #FFF;
            line-height: 100px;
        }
        .bottom {
            height: 40px;
            text-align: center;
        }
        .bottom span {
            margin-top: 5px;
            display: inline-block;
            width: 100px;
            height: 30px;
            border-radius: 10px;
            text-align: center;
            line-height: 30px;
        }
    </style>
</head>
<body>
    <div class="box">
        <p class="title">標題</p>
        <div class="body">這里是一個彈窗</div>
        <div class="bottom">
            <span onclick="hideAlert()">確定</span>
        </div>
    </div>
    <script>
        let alertBox = document.querySelector('.box');
        function alert() {
            alertBox.style.display = 'block';
        }
        alert();

        function hideAlert() {
            alertBox.style.display = 'none';
        }
    </script>
</body>
感謝各位的閱讀,以上就是“javascript怎么使用alert實現一個精美的彈窗”的內容了,經過本文的學習后,相信大家對javascript怎么使用alert實現一個精美的彈窗這一問題有了更深刻的體會,具體使用情況還需要大家實踐驗證。這里是億速云,小編將為大家推送更多相關知識點的文章,歡迎關注!
免責聲明:本站發布的內容(圖片、視頻和文字)以原創、轉載和分享為主,文章觀點不代表本網站立場,如果涉及侵權請聯系站長郵箱:is@yisu.com進行舉報,并提供相關證據,一經查實,將立刻刪除涉嫌侵權內容。