您好,登錄后才能下訂單哦!
您好,登錄后才能下訂單哦!
這篇“Android隱私協議提示彈窗如何實現”文章的知識點大部分人都不太理解,所以小編給大家總結了以下內容,內容詳細,步驟清晰,具有一定的借鑒價值,希望大家閱讀完這篇文章能有所收獲,下面我們一起來看看這篇“Android隱私協議提示彈窗如何實現”文章吧。
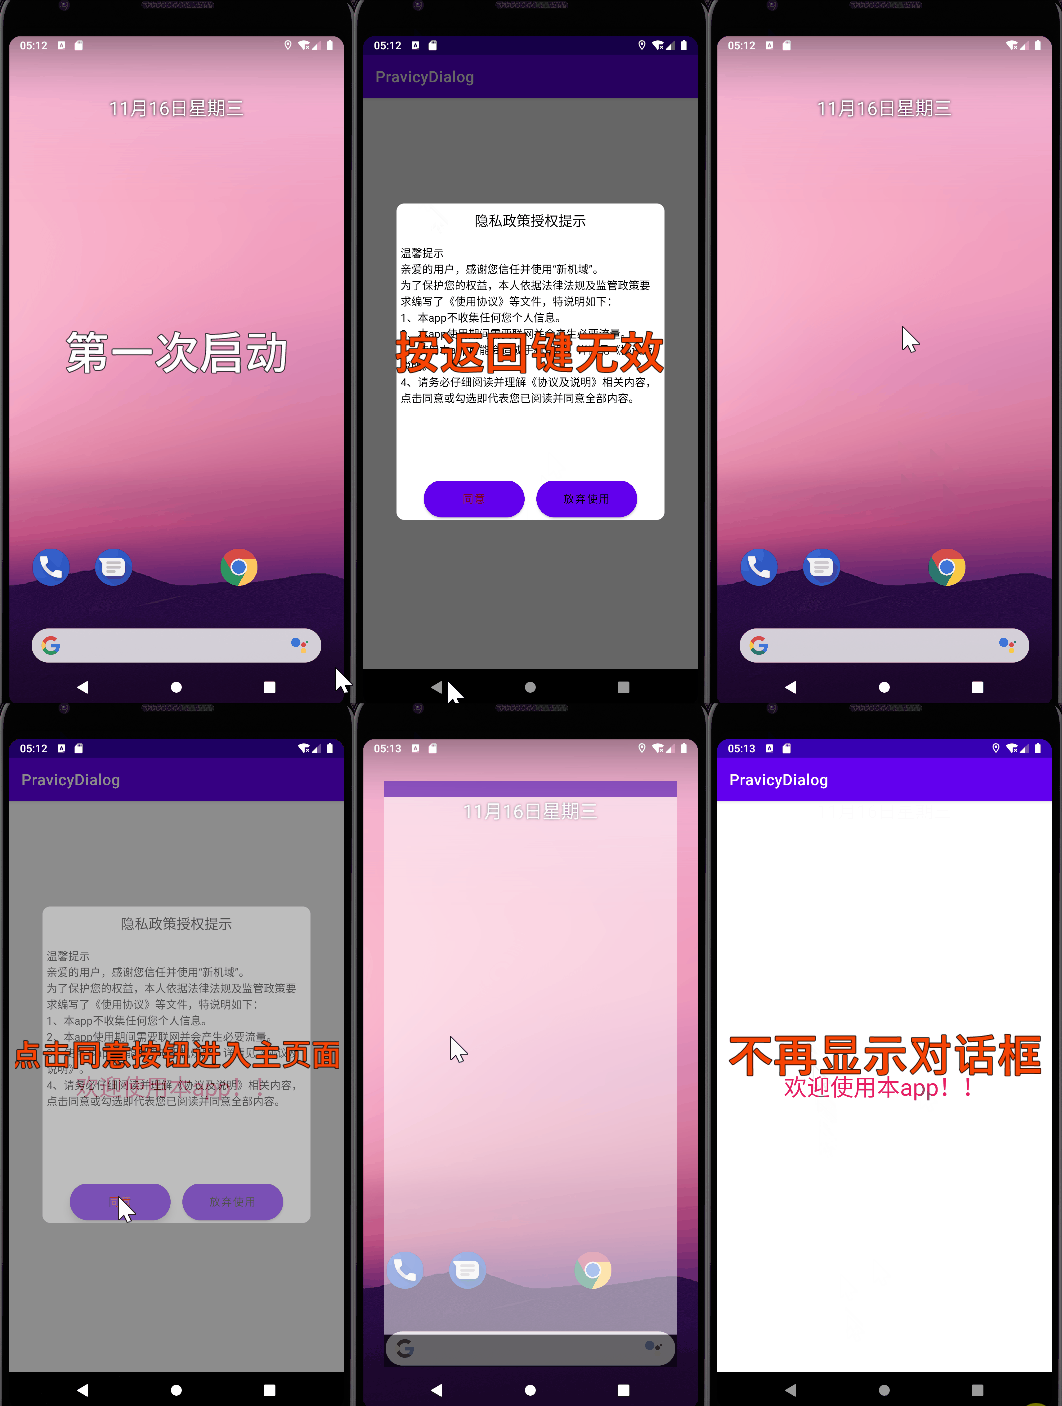
功能:
1、啟動app后彈窗隱私協議
2、屏蔽返回鍵
3、再次啟動不再顯示隱私協議。
本例程的絕大部分代碼來自下面鏈接,因為本人改了一些,增加了一些功能,所以不有臉的算原創了。
下面這個例子是“正宗”app隱私協議實現方法,而且協議內容使用的是txt格式文件,據說如果使用html格式文件,各大平臺在審核的時候大概率無法通過,但協議內容的還應該有更詳細協議及說明的鏈接,我沒做,暫時還沒學會,會了再修改一下。
Android 實現隱私政策提示彈窗
對原作者表示感謝!
直接上代碼:
MainActivity.java
/*
功能:app協議頁
1、打開app彈出協議,禁止返回鍵取消顯示。
2、再次打開協議頁不再彈出。
 */
package com.example.pravicydialog;
import androidx.appcompat.app.AppCompatActivity;
import android.app.AlertDialog;
import android.app.Dialog;
import android.content.Context;
import android.os.Bundle;
import android.util.DisplayMetrics;
import android.view.LayoutInflater;
import android.view.View;
import android.view.WindowManager;
import android.widget.TextView;
import java.io.BufferedReader;
import java.io.IOException;
import java.io.InputStream;
import java.io.InputStreamReader;
import java.io.UnsupportedEncodingException;
public class MainActivity extends AppCompatActivity {
    Dialog dialog;
    @Override
    protected void onCreate(Bundle savedInstanceState) {
        super.onCreate(savedInstanceState);
        setContentView(R.layout.activity_main);
        PravicyCheck();
    }
    public void onClickAgree(View v)
    {
        dialog.dismiss();
        //下面將已閱讀標志寫入文件,再次啟動的時候判斷是否顯示。
        this.getSharedPreferences("file", Context.MODE_PRIVATE).edit()
                .putBoolean("AGREE", true)
                .apply();
    }
    public void onClickDisagree(View v)
    {
        System.exit(0);//退出軟件
    }
    public void showPrivacy(String privacyFileName){
        String str = initAssets(privacyFileName);
        final View inflate = LayoutInflater.from(MainActivity.this).inflate(R.layout.dialog_privacy_show, null);
        TextView tv_title = (TextView) inflate.findViewById(R.id.tv_title);
        tv_title.setText("隱私政策授權提示");
        TextView tv_content = (TextView) inflate.findViewById(R.id.tv_content);
        tv_content.setText(str);
        dialog = new AlertDialog
                .Builder(MainActivity.this)
                .setView(inflate)
                .show();
        // 通過WindowManager獲取
        DisplayMetrics dm = new DisplayMetrics();
        getWindowManager().getDefaultDisplay().getMetrics(dm);
        final WindowManager.LayoutParams params = dialog.getWindow().getAttributes();
        params.width = dm.widthPixels*4/5;
        params.height = dm.heightPixels*1/2;
        dialog.setCancelable(false);//屏蔽返回鍵
        dialog.getWindow().setAttributes(params);
        dialog.getWindow().setBackgroundDrawableResource(android.R.color.transparent);
    }
    /**
     * 從assets下的txt文件中讀取數據
     */
    public String initAssets(String fileName) {
        String str = null;
        try {
            InputStream inputStream = getAssets().open(fileName);
            str = getString(inputStream);
        } catch (IOException e1) {
            e1.printStackTrace();
        }
        return str;
    }
    public static String getString(InputStream inputStream) {
        InputStreamReader inputStreamReader = null;
        try {
            inputStreamReader = new InputStreamReader(inputStream, "UTF-8");
        } catch (UnsupportedEncodingException e1) {
            e1.printStackTrace();
        }
        BufferedReader reader = new BufferedReader(inputStreamReader);
        StringBuffer sb = new StringBuffer("");
        String line;
        try {
            while ((line = reader.readLine()) != null) {
                sb.append(line);
                sb.append("\n");
            }
        } catch (IOException e) {
            e.printStackTrace();
        }
        return sb.toString();
    }
    public void PravicyCheck(){
        Boolean status =this.getSharedPreferences("file",Context.MODE_PRIVATE)
                .getBoolean("AGREE",false);
        if (status==true){
        }else{
            showPrivacy("privacy.txt");//放在assets目錄下的隱私政策文本文件
        }
    }
}
說明:
1、dialog.setCancelable(false);屏蔽返回鍵
2、將已閱讀標志寫入文件,再次啟動的時候判斷是否顯示。
preferences用法見,實現不同,原理一樣:分享一個SharedPreferences的工具類,方便保存數據
this.getSharedPreferences("file", Context.MODE_PRIVATE).edit()
                .putBoolean("AGREE", true)
                .apply();
3、判斷是否是第一次啟動代碼塊:
 public void PravicyCheck(){
        //讀標志
        Boolean status =this.getSharedPreferences("file",Context.MODE_PRIVATE)
                .getBoolean("AGREE",false);
        if (status==true){
        //如果status為true,不顯示對話框,直接進主頁面。
        }else{
            //如果status不為true顯示對話框
            showPrivacy("privacy.txt");//放在assets目錄下的隱私政策文本文件
        }
activity_main.xml(這個是主頁面,可以什么都不放,我放了一個textview)
<androidx.constraintlayout.widget.ConstraintLayout xmlns:android="http://schemas.android.com/apk/res/android"
    xmlns:app="http://schemas.android.com/apk/res-auto"
    android:layout_width="match_parent"
    android:layout_height="match_parent"
    android:orientation="horizontal">
    <TextView
        android:id="@+id/textView2"
        android:layout_width="wrap_content"
        android:layout_height="wrap_content"
        android:text="歡迎使用本app!!"
        android:textColor="#E91E63"
        android:textSize="30sp"
        app:layout_constraintBottom_toBottomOf="parent"
        app:layout_constraintEnd_toEndOf="parent"
        app:layout_constraintStart_toStartOf="parent"
        app:layout_constraintTop_toTopOf="parent" />
</androidx.constraintlayout.widget.ConstraintLayout>
dialog_privacy_show.xml(對話框)
<?xml version="1.0" encoding="utf-8"?>
<LinearLayout xmlns:android="http://schemas.android.com/apk/res/android"
    xmlns:tools="http://schemas.android.com/tools"
    android:layout_width="match_parent"
    android:layout_height="match_parent"
    android:background="@drawable/dialog_privacy_shape"
    android:orientation="vertical">
    <RelativeLayout
        android:layout_width="match_parent"
        android:layout_height="match_parent">
        <LinearLayout
            android:layout_width="match_parent"
            android:layout_height="match_parent"
            android:layout_above="@+id/ll_btn_bottom"
            android:layout_marginBottom="15dp"
            android:gravity="center"
            android:orientation="vertical">
            <TextView
                android:id="@+id/tv_title"
                android:layout_width="wrap_content"
                android:layout_height="wrap_content"
                android:layout_marginTop="10dp"
                android:layout_marginBottom="10dp"
                android:text="隱私政策授權提示"
                android:textColor="#000000"
                android:textSize="18sp" />
            <ScrollView
                android:layout_width="match_parent"
                android:layout_height="match_parent"
                android:layout_marginLeft="5dp"
                android:layout_marginRight="5dp"
                android:fadingEdgeLength="50dp"
                android:requiresFadingEdge="horizontal">
                <TextView
                    android:id="@+id/tv_content"
                    android:layout_width="match_parent"
                    android:layout_height="match_parent"
                    android:layout_marginTop="10dp"
                    android:singleLine="false"
                    android:text=""
                    android:textColor="#000000" />
            </ScrollView>
        </LinearLayout>
        <LinearLayout
            android:id="@+id/ll_btn_bottom"
            android:layout_width="match_parent"
            android:layout_height="wrap_content"
            android:layout_alignParentBottom="true"
            android:gravity="center"
            >
            <Button
                android:id="@+id/btn_agree"
                android:layout_width="130dp"
                android:layout_height="wrap_content"
                android:layout_marginBottom="2dp"
                android:layout_marginRight="15dp"
                android:text="同意"
                android:onClick="onClickAgree"
                android:textColor="#FF0006"
                android:background="@drawable/button_shape"/>
            <Button
                android:id="@+id/btn_disagree"
                android:layout_width="130dp"
                android:layout_marginBottom="2dp"
                android:layout_height="wrap_content"
                android:text="放棄使用"
                android:onClick="onClickDisagree"
                android:textColor="#000000"
                android:background="@drawable/button_shape"/>
        </LinearLayout>
    </RelativeLayout>
</LinearLayout>
button_shape.xml(按鈕形狀等屬性)
<?xml version="1.0" encoding="utf-8" ?>
<!--相當于做了一張圓角的圖片,然后給button作為背景圖片-->
<shape xmlns:android="http://schemas.android.com/apk/res/android"
    android:shape="rectangle">
    <!--設置背景色-->
    <solid android:color="#F59E27" />
    <!--設置圓角-->
    <corners android:radius="105dip" />
    <padding
        android:bottom="2dp"
        android:left="33dp"
        android:right="33dp"
        android:top="2dp">
    </padding>
</shape>
dialog_privacy_shape.xml(對話框屬性)
<?xml version="1.0" encoding="utf-8"?>
<shape xmlns:android="http://schemas.android.com/apk/res/android"
    android:shape="rectangle">
    <!-- 填充色 -->
    <solid android:color="#ffffff" />
    <!-- 矩形圓角半徑 -->
    <corners android:radius="10dp" />
</shape>
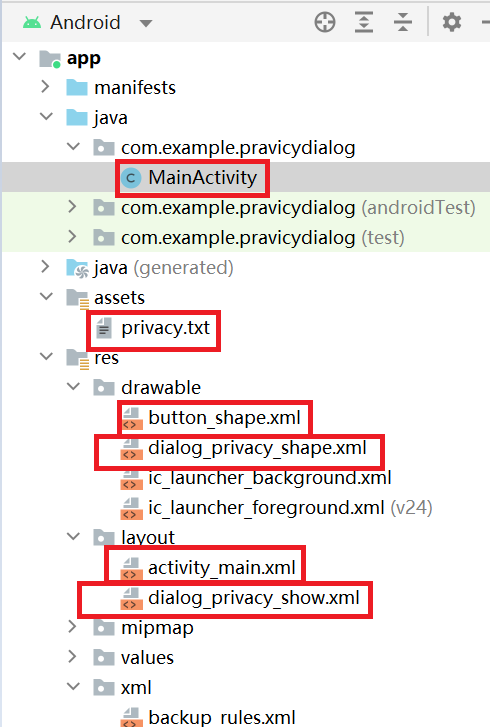
各個文件位置如圖:

最后動圖:

以上就是關于“Android隱私協議提示彈窗如何實現”這篇文章的內容,相信大家都有了一定的了解,希望小編分享的內容對大家有幫助,若想了解更多相關的知識內容,請關注億速云行業資訊頻道。
免責聲明:本站發布的內容(圖片、視頻和文字)以原創、轉載和分享為主,文章觀點不代表本網站立場,如果涉及侵權請聯系站長郵箱:is@yisu.com進行舉報,并提供相關證據,一經查實,將立刻刪除涉嫌侵權內容。