您好,登錄后才能下訂單哦!
您好,登錄后才能下訂單哦!
這篇文章主要介紹了PyQt5怎么實現輸入對話框的相關知識,內容詳細易懂,操作簡單快捷,具有一定借鑒價值,相信大家閱讀完這篇PyQt5怎么實現輸入對話框文章都會有所收獲,下面我們一起來看看吧。
輸入對話框,用于彈窗獲取用戶的輸入信息,包含輸入列表,輸入文本,輸入數字等方式。
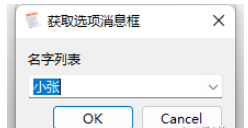
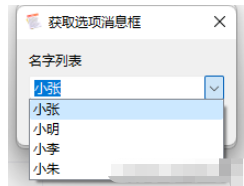
QInputDialog.getItem(self,"獲取選項消息框", "名字列表", items),返回值Tuple[str, bool]
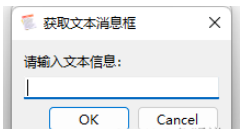
QInputDialog.getText(self,"獲取文本消息框", "請輸入文本信息:"),返回值Tuple[str, bool]
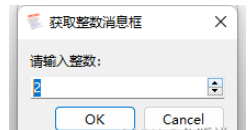
QInputDialog.getInt(self,"獲取整數消息框", "請輸入整數:"),返回值Tuple[int, bool]
QInputDialog.getMultiLineText(parent: QWidget, title: str, label: str, text: str = ..., flags: QtCore.Qt.WindowType = ..., inputMethodHints: QtCore.Qt.InputMethodHint = ...) -> typing.Tuple[str, bool]
QInputDialog.getDouble(parent: QWidget, title: str, label: str, value: float = ..., min: float = ..., max: float = ..., decimals: int = ..., flags: QtCore.Qt.WindowType = ..., step: float = ...) -> typing.Tuple[float, bool]
示例:
# _*_ coding:utf-8 _*_

import sys
from PyQt6.QtWidgets import QApplication
from PyQt6.QtWidgets import QWidget
from PyQt6.QtWidgets import QMainWindow
from PyQt6.QtWidgets import QFormLayout
from PyQt6.QtWidgets import QPushButton
from PyQt6.QtWidgets import QLineEdit
from PyQt6.QtWidgets import QInputDialog
from PyQt6.QtGui import QColor
from PyQt6.QtGui import QIcon
from PyQt6.QtCore import Qt


class QInputDialogDemoView(QMainWindow):
    """輸入消息框類"""

    def __init__(self):
        """構造函數"""

        super().__init__()
        self.setWindowTitle("MainWindow")
        self.setWindowIcon(QIcon(r"./res/20 (3).ico"))
        self.resize(200, 100)
        self.center()
        self.initui()

    def center(self):
        """居中顯示"""
        win_rect = self.frameGeometry()  # 獲取窗口矩形
        screen_center = self.screen().availableGeometry().center()  # 屏幕中心
        # 移動窗口矩形到屏幕中心
        win_rect.moveCenter(screen_center)
        # 移動窗口與窗口矩形重合
        self.move(win_rect.center())

    def initui(self):
        """初始函數"""

        # 創建表單布局作為底層布局
        self.formlayout = QFormLayout(self)
        self.formlayout.setAlignment(Qt.AlignmentFlag.AlignCenter)
        self.main_widget = QWidget()
        self.main_widget.setLayout(self.formlayout)
        self.setCentralWidget(self.main_widget)

        # 添加獲取選項按鈕
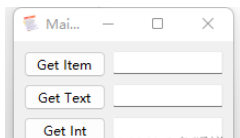
        self.btn_getitem = QPushButton("Get Item")
        self.btn_getitem.clicked.connect(self.get_item)
        self.ledit_getitem = QLineEdit()
        self.formlayout.addRow(self.btn_getitem, self.ledit_getitem)

        # 添加獲取文本按鈕
        self.btn_gettext = QPushButton("Get Text")
        self.btn_gettext.clicked.connect(self.get_text)
        self.ledit_gettext = QLineEdit()
        self.formlayout.addRow(self.btn_gettext, self.ledit_gettext)

        # 添加獲取整數按鈕
        self.btn_getint = QPushButton("Get Int")
        self.btn_getint.clicked.connect(self.get_int)
        self.ledit_getint = QLineEdit()
        self.formlayout.addRow(self.btn_getint, self.ledit_getint)

    def get_item(self):
        """獲取選項槽"""
        items = ("小張", "小明", "小李", "小朱")
        item,result = QInputDialog.getItem(self,"獲取選項消息框", "名字列表", items)
        print(f"item : {item}, ok : {result}, tpye : {type(result)}")
        if item and result:
            self.ledit_getitem.setText(item)

    def get_text(self):
        """獲取文本槽"""
        text,result = QInputDialog.getText(self,"獲取文本消息框", "請輸入文本信息:")
        print(f"item : {text}, ok : {result}, tpye : {type(result)}")
        if text and result:
            self.ledit_gettext.setText(text)


    def get_int(self):
        """獲取文本槽"""
        num,result = QInputDialog.getInt(self,"獲取整數消息框", "請輸入整數:")
        print(f"item : {num}, ok : {result}, tpye : {type(result)}")
        if num and result:
            self.ledit_getint.setText(str(num))


if __name__ == "__main__":
    """主程序運行"""
    app = QApplication(sys.argv)
    window = QInputDialogDemoView()
    window.show()
    sys.exit(app.exec())
結果:
主界面:
輸入選項:
輸入文本:
輸入整數:
關于“PyQt5怎么實現輸入對話框”這篇文章的內容就介紹到這里,感謝各位的閱讀!相信大家對“PyQt5怎么實現輸入對話框”知識都有一定的了解,大家如果還想學習更多知識,歡迎關注億速云行業資訊頻道。
免責聲明:本站發布的內容(圖片、視頻和文字)以原創、轉載和分享為主,文章觀點不代表本網站立場,如果涉及侵權請聯系站長郵箱:is@yisu.com進行舉報,并提供相關證據,一經查實,將立刻刪除涉嫌侵權內容。