溫馨提示×
您好,登錄后才能下訂單哦!
點擊 登錄注冊 即表示同意《億速云用戶服務條款》
您好,登錄后才能下訂單哦!
本篇內容主要講解“怎么用Vue.js開發網頁時鐘”,感興趣的朋友不妨來看看。本文介紹的方法操作簡單快捷,實用性強。下面就讓小編來帶大家學習“怎么用Vue.js開發網頁時鐘”吧!
父子通信的重點知識
1、子組件通過props屬性監聽從父組件中傳過來的值(值)
2、子組件通過$emit('方法名‘)來向父組件發出請求(方法)
3、學習vue必須要知道屬性只要綁定好后就是動態的模式(我個人理解),就只需要接收和請求就行了,不需要做其他的監聽操作
話不多說,上代碼
1、 創建模板
2、通過父子通信來對子組件的部分屬性進行監聽
<!DOCTYPE html>
<html lang="en">
<head>
    <meta charset="UTF-8">
    <title>Time</title>
    <link href="../css/index_css.css" rel="stylesheet">//采用外部連接的格式
</head>

<body>

<div id="content" class="content">
    <div id="over" @click="show()" :>{{o_style.value}}</div>
    <clock :cur_time="current_time" @get_hour="getHours()" @get_minute="getMinutes()" @get_second="getSeconds()"
         :hour_s="hour_style" :minute_s="minute_style" :second_s="second_style" :com_s="o_style">
    </clock>
</div>


//模板部分
<template id="time_template">
    <div class="root">
            <span :>12</span>
            <span :>3</span>
            <span :>6</span>
            <span :>9</span>
            <span class="over-point"></span>
            <div id="hour" :></div>
            <div id="minute" :></div>
            <div id="second" :></div>
            <div id="show_time">{{cur_time.hour}}:{{cur_time.minute}}:{{cur_time.second}}</div>
    </div>
</template>

<script src="../external_lib/vue.js"></script>//這里是vue.js包的導入
<script src="../js/index_js.js"></script>//采用外部連接的格式
<script src="../js/pageControl.js"></script>//采用外部連接的格式
</body>
</html>*{
margin:0px;
padding:0px;
}
body{
display: flex;
justify-content: center;
align-items: center;
align-content: center;
background:skyblue;
overflow: hidden;
}
#content{
position:relative;
width:100%;
height:100vh;
display:flex ;
justify-content: center;
align-content: center;
align-items: center;
}
.root{
width:500px;
height:500px;
border-radius: 50%;
border:2px solid grey;
position:relative;
top:50px;
background: url("../img/day.jpg") -170px;
background-size:cover;
overflow: hidden;
box-shadow: 0px 0px 15px gray;
}
.root>span,.root>div{
position:absolute;
font-size:20px;/*內部的每一個文字的大小*/
}
span:first-child{
left:240px;/*十二這個數字的x偏移量=(500/2)-(20/2)*/
top:10px;
z-index:10;
}
span:nth-child(2){
left:480px;/*3的x偏移量=(500-10)*/
top:240px;/*(500/2)-(20/2)*/
z-index:10;
}
span:nth-child(3){
left:250px;/*6*/
top:470px;
z-index:10;
}
span:nth-child(4){
left:10px;/*9*/
top:240px;
z-index:10;
}
span:nth-child(5){/*時鐘中間的骨架*/
left:225px;/*(500/2)-(50/2)*/
top:225px;/*(500/2)-(50/2)*/
display: inline-block;
width:50px;
height:50px;
line-height:50px;
text-align: center;
font-weight:bolder;
border-radius: 50%;
background:cadetblue;
box-shadow: 0px 0px 18px #5f9ea0,inset 0px 0px 10px #4faee0;
z-index:12;
}
#hour{
width:20px;
height:120px;
border-radius:12px;
background:white;
top:136px;
left:242px;
opacity:88%;
box-shadow: 0 0 18px whitesmoke;
z-index:11;
}
#minute{
width:15px;
height:160px;
border-radius:12px;
background:dodgerblue;
top:90px;
left:243px;
opacity: 0.85;
box-shadow: 0 0 18px deepskyblue;
z-index:11;
}
#second{
width:10px;
height:200px;
border-radius:12px;
background:gray;
top:50px;
left:250px;
opacity:0.8;
box-shadow: 0 0 18px snow;
z-index:11;
}
#show_time{
width:100px;
height:50px;
background:black;
opacity:0.6;
left:200px;
top:300px;
color:white;
text-align: center;
line-height:50px;
z-index:10;
}
#over{
position:absolute;
width:100%;
height:100vh;
color:white;
background:black;
opacity: 0.8;
transition:1s;
z-index:10;
}父子通信
/**子組件
 * 子組件的時針、分針、秒針都是通過父組件傳過來的值來設置它的偏移量
 */
let clock={
    template:'#time_template',
    data(){
        return{
            interval:'',//定時器對象
        }
    },
    props:{//監聽從父組件中傳過來的對象
        cur_time: '',
        com_s:{},
        hour_s:{},
        minute_s:{},
        second_s:{},
    },
    methods:{
            display(){
                this.interval=setInterval((e)=>{
                    this.setHours();
                    this.setMinutes();
                    this.setSeconds();
                },1000);
            },
            setHours(){
                this.$emit('get_hour');
            },
            setMinutes(){
                this.$emit('get_minute');
            },
            setSeconds(){
                this.$emit('get_second');
            },
    },
    created(){//讓方法在一開始就自動調用,一般適用于有定時器的方法
        this.display();
    }
};

/**
 * 父組件
 */
let fatherComponent=new Vue({
    el:'#content',
    data:{
        date:new Date(),
        current_time:{//表示當前時間的對象
            hour:'',
            minute:'',
            second:'',
        },
        //需要傳給子組件的對象
        hour_style: {},
        minute_style:{},
        second_style:{},
        //頁面樣式的初始化屬性
        o_style:{
           left:'97%',
            isNight:false,//監聽是白天還是黑夜,默認是白天
            value:'N-M',
        },
    },
    //通過子組件向父組件發起請求的方法
    methods:{
        getHours(){
            this.date=new Date();
            this.current_time.hour=this.date.getHours()>=10?this.date.getHours():'0'+this.date.getHours();
            let hour=this.date.getHours()%12+(this.date.getMinutes()+(this.date.getSeconds()/60)/60);
            this.hour_style={
                transformOrigin:'bottom center',
                transform:'rotate('+this.date.getHours()*30+'deg)',
            }
        },
        getMinutes(){
            this.date=new Date();
            this.current_time.minute=this.date.getMinutes()>=10?this.date.getMinutes():'0'+this.date.getMinutes();
            let m=this.date.getMinutes();
            this.minute_style={
                transformOrigin:'bottom center',
                transform:'rotate('+(m*6)+'deg)',//分為六十等分,每份為一分鐘
            }
        },
        getSeconds(){
            this.date=new Date();
            this.current_time.second=this.date.getSeconds()>=10?this.date.getSeconds():'0'+this.date.getSeconds();
            this.second_style={
                transformOrigin:'bottom center',
                transform:'rotate('+this.date.getSeconds()*6+'deg)',//將圓分為六十份,每份為一秒鐘。
            }
        },
        //對頁面對象的屬性進行修改
        show(){
            if(this.o_style.isNight){
                this.o_style.left='97%';
                this.o_style.isNight=false;
                this.o_style.value='N-M'
            }else{
                this.o_style.left='0%';
                this.o_style.isNight=true;
                this.o_style.value='D-M'
            }
        }
    },
    //在父組件內聲明子組件,這是必須的
    components:{
        clock
    }
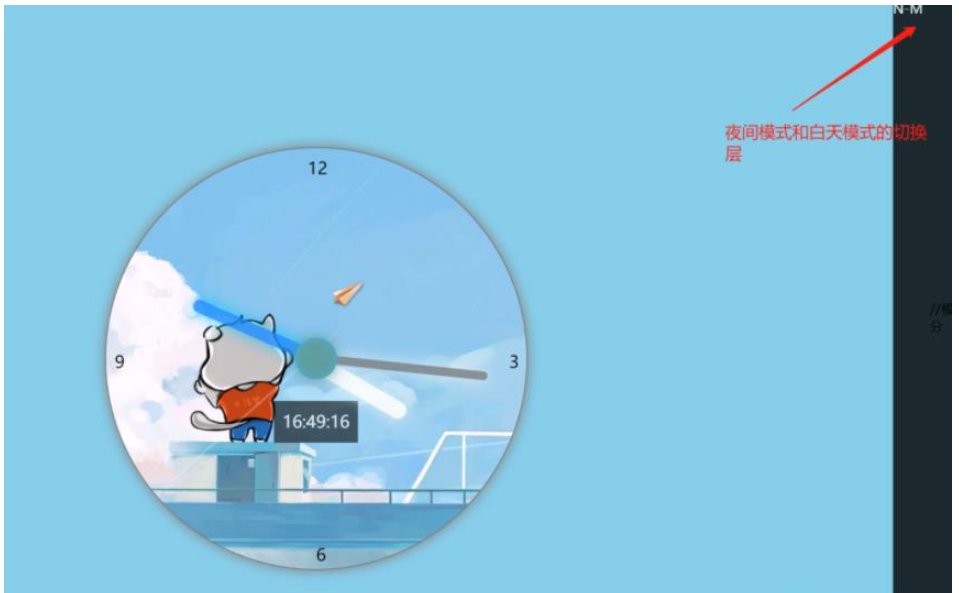
});白天模式:
在白天模式中,單擊N-M層就能變成夜間模式

夜晚模式:
在夜晚模式中單擊任何地方都可以變回白天模式
夜晚模式中每個指針都是發光的

到此,相信大家對“怎么用Vue.js開發網頁時鐘”有了更深的了解,不妨來實際操作一番吧!這里是億速云網站,更多相關內容可以進入相關頻道進行查詢,關注我們,繼續學習!
免責聲明:本站發布的內容(圖片、視頻和文字)以原創、轉載和分享為主,文章觀點不代表本網站立場,如果涉及侵權請聯系站長郵箱:is@yisu.com進行舉報,并提供相關證據,一經查實,將立刻刪除涉嫌侵權內容。