您好,登錄后才能下訂單哦!
您好,登錄后才能下訂單哦!
這篇文章主要介紹“SpringBoot如何實現登錄攔截器”,在日常操作中,相信很多人在SpringBoot如何實現登錄攔截器問題上存在疑惑,小編查閱了各式資料,整理出簡單好用的操作方法,希望對大家解答”SpringBoot如何實現登錄攔截器”的疑惑有所幫助!接下來,請跟著小編一起來學習吧!
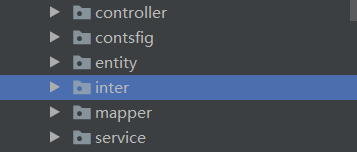
在項目目錄下建立兩個包:inter 與contsfig

在inter新建層中實現HandlerInterceptor的繼承類

package com.example.gameboxadminserver.inter;

import com.example.gameboxadminserver.entity.User;
import org.springframework.web.servlet.HandlerInterceptor;
import org.springframework.web.servlet.ModelAndView;

import javax.servlet.http.HttpServletRequest;
import javax.servlet.http.HttpServletResponse;
import javax.servlet.http.HttpSession;

public class MyInterceptor implements HandlerInterceptor {
	//在preHandle方法中進行登錄判斷
    @Override
    public boolean preHandle(HttpServletRequest request, HttpServletResponse response, Object handler) throws Exception {
        HttpSession session = request.getSession();
        //session.setAttribute("adminName","o");

        String adminName = (String)session.getAttribute("adminName");//獲取儲存的session
       //System.out.println(adminName);
        if(adminName==null){
            System.out.println("請先登陸!");
            return false;
        }
        return true;
    }

    @Override
    public void postHandle(HttpServletRequest request, HttpServletResponse response, Object handler, ModelAndView modelAndView) throws Exception {
        //System.out.println("執行了TestInterceptor的postHandle方法");
    }


    @Override
    public void afterCompletion(HttpServletRequest request, HttpServletResponse response, Object handler, Exception ex) throws Exception {

    }
}
在conrsfig中新增WebMvcConfiguer的繼承類LoginConfig

實現addInterceptors方法
package com.example.gameboxadminserver.contsfig;


import com.example.gameboxadminserver.inter.MyInterceptor;
import org.springframework.context.annotation.Configuration;
import org.springframework.web.servlet.config.annotation.InterceptorRegistration;
import org.springframework.web.servlet.config.annotation.InterceptorRegistry;
import org.springframework.web.servlet.config.annotation.WebMvcConfigurer;

@Configuration
public class LoginConfig implements WebMvcConfigurer {

    @Override
    public void addInterceptors(InterceptorRegistry registry) {
        //注冊攔截器
        InterceptorRegistration registration = registry.addInterceptor(new MyInterceptor());
        registration.addPathPatterns("/**");                      //所有路徑都被攔截
        registration.excludePathPatterns(
                //添加不攔截路徑
                "/admin/adminLogin",

        );
    }
}
在serviceImpl層
實現登錄邏輯并保存session
Httpsession session
session.setAttribute(“name”,value);
package com.example.gameboxadminserver.service.impl;

import com.example.gameboxadminserver.entity.Admin;
import com.example.gameboxadminserver.entity.Result;
import com.example.gameboxadminserver.entity.ResultUtil;
import com.example.gameboxadminserver.mapper.AdminMapper;
import com.example.gameboxadminserver.service.AdminService;
import com.baomidou.mybatisplus.extension.service.impl.ServiceImpl;
import org.springframework.beans.factory.annotation.Autowired;
import org.springframework.stereotype.Service;

import javax.servlet.http.HttpServletRequest;
import javax.servlet.http.HttpSession;

/**
 * <p>
 *  服務實現類
 * </p>
 *
 * @author firstGroup
 * @since 2020-10-28
 */
@Service
public class AdminServiceImpl extends ServiceImpl<AdminMapper, Admin> implements AdminService {
    @Autowired
    AdminMapper adminMapper;
    @Override
    public Result adminLogin(HttpSession session,String adminName, String adminPwd) {
        Admin admin = adminMapper.adminLogin(adminName,adminPwd);
        if(admin!=null){
            session.setAttribute("adminName",adminName);
            return ResultUtil.success("登陸成功!");
        }
        return ResultUtil.error(2000,"登陸失敗");
    }
}
這樣就寫完啦
功能測試
登陸失敗

無法訪問其他接口

登錄成功

成功訪問其他接口
到此,關于“SpringBoot如何實現登錄攔截器”的學習就結束了,希望能夠解決大家的疑惑。理論與實踐的搭配能更好的幫助大家學習,快去試試吧!若想繼續學習更多相關知識,請繼續關注億速云網站,小編會繼續努力為大家帶來更多實用的文章!
免責聲明:本站發布的內容(圖片、視頻和文字)以原創、轉載和分享為主,文章觀點不代表本網站立場,如果涉及侵權請聯系站長郵箱:is@yisu.com進行舉報,并提供相關證據,一經查實,將立刻刪除涉嫌侵權內容。