您好,登錄后才能下訂單哦!
您好,登錄后才能下訂單哦!
本篇內容主要講解“Java的@Autowired原理是什么”,感興趣的朋友不妨來看看。本文介紹的方法操作簡單快捷,實用性強。下面就讓小編來帶大家學習“Java的@Autowired原理是什么”吧!
構造函數注入
public Class Outer {
 private Inner inner;
 @Autowired
 public Outer(Inner inner) {
  this.inner = inner;
 }
}
屬性注入
public Class Outer {
 @Autowired
 private Inner inner;
}
方法注入
public Class Outer {
 private Inner inner;
 public Inner getInner() {
  return inner;
 }
 @Autowired
 public void setInner(Inner inner) {
  this.inner = inner;
 }
}
目前絕大部分的代碼都使用第2、第3種。第1種在bean實例化時完成,而第2、第3種的實現原理都是一樣的,在屬性填充時完成。本篇將介紹第二第三種的是實現原理
在開始之前,如果我們自己設計@Autowired,我們應該怎么實現?我想做法還是比較簡單的
通過反射查找bean的class下所有注解了@Autowired的字段和方法
獲取到字段,通過getBean(字段)獲取到對應bean,然后再通過反射調用field的set將bean注入
AutowiredAnnotationBeanPostProcessor類
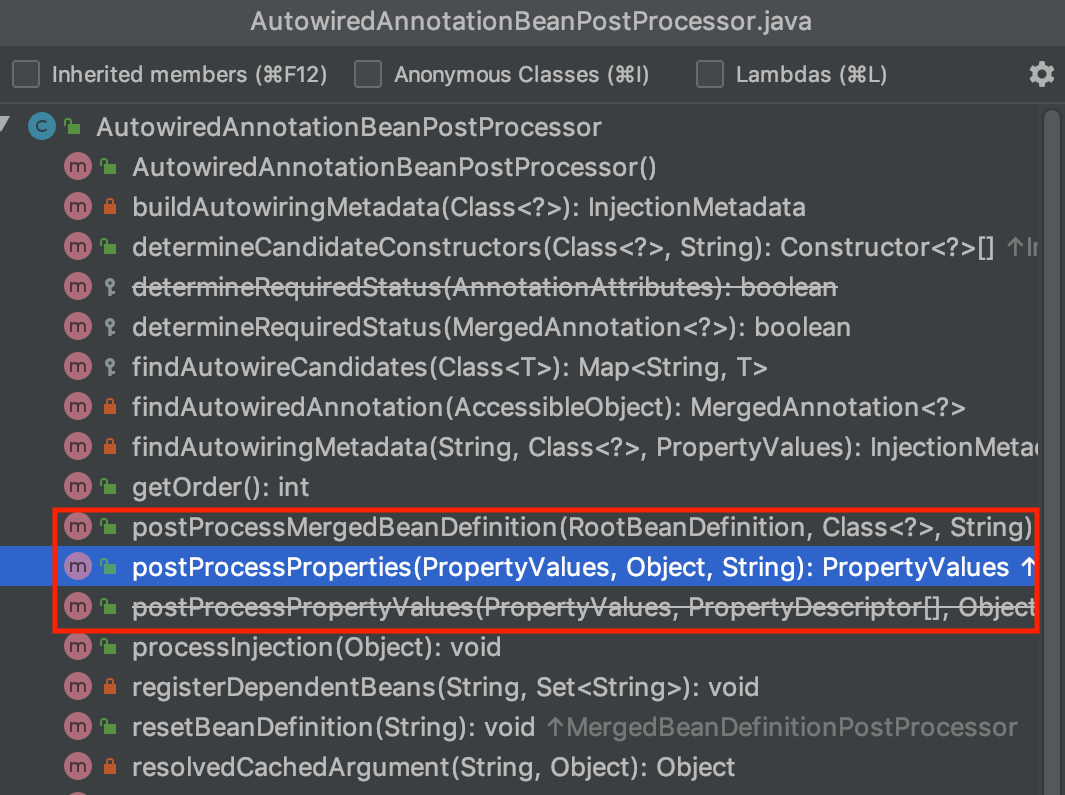
該類是@Autowired的具體實現類,先預覽一下類方法

發現實際有機會介入bean的創建操作只有可能是后置處理器,用于后置處理的有3個方法,其中一個過時不用,分別是postProcessMergedBeanDefinition、postProcessProperties后置處理,我們再看一下這2個方法的具體代碼
public class AutowiredAnnotationBeanPostProcessor extends InstantiationAwareBeanPostProcessorAdapter
  implements MergedBeanDefinitionPostProcessor, PriorityOrdered, BeanFactoryAware {
 ...
 @Override
 public void postProcessMergedBeanDefinition(RootBeanDefinition beanDefinition, Class<?> beanType, String beanName) {
  // 1. 尋找bean中所有被@Autowired注釋的屬性,并將屬性封裝成InjectedElement類型
  InjectionMetadata metadata = findAutowiringMetadata(beanName, beanType, null);
  metadata.checkConfigMembers(beanDefinition);
 }
 ...
 @Override
 public PropertyValues postProcessProperties(PropertyValues pvs, Object bean, String beanName) {
  // 1. 尋找通過@Autowired注解的屬性或者方法
  InjectionMetadata metadata = findAutowiringMetadata(beanName, bean.getClass(), pvs);
  try {
   // 2. 注入
   metadata.inject(bean, beanName, pvs);
  }
  catch (BeanCreationException ex) {
   throw ex;
  }
  catch (Throwable ex) {
   throw new BeanCreationException(beanName, "Injection of autowired dependencies failed", ex);
  }
  return pvs;
 }
 ...
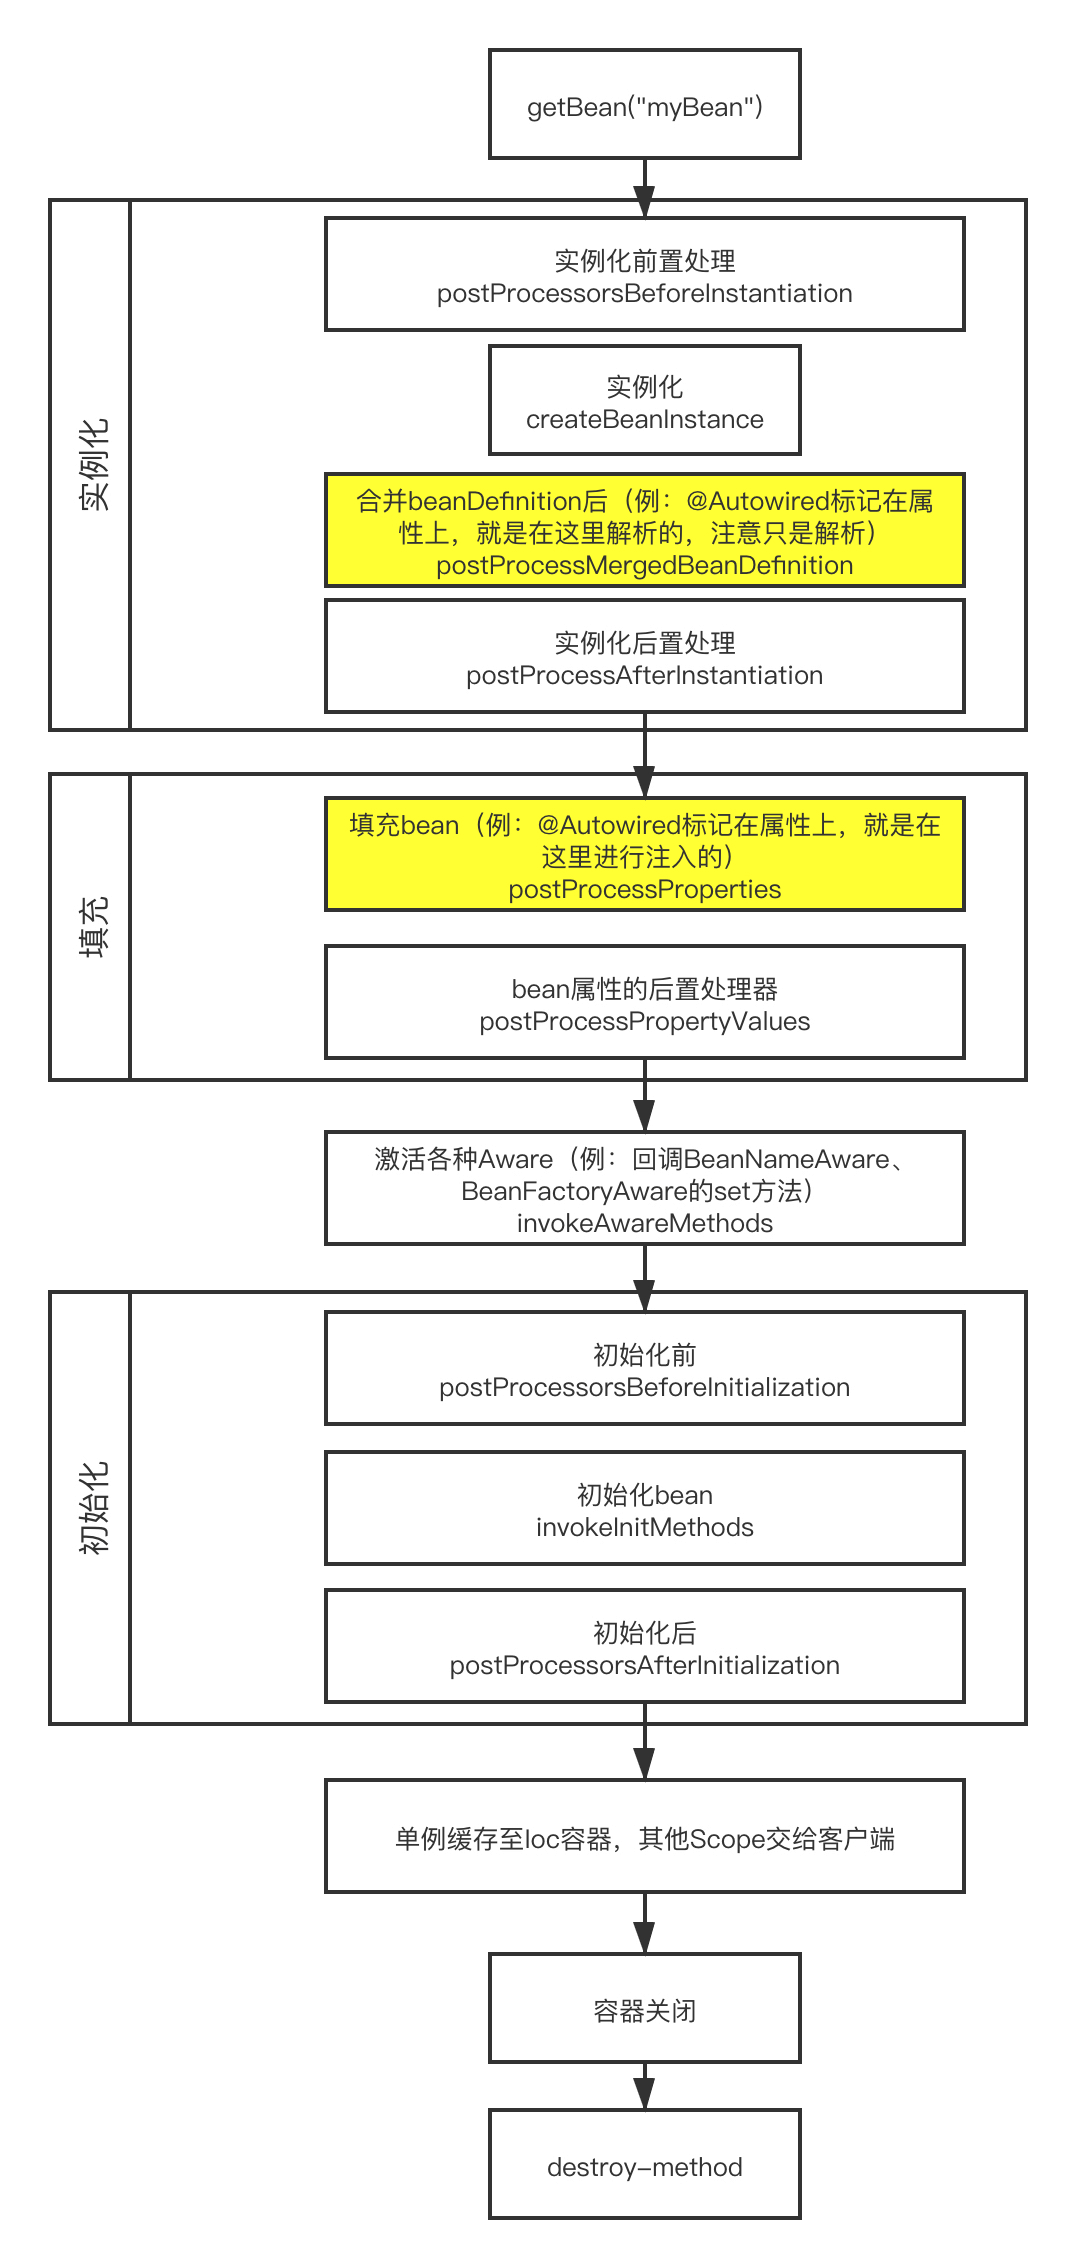
}跟我們的猜想是一樣的,首先先找出所有注解了@Autowired的屬性或者方法,然后進行注入,當然postProcessMergedBeanDefinition后置處理器的調用肯定是在postProcessProperties之前的,這里我們回顧一下spring bean的創建過程。
2個處理器我已用黃色標出

// 尋找bean中所有被@Autowired注釋的屬性,并將屬性封裝成InjectedElement類型
InjectionMetadata metadata = findAutowiringMetadata(beanName, beanType, null);
private InjectionMetadata findAutowiringMetadata(String beanName, Class<?> clazz, @Nullable PropertyValues pvs) {
  // Fall back to class name as cache key, for backwards compatibility with custom callers.
  // 獲取緩存的key值,一般以beanName做key
  String cacheKey = (StringUtils.hasLength(beanName) ? beanName : clazz.getName());
  // Quick check on the concurrent map first, with minimal locking.
  // 從緩存中獲取metadata
  InjectionMetadata metadata = this.injectionMetadataCache.get(cacheKey);
  // 檢測metadata是否需要更新
  if (InjectionMetadata.needsRefresh(metadata, clazz)) {
   synchronized (this.injectionMetadataCache) {
    metadata = this.injectionMetadataCache.get(cacheKey);
    if (InjectionMetadata.needsRefresh(metadata, clazz)) {
     if (metadata != null) {
      metadata.clear(pvs);
     }
     // 通過clazz類,查找所有@Autowired的屬性或者方法,并封裝成InjectionMetadata類型
     metadata = buildAutowiringMetadata(clazz);
     // 將metadata加入緩存
     this.injectionMetadataCache.put(cacheKey, metadata);
    }
   }
  }
  return metadata;
}可以看到spring依然在用緩存的方式提高性能,繼續跟蹤核心代碼buildAutowiringMetadata(clazz)
 private InjectionMetadata buildAutowiringMetadata(final Class<?> clazz) {
  // 查看clazz是否有Autowired注解
  if (!AnnotationUtils.isCandidateClass(clazz, this.autowiredAnnotationTypes)) {
   return InjectionMetadata.EMPTY;
  }
  // 這里需要注意AutowiredFieldElement,AutowiredMethodElement均繼承了InjectionMetadata.InjectedElement
  // 因此這個列表是可以保存注解的屬性和被注解的方法的
  List<InjectionMetadata.InjectedElement> elements = new ArrayList<>();
  Class<?> targetClass = clazz;
  // 1. 通過do while循環,遞歸的往直接繼承的父類尋找@Autowired
  do {
   final List<InjectionMetadata.InjectedElement> currElements = new ArrayList<>();
   // 2. 通過反射,獲取所有屬性,doWithLocalFields則是循環的對每個屬性應用以下匿名方法
   ReflectionUtils.doWithLocalFields(targetClass, field -> {
    // 判斷當前field屬性是否含有@Autowired的注解
    MergedAnnotation<?> ann = findAutowiredAnnotation(field);
    if (ann != null) {
     // 返回該屬性在類中的修飾符,如果等于static常量,則拋出異常,@Autowired不允許注解在靜態屬性上
     if (Modifier.isStatic(field.getModifiers())) {
      if (logger.isInfoEnabled()) {
       logger.info("Autowired annotation is not supported on static fields: " + field);
      }
      return;
     }
     // @Autowired有required屬性,獲取required的值,默認為true
     boolean required = determineRequiredStatus(ann);
     // 3. 將field封裝成InjectedElement,并添加到集合中,這里用的是AutowiredFieldElement
     currElements.add(new AutowiredFieldElement(field, required));
    }
   });
   // 4. @Autowired可以注解在方法上
   ReflectionUtils.doWithLocalMethods(targetClass, method -> {
    Method bridgedMethod = BridgeMethodResolver.findBridgedMethod(method);
    if (!BridgeMethodResolver.isVisibilityBridgeMethodPair(method, bridgedMethod)) {
     return;
    }
    MergedAnnotation<?> ann = findAutowiredAnnotation(bridgedMethod);
    if (ann != null && method.equals(ClassUtils.getMostSpecificMethod(method, clazz))) {
     if (Modifier.isStatic(method.getModifiers())) {
      if (logger.isInfoEnabled()) {
       logger.info("Autowired annotation is not supported on static methods: " + method);
      }
      return;
     }
     if (method.getParameterCount() == 0) {
      if (logger.isInfoEnabled()) {
       logger.info("Autowired annotation should only be used on methods with parameters: " +
         method);
      }
     }
     boolean required = determineRequiredStatus(ann);
     PropertyDescriptor pd = BeanUtils.findPropertyForMethod(bridgedMethod, clazz);
     // 5. 將方法封裝成InjectedElement,并添加到集合中,這里用的是AutowiredMethodElement
     currElements.add(new AutowiredMethodElement(method, required, pd));
    }
   });
   elements.addAll(0, currElements);
   // 返回直接繼承的父類
   targetClass = targetClass.getSuperclass();
  }
  // 如果父類不為空則需要把父類的@Autowired屬性或方法也找出
  while (targetClass != null && targetClass != Object.class);
  // 6. new InjectionMetadata(clazz, elements),將找到的所有的待注入屬性或方法生成metadata返回
  return InjectionMetadata.forElements(elements, clazz);
 }
外層 do … while … 的循環被用于遞歸的查找父類的@Autowired屬性或方法
通過反射的方式獲取到所有屬性并循環驗證每一個屬性是否被@Autowired注解
將查找到包含@Autowired注解的filed封裝成AutowiredFieldElement,加入到列表中
循環查找在方法上的注解
將找到的方法封裝成AutowiredMethodElement,并加入列表
這里需要特別強調一點,InjectedElement被AutowiredFieldElement、AutowiredMethodElement所繼承,他們都有各自的inject函數,實現各自的注入。因此改ArrayList elements是擁有2種類型的屬性

將找到的所有元素列表和clazz作為參數生成metadata數據返回
// 注入
metadata.inject(bean, beanName, pvs);
 public void inject(Object target, @Nullable String beanName, @Nullable PropertyValues pvs) throws Throwable {
  // 獲取所有需要被注入的元素
  Collection<InjectedElement> checkedElements = this.checkedElements;
  Collection<InjectedElement> elementsToIterate =
    (checkedElements != null ? checkedElements : this.injectedElements);
  // 迭代的元素不為空
  if (!elementsToIterate.isEmpty()) {
   for (InjectedElement element : elementsToIterate) {
    if (logger.isTraceEnabled()) {
     logger.trace("Processing injected element of bean '" + beanName + "': " + element);
    }
    // 循環注入,這里有可能是AutowiredFieldElement也可能AutowiredMethodElement,因此調用的inject是2個不同的方法
    element.inject(target, beanName, pvs);
   }
  }
 }
利用for循環,遍歷剛剛我們查到到的elements列表,進行注入。
在上面有特別提醒,這里的element有可能是AutowiredFieldElement類型、或AutowiredMethodElement類型。各自代表@Autowired注解在屬性上、以及注解在方法上的2種不同元素。因此他們調用的element.inject(target, beanName, pvs);也是不一樣的
 private class AutowiredFieldElement extends InjectionMetadata.InjectedElement {
  @Override
  protected void inject(Object bean, @Nullable String beanName, @Nullable PropertyValues pvs) throws Throwable {
   Field field = (Field) this.member;
   Object value;
   if (this.cached) {
    value = resolvedCachedArgument(beanName, this.cachedFieldValue);
   }
   else {
    // 專門用于注入的包裝類,包裝構造函數參數,方法參數或字段
    DependencyDescriptor desc = new DependencyDescriptor(field, this.required);
    // 設置class
    desc.setContainingClass(bean.getClass());
    // 需要被自動注入的beanNames,這里只有可能 = 1,方法注入時才有可能為多個
    Set<String> autowiredBeanNames = new LinkedHashSet<>(1);
    Assert.state(beanFactory != null, "No BeanFactory available");
    TypeConverter typeConverter = beanFactory.getTypeConverter();// 獲取類型轉換器
    try {
     // 通過beanFactory獲取屬性對應的值,比如需要調用getBean("b")獲取依賴的屬性單例,并且通過自動轉型轉為需要的類型
     value = beanFactory.resolveDependency(desc, beanName, autowiredBeanNames, typeConverter);
    }
    catch (BeansException ex) {
     throw new UnsatisfiedDependencyException(null, beanName, new InjectionPoint(field), ex);
    }
    synchronized (this) {
     if (!this.cached) {
      if (value != null || this.required) {
       this.cachedFieldValue = desc;
       // 注冊依賴,
       registerDependentBeans(beanName, autowiredBeanNames);
       // 因為是屬性注入,因此這里只有可能等于1
       if (autowiredBeanNames.size() == 1) {
        String autowiredBeanName = autowiredBeanNames.iterator().next();
        if (beanFactory.containsBean(autowiredBeanName) &&
          beanFactory.isTypeMatch(autowiredBeanName, field.getType())) {
         // 緩存當前value
         this.cachedFieldValue = new ShortcutDependencyDescriptor(
           desc, autowiredBeanName, field.getType());
        }
       }
      }
      else {
       this.cachedFieldValue = null;
      }
      this.cached = true;
     }
    }
   }
   if (value != null) {
    // 通過反射,將value值設置到bean中
    ReflectionUtils.makeAccessible(field);
    field.set(bean, value);
   }
  }
 }
上方大部分的工作都在做待注入bean的獲取以及類型的轉換,如果深究下去可以再把spring Ioc講一遍,但是核心還是getBean(字段)獲取到對應bean…我們這里就關心核心的語句,就是這2句
if (value != null) {
    // 通過反射,將value值設置到bean中
    ReflectionUtils.makeAccessible(field);
    field.set(bean, value);
}
spring通過反射的方式,調用field的set進行屬性的注入
 private class AutowiredMethodElement extends InjectionMetadata.InjectedElement {
  @Override
  protected void inject(Object bean, @Nullable String beanName, @Nullable PropertyValues pvs) throws Throwable {
   if (checkPropertySkipping(pvs)) {
    return;
   }
   // @Autowired標注在方法上
   Method method = (Method) this.member;
   Object[] arguments;
   if (this.cached) {
    // Shortcut for avoiding synchronization...
    // 有緩存
    arguments = resolveCachedArguments(beanName);
   }
   else {
    // 沒緩存,直接獲取方法上所有的參數
    int argumentCount = method.getParameterCount();
    arguments = new Object[argumentCount];
    DependencyDescriptor[] descriptors = new DependencyDescriptor[argumentCount];
    Set<String> autowiredBeans = new LinkedHashSet<>(argumentCount);
    Assert.state(beanFactory != null, "No BeanFactory available");
    TypeConverter typeConverter = beanFactory.getTypeConverter();
    // 循環所有參數
    for (int i = 0; i < arguments.length; i++) {
     MethodParameter methodParam = new MethodParameter(method, i);
     DependencyDescriptor currDesc = new DependencyDescriptor(methodParam, this.required);
     currDesc.setContainingClass(bean.getClass());
     descriptors[i] = currDesc;
     try {
      // 通過beanFactory,獲取代注入的bean,并進行類型轉換
      Object arg = beanFactory.resolveDependency(currDesc, beanName, autowiredBeans, typeConverter);
      if (arg == null && !this.required) {
       arguments = null;
       break;
      }
      arguments[i] = arg;
     }
     catch (BeansException ex) {
      throw new UnsatisfiedDependencyException(null, beanName, new InjectionPoint(methodParam), ex);
     }
    }
    synchronized (this) {
     if (!this.cached) {
      if (arguments != null) {
       DependencyDescriptor[] cachedMethodArguments = Arrays.copyOf(descriptors, arguments.length);
       // 注冊依賴
       registerDependentBeans(beanName, autowiredBeans);
       // 如果自動注入的個數 = 參數個數,則緩存
       if (autowiredBeans.size() == argumentCount) {
        Iterator<String> it = autowiredBeans.iterator();
        Class<?>[] paramTypes = method.getParameterTypes();
        for (int i = 0; i < paramTypes.length; i++) {
         String autowiredBeanName = it.next();
         if (beanFactory.containsBean(autowiredBeanName) &&
           beanFactory.isTypeMatch(autowiredBeanName, paramTypes[i])) {
          // 緩存
          cachedMethodArguments[i] = new ShortcutDependencyDescriptor(
            descriptors[i], autowiredBeanName, paramTypes[i]);
         }
        }
       }
       // 緩存方法
       this.cachedMethodArguments = cachedMethodArguments;
      }
      else {
       this.cachedMethodArguments = null;
      }
      this.cached = true;
     }
    }
   }
   if (arguments != null) {
    try {
     // 反射調用注入方法,將獲取到的所有bean作為參數
     ReflectionUtils.makeAccessible(method);
     method.invoke(bean, arguments);
    }
    catch (InvocationTargetException ex) {
     throw ex.getTargetException();
    }
   }
  }
}這里與屬性注入最大的區別在于,@Autowired注解在方法上,方法可以擁有多個參數,因此這里需要通過循環將一個個獲取,而獲取bean的方式于上面一樣,本質都是通過getBean獲取。
而核心語句還是2句
// 反射調用注入方法,將獲取到的所有bean作為參數
ReflectionUtils.makeAccessible(method);
method.invoke(bean, arguments);
與屬性注入不同的是,當@Autowired注解在方法上,例如我們注解在setter方法上,則只需要直接調用該setter方法將參數數組傳入即可以,即使用invoke觸發方法,具體屬性賦值的過程在setter方法中由用戶自行編寫
到此,相信大家對“Java的@Autowired原理是什么”有了更深的了解,不妨來實際操作一番吧!這里是億速云網站,更多相關內容可以進入相關頻道進行查詢,關注我們,繼續學習!
免責聲明:本站發布的內容(圖片、視頻和文字)以原創、轉載和分享為主,文章觀點不代表本網站立場,如果涉及侵權請聯系站長郵箱:is@yisu.com進行舉報,并提供相關證據,一經查實,將立刻刪除涉嫌侵權內容。