您好,登錄后才能下訂單哦!
您好,登錄后才能下訂單哦!
這篇文章主要介紹“react路由跳轉的方式有哪些”的相關知識,小編通過實際案例向大家展示操作過程,操作方法簡單快捷,實用性強,希望這篇“react路由跳轉的方式有哪些”文章能幫助大家解決問題。
方式:1、利用params,參數會顯示在地址欄,語法“...({pathname:...,search:地址欄數據})”;2、利用state,地址欄看不到數據,語法“...({pathname:...,state:{test:...}}”。
本教程操作環境:Windows10系統、react17.0.1版、Dell G3電腦。
注意: 這里使用的react-router-dom是版本5以上,路由形式是history模式react-router-dom文檔地址,其中依賴包history的github地址
params形式,路由跳轉后,參數會顯示在地址欄
跳轉的方法是使用history.push({pathname: '/personal', search: 'test=22222'}),其中search鍵對應的值就是拼接在地址欄的數據
import React from 'react'import { useHistory } from 'react-router-dom'export default ()=> {
	const history = useHistory()
	// 頁面跳轉方法
	history.push({pathname: '/personal', search: 'test=22222'})
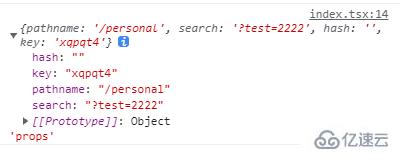
return 123}接收的方法。數據都是存儲在useLocation中的search獲取
import React from 'react'import { useLocation } from 'react-router-dom'export default ()=> {
	const location = useLocation()
	// 頁面跳轉方法
	console.log(location, 'props')
	return 123}
state的形式,頁面刷新不會丟失數據,并且地址欄也看不到數據跳轉的方法是使用history.push({pathname: '/personal', state: {test: 'dashboard'}}),其中search鍵對應的值就是拼接在地址欄的數據
import React from 'react'import { useHistory } from 'react-router-dom'export default ()=> {
	const history = useHistory()
	// 頁面跳轉方法
	history.push({pathname: '/personal', state: { test: 'dashboard' }})
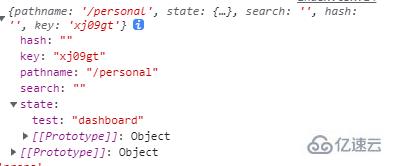
return 123}接收的方法。數據都是存儲在useLocation中的search獲取
import React from 'react'import { useLocation } from 'react-router-dom'export default ()=> {
	const location = useLocation()
	// 頁面跳轉方法
	console.log(location, 'props')
	return 123}
關于“react路由跳轉的方式有哪些”的內容就介紹到這里了,感謝大家的閱讀。如果想了解更多行業相關的知識,可以關注億速云行業資訊頻道,小編每天都會為大家更新不同的知識點。
免責聲明:本站發布的內容(圖片、視頻和文字)以原創、轉載和分享為主,文章觀點不代表本網站立場,如果涉及侵權請聯系站長郵箱:is@yisu.com進行舉報,并提供相關證據,一經查實,將立刻刪除涉嫌侵權內容。