您好,登錄后才能下訂單哦!
您好,登錄后才能下訂單哦!
本文小編為大家詳細介紹“基于PHP怎么實現JWT登錄鑒權”,內容詳細,步驟清晰,細節處理妥當,希望這篇“基于PHP怎么實現JWT登錄鑒權”文章能幫助大家解決疑惑,下面跟著小編的思路慢慢深入,一起來學習新知識吧。
JWT(JSON Web Token)是為了在網絡應用環境間傳遞聲明而執行的一種基于JSON的開放標準。
簡單的說,JWT就是一種Token的編碼算法,服務器端負責根據一個密碼和算法生成Token,然后發給客戶端,客戶端只負責后面每次請求都在HTTP header里面帶上這個Token,服務器負責驗證這個Token是不是合法的,有沒有過期等,并可以解析出subject和claim里面的數據。
第一部分為頭部(header),第二部分我們稱其為載荷(payload),第三部分是簽證(signature)。【中間用 . 分隔】
一個標準的JWT生成的token格式如下:
eyJ0eXAiOiJKV1QiLCJhbGciOiJIUzI1NiIsImp0aSI6IjRmMWcyM2ExMmFhMTEifQ.eyJpc3MiOiJodHRwOlwvXC9leGFtcGxlLmNvbSIsImF1ZCI6Imh0dHA6XC9cL2V4YW1wbGUub3JnIiwianRpIjoiNGYxZzIzYTEyYWExMSIsImlhdCI6MTY0MDE3MTA1MywibmJmIjoxNjQwMTcxMDU0LCJleHAiOjE2NDAxNzQ2NTMsInVpZCI6MjAsInVzZXJuYW1lIjoiTWFrZSJ9.bysUwNIyhqqEyL0JecSHdplSTfE6G6zuCsrAn6eyrQM
使用https://jwt.io/這個網站對JWT Token進行解析的結果如下

驗證流程:
① 在頭部信息中聲明加密算法和常量, 然后把header使用json轉化為字符串
② 在載荷中聲明用戶信息,同時還有一些其他的內容;再次使用json 把載荷部分進行轉化,轉化為字符串
③ 使用在header中聲明的加密算法和每個項目隨機生成的secret來進行加密, 把第一步分字符串和第二部分的字符串進行加密, 生成新的字符串。詞字符串是獨一無二的。
④ 解密的時候,只要客戶端帶著JWT來發起請求,服務端就直接使用secret進行解密。
特點:
① 三部分組成,每一部分都進行字符串的轉化
② 解密的時候沒有使用數據庫,僅僅使用的是secret進行解密
③ JWT的secret千萬不能泄密!
④ 不依賴數據庫,而是直接根據token取出保存的用戶信息,以及對token可用性校驗,校驗方式更加簡單便捷化,單點登錄更為簡單。
JWT Token需要持久化在redis、Memcached中嗎?
不應該這樣做,無狀態的jwt變成了有狀態了,背離了JWT通過算法驗證的初心。
在退出登錄時怎樣實現JWT Token失效呢?
退出登錄, 只要客戶端端把Token丟棄就可以了,服務器端不需要廢棄Token。
怎樣保持客戶端長時間保持登錄狀態?
服務器端提供刷新Token的接口, 客戶端負責按一定的邏輯刷新服務器Token。
composer require lcobucci/jwt 3.*
簽發token, 設置簽發人、接收人、唯一標識、簽發時間、立即生效、過期時間、用戶id、用戶username、簽名。其中,用戶id、用戶username是特意存儲在token中的信息,也可以增加一些其他信息,這樣在解析的時候就可以直接獲取到這些信息,不能是敏感數據
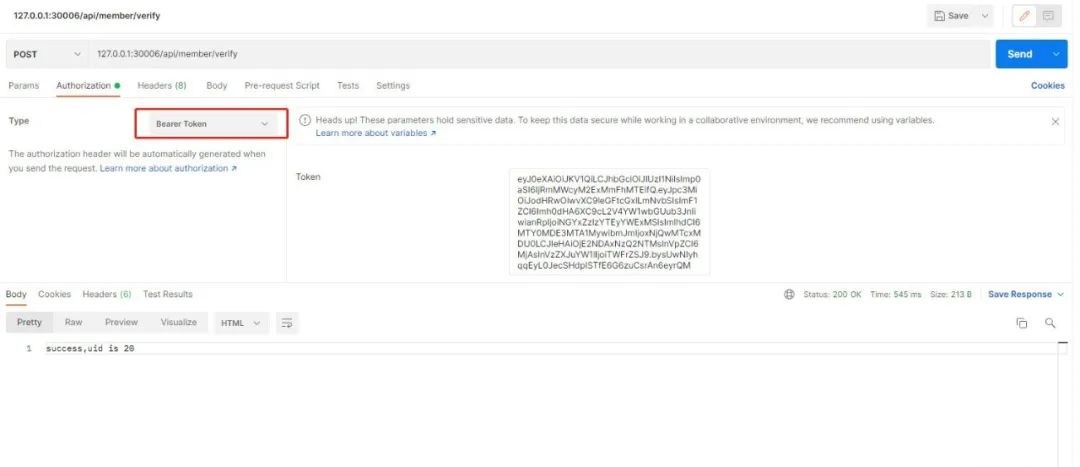
驗證令牌驗證這個Token是不是合法的,有沒有過期等,并可以解析出subject和claim里面的數據,傳遞jwt token的方式為Authorization中的Bearer Token,如下

<?php
/**
 * Created by PhpStorm
 * @author sxd
 */

namespace App\Utils;


use Lcobucci\JWT\Configuration;
use Lcobucci\JWT\Parser;
use Lcobucci\JWT\Signer\Hmac\Sha256;
use Lcobucci\JWT\Signer\Key\InMemory;
use Lcobucci\JWT\Token\Plain;
use Lcobucci\JWT\Validation\Constraint\IdentifiedBy;
use Lcobucci\JWT\Validation\Constraint\IssuedBy;
use Lcobucci\JWT\Validation\Constraint\PermittedFor;
use Lcobucci\JWT\ValidationData;

class JwtUtil
{
    // jwt github: https://github.com/lcobucci/jwt     https://jwt.io/
    protected $issuer = "http://example.com";
    protected $audience = "http://example.org";
    protected $id = "4f1g23a12aa11";
    // key 是絕對不允許泄露的
    protected static $key = "8swQsm1Xb0TA0Jw5ASPwClKVZPoTyS7GvhtaW0MxzKEihs1BNpcS2q3FYMJ11111";

    /**
     * 簽發令牌
     */
    public function getToken()
{
        $time = time();
        $config = self::getConfig();
        assert($config instanceof Configuration);

        // 簽發token, 設置簽發人、接收人、唯一標識、簽發時間、立即生效、過期時間、用戶id、用戶username、簽名
        $token = $config->builder()
            ->issuedBy($this->issuer) // Configures the issuer (iss claim)
            ->permittedFor($this->audience) // Configures the audience (aud claim)
            ->identifiedBy($this->id, true) // Configures the id (jti claim), replicating as a header item
            ->issuedAt($time) // Configures the time that the token was issue (iat claim)
            ->canOnlyBeUsedAfter($time + 1) // Configures the time that the token can be used (nbf claim)  簽發x秒鐘后生效
            ->expiresAt($time + 3600) // Configures the expiration time of the token (exp claim)
            ->withClaim('uid', 20) // Configures a new claim, called "uid"
            ->withClaim('username', "Make") // Configures a new claim, called "uid"
            ->getToken($config->signer(), $config->signingKey()); // Retrieves the generated token
        return $token->toString();
    }

    /**
     * 驗證 jwt token 并返回其中的用戶id
     * verify token
     */
    public function verifyToken_bak($token)
{
        try {
            $config = self::getConfig();
            assert($config instanceof Configuration);

            $token = $config->parser()->parse($token);
            assert($token instanceof Plain);

            //Lcobucci\JWT\Validation\Constraint\IdentifiedBy: 驗證jwt id是否匹配
            //Lcobucci\JWT\Validation\Constraint\IssuedBy: 驗證簽發人參數是否匹配
            //Lcobucci\JWT\Validation\Constraint\PermittedFor: 驗證受眾人參數是否匹配
            //Lcobucci\JWT\Validation\Constraint\RelatedTo: 驗證自定義cliam參數是否匹配
            //Lcobucci\JWT\Validation\Constraint\SignedWith: 驗證令牌是否已使用預期的簽名者和密鑰簽名
            //Lcobucci\JWT\Validation\Constraint\StrictValidAt: ::驗證存在及其有效性的權利要求中的iat,nbf和exp(支持余地配置
            //Lcobucci\JWT\Validation\Constraint\LooseValidAt: 驗證的權利要求iat,nbf和exp,當存在時(支持余地配置)

            //驗證jwt id是否匹配
            $validate_jwt_id = new IdentifiedBy($this->id);
            //驗證簽發人url是否正確
            $validate_issued = new IssuedBy($this->issuer);
            //驗證客戶端url是否匹配
            $validate_aud = new PermittedFor($this->audience);
            $config->setValidationConstraints($validate_jwt_id, $validate_issued, $validate_aud);

            $constraints = $config->validationConstraints();

            if (!$config->validator()->validate($token, ...$constraints)) {
                die("token invalid!");
            }
        } catch (\Exception $e) {
            die("error:" . $e->getMessage());
        }
        $jwtInfo = $token->claims();  // 這是jwt token中存儲的所有信息
        return $jwtInfo->get("uid");  // 獲取uid
    }

    /**
     * 加密解密使用的配置
     * @return Configuration
     */
    public static function getConfig()
{
        $configuration = Configuration::forSymmetricSigner(
        // You may use any HMAC variations (256, 384, and 512)
            new Sha256(),
            // replace the value below with a key of your own!
            InMemory::base64Encoded(self::$key)
        // You may also override the JOSE encoder/decoder if needed by providing extra arguments here
        );
        return $configuration;
    }

    /**
     * 另一種驗證方法,但是已經棄用
     * verify token
     */
    public function verifyToken($token)
{
        $token = (new Parser())->parse((string)$token);
        //驗證token
        $data = new ValidationData();
        $data->setIssuer($this->issuer);//驗證的簽發人
        $data->setAudience($this->audience);//驗證的接收人
        $data->setId($this->id);//驗證token標識

        if (!$token->validate($data)) {
            //token驗證失敗
            die("token invalid!");
        }
        $jwtInfo = $token->claims();  // 這是jwt token中存儲的所有信息
        return $jwtInfo->get("uid");  // 獲取uid
    }

}
讀到這里,這篇“基于PHP怎么實現JWT登錄鑒權”文章已經介紹完畢,想要掌握這篇文章的知識點還需要大家自己動手實踐使用過才能領會,如果想了解更多相關內容的文章,歡迎關注億速云行業資訊頻道。
免責聲明:本站發布的內容(圖片、視頻和文字)以原創、轉載和分享為主,文章觀點不代表本網站立場,如果涉及侵權請聯系站長郵箱:is@yisu.com進行舉報,并提供相關證據,一經查實,將立刻刪除涉嫌侵權內容。