您好,登錄后才能下訂單哦!
您好,登錄后才能下訂單哦!
本篇內容主要講解“SpringBoot2的profile功能是什么與怎么自定義starter”,感興趣的朋友不妨來看看。本文介紹的方法操作簡單快捷,實用性強。下面就讓小編來帶大家學習“SpringBoot2的profile功能是什么與怎么自定義starter”吧!
為了方便多環境適配,SpringBoot簡化了profile功能,具體的使用規則如下: ①在resources文件夾下可以一次創建多個application-xxx.yaml配置文件,分別對應著不同的生產、測試等環境,但是只有命名為application.yaml(或者后綴.properties的文件)文件會默認加載,所以說其他環境的配置文件中的配置信息都不會生效。
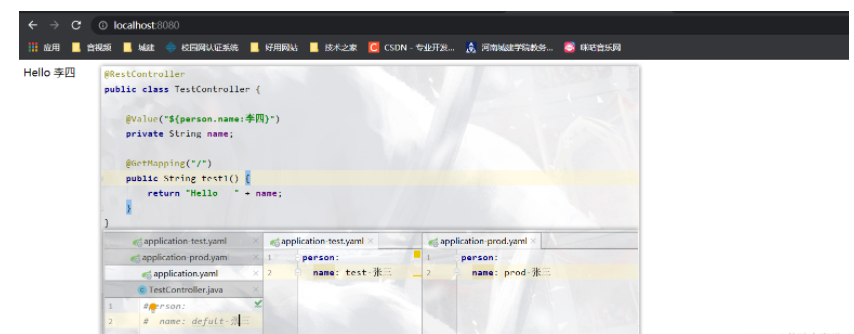
??②如果是想切換配置文件環境的話,就可以在默認配置文件中配置
spring:
profiles:
active: test

??③當不同配置文件的配置項產生沖突的時候,首先若是其他環境都沒有激活的話使用默認配置文件的配置,若是在默認配置文件中激活了其他環境的配置就按激活的配置
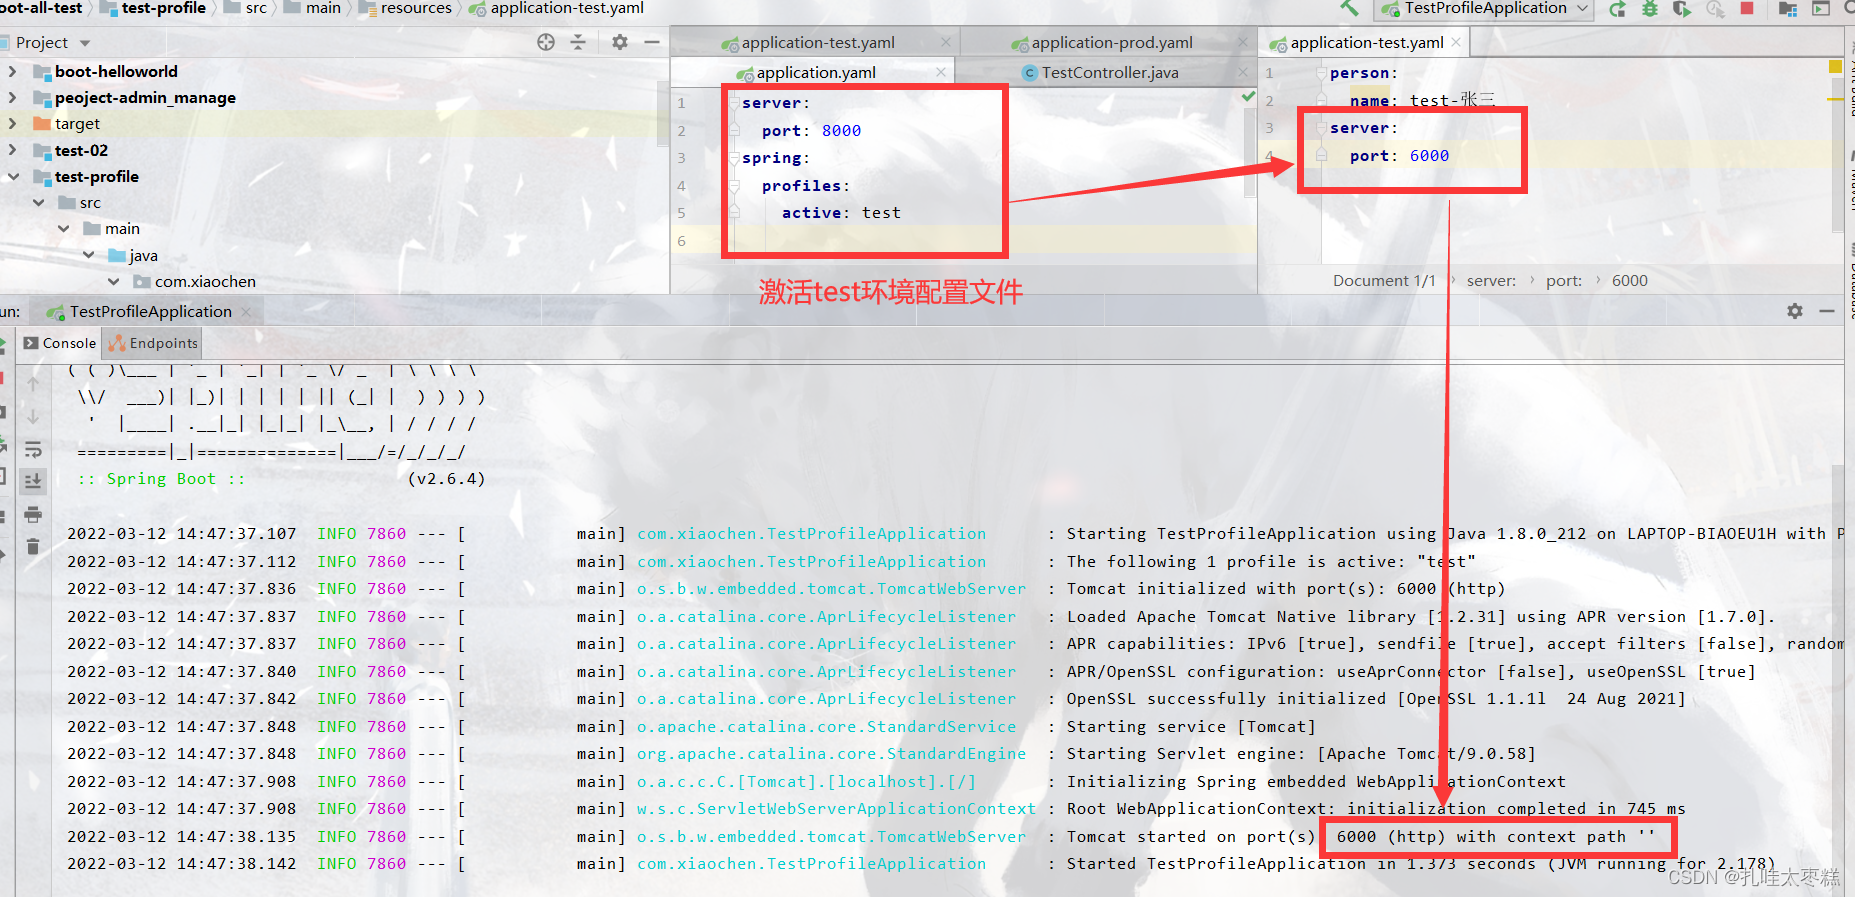
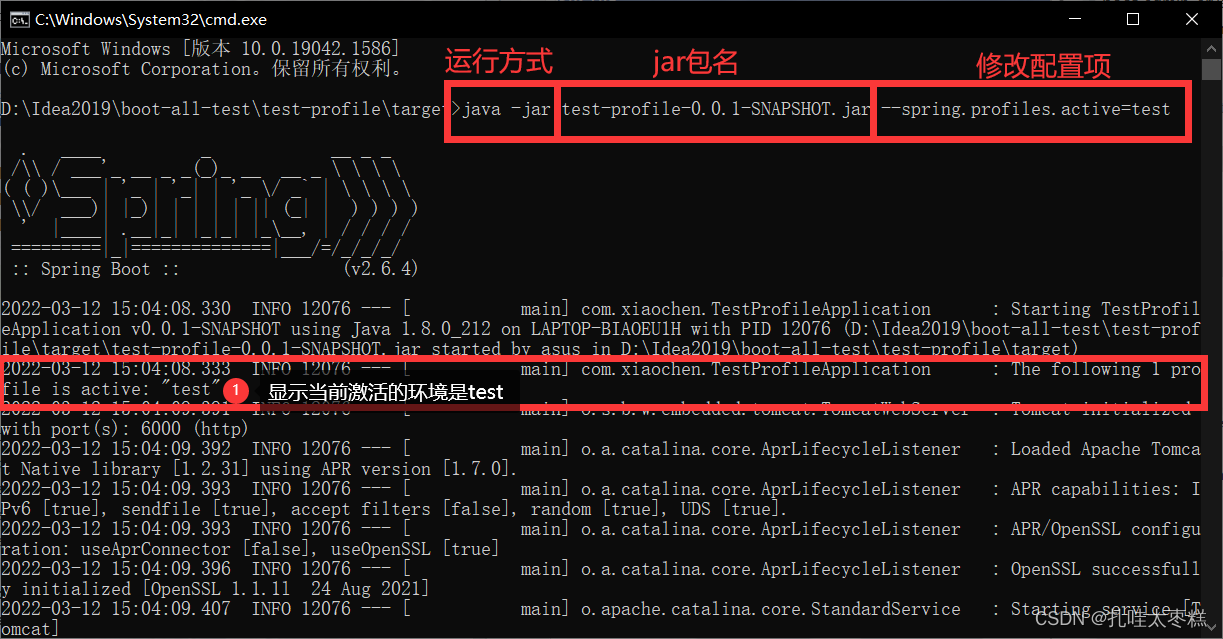
??④使用命令行運行jar包期間可以不用重新修改配置文件再次打包,可以通過命令行參數配置進行修改激活的環境。首先需要對項目進行打包并打開jar包的存儲位置
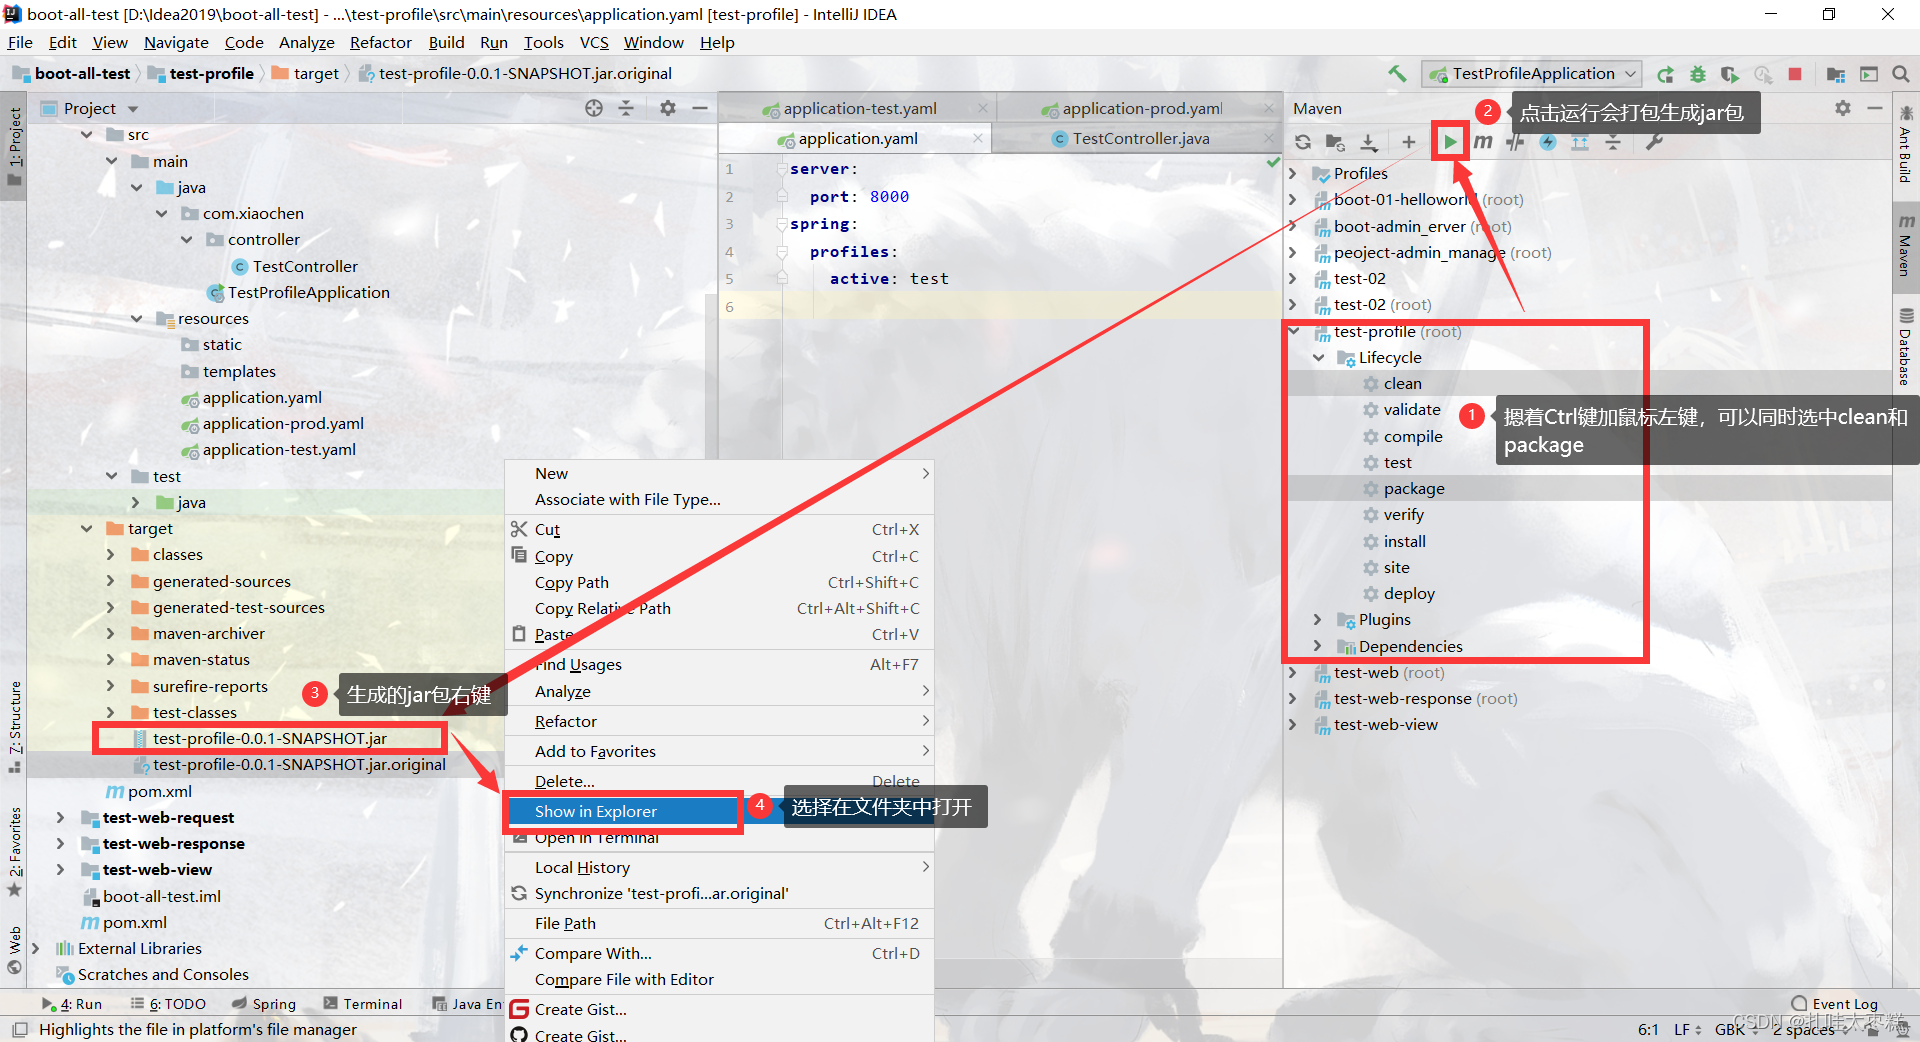
進入dos窗口輸入命令修改環境并運行jar包
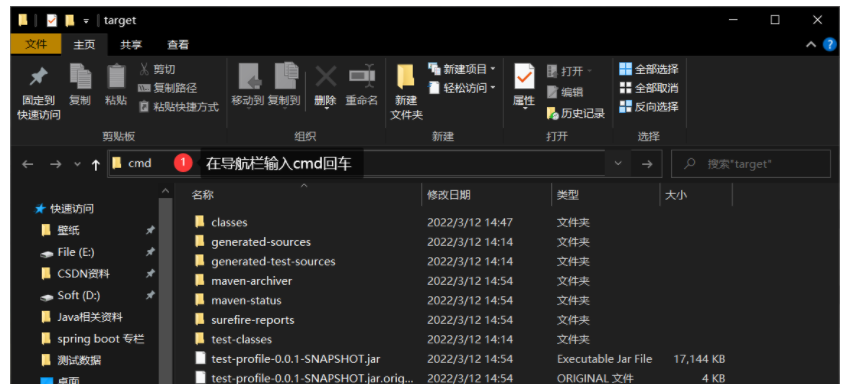
java -jar test-profile-0.0.1-SNAPSHOT.jar --spring.profiles.active=test
⑤我們該可以使用@Profile(“xxx”)注解標注在類、方法或參數綁定上,表示在指定環境下才會執行該類、方法或者進行配置文件與POJO類的綁定

??常用可以作為外部配置源的有:Java屬性文件、YAML文件、環境變量、命令行參數。其中配置文件的默認掃描位置也不只單單一個,以下五個位置都能被SpringBoot默認掃到,加載順序由高到低但是優先級相反(也就是說配置項相同的時候后面的可以覆蓋前面的):(1) classpath 根路徑(2) classpath 根路徑下config目錄(3) 項目jar包同層級(4) 項目jar包同層級的config目錄(5) config目錄的直接子目錄
??SpringBoot的starter場景啟動器想必大家都不陌生,在SpringBoot開發的時候不管進行什么開發只要用到哪種技術第一都是引入它的starter場景啟動器,接下來讓我們根據SpringBoot中的源碼自定義一個場景啟動器。
第一步: 使用Spring Initializr創建一個SpringBoot項目作為autoconfiguration,構建項目目錄如下:
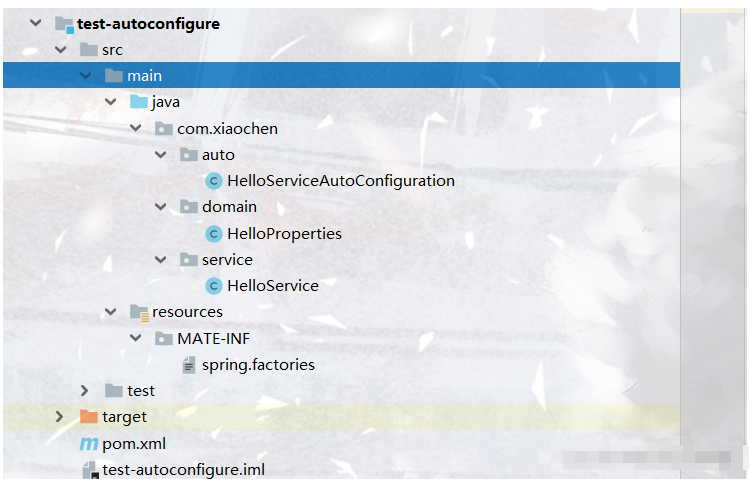
封裝自定義starter業務的HelloService
/**
 * @author : mereign
 * @date : 2022/3/12 - 20:55
 * @desc : service組件,內部定義了方法
 */
public class HelloService {

    @Autowired
    HelloProperties helloProperties;

    public String sayHello(String userName) {
        return helloProperties.getPrefix() + ":" + userName + "》" + helloProperties.getSuffix();
    }
}
封裝配置文件屬性的HelloProperties
/**
 * @author : mereign
 * @date : 2022/3/12 - 20:57
 * @desc :  配置文件的屬性封裝,默認自動導入容器中
 */
@ConfigurationProperties("com.xiaochen")
public class HelloProperties {

    private String prefix;
    private String suffix;

    public String getPrefix() {
        return prefix;
    }

    public void setPrefix(String prefix) {
        this.prefix = prefix;
    }

    public String getSuffix() {
        return suffix;
    }

    public void setSuffix(String suffix) {
        this.suffix = suffix;
    }
}
決定是否注冊組件的自動配置類HelloServiceAutoConfiguration
/**
 * @author : mereign
 * @date : 2022/3/12 - 21:04
 * @desc : 一個自動配置類,決定是否向容器中注冊service組件,以及配置文件綁定
 */

// 表明這是一個配置類
@Configuration
// 配置文件綁定
@EnableConfigurationProperties(HelloProperties.class)
public class HelloServiceAutoConfiguration {

	// 如果容器中沒有這個組件就是用下面的方法進行容器的helloService組件注入,如果有的話就用容器中的
	@ConditionalOnMissingBean(HelloService.class)
    // 容器注入組件
    @Bean
    public HelloService helloService() {
        HelloService helloService = new HelloService();
        return helloService;
    }
}
resources文件夾下創建MATE-INF目錄下spring.factories文件,這樣才能加載到指定的自動配置類
# Auto Configure
org.springframework.boot.autoconfigure.EnableAutoConfiguration=\
com.xiaochen.auto.HelloServiceAutoConfiguration
第二步: 創建一個maven項目作為自定義starter,只需要在它的pom文件中導入autoconfiguration的項目依賴
<dependencies>
    <dependency>
        <groupId>com.xiaochen</groupId>
        <artifactId>test-autoconfigure</artifactId>
        <version>0.0.1-SNAPSHOT</version>
    </dependency>
</dependencies>
第三步: 分別對兩個項目模塊在生命周期中選擇clean和install,將兩個模塊打成jar包
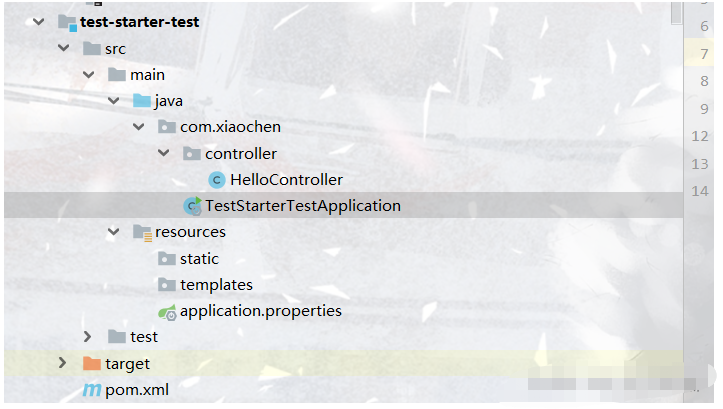
第四步: 創建測試項目,目錄結構如下
pom文件中導入自定義的starter
<dependency>
    <groupId>com.xiaochen</groupId>
    <artifactId>test-starter</artifactId>
    <version>1.0-SNAPSHOT</version>
</dependency>
創建一個測試使用的controller
@RestController
public class HelloController {

    @Autowired
    HelloService helloService;

    @GetMapping("/hel")
    public String sayHello() {
        return helloService.sayHello("張三");
    }
}
配置測試項目的配置文件
com.xiaochen.prefix=jaka
com.xiaochen.suffix=hafd
啟動測試項目訪問controller的請求映射
到此,相信大家對“SpringBoot2的profile功能是什么與怎么自定義starter”有了更深的了解,不妨來實際操作一番吧!這里是億速云網站,更多相關內容可以進入相關頻道進行查詢,關注我們,繼續學習!
免責聲明:本站發布的內容(圖片、視頻和文字)以原創、轉載和分享為主,文章觀點不代表本網站立場,如果涉及侵權請聯系站長郵箱:is@yisu.com進行舉報,并提供相關證據,一經查實,將立刻刪除涉嫌侵權內容。