溫馨提示×
您好,登錄后才能下訂單哦!
點擊 登錄注冊 即表示同意《億速云用戶服務條款》
您好,登錄后才能下訂單哦!
這篇文章主要介紹“Ubuntu中怎么搭建無人值守安裝系統”,在日常操作中,相信很多人在Ubuntu中怎么搭建無人值守安裝系統問題上存在疑惑,小編查閱了各式資料,整理出簡單好用的操作方法,希望對大家解答”Ubuntu中怎么搭建無人值守安裝系統”的疑惑有所幫助!接下來,請跟著小編一起來學習吧!

Ubuntu-desktop(ip:192.168.56.11)
apt install dnsmasq apache2 system-config-kickstart
vim /etc/dnsmasq.conf

bogus-priv
filterwin2k
interface=eth0
dhcp-range=192.168.5.150,192.168.5.250,12h
dhcp-boot=pxelinux.0  enable-tftp
tftp-root=/var/ftpd
dhcp-authoritative
創建必要的目錄
mkdir /var/ftpd
mkdir /var/www/ubuntu
掛載安裝介質
mount /dev/cdroom /mnt
cp /mnt/* /var/www/ubuntu -arf
將網絡啟動文件復制到網絡引導目錄
cp /var/www/ubuntu/install/netboot/* /var/ftpd -arf/
修改apache2配置文件
vim /etc/apache2/sites-enabled/000-default.conf

DocumentRoot /var/www#這里只給出了關鍵配置
運行system-config-kickstart生成ks.cfg文件
編輯響應文件ks.cfg
vim /var/www/ks.cfg#Generated by Kickstart Configurator#platform=AMD64 or Intel EM64Tinstall
text#System languagelang en_US#Language modules to installlangsupport en_US#System keyboardkeyboard us#System mousemouse#System timezonetimezone --utc Asia/Shanghai#Root passwordrootpw --disabled#Initial useruser wsfnk --fullname "wsfnk" --iscrypted --password $1$Q4SPUaqc$KCsPmeMevJS0zzrqLTeVw0#Reboot after installationreboot#Use text mode install#text#Install OS instead of upgrade#install#Use Web installationurl --url http://192.168.56.11/ubuntu#System bootloader configurationbootloader --location=mbr#Clear the Master Boot Recordzerombr yes#Partition clearing informationclearpart --all --initlabel#Disk partitioning informationpart swap --size 512
part /boot --fstype ext4 --size 200
part / --fstype ext4 --size 1 --grow#System authorization infomationauth  --useshadow  --enablemd5#Firewall configurationfirewall --disabled#Do not configure the X Window Systemskipx
%packages
openssh-server
openssh-client
gcc
g++
vim
curl
編輯引導文件
vim /var/ftpd/pxelinux.cfg/default

path ubuntu-installer/amd64/boot-screens/
include ubuntu-installer/amd64/boot-screens/menu.cfg
default ubuntu-installer/amd64/boot-screens/vesamenu.c32
default install
label install
kernel ubuntu-installer/amd64/linux
append ks=http://192.168.56.11/ks.cfg initrd=ubuntu-installer/amd64/initrd.gz --
prompt 0
timeout 0
systemctl start apache2
systemctl start dnsmasq
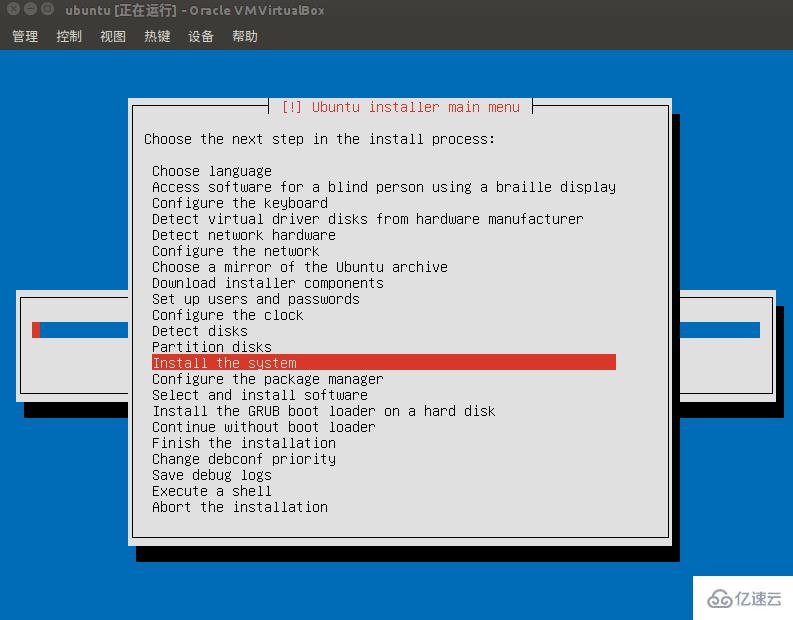
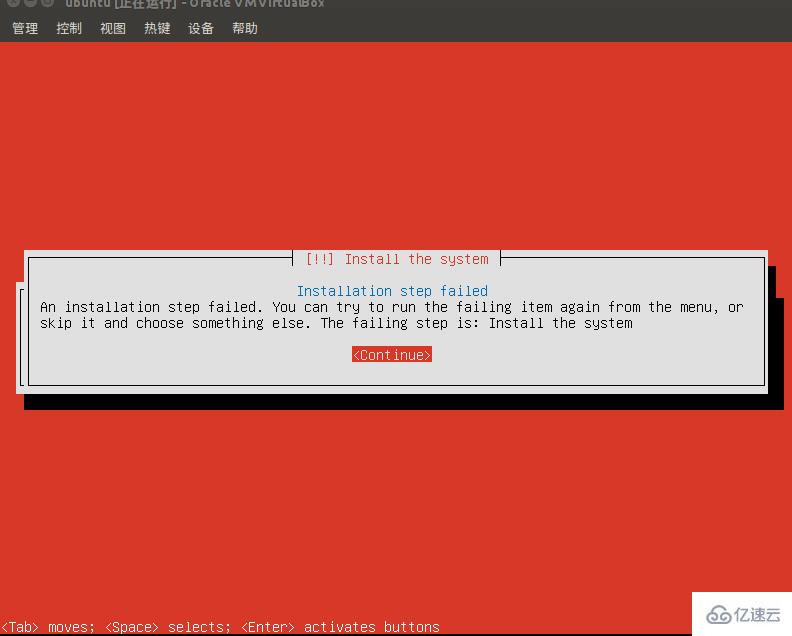
若安裝出現如下錯誤,


請在ubuntu-installer/amd64/boot-screens/txt.cfg里,append加入如下配置
live-installer/net-image=http://192.168.56.11/ubuntu/install/filesystem.squashfs clock-setup/ntp=false ip=dhcp ksdevice=bootif
解決圖片所示的錯誤
vim /var/ftpd/ubuntu-installer/amd64/boot-screens/txt.cfg

default install
label install
menu label ^Install
kernel ubuntu-installer/amd64/linux
append ks=http://192.168.56.11/ks.cfg vga=788 initrd=ubuntu-installer/amd64/initrd.gz live-installer/net-image=http://192.168.56.11/ubuntu/install/filesystem.squashfs clock-setup/ntp=false ip=dhcp ksdevice=bootif --- quit
到此,關于“Ubuntu中怎么搭建無人值守安裝系統”的學習就結束了,希望能夠解決大家的疑惑。理論與實踐的搭配能更好的幫助大家學習,快去試試吧!若想繼續學習更多相關知識,請繼續關注億速云網站,小編會繼續努力為大家帶來更多實用的文章!
免責聲明:本站發布的內容(圖片、視頻和文字)以原創、轉載和分享為主,文章觀點不代表本網站立場,如果涉及侵權請聯系站長郵箱:is@yisu.com進行舉報,并提供相關證據,一經查實,將立刻刪除涉嫌侵權內容。