您好,登錄后才能下訂單哦!
您好,登錄后才能下訂單哦!
這篇文章給大家分享的是有關Linux下如何使用Lm_Sensors檢測cpu溫度的內容。小編覺得挺實用的,因此分享給大家做個參考,一起跟隨小編過來看看吧。
lm_sensors 的軟件可以幫助我們來監控主板,CPU 的工作電壓,風扇轉速、溫度等數據。這些數據我們通常在主板的 BIOS 也可以看到。當我們可以在機器運行的時候通過 lm_sensors 隨時來監測著 CPU 的溫度變化,可以預防呵保護因為 CPU 過熱而會燒掉。

Lm_sensors是一個命令行工具,用于顯示所有芯片傳感器數據的當前讀數,包括CPU溫度。默認情況下,Ubuntu LInux沒有安裝Lm_Sensors,因此,我們必須自己安裝它們。
bob@bob-PC:~$ sudo apt install lm-sensors
接下來,我們需要檢測安裝在電腦上的硬件監控芯片。現在我們可以開始檢測電腦的硬件傳感器了:
bob@bob-PC:~$ sudo sensors-detect# sensors-detect revision 6284 (2015-05-31 14:00:33 +0200)# System: VMware, Inc. VMware Virtual Platform [None]# Board: Intel Corporation 440BX Desktop Reference Platform# Kernel: 4.15.0-30Ubuntu-generic x86_64# Processor: Intel(R) Core(TM) i7-8700 CPU @ 3.20GHz (6/158/10)This program will help you determine which kernel modules you need
to load to use lm_sensors most effectively. It is generally safe
and recommended to accept the default answers to all questions,
unless you know what you're doing.

Some south bridges, CPUs or memory controllers contain embedded sensors.
Do you want to scan for them? This is totally safe. (YES/no): yes
Silicon Integrated Systems SIS5595...                       No
VIA VT82C686 Integrated Sensors...                          No
VIA VT8231 Integrated Sensors...                            No
AMD K8 thermal sensors...                                   No
AMD Family 10h thermal sensors...                           No
AMD Family 11h thermal sensors...                           No
AMD Family 12h and 14h thermal sensors...                   No
AMD Family 15h thermal sensors...                           No
AMD Family 16h thermal sensors...                           No
AMD Family 17h thermal sensors...                           No
AMD Family 15h power sensors...                             No
AMD Family 16h power sensors...                             No
Intel digital thermal sensor...                             Success!
   (driver `coretemp')
Intel AMB FB-DIMM thermal sensor...                         No
Intel 5500/5520/X58 thermal sensor...                       No
VIA C7 thermal sensor...                                    No
VIA Nano thermal sensor...                                  No

Some Super I/O chips contain embedded sensors. We have to write to
standard I/O ports to probe them. This is usually safe.
Do you want to scan for Super I/O sensors? (YES/no): yes

..................
可以通過一下命令查看溫度數據了:
bob@bob-PC:~$ sensors
iwlwifi_1-virtual-0
Adapter: Virtual device
temp1:        +33.0°C

pch_skylake-virtual-0
Adapter: Virtual device
temp1:        +38.5°C

BAT0-acpi-0
Adapter: ACPI interface
in0:         +12.45 V

coretemp-isa-0000
Adapter: ISA adapter
Package id 0:  +39.0°C  (high = +100.0°C, crit = +100.0°C)
Core 0:        +39.0°C  (high = +100.0°C, crit = +100.0°C)
Core 1:        +38.0°C  (high = +100.0°C, crit = +100.0°C)

thinkpad-isa-0000
Adapter: ISA adapter
fan1:           0 RPM
temp1:        +38.0°C
temp2:            N/A
temp3:         +0.0°C
temp4:         +0.0°C
temp5:         +0.0°C
temp6:         +0.0°C
temp7:         +0.0°C
temp8:         +0.0°C

BAT1-acpi-0
Adapter: ACPI interface
in0:         +12.49 V

acpitz-acpi-0
Adapter: ACPI interface
temp1:        +38.0°C  (crit = +128.0°C)
還可以使用watch命令實時關注:
bob@bob-PC:~$ watch sensors
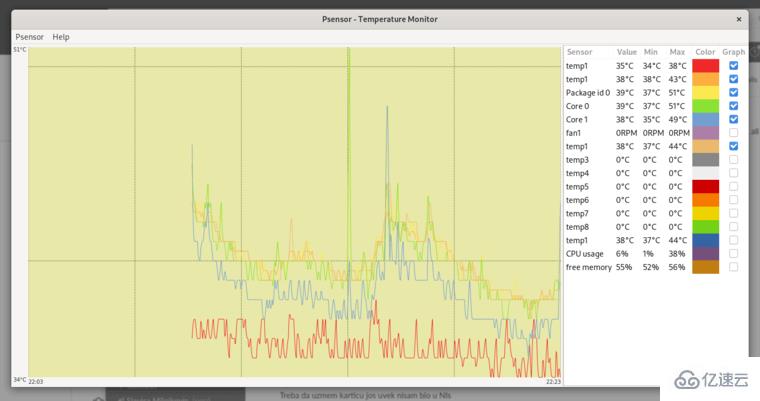
使用Psensor,您可以檢查以下各項:
最新版本的Psensor還為Ubuntu提供了一個applet指示器,因此在Ubuntu上更容易監控硬件溫度。您可以選擇在頂部面板中顯示溫度。它甚至可以在溫度超過極限時發送桌面通知。
我們可以使用下面的命令安裝Psensor:
bob@bob-PC:~/Desktop$ sudo apt install -y psensor
打開ubuntu的launchpad,在里面找到psensor,打開該應用就可以看到多個傳感器: 

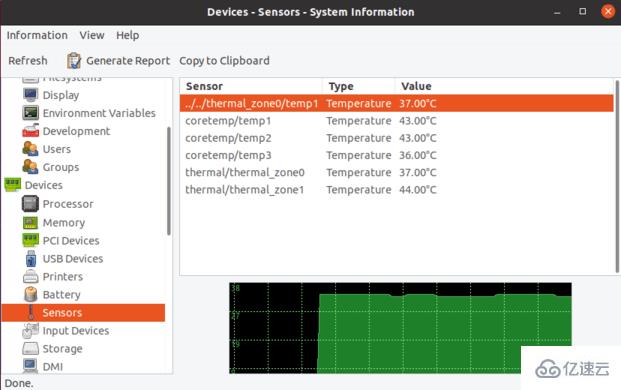
Hardinfo是Linux中用于在圖形化界面中顯示硬件信息的工具。可以使用它檢測cpu的溫度。以下命令安裝hardinfo:
bob@bob-PC:~/Desktop$ sudo apt install hardinfo# 運行一下命令打開hardinfobob@bob-PC:~/Desktop$ sudo hardinfo

感謝各位的閱讀!關于“Linux下如何使用Lm_Sensors檢測cpu溫度”這篇文章就分享到這里了,希望以上內容可以對大家有一定的幫助,讓大家可以學到更多知識,如果覺得文章不錯,可以把它分享出去讓更多的人看到吧!
免責聲明:本站發布的內容(圖片、視頻和文字)以原創、轉載和分享為主,文章觀點不代表本網站立場,如果涉及侵權請聯系站長郵箱:is@yisu.com進行舉報,并提供相關證據,一經查實,將立刻刪除涉嫌侵權內容。