您好,登錄后才能下訂單哦!
您好,登錄后才能下訂單哦!
本文小編為大家詳細介紹“docker如何使用Dockerfile構建鏡像”,內容詳細,步驟清晰,細節處理妥當,希望這篇“docker如何使用Dockerfile構建鏡像”文章能幫助大家解決疑惑,下面跟著小編的思路慢慢深入,一起來學習新知識吧。
1、使用 commit 命令構建
docker commit 命令是創建新鏡像最直觀的方法,其過程包含三個步驟:
運行容器;
修改容器;
將容器保存為新的鏡像。
先從創建一個新容器開始,這個容器我們就使用很常見的 ubuntu 鏡像,操作步驟如下
1.1 運行一個要進行修改的容器
root@ubuntu:~# docker run -ti ubuntu /bin/bash
root@733a4b080491:/#
1.2 安裝 apache 軟件包
root@733a4b080491:/# apt-get update
... ...
root@733a4b080491:/# apt-get install -y apache2
... ...
我們啟動了一個容器,并在里面安裝了 apache 。我們將會拿這個容器作為一個 web 服務器來運行,我們需要把它保存下來,這樣就不用每次都運行這個步驟了。
1.3 提交定制容器
root@ubuntu:~# docker ps -a
container id  image    command    created    status      ports    names
733a4b080491  ubuntu    "/bin/bash"   11 minutes ago  exited (0) 5 seconds ago      suspicious_mestorf
root@ubuntu:~# docker commit 733a4b080491 wzlinux/ubuntu_with_apache
sha256:902ac2c87147fefc5b70c741ce9550dcda426cea9f824f442d5cc2744bdc90ae
root@ubuntu:~# docker images
repository     tag     image id   created    size
wzlinux/ubuntu_with_apache latest    902ac2c87147  33 seconds ago  261mb
ubuntu      latest    20c44cd7596f  10 days ago   123mb
可以看到,我們使用 docker commit 提交了修改過的容器,從 size 上可以看到鏡像因為安裝軟件而變大了,docker commit 提交的只是創建容器的鏡像與容器的當前狀態之間有差異的部分,這使得該更新非常輕量。
以上演示了如何用 docker commit 創建新鏡像。然而,docker 并不建議用戶通過這種方式構建鏡像。因為這是一種手工創建鏡像的方式,容易出錯,效率低且可重復性弱。比如要在 debian base 鏡像中也加入 apache,還得重復前面的所有步驟。更重要的:使用者并不知道鏡像是如何創建出來的,里面是否有惡意程序。也就是說無法對鏡像進行審計,存在安全隱患。
不過,為了對 docker 有一個更全面的了解,我們還是要了解一下如何使用 docker commit 構建 docker 鏡像。因為即便是用 dockerfile(推薦方法)構建鏡像,底層也 docker commit 一層一層構建新鏡像的。學習 docker commit 能夠幫助我們更加深入地理解構建過程和鏡像的分層結構。
2、使用 dockerfile 構建
dockerfile 使用基本的基于dsl(domain specific language)語法的指令來構建一個 docker 鏡像,我們推薦使用 dockerfile 方法來代替 docker commit,因為通過前者構建鏡像更具備可重復性、透明性以及冪等性。
一旦有了 dockerfile,我們就可以使用 docker build 命令基于該 dockerfile 中的指令構建一個新的鏡像。
2.1 我們的第一個 dockerfile
用 dockerfile 創建上面的 ubuntu_with_apache,內容如下。
# version 0.0.1
from ubuntu
run sed -i 's/archive.ubuntu.com/cn.archive.ubuntu.com/g' /etc/apt/sources.list
run sed -i 's/security.ubuntu/cn.archive.ubuntu/g' /etc/apt/sources.list
run apt-get -y update && apt-get -y install apache2
expose 80
執行 docker build 命令時,dockerfile 中的所有指令都會被執行并且提交,并且在該命令成功結束后返回一個新鏡像。
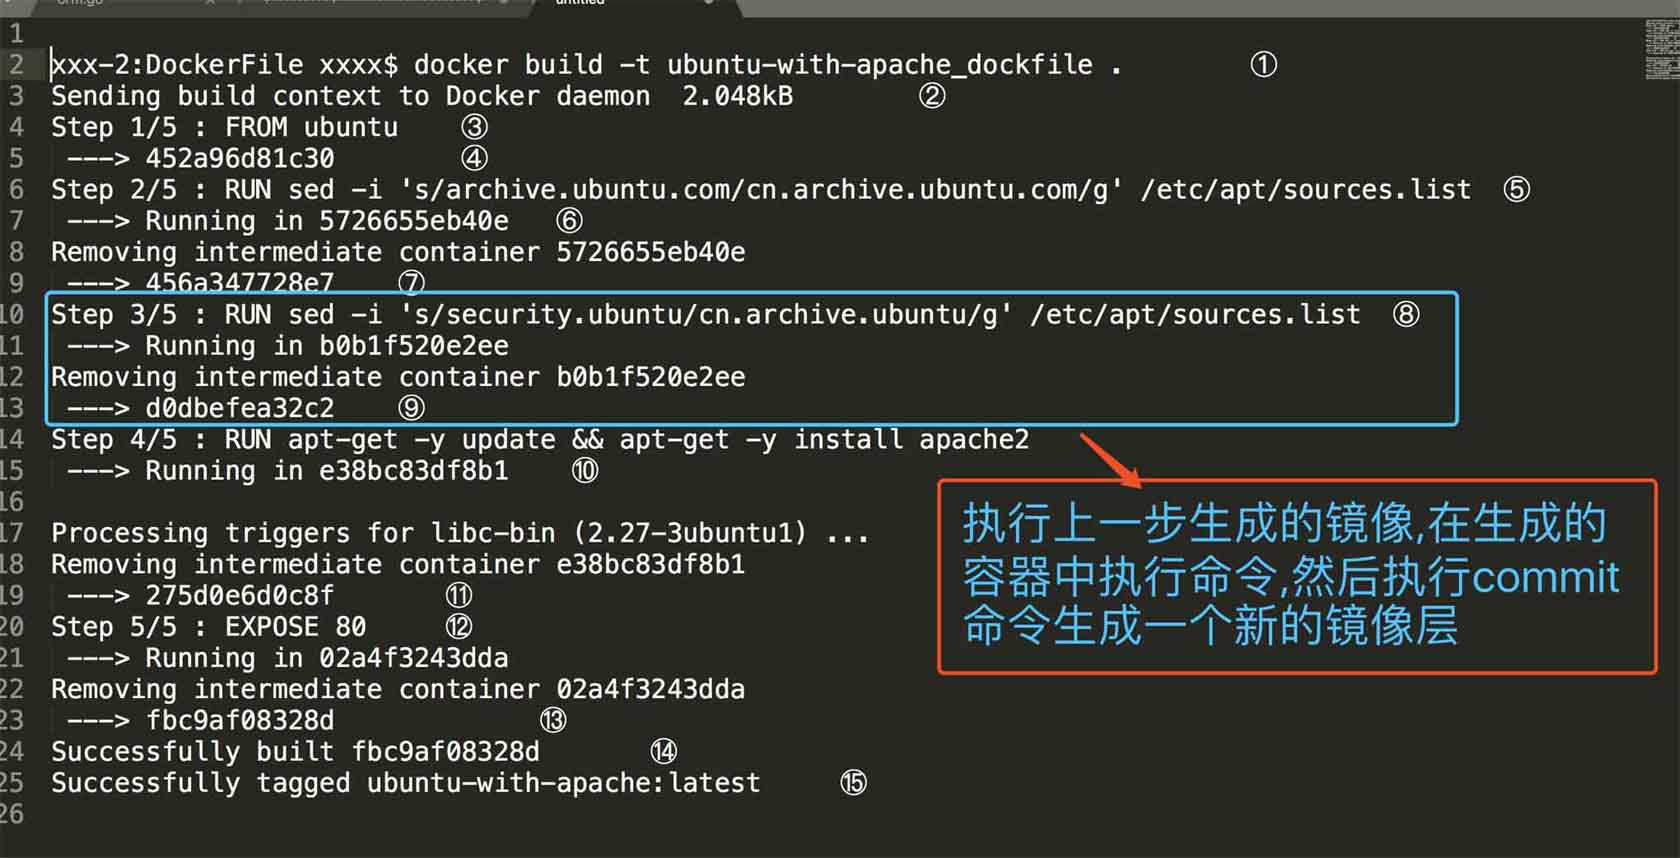
root@ubuntu:~/sample# docker build -t ubuntu_with_apache_dockerfile .  ①
sending build context to docker daemon 6.144kb  ②
step 1/5 : from ubuntu   ③
 ---> 20c44cd7596f
step 2/5 : run sed -i 's/archive.ubuntu.com/cn.archive.ubuntu.com/g' /etc/apt/sources.list
 ---> running in bac6dc3b900f
 ---> c66ad94ad8a4
removing intermediate container bac6dc3b900f
step 3/5 : run sed -i 's/security.ubuntu/cn.archive.ubuntu/g' /etc/apt/sources.list
 ---> running in 5158558b6403
 ---> 0a4c480147c5
removing intermediate container 5158558b6403
step 4/5 : run apt-get -y update && apt-get -y install apache2    ④
 ---> running in f547ce7a1b39   ⑤
 ……
 ……
 ---> 118bde35120a   ⑥
removing intermediate container f547ce7a1b39  ⑦
step 5/5 : expose 80
 ---> running in e546786de05b
 ---> f55d7b07365b
removing intermediate container e546786de05b
successfully built f55d7b07365b   ⑧
successfully tagged ubuntu_with_apache_dockerfile:latest

① 運行 docker build 命令,-t 將新鏡像命名為 ubuntu-with-apache-dockerfile,命令末尾的 . 指明 build context 為當前目錄。docker 默認會從 build context 中查找 dockerfile 文件,我們也可以通過 -f 參數指定 dockerfile 的位置。
② 從這步開始就是鏡像真正的構建過程。 首先 docker 將 build context 中的所有文件發送給 docker daemon。build context 為鏡像構建提供所需要的文件或目錄。
dockerfile 中的 add、copy 等命令可以將 build context 中的文件添加到鏡像。此例中,build context 為當前目錄 /sample,該目錄下的所有文件和子目錄都會被發送給 docker daemon。
所以,使用 build context 就得小心了,不要將多余文件放到 build context,特別不要把 /、/usr 作為 build context,否則構建過程會相當緩慢甚至失敗。
③ step 1:執行 from,將 ubuntu 作為 base 鏡像。ubuntu 鏡像 id 為 452a96d81c30。
④ step 4:執行 run,安裝 apache,具體步驟為 ⑤ ~ ?。
⑤ 啟動 id 為 e38bc83df8b1 的臨時容器,在容器中通過 apt-get 安裝 apache。
⑥ 安裝成功后,將容器保存為鏡像,其 id 為 fbc9af08328d。這一步底層使用的是類似 docker commit 的命令。
⑦ 刪除臨時容器 02a4f3243dda。
⑧ 鏡像構建成功。
通過 docker images 查看鏡像信息。
root@ubuntu:~/sample# docker images
repository      tag     image id   created    size
ubuntu_with_apache_dockerfile latest    f55d7b07365b  27 minutes ago  261mb
wzlinux/ubuntu_with_apache  latest    902ac2c87147  about an hour ago 261mb
ubuntu       latest    20c44cd7596f  10 days ago   123mb
2.2 查看鏡像分成結構
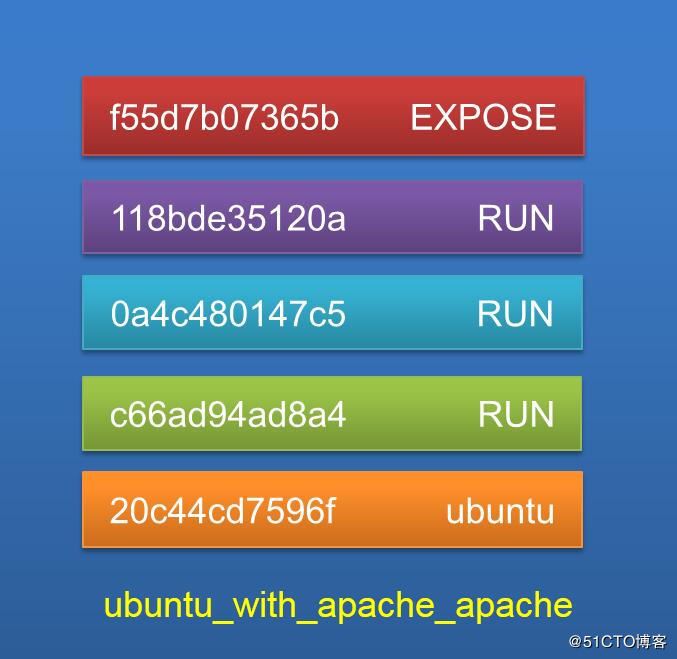
ubuntu_with_apache_dockerfile 是通過在 base 鏡像的頂部添加幾個新的鏡像層而得到的。

上圖是從原文中拷貝的,下圖是在我的電腦上面實驗得到的數據,image的id不同,但是其他都是相同的。

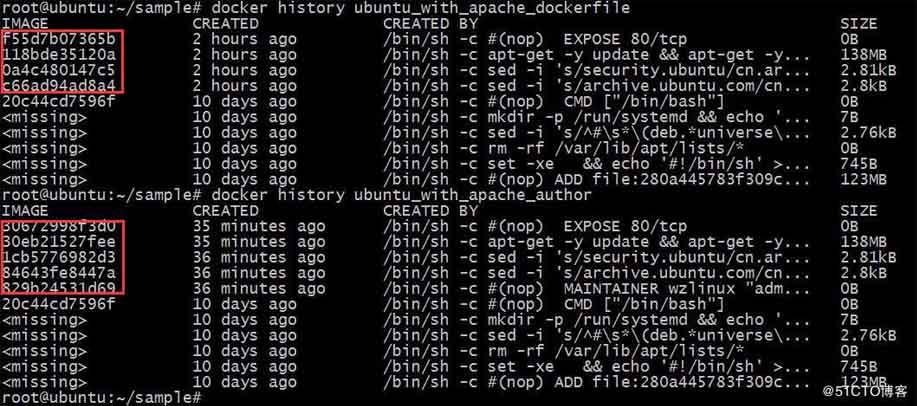
查看我本機的ubuntu的image歷史如下:

從輸出的結果可以看出來,每個命令都會生成一個鏡像層。
docker history 會顯示鏡像的構建歷史,也就是 dockerfile 的執行過程。
ubuntu_with_apache_dockerfile 與 ubuntu 鏡像相比,確實只是多了幾層,dockerfile 中的每個指令都會創建一層,docker history 也向我們展示了鏡像的分層結構,每一層由上至下排列。
2.3 鏡像的緩存特性
由于每一步的構建過程都會將結果提交為鏡像,所以 docker 的構建鏡像過程就顯得非常聰明。它會將之前的鏡像層看作緩存。
比如我們把 expose 80 改為 expose 8080。
root@ubuntu:~/sample# docker build -t ubuntu_with_apache_8080 .
sending build context to docker daemon 6.144kb
step 1/5 : from ubuntu
---> 20c44cd7596f
step 2/5 : run sed -i 's/archive.ubuntu.com/cn.archive.ubuntu.com/g'  /etc/apt/sources.list
 ---> using cache ---> c66ad94ad8a4step 3/5 : run sed -i 's/security.ubuntu/cn.archive.ubuntu/g' /etc/apt/sources.list
---> using cache
---> 0a4c480147c5
step 4/5 : run apt-get -y update && apt-get -y install apache2
---> using cache
---> 118bde35120a
step 5/5 : expose 8080
---> running in c89f8210c56a
---> ac88967e578e
removing intermediate container c89f8210c56a
successfully built ac88967e578e
successfully tagged ubuntu_with_apache_8080:latest
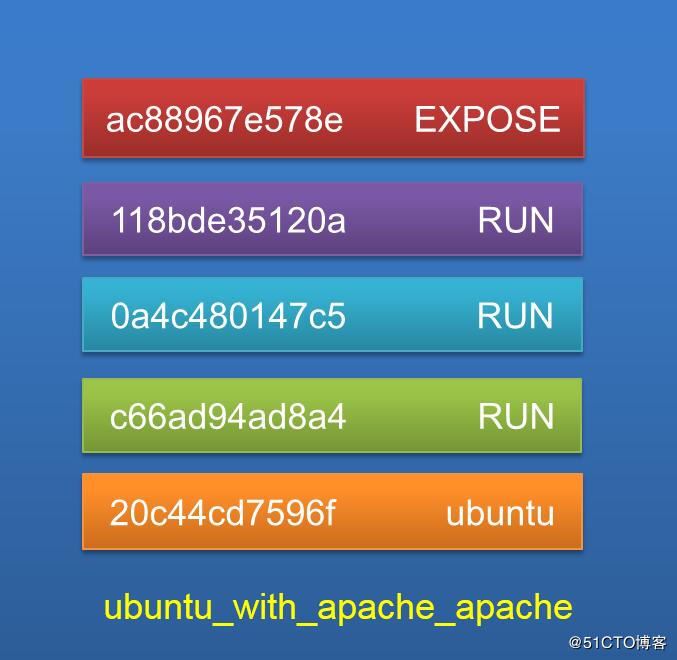
我們可以看到,之前的指令都是一樣的,所以 docker 直接利用之前的緩存,只構建我們更改的指令,新的鏡像層如下。

如果我們希望在構建鏡像時不使用緩存,可以在 docker build 命令中加上 --no-cache 參數。
dockerfile 中每一個指令都會創建一個鏡像層,上層是依賴于下層的。無論什么時候,只要某一層發生變化,其上面所有層的緩存都會失效。也就是說,如果我們改變 dockerfile 指令的執行順序,或者修改或添加指令,都會使緩存失效。比如我們在前面添加指令 maintainer wzlinux "admin@wzlinux.com"。如下:
# version 0.0.1
from ubuntu
maintainer wzlinux "admin@wzlinux.com"
run sed -i 's/archive.ubuntu.com/cn.archive.ubuntu.com/g' /etc/apt/sources.list
run sed -i 's/security.ubuntu/cn.archive.ubuntu/g' /etc/apt/sources.list
run apt-get -y update && apt-get -y install apache2
expose 80
然后使用docker進行構建,查看其過程。
root@ubuntu:~/sample# docker build -t ubuntu_with_apache_author .

sending build context to docker daemon 6.144kb
step 1/6 : from ubuntu
 ---> 20c44cd7596f
step 2/6 : maintainer wzlinux "admin@wzlinux.com"
---> running in 637bb3457407
---> 829b24531d69
removing intermediate container 637bb3457407
step 3/6 : run sed -i 's/archive.ubuntu.com/cn.archive.ubuntu.com/g' /etc/apt/sources.list
---> running in 416ae8aefb61
---> 84643fe8447a
removing intermediate container 416ae8aefb61
step 4/6 : run sed -i 's/security.ubuntu/cn.archive.ubuntu/g' /etc/apt/sources.list
---> running in 58d8375fd5c3
---> 1cb5776982d3
removing intermediate container 58d8375fd5c3
step 5/6 : run apt-get -y update && apt-get -y install apache2
---> running in 0514a7d04814
 ……
 ……
processing triggers for sgml-base (1.26+nmu4ubuntu1)
 ...
---> 30eb21527fee
removing intermediate container 0514a7d04814
step 6/6 : expose 80
---> running in 476ca5f98886
---> 30672998f3d0
removing intermediate container 476ca5f98886
successfully built 30672998f3d0
successfully tagged ubuntu_with_apache_author:latest

從輸出的結果生成了很多新的鏡像層,緩存已經失效。
2.4 調試 dockerfile
包括 dockerfile 在內的任何腳本和程序都會出錯。有錯并不可怕,但必須有辦法排查,那我們測試一下在構建的過程中指令出現錯誤怎么辦,比如我們把第二個sed指令寫錯了,寫錯了sd。
# version 0.0.1
from ubuntu
maintainer wzlinux "admin@wzlinux.com"
run sed -i 's/archive.ubuntu.com/cn.archive.ubuntu.com/g' /etc/apt/sources.list
run sd -i 's/security.ubuntu/cn.archive.ubuntu/g' /etc/apt/sources.list
run apt-get -y update && apt-get -y install apache2
expose 80
執行 docker build,如下。

dockerfile 在執行第四步 run 指令時失敗。我們可以利用第三步創建的鏡像 84643fe8447a 進行調試,方式是通過 docker run -it 啟動鏡像的一個容器。
root@ubuntu:~/sample# docker run -ti 84643fe8447a /bin/bash
root@422ecce78664:/# sd
bash: sd: command not found
其實我們肯定不會傻到連 sd 不存在也不知道,我這里只是作為一個例子,其他更難的排錯方法我們就使用這種方式。
2.5 dockerfile 指令
from
指定 base 鏡像。
maintainer
設置鏡像的作者,可以是任意字符串。
copy
將文件從 build context 復制到鏡像。
copy 支持兩種形式:
copy src destcopy ["src", "dest"]
注意:src 只能指定 build context 中的文件或目錄。
add
與 copy 類似,從 build context 復制文件到鏡像。不同的是,如果 src 是歸檔文件(tar, zip, tgz, xz 等),文件會被自動解壓到 dest。
env
設置環境變量,環境變量可被后面的指令使用。例如:
env my_version 1.3run apt-get install -y mypackage=$my_version
expose
指定容器中的進程會監聽某個端口,docker 可以將該端口暴露出來。
volume
將文件或目錄聲明為 volume。
workdir
為后面的 run, cmd, entrypoint, add 或 copy 指令設置鏡像中的當前工作目錄。
run
在容器中運行指定的命令。
cmd
容器啟動時運行指定的命令。
dockerfile 中可以有多個 cmd 指令,但只有最后一個生效。cmd 可以被 docker run 之后的參數替換。
entrypoint
設置容器啟動時運行的命令。
dockerfile 中可以有多個 entrypoint 指令,但只有最后一個生效。cmd 或 docker run 之后的參數會被當做參數傳遞給 entrypoint。
讀到這里,這篇“docker如何使用Dockerfile構建鏡像”文章已經介紹完畢,想要掌握這篇文章的知識點還需要大家自己動手實踐使用過才能領會,如果想了解更多相關內容的文章,歡迎關注億速云行業資訊頻道。
免責聲明:本站發布的內容(圖片、視頻和文字)以原創、轉載和分享為主,文章觀點不代表本網站立場,如果涉及侵權請聯系站長郵箱:is@yisu.com進行舉報,并提供相關證據,一經查實,將立刻刪除涉嫌侵權內容。