您好,登錄后才能下訂單哦!
您好,登錄后才能下訂單哦!
這篇文章主要介紹了SpringBoot自動配置原理的示例分析,具有一定借鑒價值,感興趣的朋友可以參考下,希望大家閱讀完這篇文章之后大有收獲,下面讓小編帶著大家一起了解一下。
SpringBoot 的誕生就是為了簡化 Spring 中繁瑣的 XML 配置,其本質依然還是Spring框架,使用SpringBoot之后可以不使用任何 XML 配置來啟動一個服務,使得我們在使用微服務架構時可以更加快速的建立一個應用。
簡單來說就是SpringBoot其實不是什么新的框架,它默認配置了很多框架的使用方式。
提供了固定的配置來簡化配置,即約定大約配置
盡可能地自動配置 Spring 和第三方庫,即能自動裝配
內嵌容器,創建獨立的 Spring 應用
讓測試變的簡單,內置了JUnit、Spring Boot Test等多種測試框架,方便測試
提供可用于生產的特性,如度量、運行狀況檢查和外部化配置。
完全不需要生成代碼,也不需要 XML 配置。
下面探究SpringBoot的啟動原理,關于一些細節就不贅述,我們捉住主線分析即可。
注意:本文的 SpringBoot 版本為 2.6.1
一切的來自起源SpringBoot的啟動類,我們發現main方法上面有個注解:@SpringBootApplication
@SpringBootApplication
public class SpringbootWorkApplication {
    public static void main(String[] args) {
        SpringApplication.run(SpringbootWorkApplication.class, args);
    }
}
@SpringBootApplication 標注在某個類上說明這個類是 SpringBoot 的主配置類, SpringBoot 就應該運行這個類的main方法來啟動 SpringBoot 應用;它的本質是一個組合注解,我們點進去查看該類的元信息主要包含3個注解:
@Target({ElementType.TYPE})
@Retention(RetentionPolicy.RUNTIME)
@Documented
@Inherited
@SpringBootConfiguration
@EnableAutoConfiguration
@ComponentScan(
    excludeFilters = {@Filter(
    type = FilterType.CUSTOM,
    classes = {TypeExcludeFilter.class}
), @Filter(
    type = FilterType.CUSTOM,
    classes = {AutoConfigurationExcludeFilter.class}
)}
)
public @interface SpringBootApplication {@SpringBootConfiguration(里面就是@Configuration,標注當前類為配置類,其實只是做了一層封裝改了個名字而已)
@EnableAutoConfiguration(開啟自動配置)
@ComponentScan(包掃描)
注:@Inherited是一個標識,用來修飾注解,如果一個類用上了@Inherited修飾的注解,那么其子類也會繼承這個注解
我們下面逐一分析這3個注解作用
3.1.1 @SpringBootConfiguration
我們繼續點@SpringBootConfiguration進去查看源碼如下:
@Target({ElementType.TYPE})
@Retention(RetentionPolicy.RUNTIME)
@Documented
@Configuration
@Indexed
public @interface SpringBootConfiguration {
    @AliasFor(
        annotation = Configuration.class
    )
    boolean proxyBeanMethods() default true;
}
@Configuration標注在某個類上,表示這是一個 springboot的配置類。可以向容器中注入組件。
3.1.2 @ComponentScan
@ComponentScan:配置用于 Configuration 類的組件掃描指令。
提供與 Spring XML 的 <context:component-scan> 元素并行的支持。
可以 basePackageClasses 或basePackages 來定義要掃描的特定包。 如果沒有定義特定的包,將從聲明該注解的類的包開始掃描。
3.1.3 @EnableAutoConfiguration
@EnableAutoConfiguration顧名思義就是:開啟自動導入配置
這個注解是SpringBoot的重點,我們下面詳細講解
我們點進去看看該注解有什么內容
@Target({ElementType.TYPE})
@Retention(RetentionPolicy.RUNTIME)
@Documented
@Inherited
@AutoConfigurationPackage   //自動導包
@Import({AutoConfigurationImportSelector.class}) //自動配置導入選擇
public @interface EnableAutoConfiguration {
    String ENABLED_OVERRIDE_PROPERTY = "spring.boot.enableautoconfiguration";

    Class<?>[] exclude() default {};

    String[] excludeName() default {};
}自動導入配置包
點進去查看代碼:
@Target({ElementType.TYPE})
@Retention(RetentionPolicy.RUNTIME)
@Documented
@Inherited
@Import({Registrar.class})
public @interface AutoConfigurationPackage {
    String[] basePackages() default {};

    Class<?>[] basePackageClasses() default {};
}
@Import 為spring的注解,導入一個配置文件,在springboot中為給容器導入一個組件,而導入的組件由 AutoConfigurationPackages.class的內部類Registrar.class 執行邏輯來決定是如何導入的。
4.1.1 @Import({Registrar.class})
點Registrar.class進去查看源碼如下:
static class Registrar implements ImportBeanDefinitionRegistrar, DeterminableImports {
    Registrar() {
    }

    public void registerBeanDefinitions(AnnotationMetadata metadata, BeanDefinitionRegistry registry) {
        //斷點
        AutoConfigurationPackages.register(registry, (String[])(new AutoConfigurationPackages.PackageImports(metadata)).getPackageNames().toArray(new String[0]));
    }

    public Set<Object> determineImports(AnnotationMetadata metadata) {
        return Collections.singleton(new AutoConfigurationPackages.PackageImports(metadata));
    }
}
注:Registrar實現了ImportBeanDefinitionRegistrar類,就可以被注解@Import導入到spring容器里。
這個地方打斷點
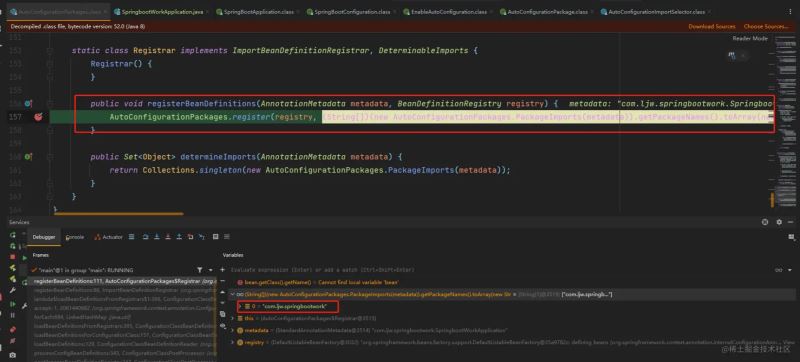
運行可以查看到(String[])(new AutoConfigurationPackages.PackageImports(metadata)).getPackageNames().toArray(new String[0])的值為com.ljw.springbootwork:當前啟動類所在的包名
結論:@AutoConfigurationPackage 就是將主配置類(@SpringBootApplication 標注的類)所在的包下面所有的組件都掃描注冊到 spring 容器中。
作用:AutoConfigurationImportSelector開啟自動配置類的導包的選擇器,即是帶入哪些類,有選擇性的導入
點AutoConfigurationImportSelector.class進入查看源碼,這個類中有兩個方法見名知意:
1.selectImports:選擇需要導入的組件
public String[] selectImports(AnnotationMetadata annotationMetadata) {
    if (!this.isEnabled(annotationMetadata)) {
        return NO_IMPORTS;
    } else {
        AutoConfigurationImportSelector.AutoConfigurationEntry autoConfigurationEntry = this.getAutoConfigurationEntry(annotationMetadata);
        return StringUtils.toStringArray(autoConfigurationEntry.getConfigurations());
    }
}
2.getAutoConfigurationEntry:根據導入的@Configuration類的AnnotationMetadata返回AutoConfigurationImportSelector.AutoConfigurationEntry
protected AutoConfigurationImportSelector.AutoConfigurationEntry getAutoConfigurationEntry(AnnotationMetadata annotationMetadata) {
    if (!this.isEnabled(annotationMetadata)) {
        return EMPTY_ENTRY;
    } else {
        AnnotationAttributes attributes = this.getAttributes(annotationMetadata);
         // 這打個斷點,看看 返回的數據
        List<String> configurations = this.getCandidateConfigurations(annotationMetadata, attributes);
        //刪除重復項
        configurations = this.removeDuplicates(configurations);
        Set<String> exclusions = this.getExclusions(annotationMetadata, attributes);
        //檢查
        this.checkExcludedClasses(configurations, exclusions);
        //刪除需要排除的依賴
        configurations.removeAll(exclusions);
        configurations = this.getConfigurationClassFilter().filter(configurations);
        this.fireAutoConfigurationImportEvents(configurations, exclusions);
        return new AutoConfigurationImportSelector.AutoConfigurationEntry(configurations, exclusions);
    }
}
this.getCandidateConfigurations(annotationMetadata, attributes)這里斷點查看
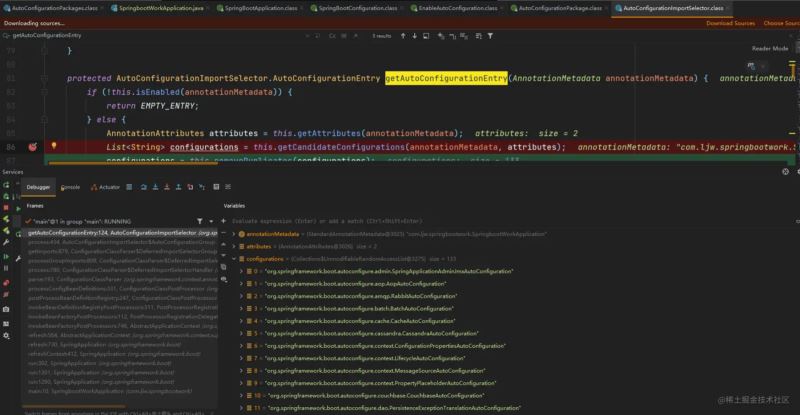
configurations數組長度為133,并且文件后綴名都為 **AutoConfiguration
結論: 這些都是候選的配置類,經過去重,去除需要的排除的依賴,最終的組件才是這個環境需要的所有組件。有了自動配置,就不需要我們自己手寫配置的值了,配置類有默認值的。
我們繼續往下看看是如何返回需要配置的組件的
4.2.1 getCandidateConfigurations(annotationMetadata, attributes)
方法如下:
protected List<String> getCandidateConfigurations(AnnotationMetadata metadata, AnnotationAttributes attributes) {
    List<String> configurations = SpringFactoriesLoader.loadFactoryNames(this.getSpringFactoriesLoaderFactoryClass(), this.getBeanClassLoader());
    Assert.notEmpty(configurations, "No auto configuration classes found in META-INF/spring.factories. If you are using a custom packaging, make sure that file is correct.");
    return configurations;
}
這里有句斷言: Assert.notEmpty(configurations, "No auto configuration classes found in META-INF/spring.factories. If you are using a custom packaging, make sure that file is correct.");
意思是:“在 META-INF/spring.factories 中沒有找到自動配置類。如果您使用自定義包裝,請確保該文件是正確的。“
結論: 即是要loadFactoryNames()方法要找到自動的配置類返回才不會報錯。
4.2.1.1 getSpringFactoriesLoaderFactoryClass()
我們點進去發現:this.getSpringFactoriesLoaderFactoryClass()返回的是EnableAutoConfiguration.class這個注解。這個注解和@SpringBootApplication下標識注解是同一個注解。
protected Class<?> getSpringFactoriesLoaderFactoryClass() {
    return EnableAutoConfiguration.class;
}
結論:獲取一個能加載自動配置類的類,即SpringBoot默認自動配置類為EnableAutoConfiguration
4.2.2 SpringFactoriesLoader
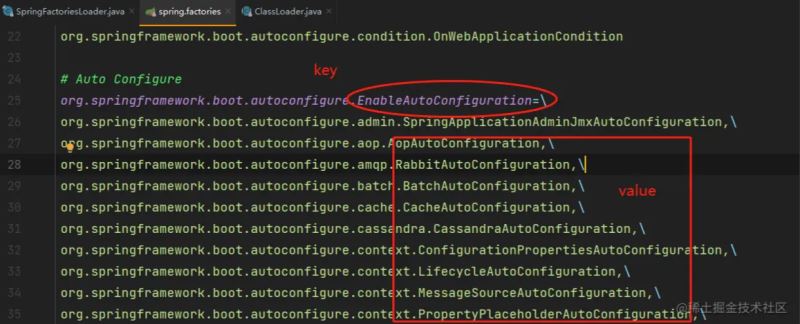
SpringFactoriesLoader工廠加載機制是Spring內部提供的一個約定俗成的加載方式,只需要在模塊的META-INF/spring.factories文件,這個Properties格式的文件中的key是接口、注解、或抽象類的全名,value是以逗號 “ , “ 分隔的實現類,使用SpringFactoriesLoader來實現相應的實現類注入Spirng容器中。
注:會加載所有jar包下的classpath路徑下的META-INF/spring.factories文件,這樣文件不止一個。
4.2.2.1 loadFactoryNames()
public static List<String> loadFactoryNames(Class<?> factoryType, @Nullable ClassLoader classLoader) {
   ClassLoader classLoaderToUse = classLoader;
   if (classLoaderToUse == null) {
      classLoaderToUse = SpringFactoriesLoader.class.getClassLoader();
   }
   String factoryTypeName = factoryType.getName();
   return loadSpringFactories(classLoaderToUse).getOrDefault(factoryTypeName, Collections.emptyList());
}
斷點查看factoryTypeName:
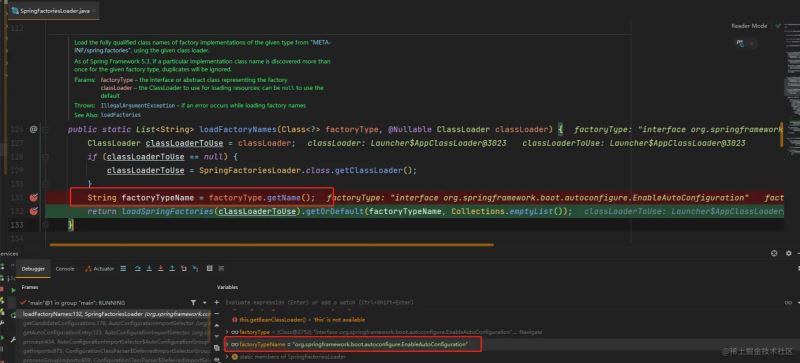
先是將 EnableAutoConfiguration.class 傳給了 factoryType
然后String factoryTypeName = factoryType.getName();,所以factoryTypeName 值為 org.springframework.boot.autoconfigure.EnableAutoConfiguration
4.2.2.2 loadSpringFactories()
接著查看loadSpringFactories方法的作用
private static Map<String, List<String>> loadSpringFactories(ClassLoader classLoader) {
    //斷點查看
   Map<String, List<String>> result = cache.get(classLoader);
   if (result != null) {
      return result;
   }

   result = new HashMap<>();
   try {
      //注意這里:META-INF/spring.factories
      Enumeration<URL> urls = classLoader.getResources(FACTORIES_RESOURCE_LOCATION);
      while (urls.hasMoreElements()) {
         URL url = urls.nextElement();
         UrlResource resource = new UrlResource(url);
         Properties properties = PropertiesLoaderUtils.loadProperties(resource);
         for (Map.Entry<?, ?> entry : properties.entrySet()) {
            String factoryTypeName = ((String) entry.getKey()).trim();
            String[] factoryImplementationNames =
                  StringUtils.commaDelimitedListToStringArray((String) entry.getValue());
            for (String factoryImplementationName : factoryImplementationNames) {
            //斷點
               result.computeIfAbsent(factoryTypeName, key -> new ArrayList<>())
                     .add(factoryImplementationName.trim());
            }
         }
      }

      // Replace all lists with unmodifiable lists containing unique elements
      //去重,斷點查看result值
      result.replaceAll((factoryType, implementations) -> implementations.stream().distinct()
            .collect(Collectors.collectingAndThen(Collectors.toList(), Collections::unmodifiableList)));
      cache.put(classLoader, result);
   }
   catch (IOException ex) {
      throw new IllegalArgumentException("Unable to load factories from location [" +
            FACTORIES_RESOURCE_LOCATION + "]", ex);
   }
   return result;
}
這里的 FACTORIES_RESOURCE_LOCATION 在上面有定義:META-INF/spring.factories
public final class SpringFactoriesLoader {

   /**
    * The location to look for factories.
    * <p>Can be present in multiple JAR files.
    */
   public static final String FACTORIES_RESOURCE_LOCATION = "META-INF/spring.factories";
META-INF/spring.factories文件在哪里??
在所有引入的java包的當前類路徑下的META-INF/spring.factories文件都會被讀取,如:
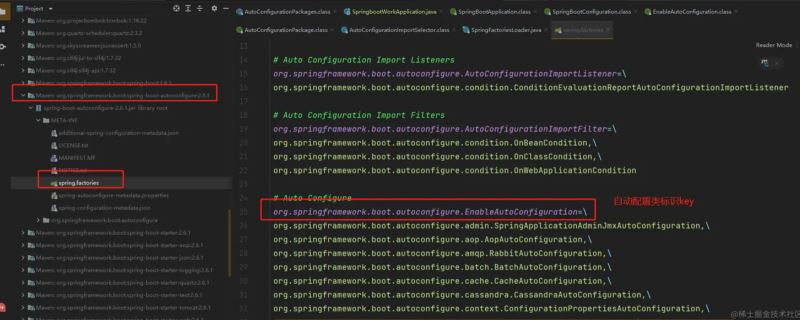
斷點查看result值如下:
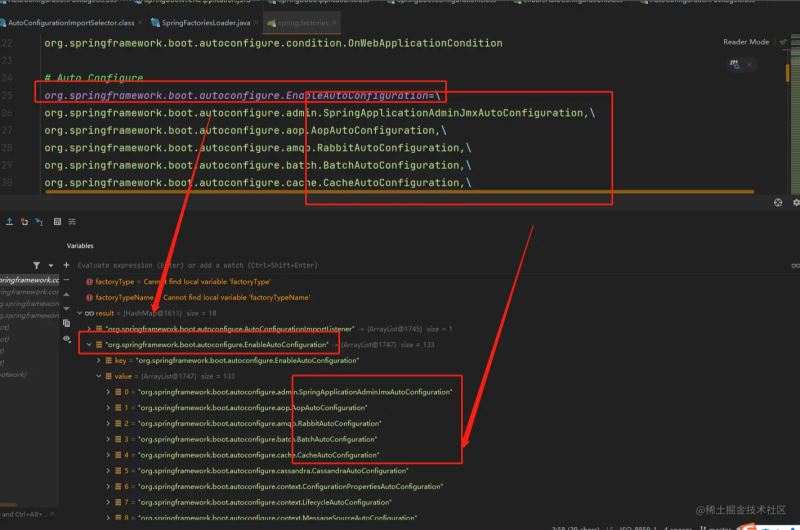
該方法作用是加載所有依賴的路徑META-INF/spring.factories文件,通過map結構保存,key為文件中定義的一些標識工廠類,value就是能自動配置的一些工廠實現的類,value用list保存并去重。
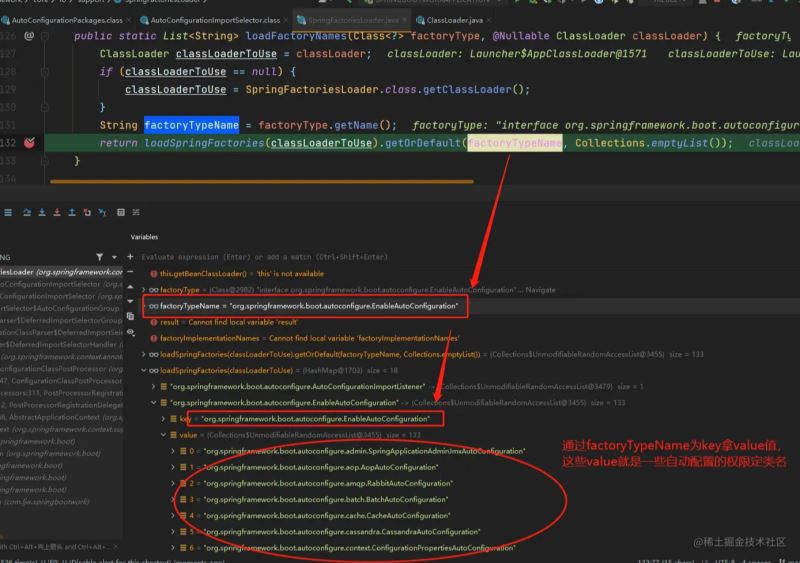
在回看 loadSpringFactories(classLoaderToUse).getOrDefault(factoryTypeName, Collections.emptyList());
因為 loadFactoryNames 方法攜帶過來的第一個參數為 EnableAutoConfiguration.class,所以 factoryType 值也為 EnableAutoConfiguration.class,那么 factoryTypeName 值為 EnableAutoConfiguration。拿到的值就是META-INF/spring.factories文件下的key為
org.springframework.boot.autoconfigure.EnableAutoConfiguration的值
getOrDefault 當 Map 集合中有這個 key 時,就使用這個 key值,如果沒有就使用默認值空數組
結論:
loadSpringFactories()該方法就是從“META-INF/spring.factories”中加載給定類型的工廠實現的完全限定類名放到map中
loadFactoryNames()是根據SpringBoot的啟動生命流程,當需要加載自動配置類時,就會傳入org.springframework.boot.autoconfigure.EnableAutoConfiguration參數,從map中查找key為org.springframework.boot.autoconfigure.EnableAutoConfiguration的值,這些值通過反射加到容器中,之后的作用就是用它們來做自動配置,這就是Springboot自動配置開始的地方
只有這些自動配置類進入到容器中以后,接下來這個自動配置類才開始進行啟動
當需要其他的配置時如監聽相關配置:listenter,就傳不同的參數,獲取相關的listenter配置。
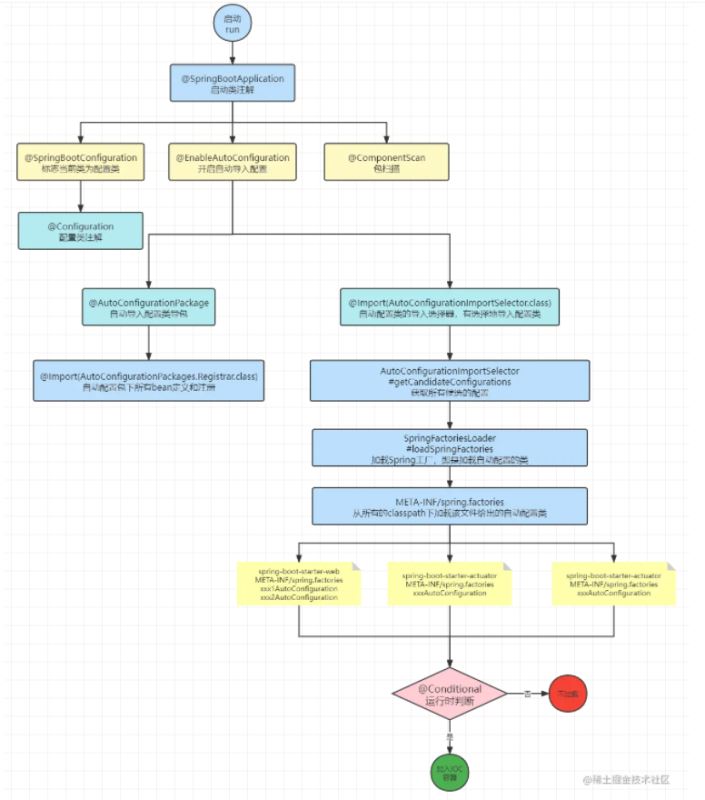
在加載自動配置類的時候,并不是將spring.factories的配置全部加載進來,而是通過@Conditional等注解的判斷進行動態加載
@Conditional其實是spring底層注解,意思就是根據不同的條件,來進行自己不同的條件判斷,如果滿足指定的條件,那么配置類里邊的配置才會生效。
常用的Conditional注解:
@ConditionalOnClass : classpath中存在該類時起效
@ConditionalOnMissingClass : classpath中不存在該類時起效
@ConditionalOnBean : DI容器中存在該類型Bean時起效
@ConditionalOnMissingBean : DI容器中不存在該類型Bean時起效
@ConditionalOnSingleCandidate : DI容器中該類型Bean只有一個或@Primary的只有一個時起效
@ConditionalOnExpression : SpEL表達式結果為true時
@ConditionalOnProperty : 參數設置或者值一致時起效
@ConditionalOnResource : 指定的文件存在時起效
@ConditionalOnJndi : 指定的JNDI存在時起效
@ConditionalOnJava : 指定的Java版本存在時起效
@ConditionalOnWebApplication : Web應用環境下起效
@ConditionalOnNotWebApplication : 非Web應用環境下起效
1.帶有@Configuration的配置類
2.ImportSelector 的實現
3.ImportBeanDefinitionRegistrar 的實現
感謝你能夠認真閱讀完這篇文章,希望小編分享的“SpringBoot自動配置原理的示例分析”這篇文章對大家有幫助,同時也希望大家多多支持億速云,關注億速云行業資訊頻道,更多相關知識等著你來學習!
免責聲明:本站發布的內容(圖片、視頻和文字)以原創、轉載和分享為主,文章觀點不代表本網站立場,如果涉及侵權請聯系站長郵箱:is@yisu.com進行舉報,并提供相關證據,一經查實,將立刻刪除涉嫌侵權內容。