您好,登錄后才能下訂單哦!
您好,登錄后才能下訂單哦!
這篇文章主要介紹怎么利用vue3仿蘋果系統側邊消息提示效果,文中介紹的非常詳細,具有一定的參考價值,感興趣的小伙伴們一定要看完!
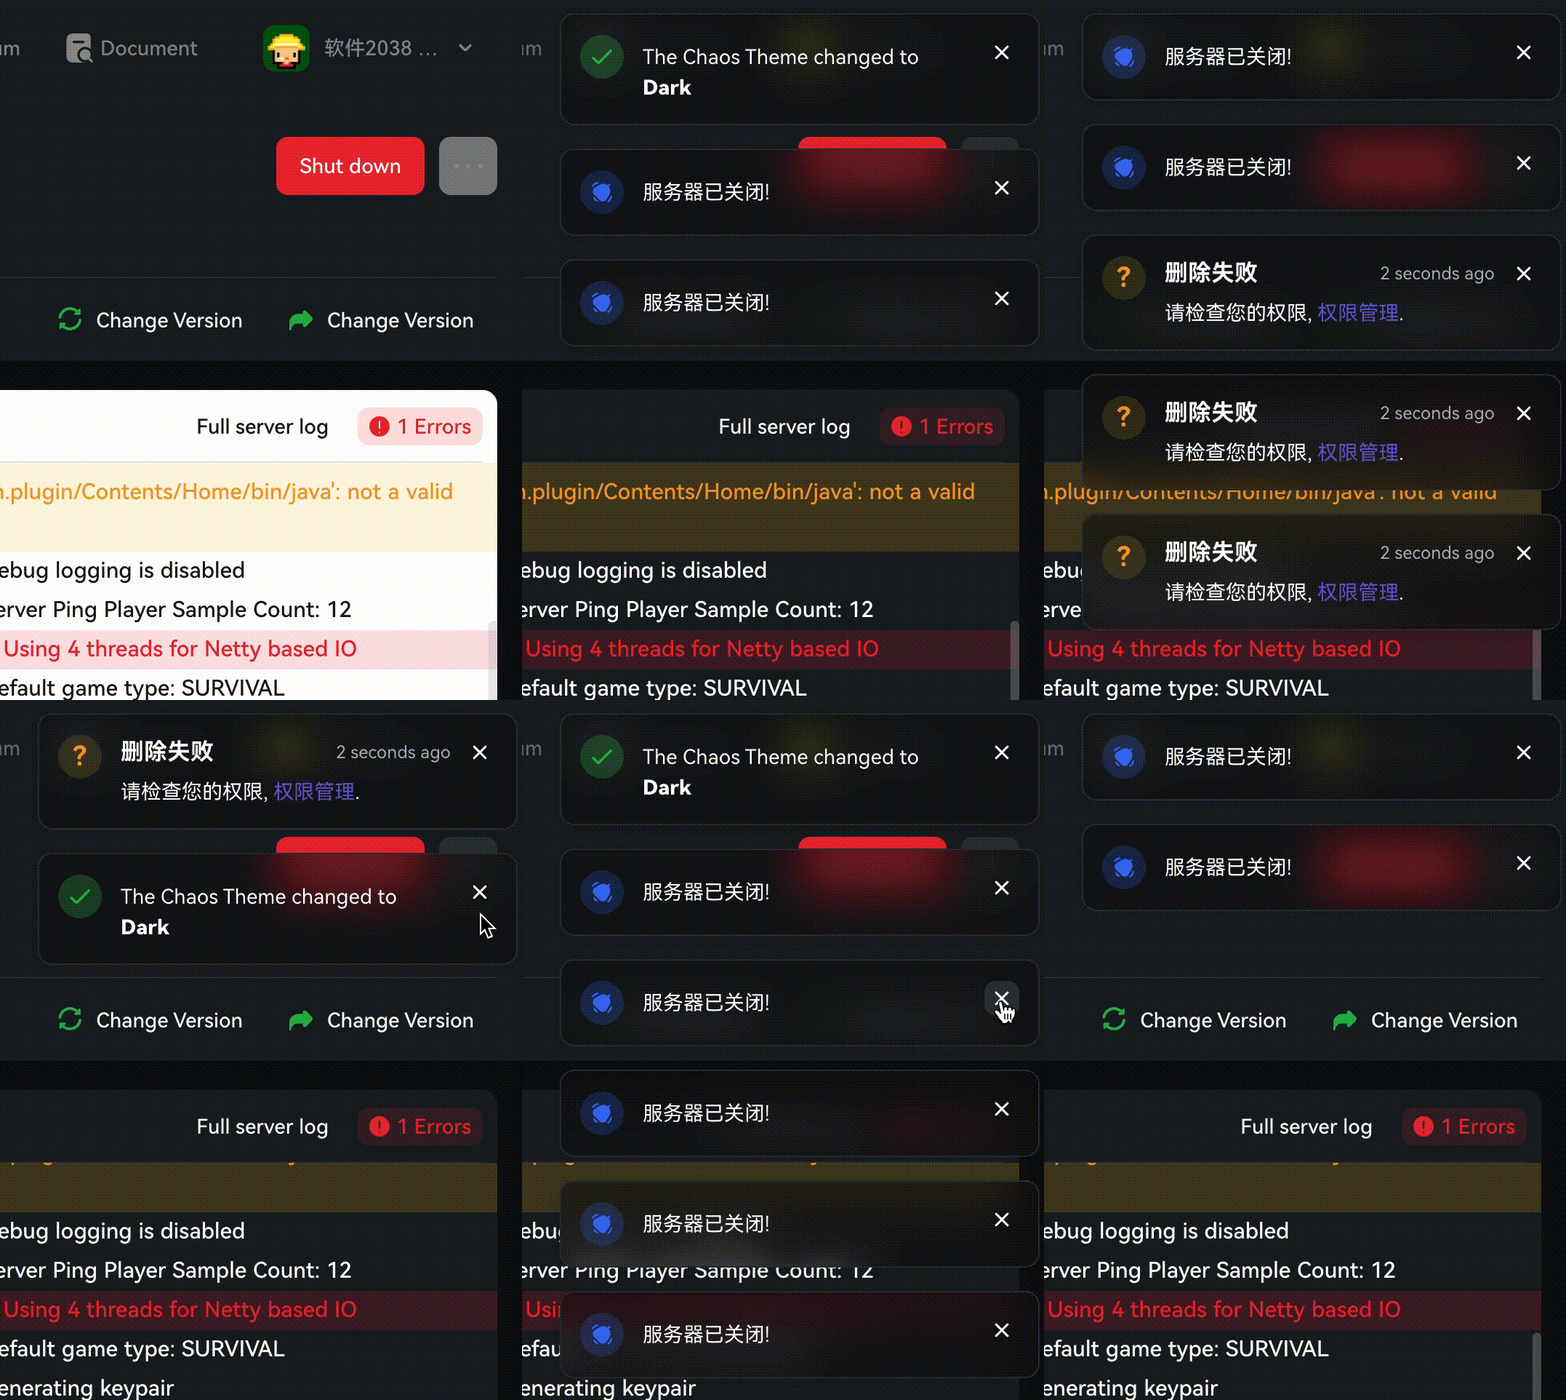
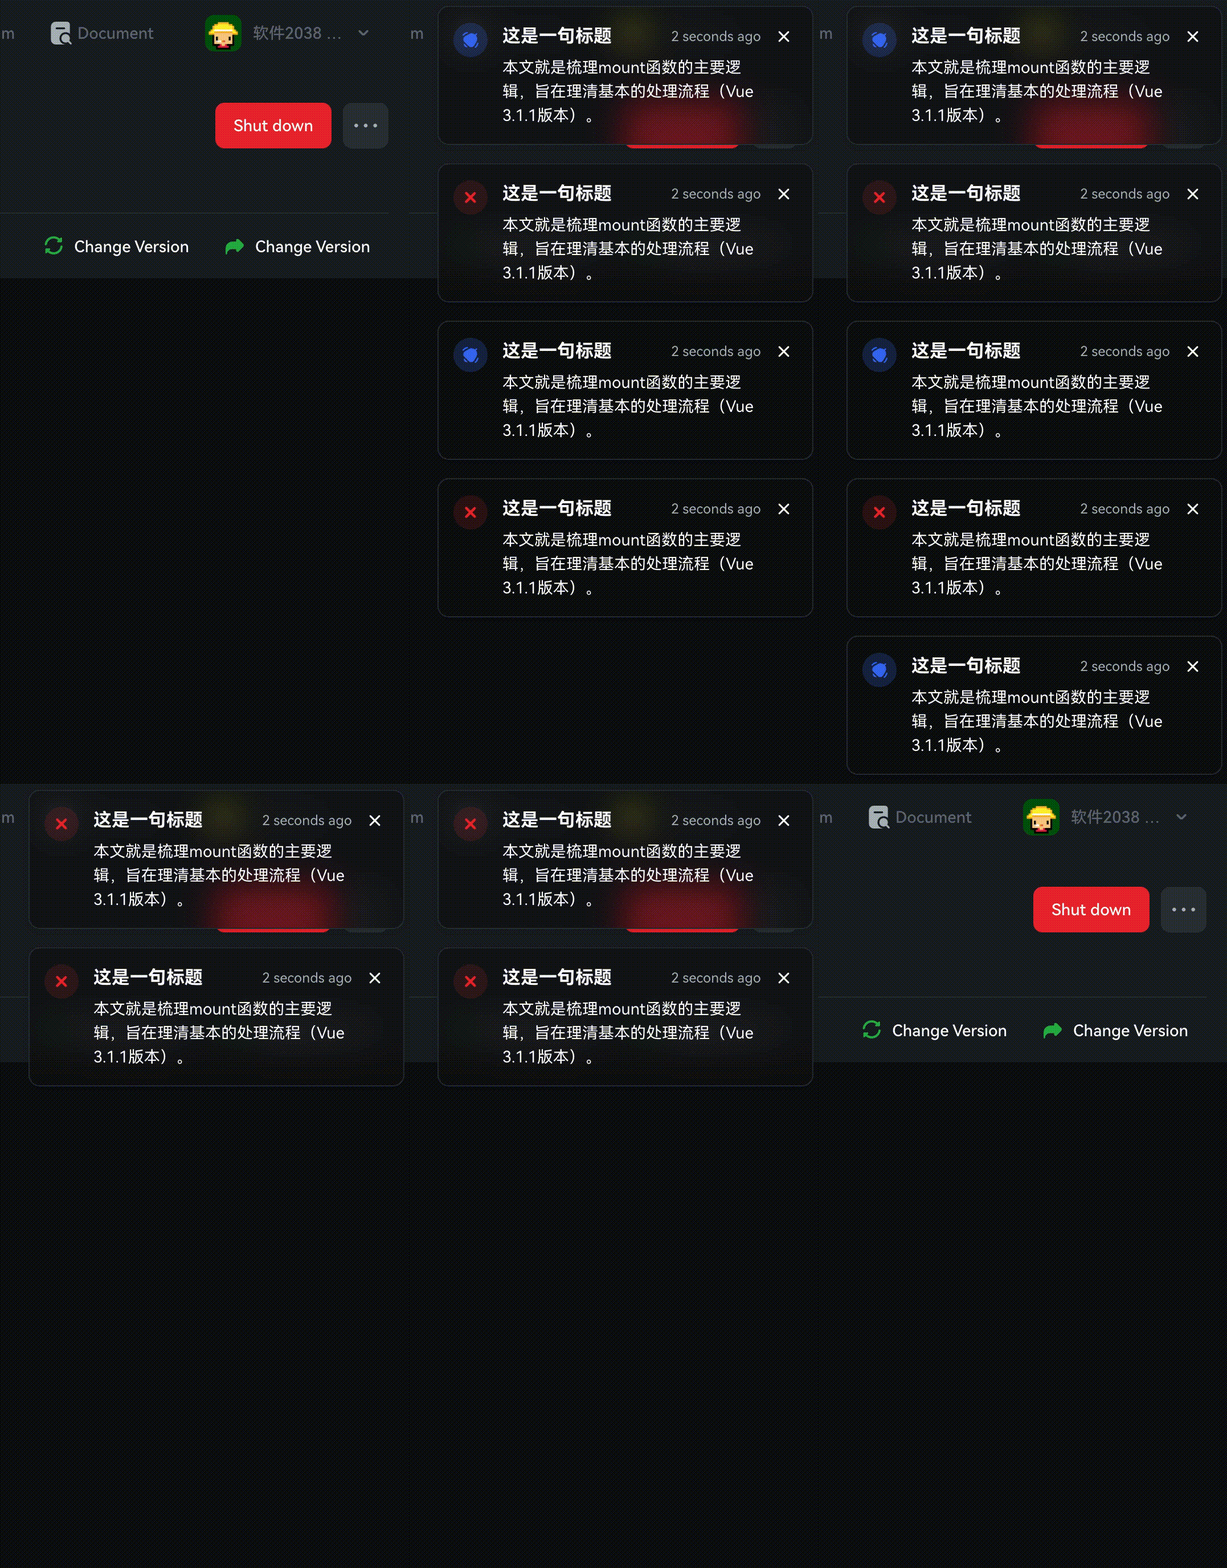
最近在做畢業設計, 想給畢設系統加上一個仿蘋果系統的側邊消息提示框, 讓我們先來看看效果.

熟悉前端開發的同學可能發現了, 在 Element UI 中這個組件叫 Notification 通知; 在Bootstrap 中這個組件叫 Toasts.
當初看到這個組件就覺得很酷炫, 今天就帶大家看一下我是怎么一步一步實現的, 有不對或者可以優化的地方請各位大佬點評. ???? (本次組件基于 Vue3 實現)
Toasts
|
| -- index.js // 注冊組件, 定義全局變量以便調用
|
| -- instance.js // 手動實例創建前后的邏輯
|
| -- toasts.vue // 消息提示 HTMl 部分
|
| -- toastsBus.js // 解決 vue3 去除 $on和$emit 的解決方案

<!-- 彈窗 -->
<div class="toast-container">
    <!-- icon圖標 -->
    <template>
        ...
    </template>
    <!-- 主要內容 -->
    <div class="toast-content">
        <!-- 標題及其倒計時 -->
        <div class="toast-head">
            ...
        </div>
        <!-- body -->
        <div class="toast-body">...</div>
        <!-- 操作按鈕 -->
        <div class="toast-operate">
            ...
        </div>
    </div>
    <!-- 關閉 -->
    <div class="toast-close">
        <i class="fi fi-rr-cross-small"></i>
    </div>
</div>
在這里我們注冊組件, 定義全局變量以便調用
import toast from './instance'
import Toast from './toasts.vue'

export default (app) => {
    // 注冊組件
    app.component(Toast.name, Toast);
    // 注冊全局變量, 后續只需調用 $Toast({}) 即可
    app.config.globalProperties.$Toast = toast;
}???????????? 這里是全文的重點 ????????????
首先我們學習如何將組件手動掛載至頁面
import { createApp } from 'vue';
import Toasts from './toasts'

const toasts = (options) => {
    // 創建父容器
    let root = document.createElement('div');
    document.body.appendChild(root)
    // 創建Toasts實例
    let ToastsConstructor = createApp(Toasts, options)
    // 掛載父親元素
    let instance = ToastsConstructor.mount(root)
    // 拋出實例本身給vue
    return instance
}
export default toasts;
給每一個創建的 toasts 正確的定位

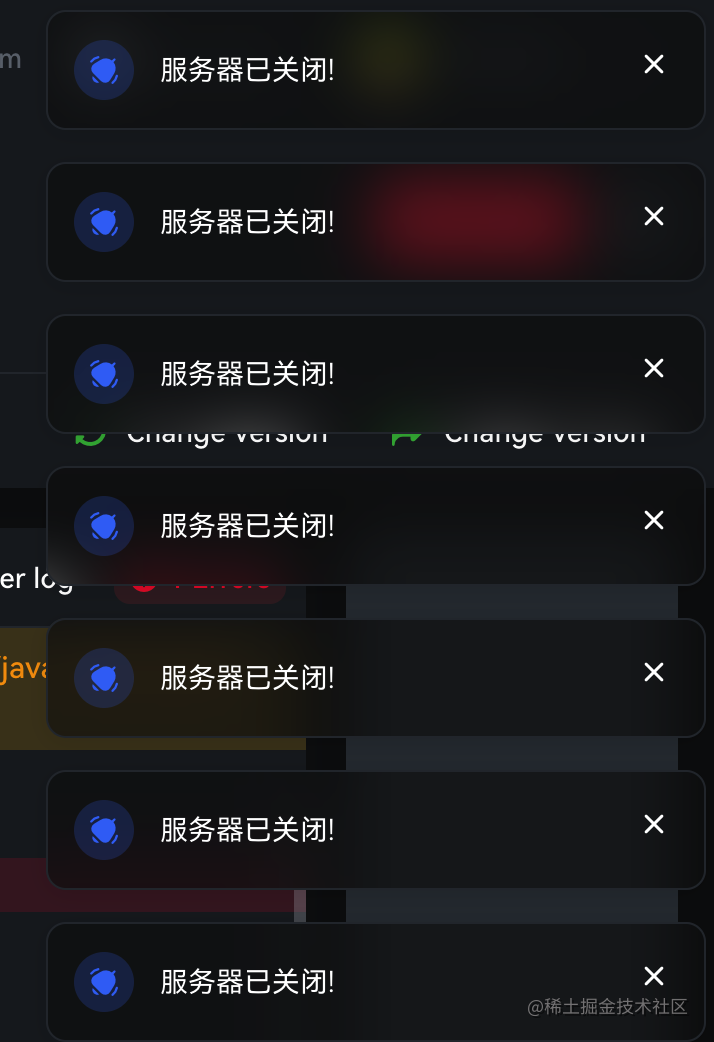
如圖所示, 每創建一個 toasts 將會排列到上一個 toasts 的下方(這里的間隙為16px). 想要做到這種效果我們需要知道 已存在 的toasts 的高度.
// instance.js

// 這里我們需要定義一個數組來存放當前存活的 toasts
let instances = []

const toasts = (options) => {
    ...
    // 創建后將實例加入數組
    instances.push(instance)

    // 重制高度
    let verticalOffset = 0
    // 遍歷獲取當前已存活的 toasts 高度及其間隙 累加
    instances.forEach(item => {
        verticalOffset += item.$el.offsetHeight + 16
    })
    // 累加本身需要的間隙
    verticalOffset += 16
    // 賦值當前實例y軸方向便宜長度
    instance.toastPosition.y = verticalOffset
    ...
}
export default toasts;
加入 主動&定時 關閉功能
讓我們先來分析一下這里的業務:
定時關閉: 在 toast 創建時給一個自動關閉時間, 當計時器結束后自動關閉.
主動關閉: 點擊關閉按鈕關閉 toast.
在這個基礎上我們可以加上一些人性化的操作, 例如鼠標移入某個 toast 時停止它的自動關閉(其他 toast 不受影響), 當鼠標移開時重新啟用它的自動關閉.
<!-- toasts.vue -->
<template>
    <transition name="toast" @after-leave="afterLeave" @after-enter="afterEnter">
        <div ref="container" class="toast-container" : v-show="visible" @mouseenter="clearTimer" @mouseleave="createTimer">
            ...
            <!-- 關閉 -->
            <div class="toast-close"  @click="destruction">
                <i class="fi fi-rr-cross-small"></i>
            </div>
        </div>
    </transition>
</template>

<script>
import Bus from './toastsBus'
import {ref, computed, onMounted, onBeforeUnmount} from 'vue'
export default {
    props: {
        // 自動關閉時間 (單位毫秒)
        autoClose: {
            type: Number,
            default: 4500
        }
    },
    setup(props){
        // 是否顯示
        const visible = ref(false);

        // toast容器實例
        const container = ref(null);
        // toast本身高度
        const height = ref(0);

        // toast位置
        const toastPosition = ref({
            x: 16,
            y: 16
        })
        const toastStyle = computed(()=>{
            return {
                top: `${toastPosition.value.y}px`,
                right: `${toastPosition.value.x}px`,
            }
        })

        // toast的id
        const id = ref('')

        // toast離開動畫結束后
        function afterLeave(){
            // 告訴 instance.js 需要進行關閉操作 ()
            Bus.$emit('closed',id.value);
        }
        // toast進入動畫結束后
        function afterEnter(){
            height.value = container.value.offsetHeight
        }

        // 定時器
        const timer = ref(null);

        // 鼠標進入toast
        function clearTimer(){
             if(timer.value)
                clearTimeout(timer.value)
        }
        // 鼠標移出toast
        function createTimer(){
           if(props.autoClose){
                timer.value = setTimeout(() => {
                    visible.value = false
                }, props.autoClose)
            }
        }

        // 銷毀
        function destruction(){
            visible.value = false
        }

        onMounted(()=>{
            createTimer();
        })

        onBeforeUnmount(()=>{
            if(timer.value)
                clearTimeout(timer.value)
        })


        return {
            visible,
            container,
            height,
            toastPosition,
            toastStyle,
            id,
            afterLeave,
            afterEnter,
            timer,
            clearTimer,
            createTimer,
            destruction
        }
    }
}
</script>
我們來分析一下 instance.js 中 toast 關閉時的邏輯
將此 toast 從存活數組中刪除, 并且遍歷數組將從此條開始后面的 toast 位置向上位移.
從 <body> 中刪除Dom元素.
調用 unmount() 銷毀實例.

// instance.js
import { createApp } from 'vue';
import Toasts from './toasts'
import Bus from './toastsBus'

let instances = []
let seed = 1

const toasts = (options) => {
    // 手動掛載實例
    let ToastsConstructor = createApp(Toasts, options)
    let instance = ToastsConstructor.mount(root)
    // 給實例加入唯一標識符
    instance.id = id
    // 顯示實例
    instance.visible = true

    ...

    // 監聽 toasts.vue 傳來關閉事件
    Bus.$on('closed', (id) => {
        // 因為這里會監聽到所有的 ‘closed' 事件, 所以要匹配 id 確保
        if (instance.id == id) {
            // 調用刪除邏輯
            removeInstance(instance)
            // 在 <body> 上刪除dom元素
            document.body.removeChild(root)
            // 銷毀實例
            ToastsConstructor.unmount();
        }
    })

    instances.push(instance)
    return instance
}

export default toasts;

// 刪除邏輯
const removeInstance = (instance) => {
    if (!instance) return
    let len = instances.length
    // 找出當前需要銷毀的下標
    const index = instances.findIndex(item => {
        return item.id === instance.id
    })
    // 從數組中刪除
    instances.splice(index, 1)
    // 如果當前數組中還存在存活 Toasts, 需要遍歷將下面的Toasts上移, 重新計算位移
    if (len <= 1) return
    // 獲取被刪除實例的高度
    const h = instance.height
    // 遍歷被刪除實例以后下標的 Toasts
    for (let i = index; i < len - 1; i++) {
        // 公式: 存活的實例將本身的 y 軸偏移量減去被刪除高度及其間隙高度
        instances[i].toastPosition.y = parseInt(instances[i].toastPosition.y - h - 16)
    }
}index.js
import toast from './instance'
import Toast from './toasts.vue'

export default (app) => {
    app.component(Toast.name, Toast);
    app.config.globalProperties.$Toast = toast;
}
toastsBus.js
import emitter from 'tiny-emitter/instance'

export default {
    $on: (...args) => emitter.on(...args),
    $once: (...args) => emitter.once(...args),
    $off: (...args) => emitter.off(...args),
    $emit: (...args) => emitter.emit(...args)
}
instance.js
import { createApp } from 'vue';
import Toasts from './toasts'
import Bus from './toastsBus'

let instances = []
let seed = 1

const toasts = (options) => {
    // 創建父容器
    const id = `toasts_${seed++}`
    let root = document.createElement('div');
    root.setAttribute('data-id', id)
    document.body.appendChild(root)
    let ToastsConstructor = createApp(Toasts, options)
    let instance = ToastsConstructor.mount(root)
    instance.id = id
    instance.visible = true
        // 重制高度
    let verticalOffset = 0
    instances.forEach(item => {
        verticalOffset += item.$el.offsetHeight + 16
    })
    verticalOffset += 16

    instance.toastPosition.y = verticalOffset

    Bus.$on('closed', (id) => {
        if (instance.id == id) {
            removeInstance(instance)
            document.body.removeChild(root)
            ToastsConstructor.unmount();
        }
    })
    instances.push(instance)
    return instance
}

export default toasts;

const removeInstance = (instance) => {
    if (!instance) return
    let len = instances.length
    const index = instances.findIndex(item => {
        return item.id === instance.id
    })
    instances.splice(index, 1)
    if (len <= 1) return
    const h = instance.height
    for (let i = index; i < len - 1; i++) {
        instances[i].toastPosition.y = parseInt(instances[i].toastPosition.y - h - 16)
    }
}
toast.vue
加入億點點細節, 例如icon可以自定義或者是圖片, 可以取消關閉按鈕, 設置自動關閉時長, 或者停用自動關閉功能.
<template>
<transition name="toast" @after-leave="afterLeave" @after-enter="afterEnter">
  <!-- 彈窗 -->
  <div ref="container" class="toast-container" : v-show="visible" @mouseenter="clearTimer" @mouseleave="createTimer">
    <!-- icon -->
    <template v-if="type || type != 'custom' || type != 'img'">
        <div class="toast-icon success" v-if="type==='success'">
            <i class="fi fi-br-check"></i>
        </div>
        <div class="toast-icon warning" v-if="type==='warning'">
            ?
        </div>
        <div class="toast-icon info" v-if="type==='info'">
            <i class="fi fi-sr-bell-ring"></i>
        </div>
        <div class="toast-icon error" v-if="type==='error'">
            <i class="fi fi-br-cross-small"></i>
        </div>
    </template>
    <div : class="toast-icon" v-if="type==='custom'" v-html="customIcon"></div>
    <img class="toast-custom-img" :src="customImg" v-if="type==='img'"/>
    <!-- content -->
    <div class="toast-content">
        <!-- head -->
        <div class="toast-head" v-if="title">
            <!-- title -->
            <span class="toast-title">{{title}}</span>
            <!-- time -->
            <span class="toast-countdown">{{countDown}}</span>
        </div>
        <!-- body -->
        <div class="toast-body" v-if="message" v-html="message"></div>
        <!-- operate -->
        <div class="toast-operate">
            <a class="toast-button-confirm"
               :class="[{'success':type==='success'},
                        {'warning':type==='warning'},
                        {'info':type==='info'},
                        {'error':type==='error'}]">{{confirmText}}</a>
        </div>
    </div>
    <!-- 關閉 -->
    <div v-if="closeIcon" class="toast-close"  @click="destruction">
        <i class="fi fi-rr-cross-small"></i>
    </div>
  </div>
  </transition>
</template>

<script>
import Bus from './toastsBus'
import {ref, computed, onMounted, onBeforeUnmount} from 'vue'
export default {
    props: {
        title: String,
        closeIcon: {
            type: Boolean,
            default: true
        },
        message: String,
        type: {
            type: String,
            validator: function(val) {
                return ['success', 'warning', 'info', 'error', 'custom', 'img'].includes(val);
            }
        },
        confirmText: String,
        customIcon: String,
        customIconBackground: String,
        customImg: String,
        autoClose: {
            type: Number,
            default: 4500
        }
    },
    setup(props){
        // 顯示
        const visible = ref(false);

        // 容器實例
        const container = ref(null);

        // 高度
        const height = ref(0);

        // 位置
        const toastPosition = ref({
            x: 16,
            y: 16
        })
        const toastStyle = computed(()=>{
            return {
                top: `${toastPosition.value.y}px`,
                right: `${toastPosition.value.x}px`,
            }
        })

        // 倒計時
        const countDown = computed(()=>{
            return '2 seconds ago'
        })

        const id = ref('')

        // 離開以后
        function afterLeave(){
            Bus.$emit('closed',id.value);
        }
        // 進入以后
        function afterEnter(){
            height.value = container.value.offsetHeight
        }

        // 定時器
        const timer = ref(null);

        // 鼠標進入
        function clearTimer(){
             if(timer.value)
                clearTimeout(timer.value)
        }
        // 鼠標移出
        function createTimer(){
           if(props.autoClose){
                timer.value = setTimeout(() => {
                    visible.value = false
                }, props.autoClose)
            }
        }

        // 銷毀
        function destruction(){
            visible.value = false
        }

        onMounted(()=>{
            createTimer();
        })

        onBeforeUnmount(()=>{
            if(timer.value)
                clearTimeout(timer.value)
        })

        return {
            visible,
            toastPosition,
            toastStyle,
            countDown,
            afterLeave,
            afterEnter,
            clearTimer,
            createTimer,
            timer,
            destruction,
            container,
            height,
            id
        }
    }
}
</script>

<style lang="scss" scoped>
// 外部容器
.toast-container{
    width: 330px;
    box-shadow: rgba(0, 0, 0, 0.1) 0px 2px 12px 0px;
    background-color: rgba(#F7F7F7, .6);
    border: 1px solid #E5E5E5;
    padding: 14px 13px;
    z-index: 1001;
    position: fixed;
    top: 0;
    right: 0;
    border-radius: 10px;
    backdrop-filter: blur(15px);
    display: flex;
    align-items: stretch;
    transition: all .3s ease;
    will-change: top,left;
}
// -------------- icon --------------
.toast-icon, .toast-close{
    flex-shrink: 0;
}
.toast-icon{
    width: 30px;
    height: 30px;
    border-radius: 100%;
    display: inline-flex;
    align-items: center;
    justify-content: center;
}
// 正確
.toast-icon.success{
    background-color: rgba(#2BB44A, .15);
    color: #2BB44A;
}
// 異常
.toast-icon.warning{
    background-color: rgba(#ffcc00, .15);
    color: #F89E23;
    font-weight: 600;
    font-size: 18px;
}
// 錯誤
.toast-icon.error{
    font-size: 18px;
    background-color: rgba(#EB2833, .1);
    color: #EB2833;
}
// 信息
.toast-icon.info{
    background-color: rgba(#3E71F3, .1);
    color: #3E71F3;
}
// 自定義圖片
.toast-custom-img{
    width: 40px;
    height: 40px;
    border-radius: 10px;
    overflow: hidden;
    flex-shrink: 0;
}
// ------------- content -----------
.toast-content{
    padding: 0 8px 0 13px;
    flex: 1;
}
// -------------- head --------------
.toast-head{
    display: flex;
    align-items: center;
    justify-content: space-between;
}
// title
.toast-title{
    font-size: 16px;
    line-height: 24px;
    color: #191919;
    font-weight: 600;
    overflow: hidden;
    text-overflow: ellipsis;
    white-space: nowrap;
}
// time
.toast-countdown{
    font-size: 12px;
    color: #929292;
    line-height: 18.375px;
}
// --------------- body -----------
.toast-body{
    color: #191919;
    line-height: 21px;
    padding-top: 5px;
}
// ---------- close -------
.toast-close{
    padding: 3px;
    cursor: pointer;
    font-size: 18px;
    width: 24px;
    height: 24px;
    border-radius: 8px;
    display: inline-flex;
    align-items: center;
    justify-content: center;
}
.toast-close:hover{
    background-color: rgba(#E4E4E4, .5);
}
// --------- operate ----------
.toast-button-confirm{
    font-weight: 600;
    color: #3E71F3;
}
.toast-button-confirm:hover{
    color: #345ec9;
}
// 成功
.toast-button-confirm.success{
    color: #2BB44A;
}
.toast-button-confirm.success:hover{
    color: #218a3a;
}
// 異常
.toast-button-confirm.warning{
    color: #F89E23;
}
.toast-button-confirm.warning:hover{
    color: #df8f1f;
}
// 信息
.toast-button-confirm.info{
    color: #3E71F3;
}
.toast-button-confirm.info:hover{
    color: #345ec9;
}
// 錯誤
.toast-button-confirm.error{
    color: #EB2833;
}
.toast-button-confirm.error:hover{
    color: #c9101a;
}


/*動畫*/
.toast-enter-from,
.toast-leave-to{
  transform: translateX(120%);
}
.v-leave-from,
.toast-enter-to{
  transform: translateX(00%);
}
</style>
main.js
import { createApp } from 'vue'
import App from './App.vue'

const app = createApp(App)

import '@/assets/font/UIcons/font.css'

// 安裝toasts
import toasts from './components/toasts'

app.use(toasts).mount('#app')
使用
<template>
    <button @click="clickHandle">發送</button>
</template>

<script>
import { getCurrentInstance } from 'vue'
export default {
  setup(){
    const instance = getCurrentInstance()
    function clickHandle(){
      // 這里調用 vue3 的全局變量時比較羞恥, 不知道各位大佬有沒有其他好辦法
      instance.appContext.config.globalProperties.$Toast({
        type: 'info',
        title: '這是一句標題',
        message: '本文就是梳理mount函數的主要邏輯,旨在理清基本的處理流程(Vue 3.1.1版本)。'
      })
    }
    return {
      clickHandle
    }
  }
}
</script>
以上是“怎么利用vue3仿蘋果系統側邊消息提示效果”這篇文章的所有內容,感謝各位的閱讀!希望分享的內容對大家有幫助,更多相關知識,歡迎關注億速云行業資訊頻道!
免責聲明:本站發布的內容(圖片、視頻和文字)以原創、轉載和分享為主,文章觀點不代表本網站立場,如果涉及侵權請聯系站長郵箱:is@yisu.com進行舉報,并提供相關證據,一經查實,將立刻刪除涉嫌侵權內容。