您好,登錄后才能下訂單哦!
您好,登錄后才能下訂單哦!
本篇內容介紹了“如何解決springboot定時任務@Scheduled執行多次的問題”的有關知識,在實際案例的操作過程中,不少人都會遇到這樣的困境,接下來就讓小編帶領大家學習一下如何處理這些情況吧!希望大家仔細閱讀,能夠學有所成!
springboot定時任務@Scheduled執行多次
原因
解決方法
使用 @Scheduled 定時任務突然不執行了
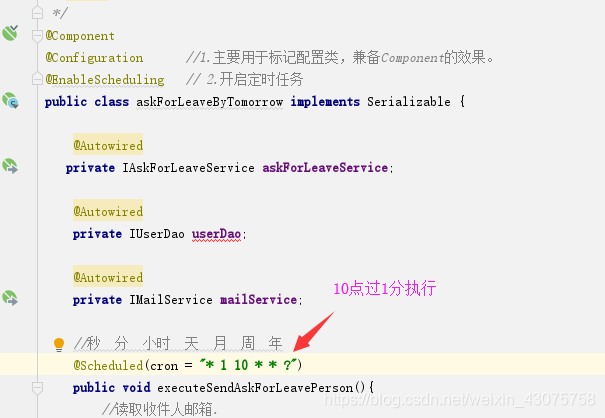
在spring boot開發定時任務時遇到一個很怪異的現象..我進行調試模式,在沒有bug的情況下.執行了三 次才停止..如圖:

是因為執行時間太短,在CronSequenceGenerator.class的next方法。
public Date next(Date date) {
        Calendar calendar = new GregorianCalendar();
        calendar.setTimeZone(this.timeZone);
        calendar.setTime(date);
        //1.設置下次執行時間的毫秒為0,如上次任務執行過程不足1秒,則calendar的時間會被設置成上次任務的執行時間
        calendar.set(14, 0);
        long originalTimestamp = calendar.getTimeInMillis();
        this.doNext(calendar, calendar.get(1));
        //2.由于有上面一步,執行時間太短,會導致下述條件為true
            if(calendar.getTimeInMillis() == originalTimestamp) {
        //3.calendar在原來的時間上增加1秒
            calendar.add(13, 1);
         //CronSequenceGenerator的doNext算法從指定時間開始(包括指定時間)查找符合cron表達式規則下一個匹配的時間
         //注意第一個匹配符是*,由于增加了1秒,依然符合cron="* 0/2 * * * *",所以下一個執行時間就是在原來的基礎上增加了一               秒
            this.doNext(calendar, calendar.get(1));
        }
        return calendar.getTime();
代碼會進入if語句,并設置執行時間在原來的基礎上增加一秒。
但由于增加一秒后的時間戳依然符合cron表達式,于是在執行完代碼后一秒,任務又開始執行了
程序執行時間太短沒有關系,只要cron表達式秒的匹配符不設置為*就可以了。如圖:

在 SpringBoot 中可以通過 @Scheduled 注解來定義一個定時任務, 但是有時候你可能會發現有的定時任務到時間了卻沒有執行,但是又不是每次都不執行,這是怎么回事?
下面這段代碼定義了一個每隔十秒鐘執行一次的定時任務:
@Component
public class ScheduledTaskDemo {
    private static final Logger logger = LoggerFactory.getLogger(ScheduledTaskDemo.class);
    @Scheduled(cron = "0/10 * * * * *")
    public void execute() {
        logger.info("Scheduled task is running... ...");
    }
}
此時啟動 SpringBoot 應用, 可以在控制臺看到這個定時任務每隔10秒鐘打印一條log

但是, 一切還沒結束,如果沒有相關log顯示, 檢查是否在入口類或者 Configuration 類上添加了@EnableScheduling 注解
在上面的相關代碼中, 我們使用cron表達式來指定定時任務的執行時間點, 即從0秒開始, 每隔10秒鐘執行一次, 現在我們再加一個定時任務:
@Component
public class SecondScheduledTaskDemo {
    private static final Logger logger = LoggerFactory.getLogger(ScheduledTaskDemo.class);
    @Scheduled(cron = "0/10 * * * * *")
    public void second() {
        logger.info("Second scheduled task is starting... ...");
        logger.info("Second scheduled task is ending... ...");
    }
}
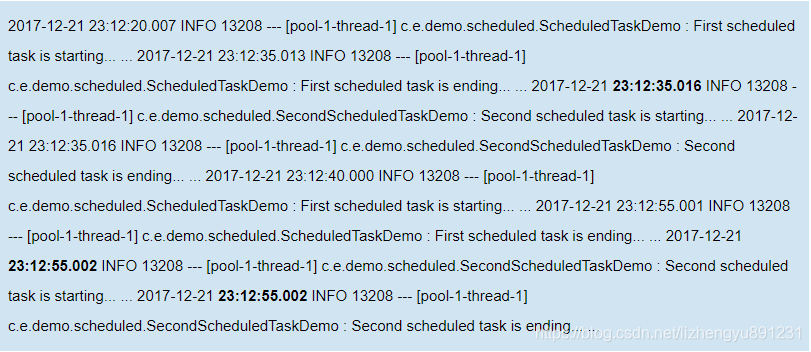
現在再啟動SpringBoot應用, 再看log:

注意log中定時任務執行的時間點, 第二個定時任務原本應該每隔10秒鐘執行一次, 但是從23:12:20到23:13:55, 本該執行4次, 確只執行了2次.
難道是cron表達式不對?
No.
為了找到原因, 我們從 @Scheduled 注解的源碼開始找:
*
 * <p>Processing of {@code @Scheduled} annotations is performed by
 * registering a {@link ScheduledAnnotationBeanPostProcessor}. This can be
 * done manually or, more conveniently, through the {@code <task:annotation-driven/>}
 * element or @{@link EnableScheduling} annotation.
 *
劃重點, 每一個有 @Scheduled 注解的方法都會被注冊為一個ScheduledAnnotationBeanPostProcessor, 再接著往下看ScheduledAnnotationBeanPostProcessor:
/**
     * Set the {@link org.springframework.scheduling.TaskScheduler} that will invoke
     * the scheduled methods, or a {@link java.util.concurrent.ScheduledExecutorService}
     * to be wrapped as a TaskScheduler.
     * <p>If not specified, default scheduler resolution will apply: searching for a
     * unique {@link TaskScheduler} bean in the context, or for a {@link TaskScheduler}
     * bean named "taskScheduler" otherwise; the same lookup will also be performed for
     * a {@link ScheduledExecutorService} bean. If neither of the two is resolvable,
     * a local single-threaded default scheduler will be created within the registrar.
     * @see #DEFAULT_TASK_SCHEDULER_BEAN_NAME
     */
    public void setScheduler(Object scheduler) {
        this.scheduler = scheduler;
    }
重點來了, 注意這句話:

這句話意味著, 如果我們不主動配置我們需要的 TaskScheduler, SpringBoot 會默認使用一個單線程的scheduler來處理我們用 @Scheduled 注解實現的定時任務, 到此我們剛才的問題就可以理解了:
23:12:20, 第一個定時任務在線程pool-1-thread-1開始執行, 由于我們沒有配置scheduler, 目前這個線程池pool-1里只有一個線程, 在打印了starting日志之后, 這個線程開始sleep;第二個定時任務也準備執行, 但是線程池已經沒有多余線程了, 只能等待.
23:12:30, 第一個定時任務還在sleep, 第二個定時任務還在等待.
23:12:35, 第一個定時任務sleep結束, 打印ending日志并結束, 此時線程池空閑, 第二個定時任務從等待狀態直接開始執行, 執行結束之后, 線程池空閑.
23:12:40, 線程池空閑, 第一個定時任務執行, 打印starting日志, 開始sleep.

搞清楚這個流程之后, 解決這個問題就很簡單了.
根據剛才注釋的描述, 我們只需要提供一個滿足我們需要的 TaskScheduler 并注冊到context中就可以了.
@Configuration
public class ScheduledTaskConfiguration implements SchedulingConfigurer {
    /**
     * Callback allowing a {@link TaskScheduler
     * TaskScheduler} and specific {@link Task Task}
     * instances to be registered against the given the {@link ScheduledTaskRegistrar}
     *
     * @param taskRegistrar the registrar to be configured.
     */
    @Override
    public void configureTasks(ScheduledTaskRegistrar taskRegistrar) {
        final ThreadPoolTaskScheduler taskScheduler = new ThreadPoolTaskScheduler();
        taskScheduler.setPoolSize(2);
        taskScheduler.initialize();
        taskRegistrar.setTaskScheduler(taskScheduler);
    }
}
上面的代碼提供了一個線程池大小為2的taskScheduler, 現在再啟動下SpringBoot看看效果.

可以看到, 當線程池里有兩個線程的時候, 這兩個定時任務各自按照預定的時間進行觸發, 互不影響了.
“如何解決springboot定時任務@Scheduled執行多次的問題”的內容就介紹到這里了,感謝大家的閱讀。如果想了解更多行業相關的知識可以關注億速云網站,小編將為大家輸出更多高質量的實用文章!
免責聲明:本站發布的內容(圖片、視頻和文字)以原創、轉載和分享為主,文章觀點不代表本網站立場,如果涉及侵權請聯系站長郵箱:is@yisu.com進行舉報,并提供相關證據,一經查實,將立刻刪除涉嫌侵權內容。