您好,登錄后才能下訂單哦!
您好,登錄后才能下訂單哦!
本篇內容介紹了“如何用Unity實現局域網聊天室功能”的有關知識,在實際案例的操作過程中,不少人都會遇到這樣的困境,接下來就讓小編帶領大家學習一下如何處理這些情況吧!希望大家仔細閱讀,能夠學有所成!
整體過程分為兩部分:構建服務端、構建客戶端。
大概思路:
1. 聲明Socket連接以及綁定IP和端口,這里面使用
using System;
using System.Collections.Generic;
using System.Linq;
using System.Text;
using System.Threading.Tasks;
using System.Net.Sockets;
using System.Net;


namespace ServerApplication
{
    class Program
    {
        public static string IP;
        public static int Port;
        static List<Client> clientList = new List<Client>();

        static Socket serverSocket;


        static void Main(string[] args)
        {

            //綁定IP和端口
            BindIPAndPort();
            //
            while (true)
            {
                Socket clientSocket = serverSocket.Accept();
                Client client = new Client(clientSocket);
                clientList.Add(client);
                Console.WriteLine("一臺主機進入連接");
            }
        }


        /// <summary>
        /// 廣播數據
        /// </summary>
        public static void BroadcostMSG(string s)
        {
            List<Client> NotConnectedList = new List<Client>();
            foreach (var item in clientList)
            {
                if(item.IsConnected)
                {
                    item.SendMSG(s);
                }
                else
                {
                    NotConnectedList.Add(item);
                }

            }

            foreach (var item in NotConnectedList)
            {
                clientList.Remove(item);
            }


        }


        /// <summary>
        /// 綁定IP和端口
        /// </summary>
       public static void BindIPAndPort()
        {

            //創建一個serverSocket
            serverSocket = new Socket(AddressFamily.InterNetwork, SocketType.Stream, ProtocolType.Tcp);

            //聲明IP和端口
            Console.WriteLine("輸入IP地址:");
            IP = Console.ReadLine();
            string ipStr = IP;


            Console.WriteLine("請輸入端口:");
            Port = int.Parse(Console.ReadLine());
            int port = Port;

            IPAddress serverIp = IPAddress.Parse(ipStr);
            EndPoint serverPoint = new IPEndPoint(serverIp, port);

            //socket和ip進行綁定
            serverSocket.Bind(serverPoint);

            //監聽最大數為100
            serverSocket.Listen(100);
        }
    }
}
using System;
using System.Collections.Generic;
using System.Linq;
using System.Text;
using System.Threading.Tasks;
using System.Net.Sockets;
using System.Threading;
namespace ServerApplication
{
class Client
{
public Socket clientSocket;
//聲明一個線程用于接收信息
Thread t;
//接收信息所用容器
byte[] data = new byte[1024];
//構造函數
public Client(Socket s)
{
clientSocket = s;
t = new Thread(ReceiveMSG);
t.Start();
}
/// <summary>
/// 接收數據
/// </summary>
void ReceiveMSG()
{
while(true)
{
if (clientSocket.Poll(10,SelectMode.SelectRead))
{
break;
}
data = new byte[1024];
int length = clientSocket.Receive(data);
string message = Encoding.UTF8.GetString(data, 0, length);
Program.BroadcostMSG(message);
Console.WriteLine("收到消息:" + message);
}
}
/// <summary>
/// 發送數據
/// </summary>
/// <param name="s"></param>
public void SendMSG(string message)
{
byte[] data = Encoding.UTF8.GetBytes(message);
clientSocket.Send(data);
}
//判斷此Client對象是否在連接狀態
public bool IsConnected
{
get { return clientSocket.Connected; }
}
}
}a.UI界面
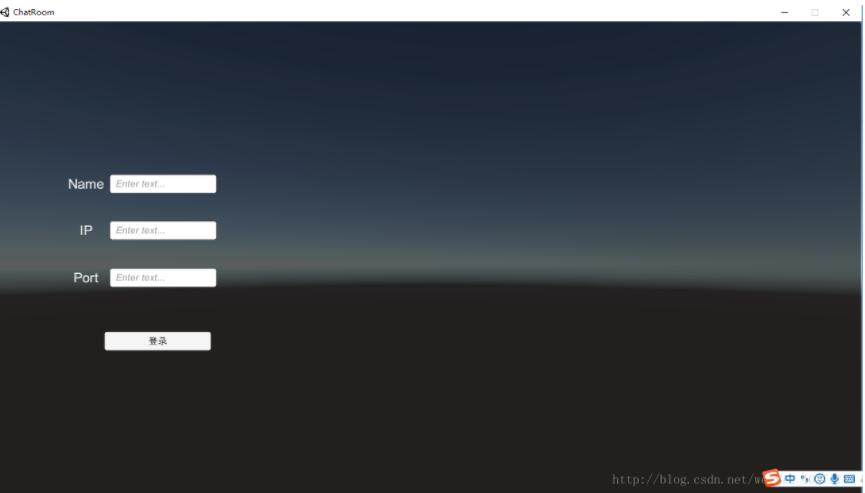
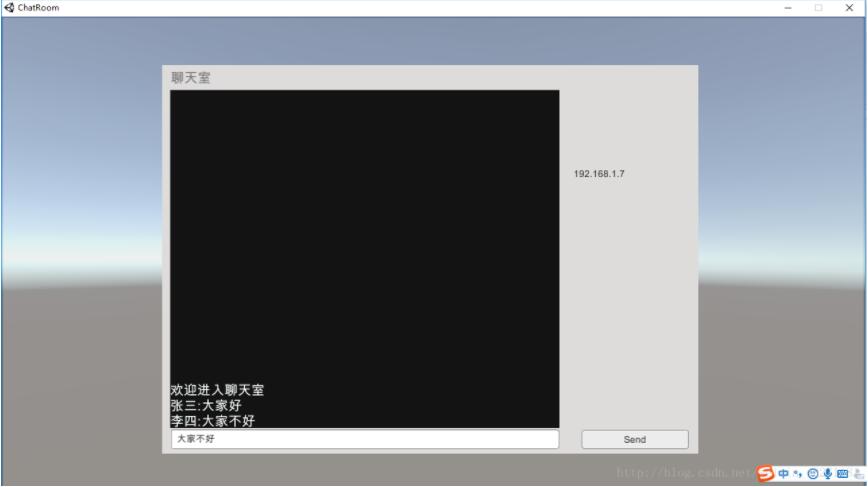
UI界面是使用UGUI實現的
登錄用戶可以自己取名進行登錄(發言時用于顯示),使用時需要輸入服務端的IP地址和端口號

下面是聊天室的頁面,在輸入框內輸入要發送的消息,點擊Send,將信息發送出去

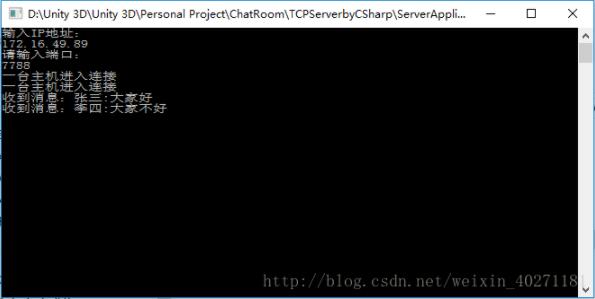
這是服務端的信息

b.關于客戶端的腳本
(1)這是ClientManager,負責與服務端進行連接,通信
using System.Collections;
using System.Collections.Generic;
using UnityEngine;
using System.Net.Sockets;
using System.Net;
using System.Text;
using UnityEngine.UI;
using System.Threading;
public class ClientManager : MonoBehaviour
{
    //ip:192.168.1.7
    public string ipAddressstr;
    public int port;
    public Text ipTextToShow;
    //Socket
    private Socket ClientServer;

    //文本輸入框
    public InputField inputTxt;
    public string inputMSGStr;

    //接收
    Thread t;
    public Text receiveTextCom;
    public string message;

    // Use this for initialization
    void Start()
    {
        ipTextToShow.text = ipAddressstr;
       // ConnectedToServer();

    }

    // Update is called once per frame
    void Update()
    {
        if (message != null && message != "")
        {
            receiveTextCom.text = receiveTextCom.text + "\n" + message;
            message = "";
        }
    }


    /// <summary>
    /// 連接服務器
    /// </summary>
    public void ConnectedToServer()
    {
        ClientServer = new Socket(AddressFamily.InterNetwork, SocketType.Stream, ProtocolType.Tcp);

        //聲明IP地址和端口
        IPAddress ServerAddress = IPAddress.Parse(ipAddressstr);
        EndPoint ServerPoint = new IPEndPoint(ServerAddress, port);

        ipAddressstr = IpInfo.ipStr;
        port = IpInfo.portStr;


        //開始連接
        ClientServer.Connect(ServerPoint);

        t = new Thread(ReceiveMSG);
        t.Start();

    }


    /// <summary>
    /// 接收消息
    /// </summary>
    /// <returns>“string”</returns>
    void ReceiveMSG()
    {
        while (true)
        {
            if (ClientServer.Connected == false)
            {
                break;
            }
            byte[] data = new byte[1024];
            int length = ClientServer.Receive(data);
            message = Encoding.UTF8.GetString(data, 0, length);
            //Debug.Log("有消息進來");

        }

    }


    /// <summary>
    /// 發送string類型數據
    /// </summary>
    /// <param name="input"></param>
    public void SendMSG()
    {

        Debug.Log("button Clicked");
        //message = "我:" + inputTxt.text;
        inputMSGStr = inputTxt.text;
        byte[] data = Encoding.UTF8.GetBytes(IpInfo.name+":"+inputMSGStr);
        ClientServer.Send(data);

    }

    private void OnDestroy()
    {
        ClientServer.Shutdown(SocketShutdown.Both);
        ClientServer.Close();
    }
    private void OnApplicationQuit()
    {
        OnDestroy();
    }
}
(2)SceneManager,用于場景切換,這里只是利用GameObject進行SetActive()來實現,并不是創建了單獨的Scene進行管理。
using System.Collections;
using System.Collections.Generic;
using UnityEngine;

public class SceneManager : MonoBehaviour {


    public GameObject loginPanel;
    public GameObject communicatingPanel;
    // Use this for initialization

    public void OnSwitch()
    {
        loginPanel.SetActive(false);
        communicatingPanel.SetActive(true);
    }
}
(3)LogInPanel和IPInfo,一個掛載在登錄界面上,一個是數據模型,用于存儲數據。
using System.Collections;
using System.Collections.Generic;
using UnityEngine;
using UnityEngine.UI;

public class LogInPanel : MonoBehaviour {


    public Text nameInputTxt;
    public Text ipInputTxt;
    public Text portInputTxt;


    //private string name;
    //private string ipStr;
    //private string portStr;


    public void OnLogInClick()
    {
        IpInfo.name = nameInputTxt.text;
        IpInfo.ipStr = ipInputTxt.text;
        IpInfo.portStr = int.Parse(portInputTxt.text);
    }


}
public static class IpInfo {
public static string name;
public static string ipStr;
public static int portStr;
}“如何用Unity實現局域網聊天室功能”的內容就介紹到這里了,感謝大家的閱讀。如果想了解更多行業相關的知識可以關注億速云網站,小編將為大家輸出更多高質量的實用文章!
免責聲明:本站發布的內容(圖片、視頻和文字)以原創、轉載和分享為主,文章觀點不代表本網站立場,如果涉及侵權請聯系站長郵箱:is@yisu.com進行舉報,并提供相關證據,一經查實,將立刻刪除涉嫌侵權內容。