您好,登錄后才能下訂單哦!
您好,登錄后才能下訂單哦!
這篇文章主要講解了“如何理解SpringCloud搭建父工程的過程”,文中的講解內容簡單清晰,易于學習與理解,下面請大家跟著小編的思路慢慢深入,一起來研究和學習“如何理解SpringCloud搭建父工程的過程”吧!
SpringCloud和SpringBoot版本選擇
更詳細的版本選擇
相關技術選型
創建工程
創建父工程
新建maven工程
配置父工程的pom文件
SpringCloud是分布式微服務架構的一站式解決方案,十多種微服務架構落地技術的集合體,俗稱微服務全家桶
自2019年以后官方建議使用2.0以后的版本
官網地址
在官網的頁首可以看到最新版本以及對應的springboot版本
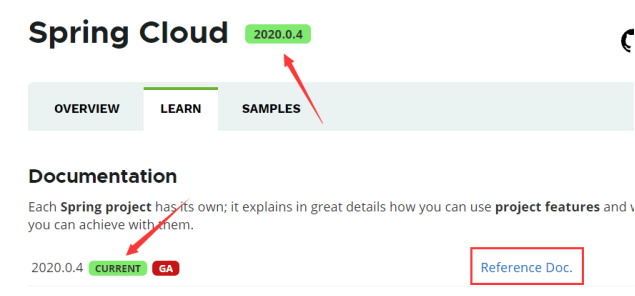
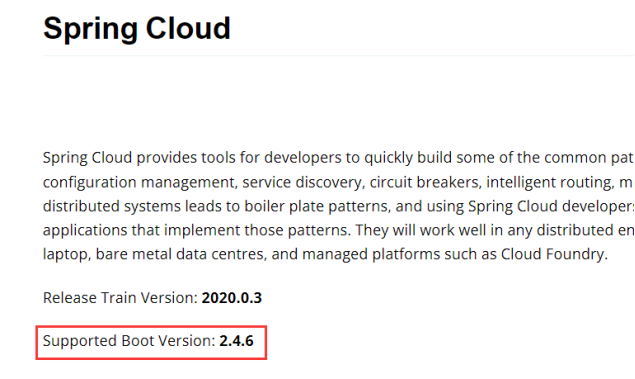
在官網可以看到官方推薦的springcloud與springboot相對應的版本

版本info

其中可以看到官方推薦的版本選擇
目前選擇以下版本
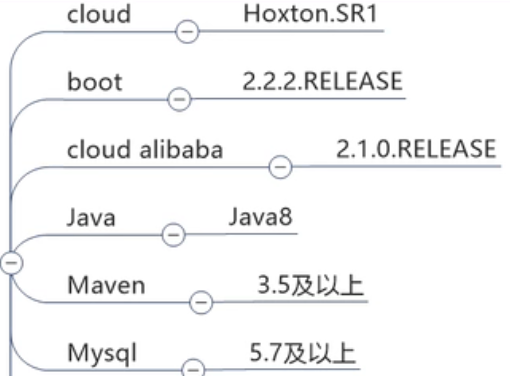

鐵則:約定>配置>編碼
New Project
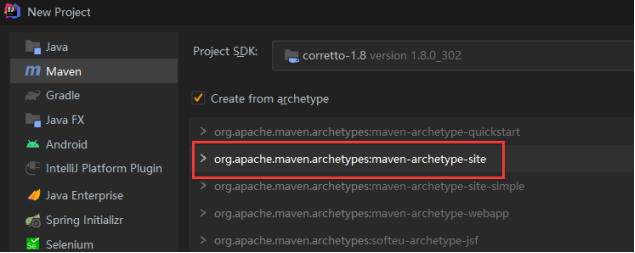
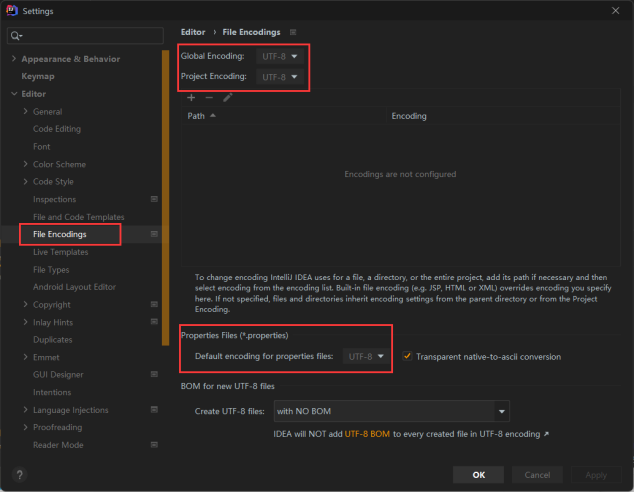
字符編碼
在setting中設置
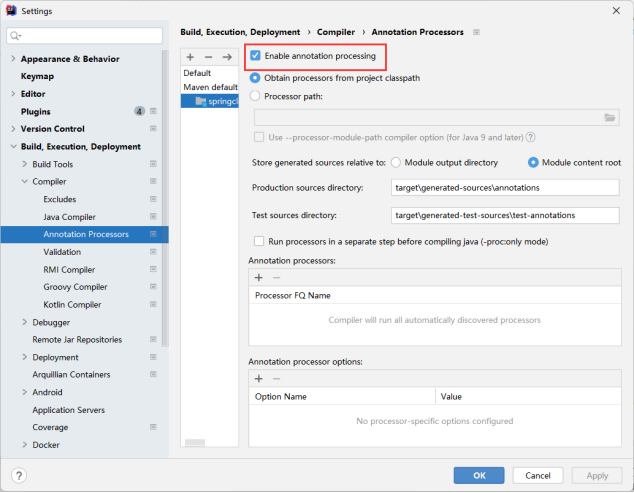
使注解生效
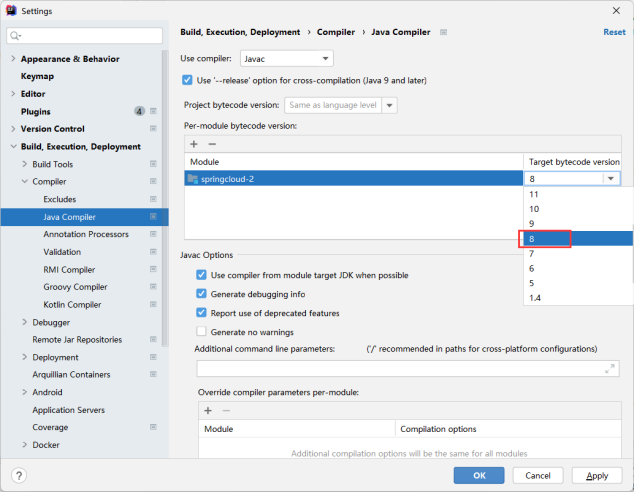
選擇java編譯版本為java8
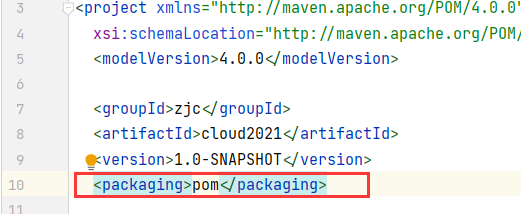
指定打包方式為pom
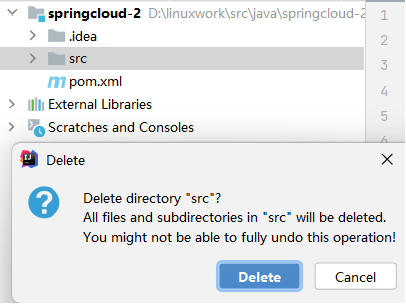
刪除自帶的src文件夾
更換pom.xml文件中的部分內容
<!-- 統一管理jar包版本 -->
  <properties>
	<project.build.sourceEncoding>UTF-8</project.build.sourceEncoding>
	<maven.compiler.source>1.8</maven.compiler.source>
	<maven.compiler.target>1.8</maven.compiler.target>
	<junit.version>4.12</junit.version>
	<log4j.version>1.2.17</log4j.version>
	<lombok.version>1.16.18</lombok.version>
	<mysql.version>5.1.47</mysql.version>
	<druid.version>1.1.16</druid.version>
	<mybatis.spring.boot.version>1.3.0</mybatis.spring.boot.version>
  </properties>

<!--  使用dependencyManagement,父工程指定,子工程不用再指定-->
  <dependencyManagement>
  <dependencies>
  <dependency>
	<groupId>org.apache.maven.plugins</groupId>
	<artifactId>maven-project-info-reports-plugin</artifactId>
	<version>3.0.0</version>
  </dependency>
  <!--spring boot 2.2.2-->
  <dependency>
	<groupId>org.springframework.boot</groupId>
	<artifactId>spring-boot-dependencies</artifactId>
	<version>2.2.2.RELEASE</version>
	<type>pom</type>
	<scope>import</scope>
  </dependency>
  <!--spring cloud Hoxton.SR1-->
  <dependency>
	<groupId>org.springframework.cloud</groupId>
	<artifactId>spring-cloud-dependencies</artifactId>
	<version>Hoxton.SR1</version>
	<type>pom</type>
	<scope>import</scope>
  </dependency>
  <!--spring cloud 阿里巴巴-->
  <dependency>
	<groupId>com.alibaba.cloud</groupId>
	<artifactId>spring-cloud-alibaba-dependencies</artifactId>
	<version>2.1.0.RELEASE</version>
	<type>pom</type>
	<scope>import</scope>
  </dependency>
  <!--mysql-->
  <dependency>
	<groupId>mysql</groupId>
	<artifactId>mysql-connector-java</artifactId>
	<version>${mysql.version}</version>
	<scope>runtime</scope>
  </dependency>
  <!-- druid-->
  <dependency>
	<groupId>com.alibaba</groupId>
	<artifactId>druid</artifactId>
	<version>${druid.version}</version>
  </dependency>

	<!--mybatis-->
	<dependency>
	  <groupId>org.mybatis.spring.boot</groupId>
	  <artifactId>mybatis-spring-boot-starter</artifactId>
	  <version>${mybatis.spring.boot.version}</version>
	</dependency>
	<!--junit-->
	<dependency>
	  <groupId>junit</groupId>
	  <artifactId>junit</artifactId>
	  <version>${junit.version}</version>
	</dependency>
	<!--log4j-->
	<dependency>
	  <groupId>log4j</groupId>
	  <artifactId>log4j</artifactId>
	  <version>${log4j.version}</version>
	</dependency>
  </dependencies>

  </dependencyManagement>

  <build>
	<plugins>
	  <plugin>
		<groupId>org.springframework.boot</groupId>
		<artifactId>spring-boot-maven-plugin</artifactId>
		<configuration>
		  <fork>true</fork>
		  <addResources>true</addResources>
		</configuration>
	  </plugin>
	</plugins>
  </build>
更換部分如下

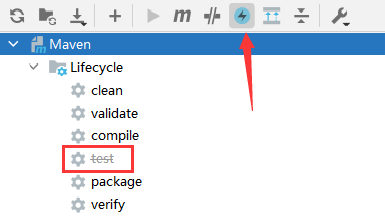
為了防止打包時因為test出錯而卡住,需要skip maven生命周期中的test
dependencyManagement 和dependencies的區別
dependencyManagement 通常在父工程中聲明,用于聲明依賴的version和scope,而不會實際引入包
dependencies通常在子工程中聲明,會實際引入包,如果引入了父工程聲明過的包,則聲明時不再需要指定版本
感謝各位的閱讀,以上就是“如何理解SpringCloud搭建父工程的過程”的內容了,經過本文的學習后,相信大家對如何理解SpringCloud搭建父工程的過程這一問題有了更深刻的體會,具體使用情況還需要大家實踐驗證。這里是億速云,小編將為大家推送更多相關知識點的文章,歡迎關注!
免責聲明:本站發布的內容(圖片、視頻和文字)以原創、轉載和分享為主,文章觀點不代表本網站立場,如果涉及侵權請聯系站長郵箱:is@yisu.com進行舉報,并提供相關證據,一經查實,將立刻刪除涉嫌侵權內容。