您好,登錄后才能下訂單哦!
您好,登錄后才能下訂單哦!
小編給大家分享一下SpringBoot整合Apollo配置中心怎么用,相信大部分人都還不怎么了解,因此分享這篇文章給大家參考一下,希望大家閱讀完這篇文章后大有收獲,下面讓我們一起去了解一下吧!
1.Apollo 是什么?Apollo(阿波羅)是攜程框架部門研發的分布式配置中心。服務端基于Spring Boot和Spring Cloud開發。
2.為什么要使用Apollo?
安全性:配置跟隨源代碼保存在代碼庫中,容易造成配置泄漏
時效性:普通方式配置,修改配置,需要重啟服務才能生效
局限性:無法支持動態調整:例如日志開關、功能開關
注:本文主要介紹SpringBoot 整合 Apollo 實現動態配置
1.1 添加Maven依賴
<dependency>
  <groupId>com.ctrip.framework.apollo</groupId>
  <artifactId>apollo-client</artifactId>
  <version>1.3.0</version>
</dependency>
1.2 配置文件
# apollo集成
# apollo 配置應用的 appid
app.id=springboot-apollo-demo1
# apollo meta-server地址,一般同config-server地址
apollo.meta=http://192.168.0.153:8080
#啟用apollo配置開關
apollo.bootstrap.enabled=true
apollo.bootstrap.eagerLoad.enabled=true
# apollo 使用配置的命名空間,多個以逗號分隔
apollo.bootstrap.namespaces = application
配置說明:
app.id:在配置中心配置的應用身份信息。
apollo.bootstrap.enabled:在應用啟動階段是否向Spring容器注入被托管的properties文件配置信息。
apollo.bootstrap.eagerLoad.enabled:將Apollo配置加載提到初始化日志系統之前。
apollo.bootstrap.namespaces:配置的命名空間,多個逗號分隔,一個namespace相當于一個配置文件。
**apollo.meta:**當前環境服務配置地址,生產環境建議至少雙節點,可以填寫多個逗號分隔,使用一個單獨的域,如 http://config.xxx.com(由nginx等軟件負載平衡器支持),而不是多個IP地址,因為服務器可能會擴展或縮小。
圖示說明:
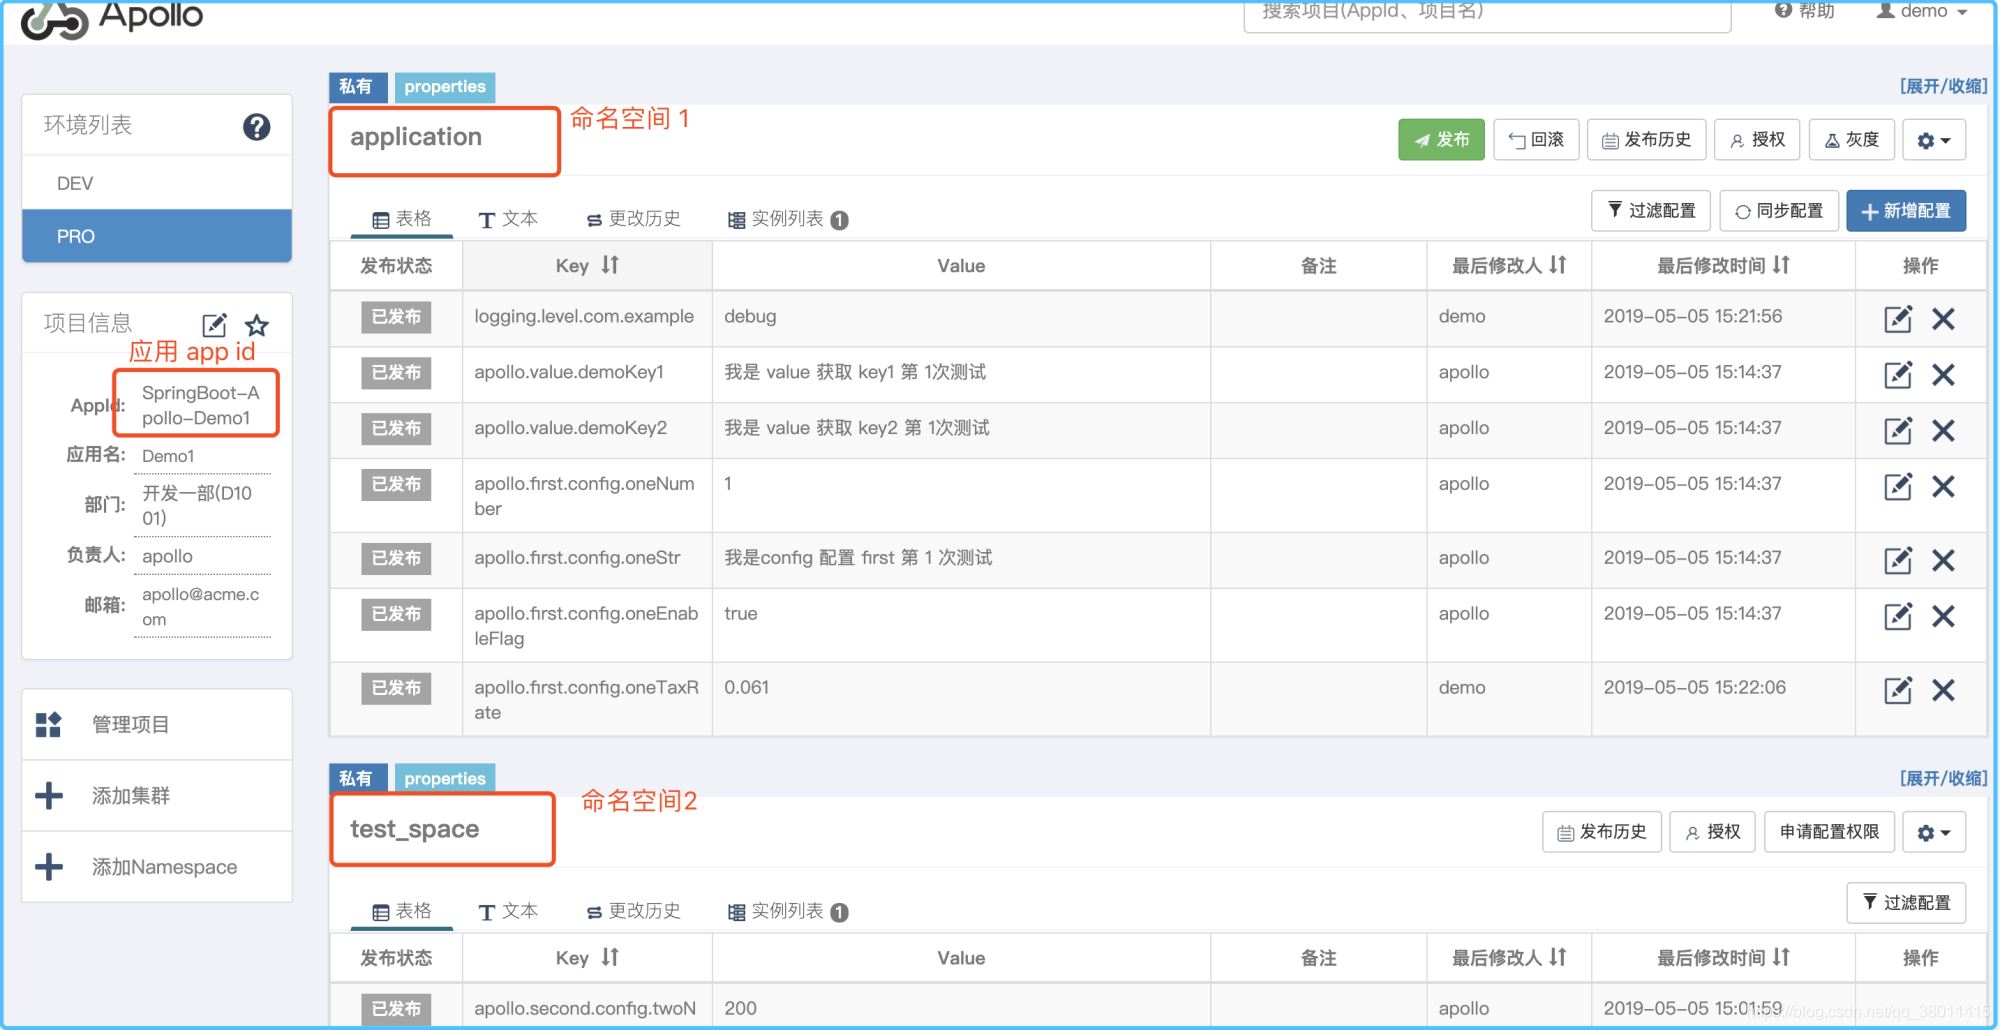
1.3 添加啟動類
@SpringBootApplication(exclude = {DataSourceAutoConfiguration.class, DataSourceTransactionManagerAutoConfiguration.class})
public class SpringbootApolloApplication {
    public static void main(String[] args) {
        SpringApplication.run(SpringbootApolloApplication.class, args);
    }
}
1.4 添加配置開關類
基于@Value注解配置
@Component
public class ValueStyleProperty {

    @Value("${apollo.value.demoKey1}")
    private String demoKey1;


    @Value("${apollo.value.demoKey2}")
    private String demoKey2;
    //省略 get/set 方法
}
1.5 添加測試controller
/**
 * value注解方式,獲取屬性
 *
 * @author mengqiang
 */
@RestController
@RequestMapping("/value-style")
public class ValuePropertyController {

    @Autowired
    private ValueStyleProperty keyProperty;

    @Value("${server.port}")
    private String port;

    @Value("${apollo.bootstrap.namespaces:'application'}")
    private String namespaces;

    @GetMapping("/get")
    public Map<String, Object> getProperty() {
        Map<String, Object> map = new LinkedHashMap<>();
        map.put("port", port);
        map.put("namespaces", namespaces);
        map.put("demoKey1", keyProperty.getDemoKey1());
        map.put("demoKey2", keyProperty.getDemoKey2());
        return map;
    }
}2.1 創建項目

2.2 填寫配置信息
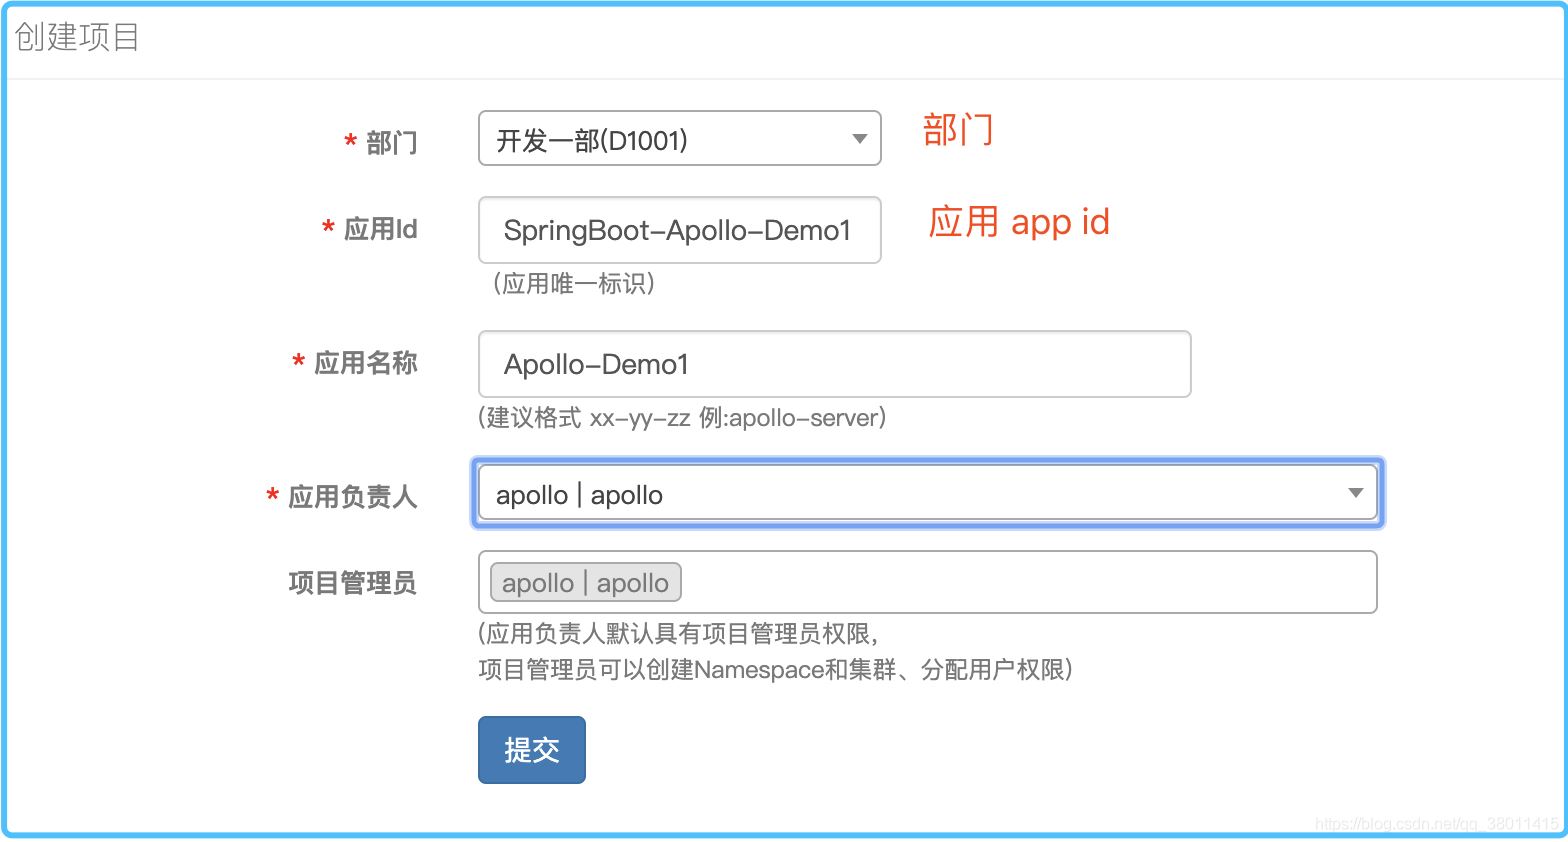
配置說明:
部門:選擇應用所在的部門。(可自定義部門)
應用AppId:用來標識應用身份的唯一id,格式為string,需與application.properties中配置的app.id一致。
應用名稱:應用名,僅用于界面展示。
應用負責人:選擇的人默認會成為該項目的管理員,具備項目權限管理、集群創建、Namespace創建等權限。
項目配置主頁截圖
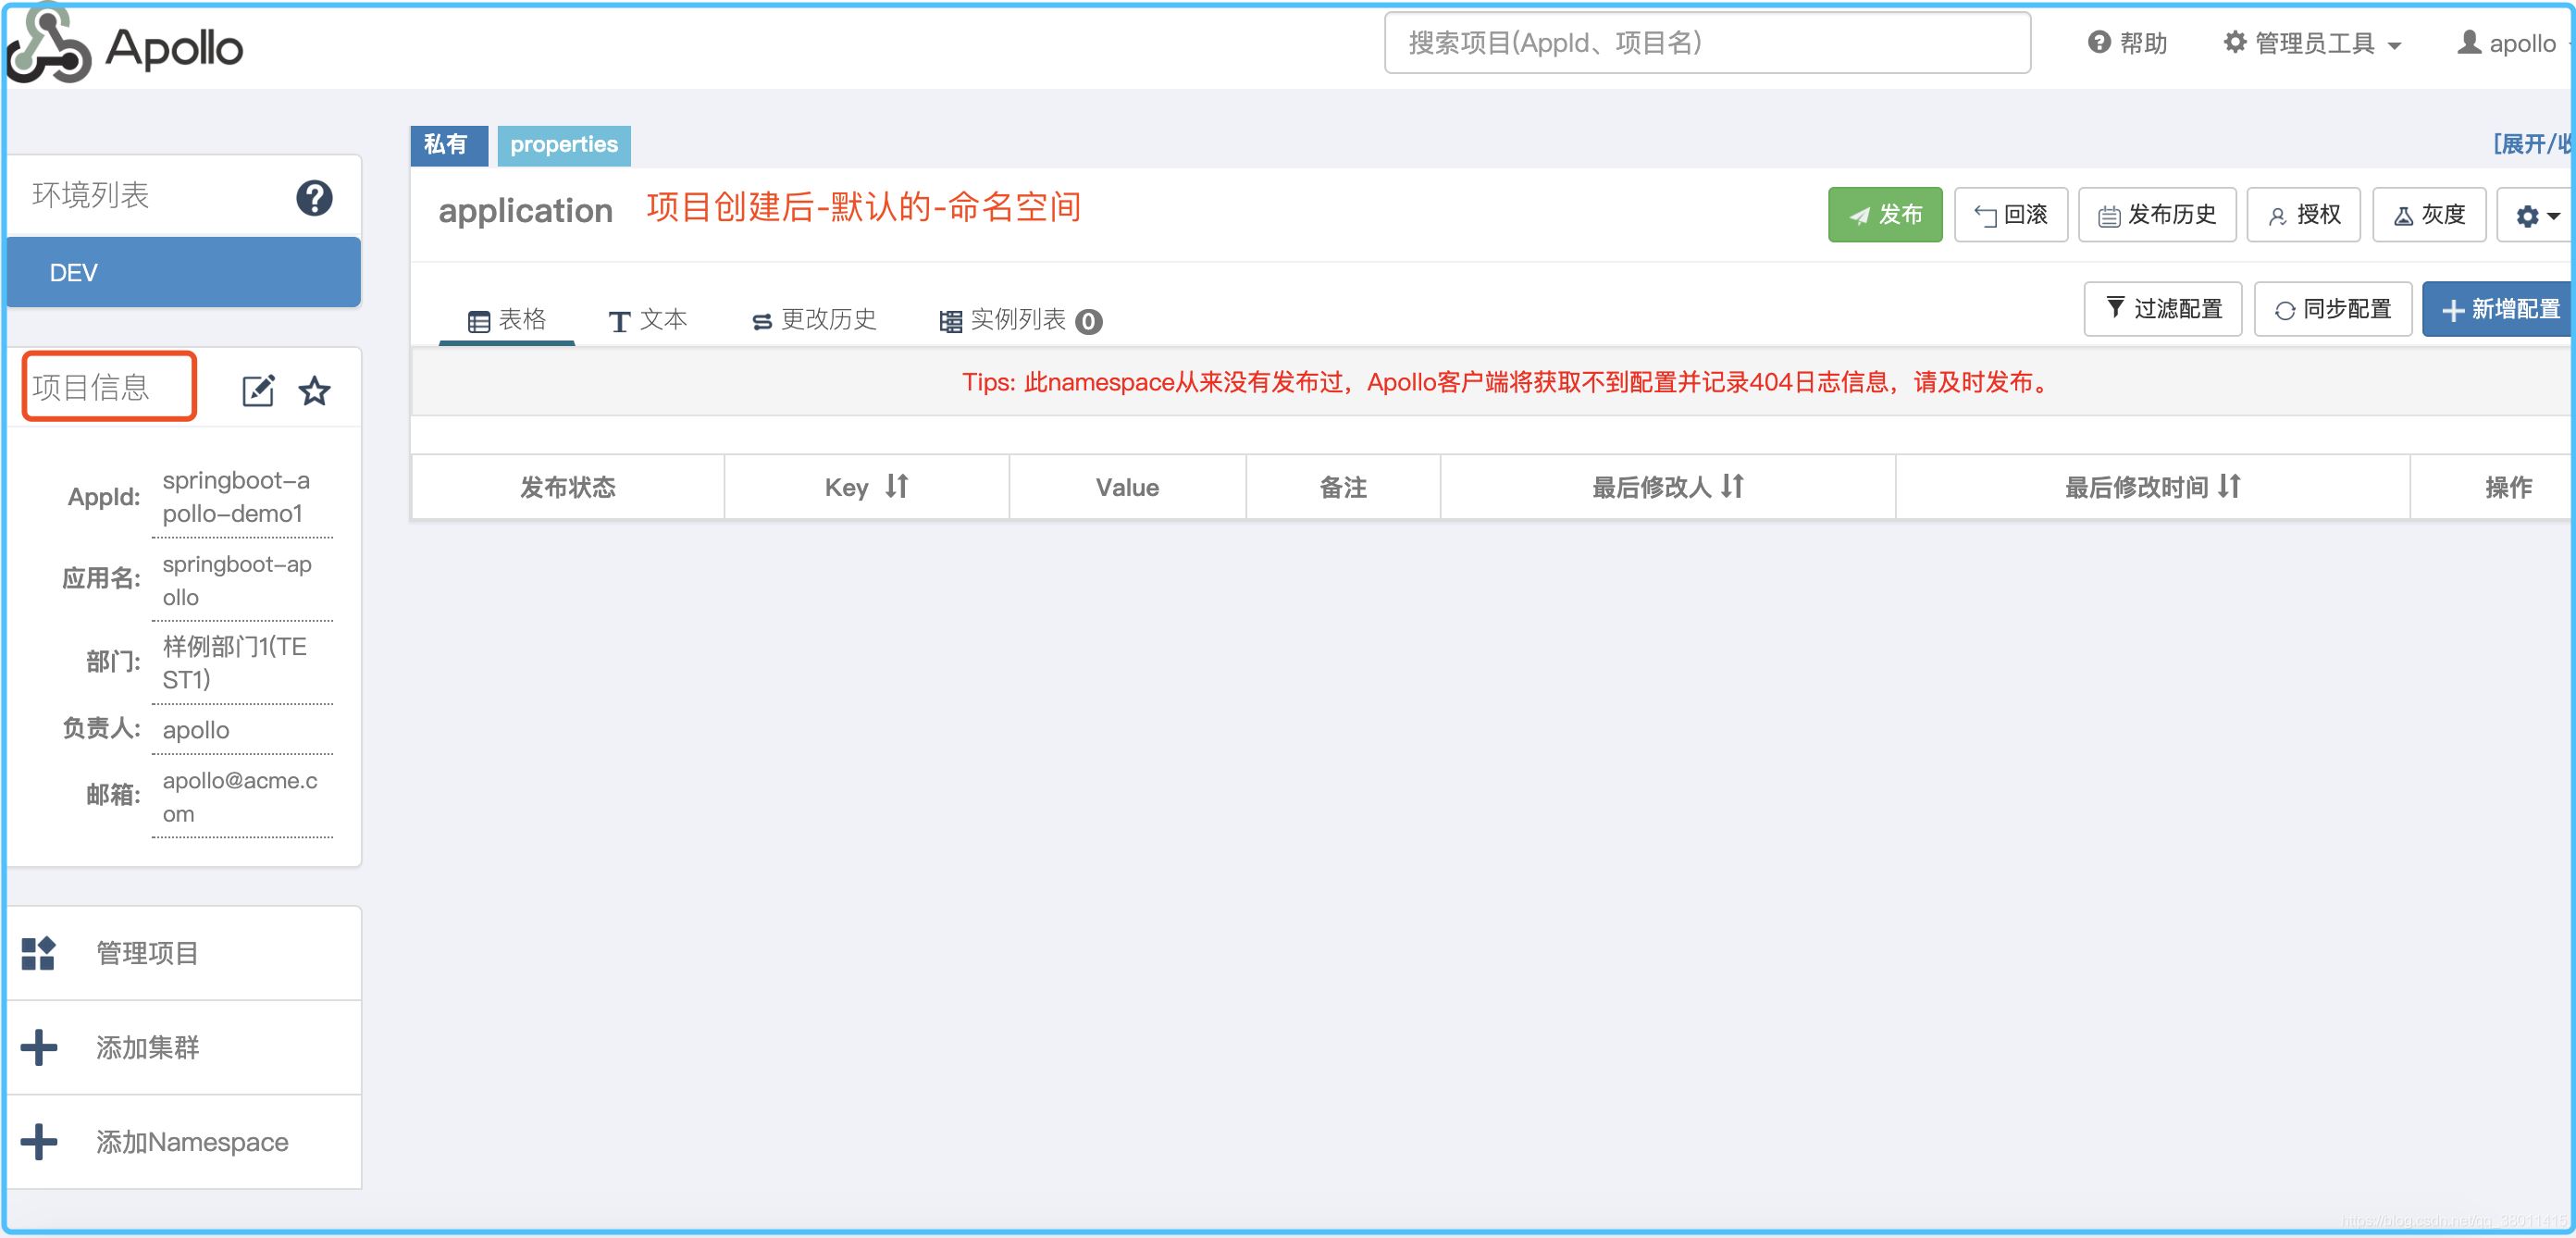
2.3 添加配置
2.3.1 表格形式單個添加
注:不能批量操作

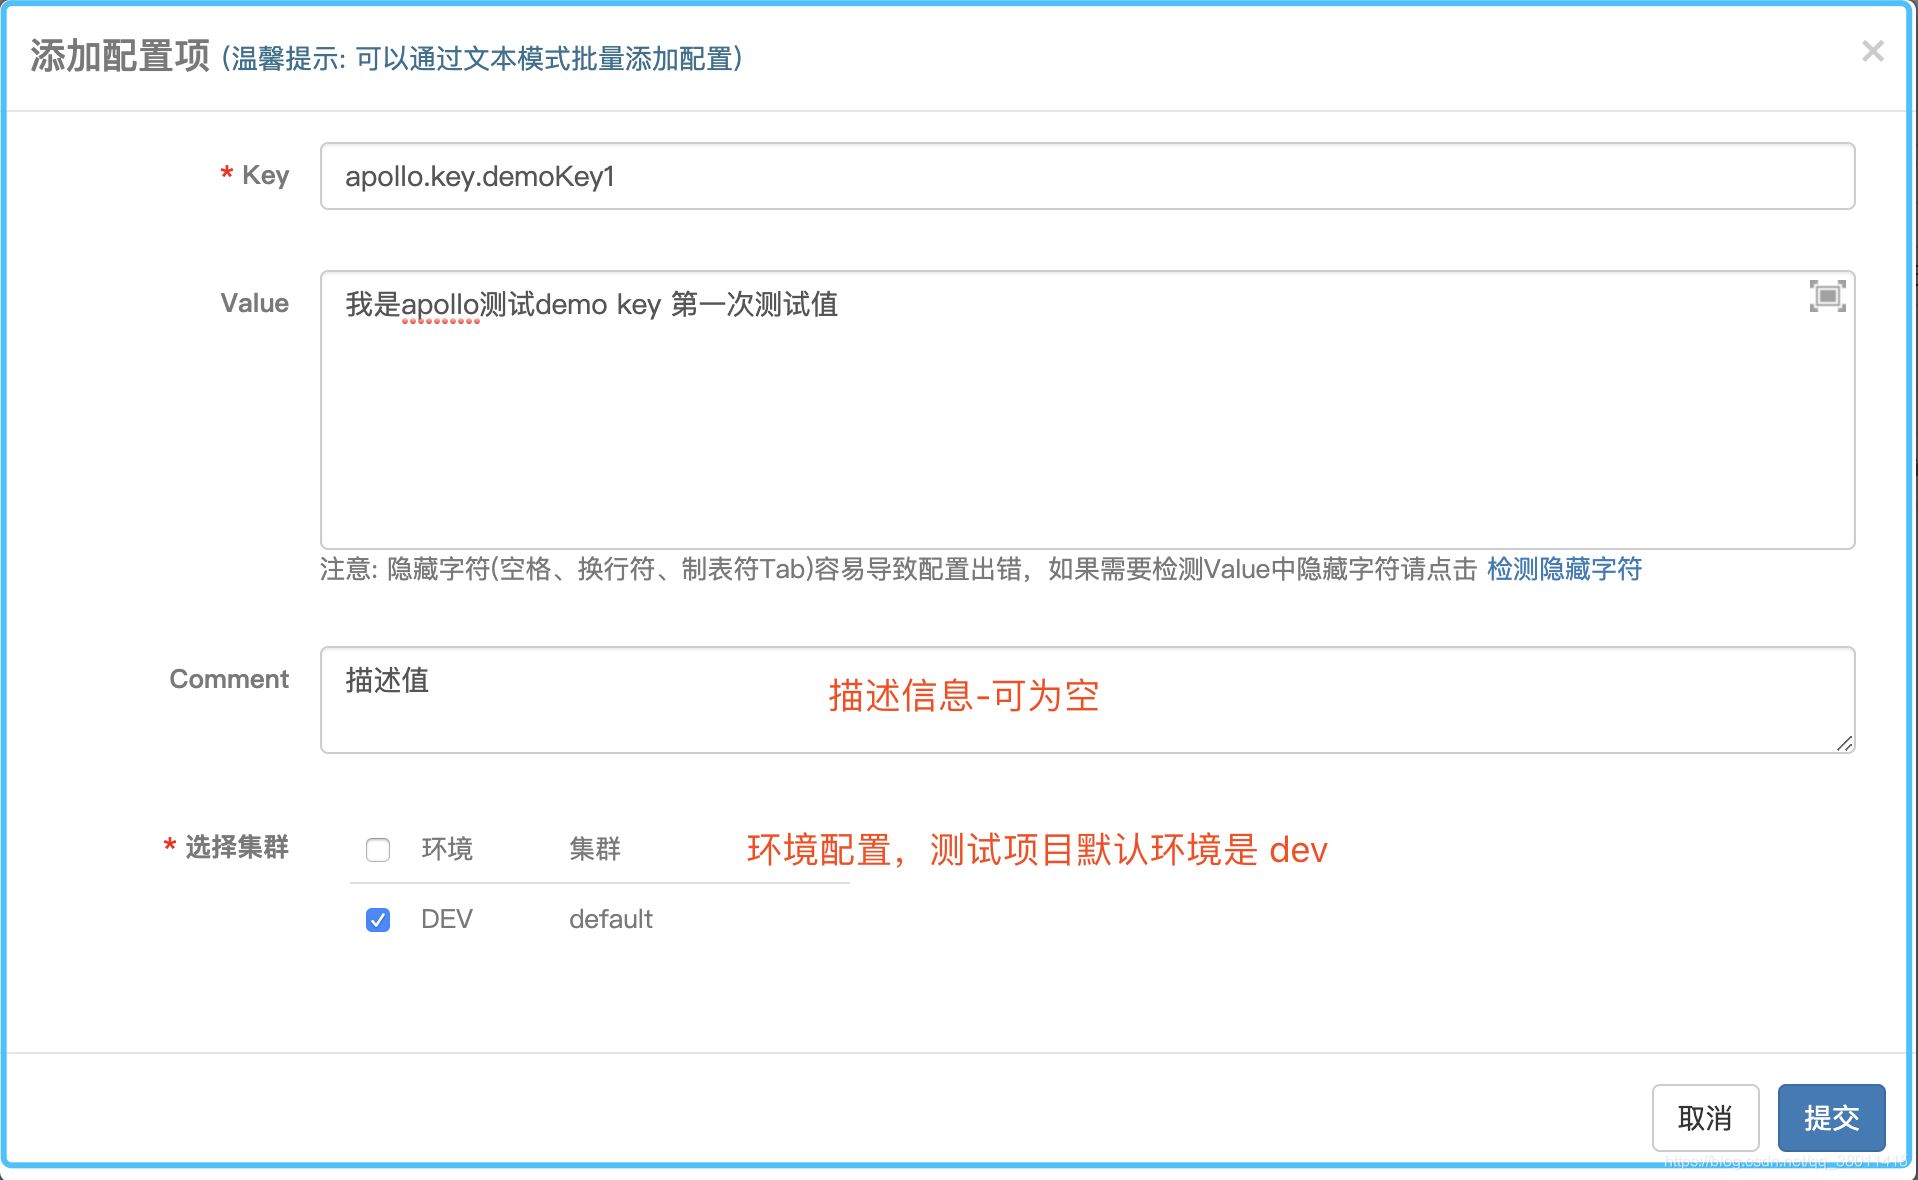
2.3.2 文本形式批量添加
注:可實現批量操作

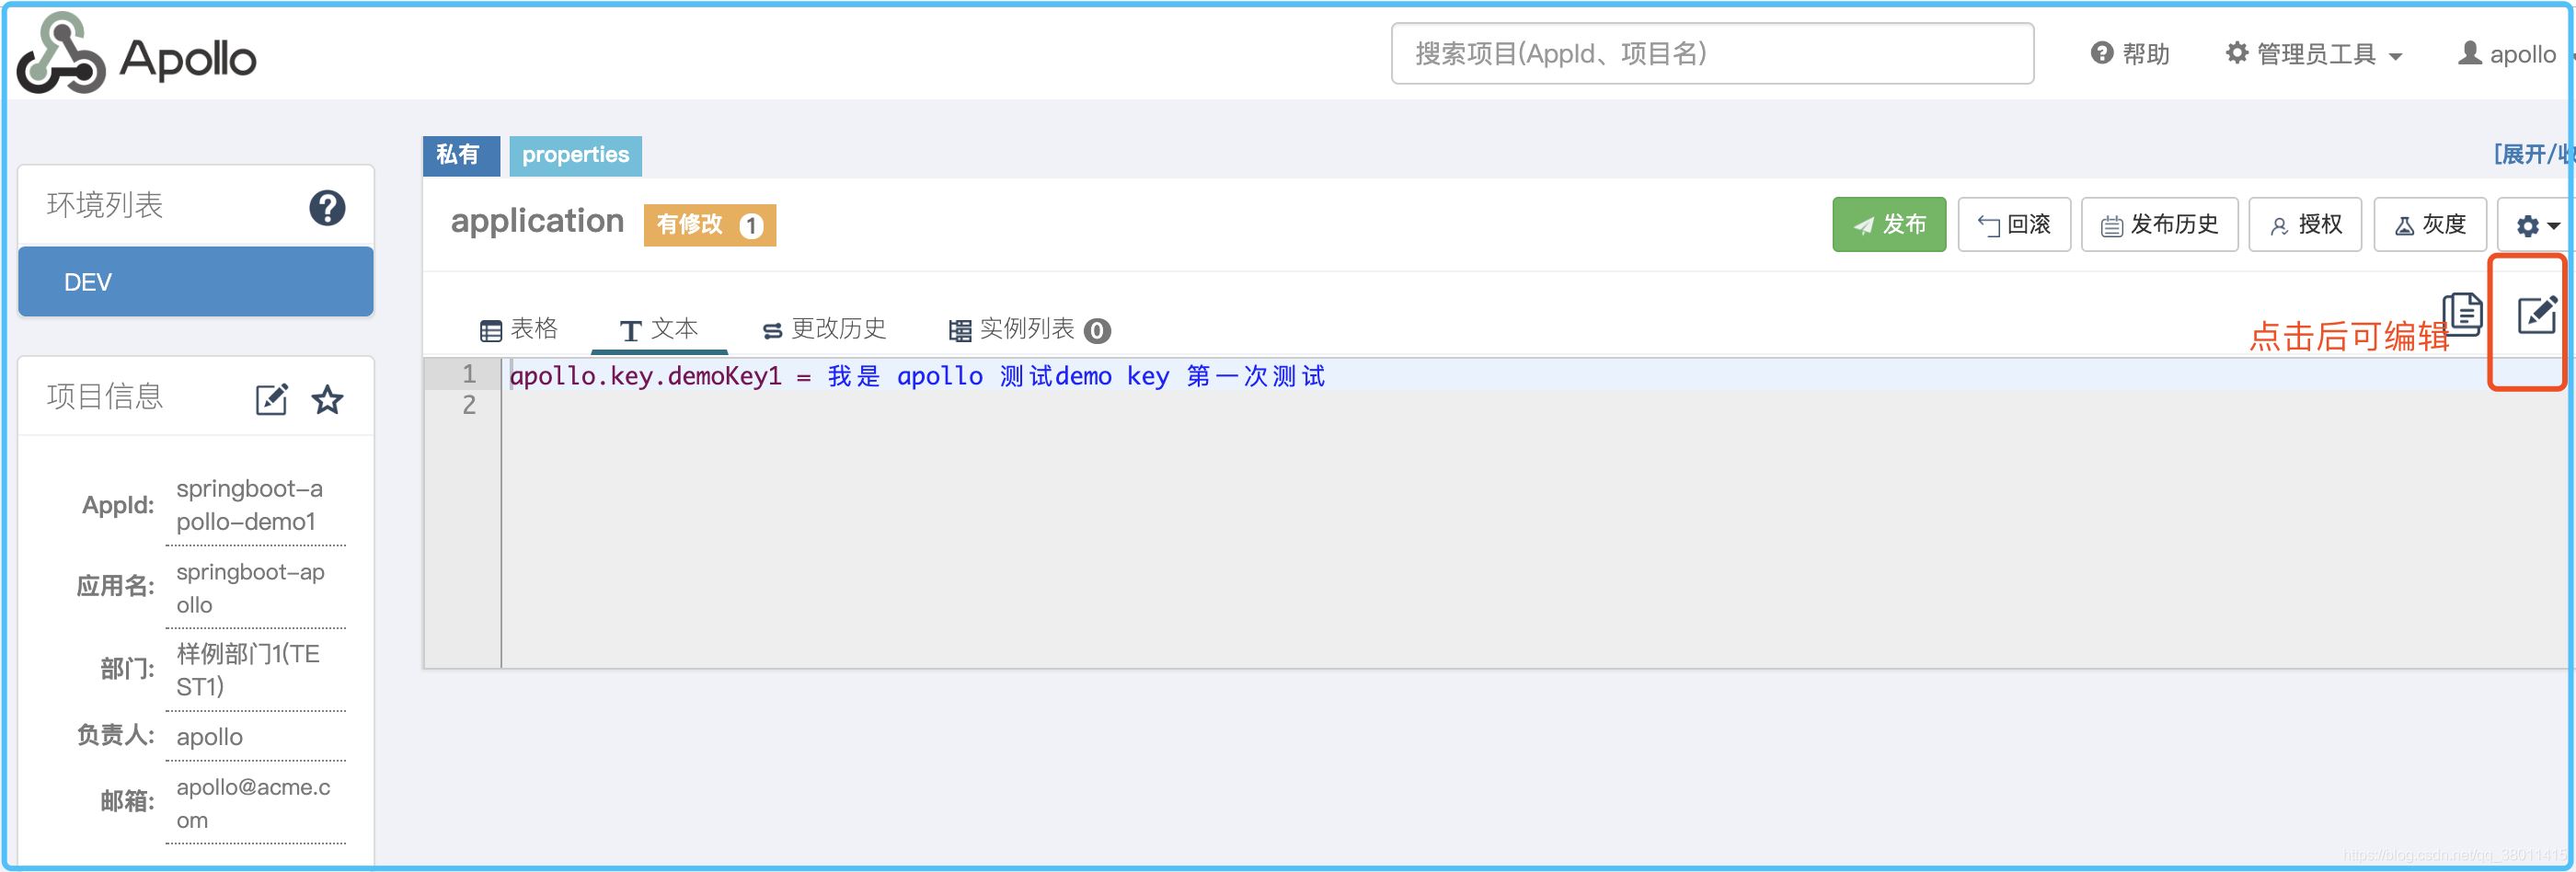
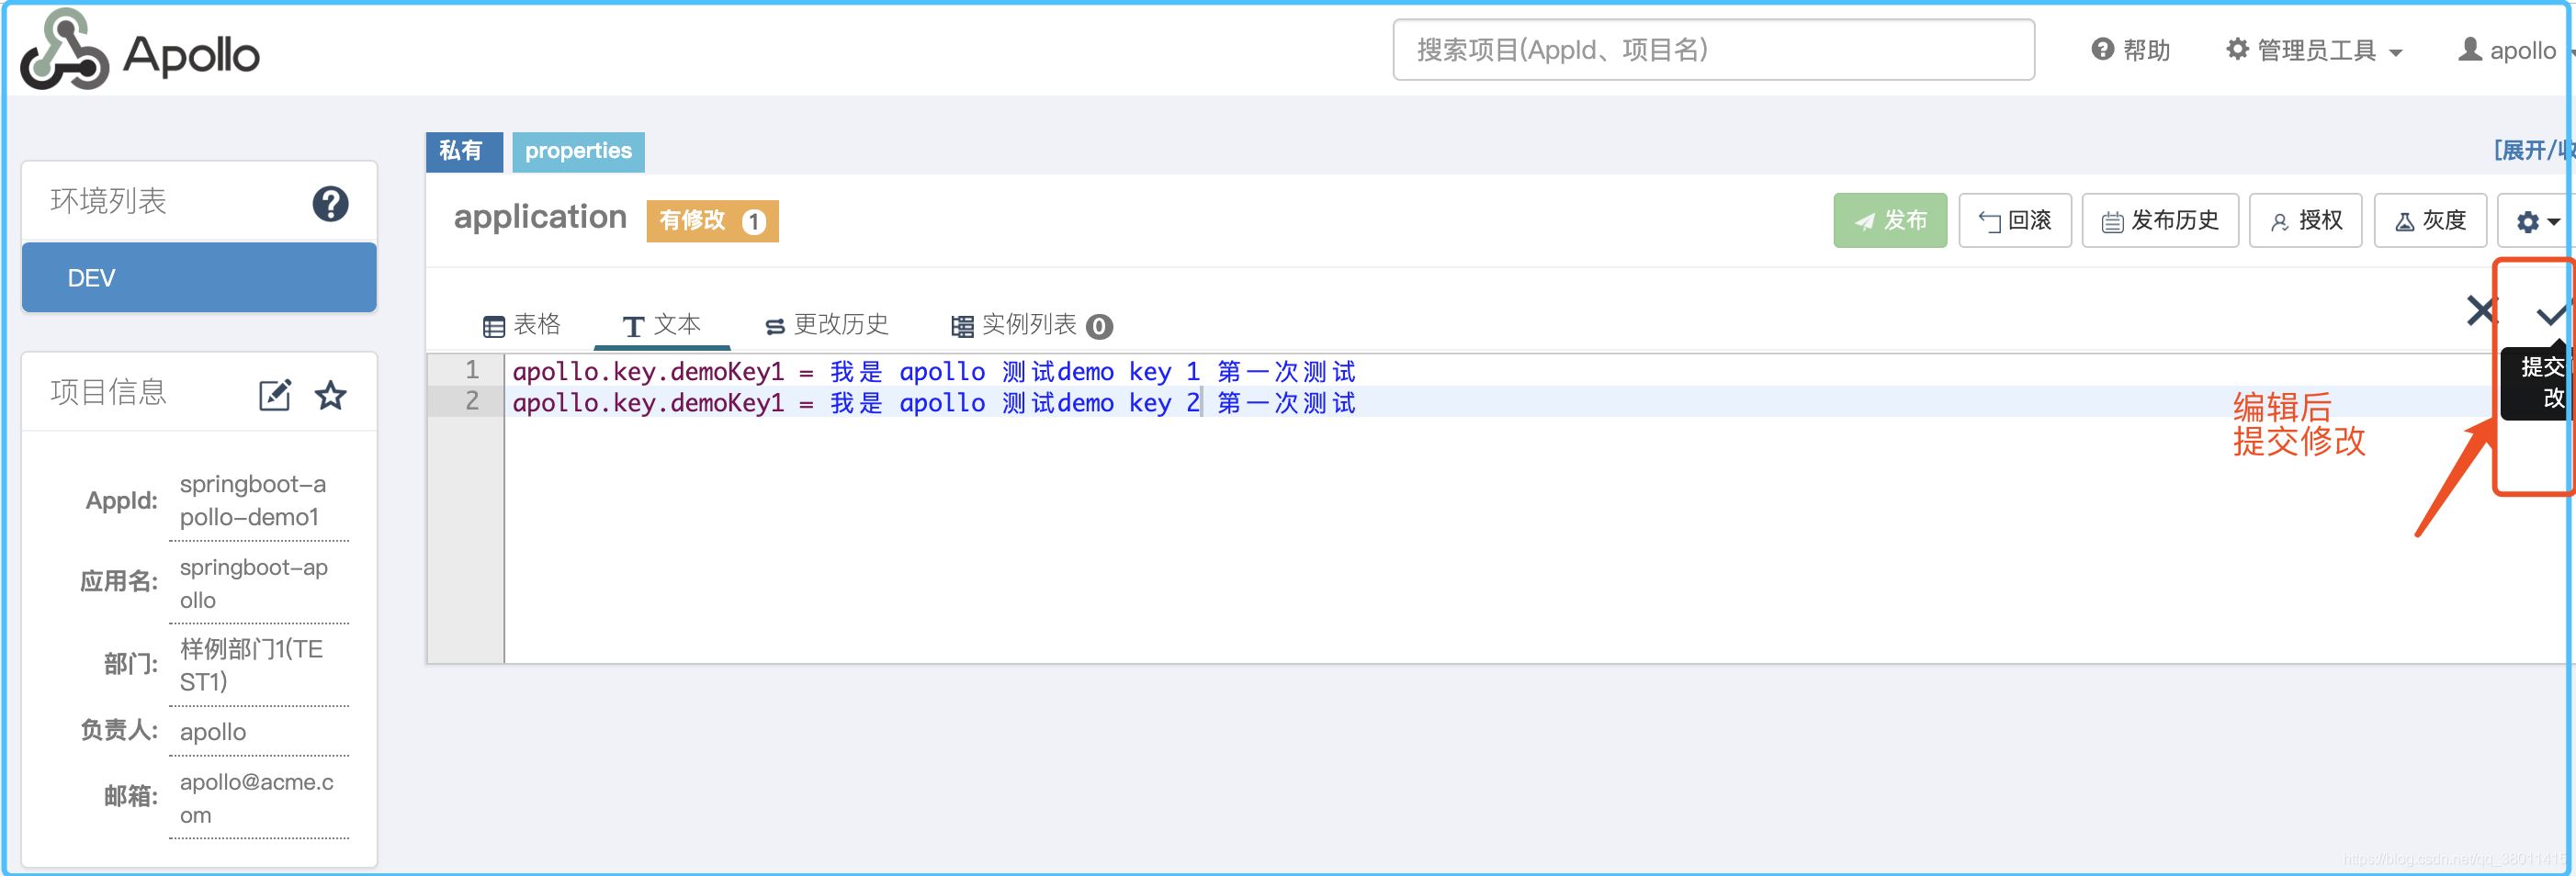
2.4 發布配置
注:配置只有發布后才會生效
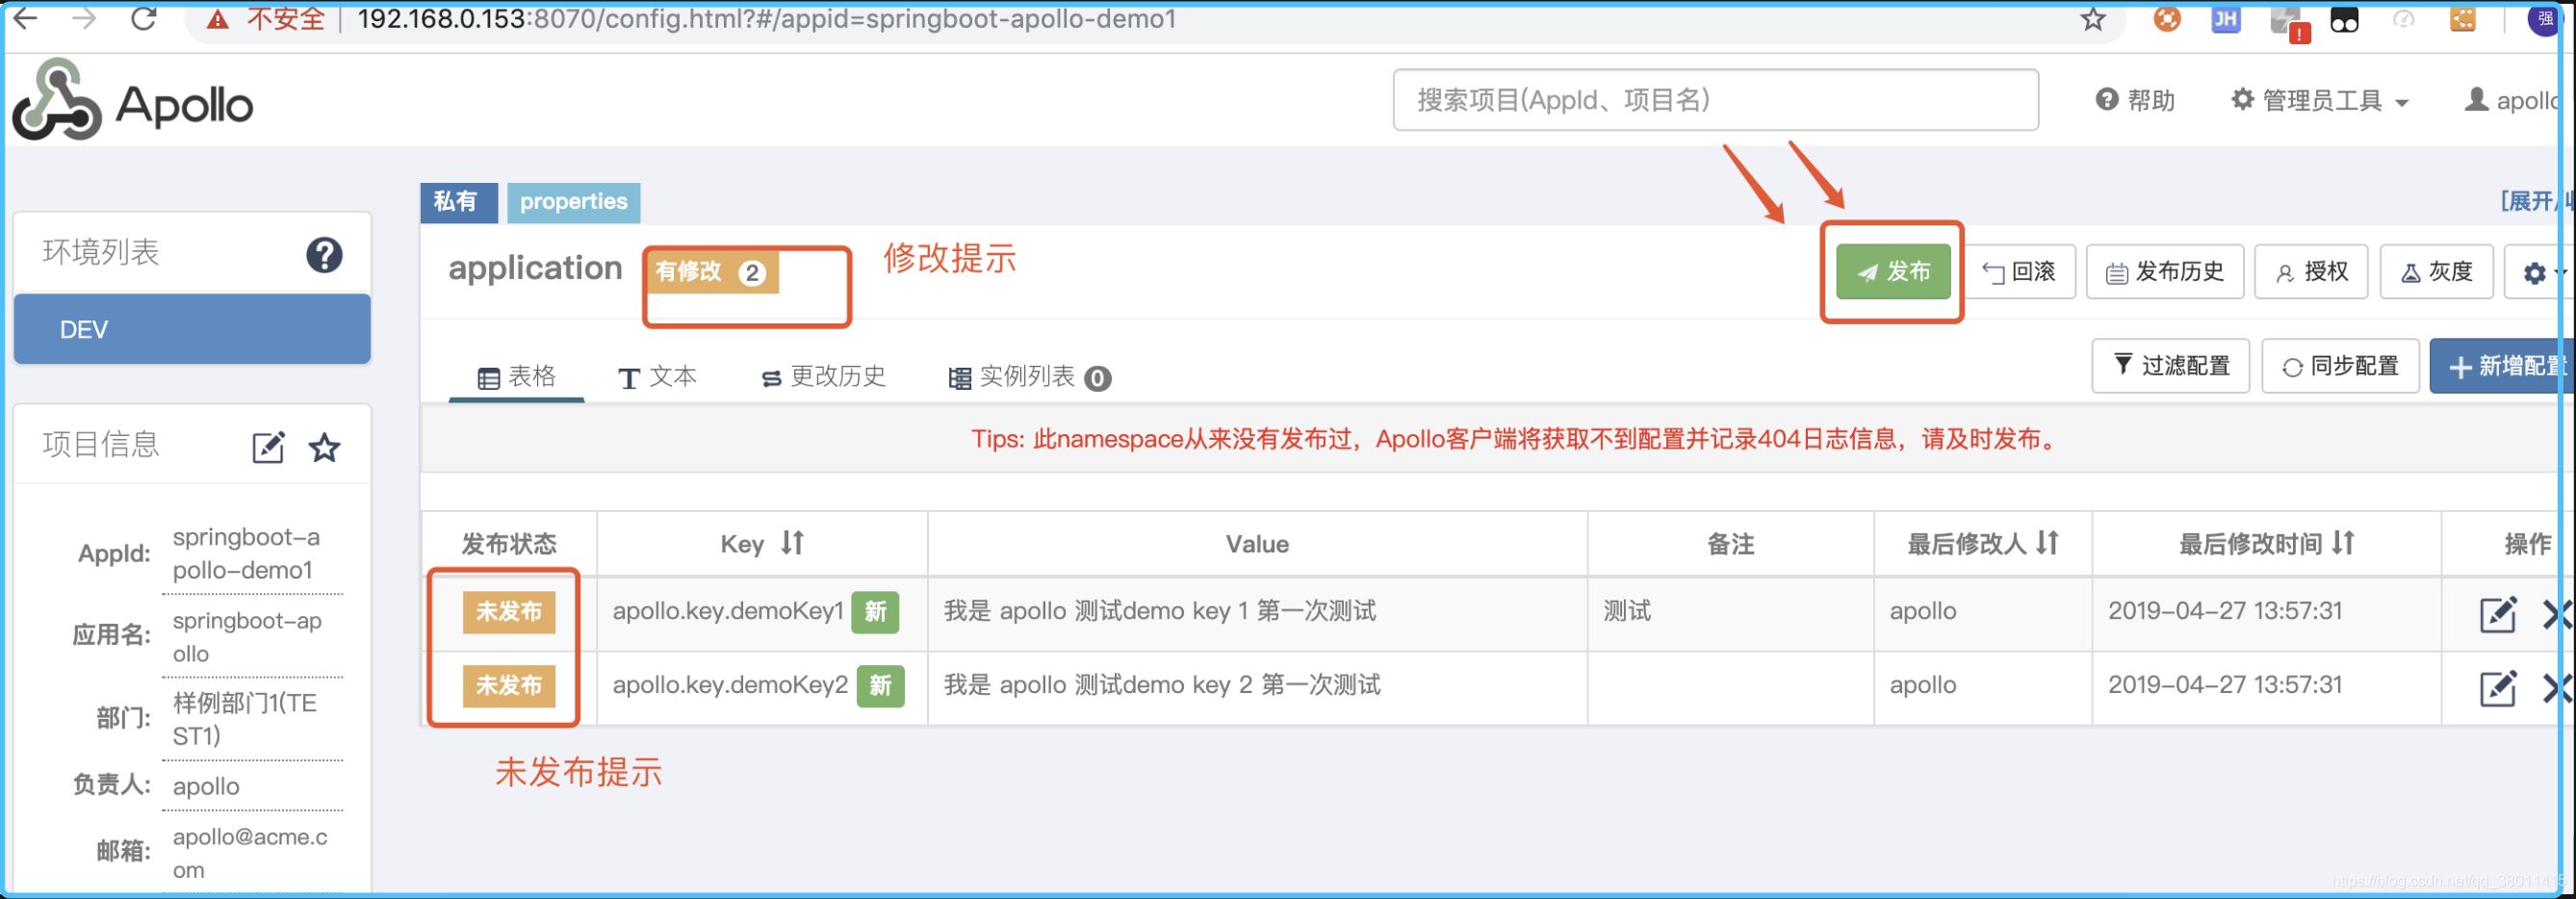
點擊發布按鈕
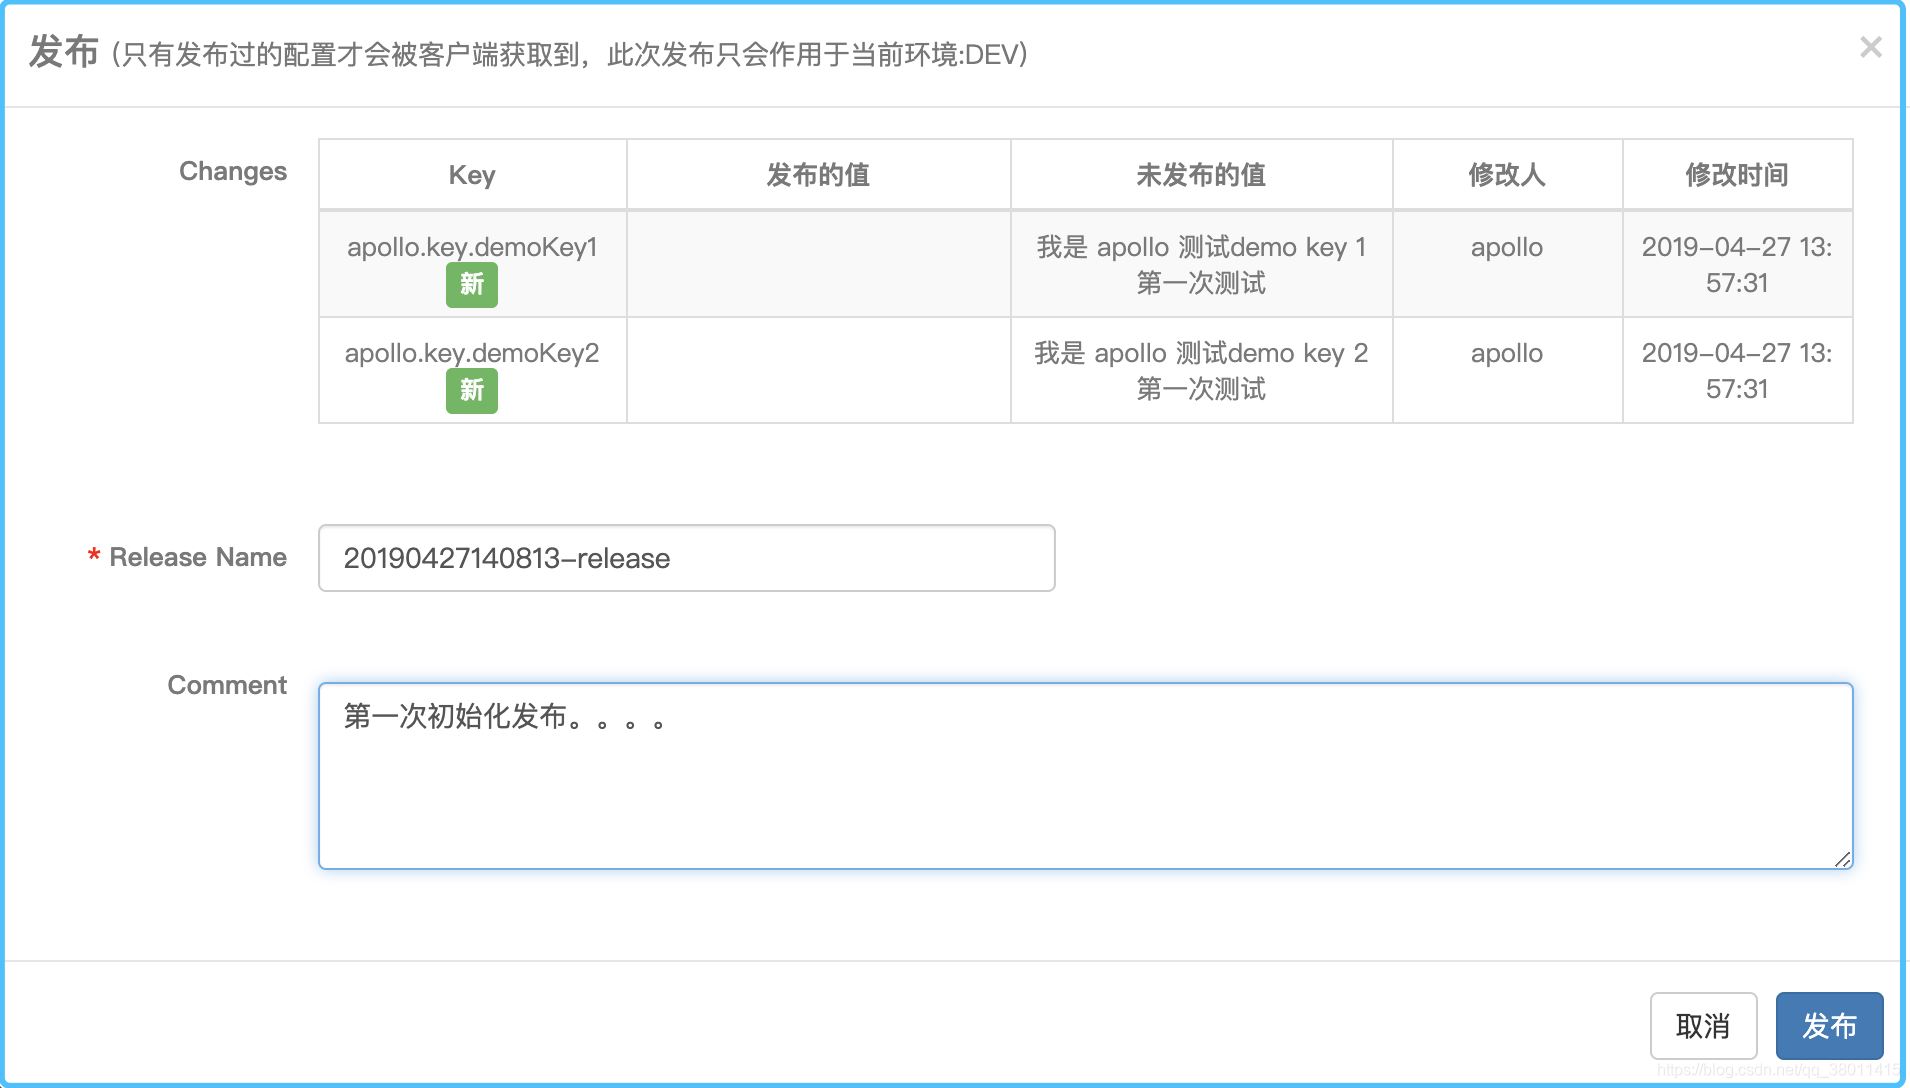
2.5 多環境同步配置
注意事項:
通過同步配置功能,可以使多個環境、集群間的配置保持一致需要注意的是,同步完之后需要發布后才會對應用生效
點擊同步配置

選擇需要同步的配置,以及目標環境
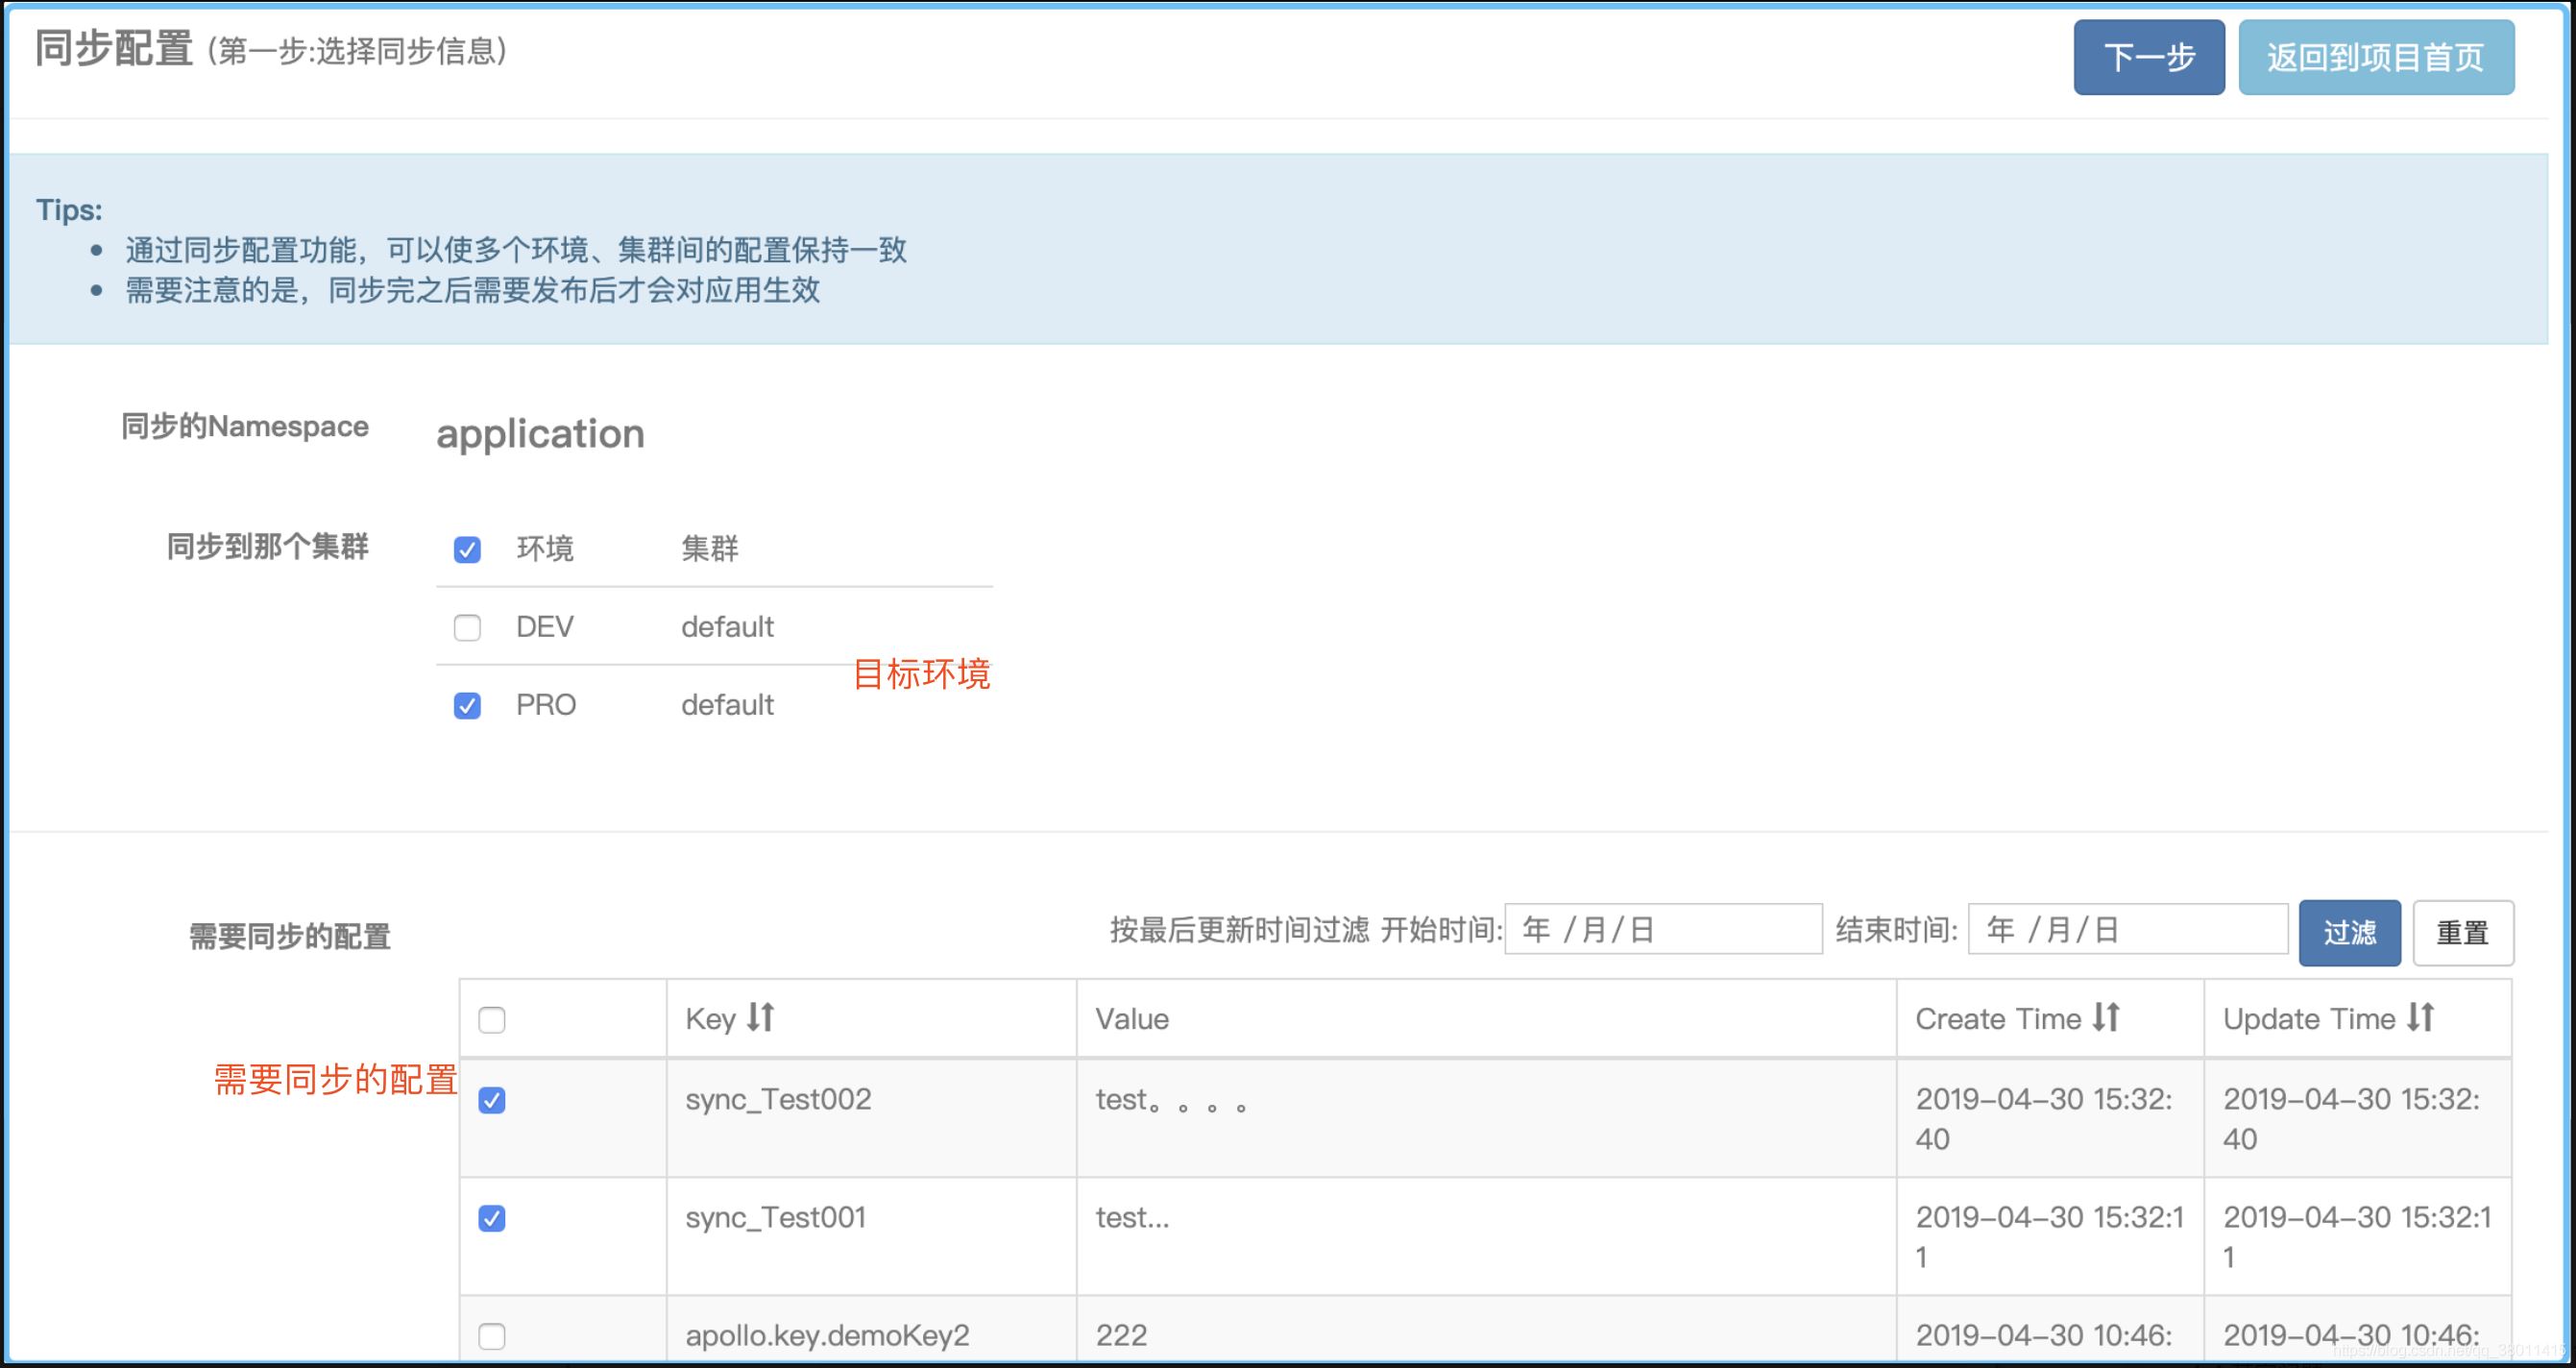
點擊同步

目標環境查看

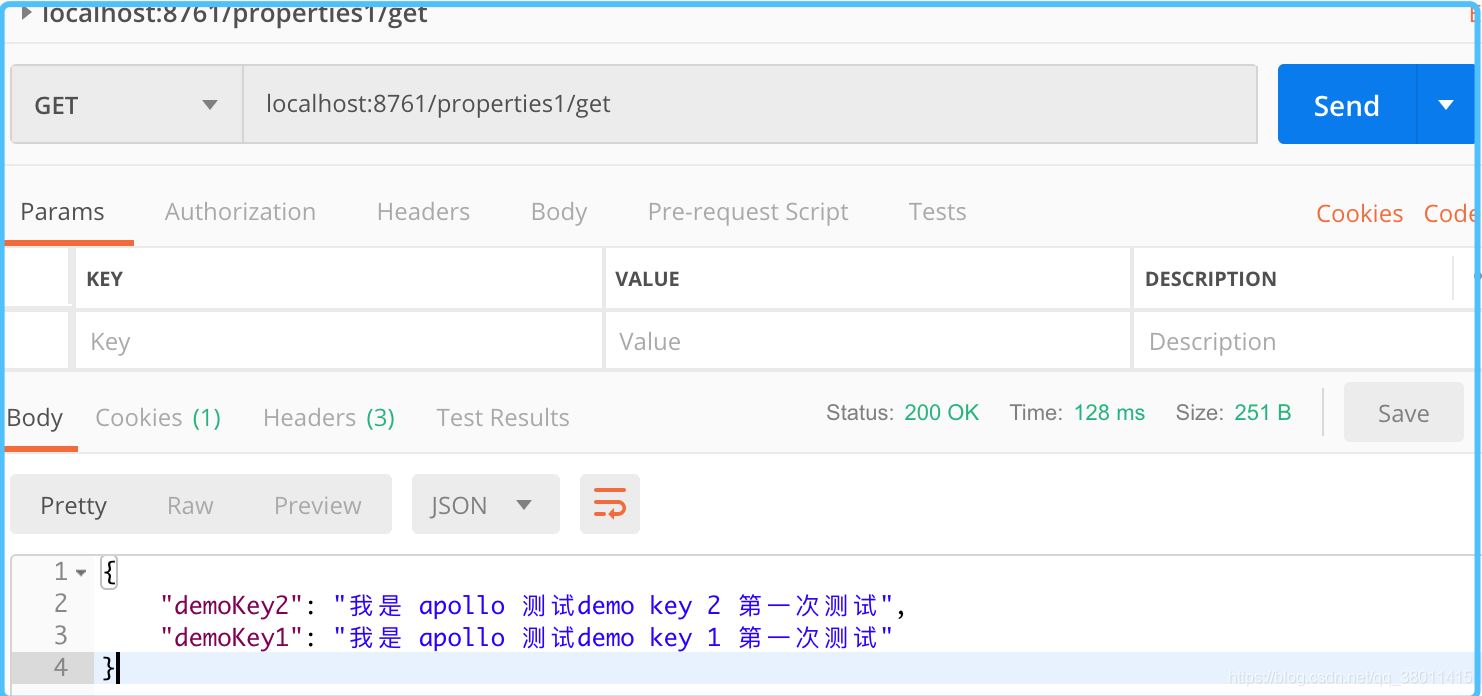
3.1 初始啟動讀取測試
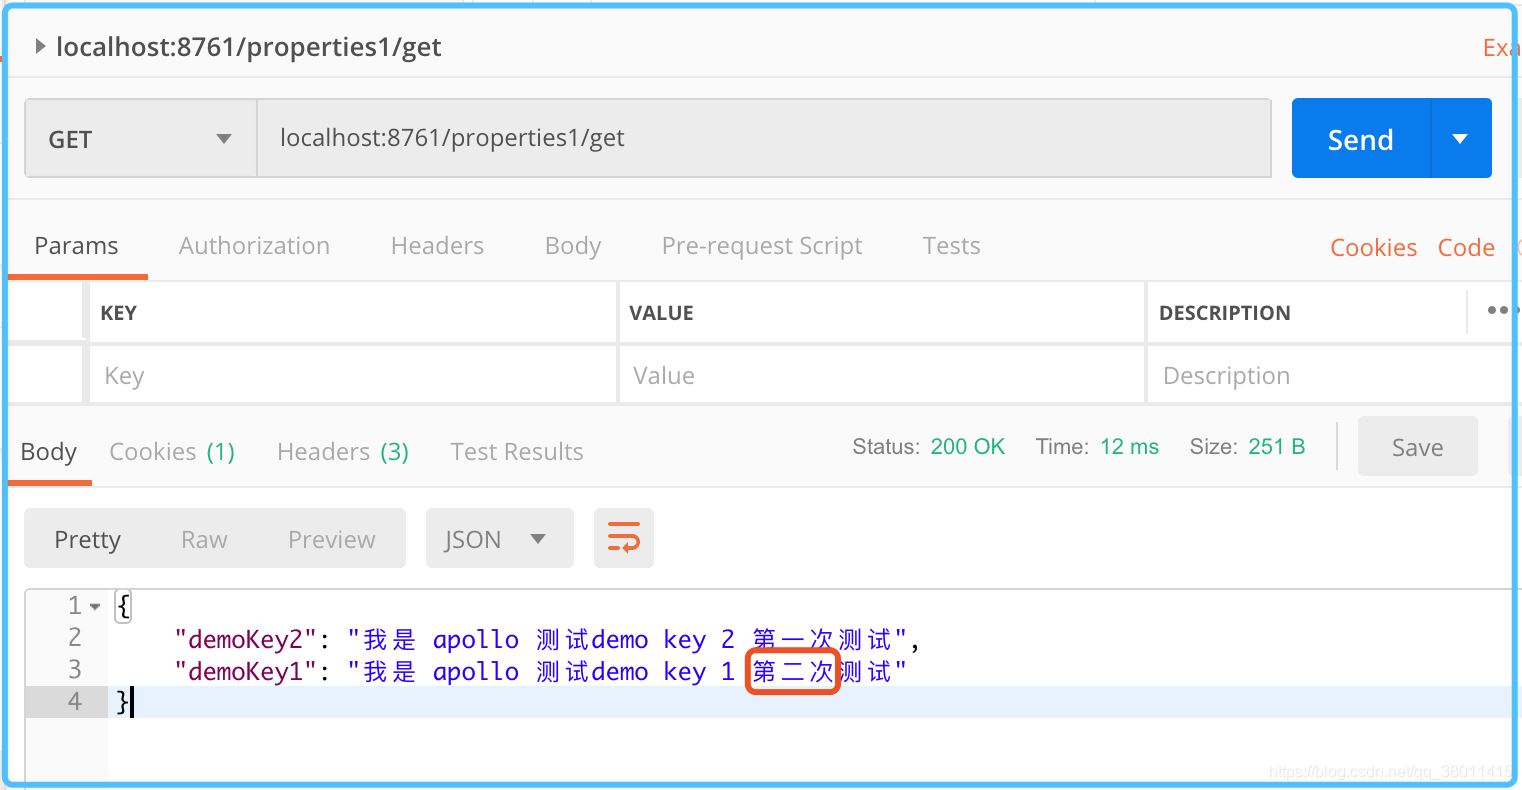
3.2 自動更新屬性測試

發布后控制臺變化

測試輸出值變化
4.1@ConfigurationProperties注解整合Apollo不生效問題
示例配置類
/**
 * 公共開關,key值 屬性配置
 *
 * @author mengqiang
 */
@Component
@ConfigurationProperties(prefix = "apollo.first.config")
public class ConfigFirstProperty {

    /**
     * 測試數字
     */
    private Integer oneNumber;

    /**
     * 測試字符串
     */
    private String oneStr;

    /**
     * 啟用標記
     */
    private Boolean oneEnableFlag;

    /**
     * 稅率 默認 0.03
     */
    private BigDecimal oneTaxRate = new BigDecimal("0.03");
   //省略 get/set 方法

}
解決方案
添加監聽配置
import com.ctrip.framework.apollo.model.ConfigChange;
import com.ctrip.framework.apollo.model.ConfigChangeEvent;
import com.ctrip.framework.apollo.spring.annotation.ApolloConfigChangeListener;
import org.slf4j.Logger;
import org.slf4j.LoggerFactory;
import org.springframework.beans.BeansException;
import org.springframework.context.ApplicationContext;
import org.springframework.context.ApplicationContextAware;
import org.springframework.stereotype.Component;
import org.springframework.cloud.context.environment.EnvironmentChangeEvent;

/**
 * Apollo 配置監聽
 */
@Configuration
public class ApolloConfigListener implements ApplicationContextAware {

    /**
     * 日志
     */
    private static final Logger LOGGER = LoggerFactory.getLogger(ApolloConfigListener.class);

    private ApplicationContext applicationContext;

   /**
     * 配置監聽
     * ApolloConfigChangeListener > value 屬性默認 命名空間 "application"
     *
     * 示例: @ApolloConfigChangeListener(value = {"application", "test_space"})
     */
    @ApolloConfigChangeListener
    private void onChange(ConfigChangeEvent changeEvent) {
        LOGGER.info("【Apollo-config-change】start");
        for (String key : changeEvent.changedKeys()) {
            ConfigChange change = changeEvent.getChange(key);
            LOGGER.info("key={} , propertyName={} , oldValue={} , newValue={} ", key, change.getPropertyName(), change.getOldValue(), change.getNewValue());
        }
        // 更新相應的bean的屬性值,主要是存在@ConfigurationProperties注解的bean
        this.applicationContext.publishEvent(new EnvironmentChangeEvent(changeEvent.changedKeys()));

        LOGGER.info("【Apollo-config-change】end");
    }

    @Override
    public void setApplicationContext(ApplicationContext applicationContext) throws BeansException {
        this.applicationContext = applicationContext;
    }
}
4.2日志級別未更新問題
示例配置
logging.level.com.example=info
解決方案-日志監聽器
import com.ctrip.framework.apollo.model.ConfigChange;
import com.ctrip.framework.apollo.model.ConfigChangeEvent;
import com.ctrip.framework.apollo.spring.annotation.ApolloConfigChangeListener;
import org.apache.commons.lang3.StringUtils;
import org.slf4j.Logger;
import org.slf4j.LoggerFactory;
import org.springframework.boot.logging.LogLevel;
import org.springframework.boot.logging.LoggingSystem;
import org.springframework.context.annotation.Configuration;
import javax.annotation.Resource;

/**
 * Apollo 日志-配置監聽
 */
@Configuration
public class LoggerConfigListener {

    private static final Logger LOGGER = LoggerFactory.getLogger(LoggerConfigListener.class);
    private static final String LOGGER_TAG = "logging.level.";

    @Resource
    private LoggingSystem loggingSystem;

    /**
     * 監聽 日志配置的變化
     */
    @ApolloConfigChangeListener(interestedKeyPrefixes = LOGGER_TAG)
    private void onChangeLogger(ConfigChangeEvent changeEvent) {
        LOGGER.info("【Apollo-logger-config-change】>> start");
        refreshLoggingLevel(changeEvent);
        LOGGER.info("【Apollo-logger-config-change】>> end");
    }

    /**
     * 刷新日志級別
     */
    private void refreshLoggingLevel(ConfigChangeEvent changeEvent) {
        if (null == loggingSystem) {
            return;
        }
        for (String key : changeEvent.changedKeys()) {
            ConfigChange change = changeEvent.getChange(key);
            if (!StringUtils.containsIgnoreCase(key, LOGGER_TAG)) {
                continue;
            }
            LOGGER.info("【Apollo-logger-config-change】>> key={} , propertyName={} , oldValue={} , newValue={} ",
                    key, change.getPropertyName(), change.getOldValue(), change.getNewValue());
            String newLevel = change.getNewValue();
            LogLevel level = LogLevel.valueOf(newLevel.toUpperCase());
            loggingSystem.setLogLevel(key.replace(LOGGER_TAG, ""), level);
            LOGGER.info("【Apollo-logger-config-change】>> {} -> {}", key, newLevel);
        }
    }
}
4.3日志+配置類自動刷新整合監聽
注:由于 4.1與4.2監聽有重合,所以最好放在一起處理
import com.ctrip.framework.apollo.model.ConfigChange;
import com.ctrip.framework.apollo.model.ConfigChangeEvent;
import com.ctrip.framework.apollo.spring.annotation.ApolloConfigChangeListener;
import org.apache.commons.lang3.StringUtils;
import org.slf4j.Logger;
import org.slf4j.LoggerFactory;
import org.springframework.beans.BeansException;
import org.springframework.boot.logging.LogLevel;
import org.springframework.boot.logging.LoggingSystem;
import org.springframework.cloud.context.environment.EnvironmentChangeEvent;
import org.springframework.context.ApplicationContext;
import org.springframework.context.ApplicationContextAware;
import org.springframework.context.annotation.Configuration;
import javax.annotation.Resource;

/**
 * Apollo 配置監聽
 */
@Configuration
public class ApolloConfigListener implements ApplicationContextAware {
    /**
     * 日志
     */
    private static final Logger LOGGER = LoggerFactory.getLogger(ApolloConfigListener.class);
    /**
     * 日志配置常量
     */
    private static final String LOGGER_TAG = "logging.level.";

    @Resource
    private LoggingSystem loggingSystem;

    private ApplicationContext applicationContext;

    @Override
    public void setApplicationContext(ApplicationContext applicationContext) throws BeansException {
        this.applicationContext = applicationContext;
    }


    /**
     * 配置監聽
     * ApolloConfigChangeListener > value 屬性默認 命名空間 "application"
     */
    @ApolloConfigChangeListener
    private void onChangeConfig(ConfigChangeEvent changeEvent) {
        LOGGER.info("【Apollo-config-change】>> start");
        for (String key : changeEvent.changedKeys()) {
            ConfigChange change = changeEvent.getChange(key);
            LOGGER.info("【Apollo-config-change】>> key={} , propertyName={} , oldValue={} , newValue={} ",
                    key, change.getPropertyName(), change.getOldValue(), change.getNewValue());
            //是否為日志配置
            if (StringUtils.containsIgnoreCase(key, LOGGER_TAG)) {
                //日志配置刷新
                changeLoggingLevel(key, change);
                continue;
            }
            // 更新相應的bean的屬性值,主要是存在@ConfigurationProperties注解的bean
            this.applicationContext.publishEvent(new EnvironmentChangeEvent(changeEvent.changedKeys()));
        }
        LOGGER.info("【Apollo-config-change】>> end");
    }

    /**
     * 刷新日志級別
     */
    private void changeLoggingLevel(String key, ConfigChange change) {
        if (null == loggingSystem) {
            return;
        }
        String newLevel = change.getNewValue();
        LogLevel level = LogLevel.valueOf(newLevel.toUpperCase());
        loggingSystem.setLogLevel(key.replace(LOGGER_TAG, ""), level);
        LOGGER.info("【Apollo-logger-config-change】>> {} -> {}", key, newLevel);
    }
}
4.4 其它問題
4.4.1配置文件與配置中心同時存在配置,啟用的是那一份
apollo 配置開關開啟情況下,配置中心配置會覆蓋本地配置
注:配置開關 apollo.bootstrap.enabled=true
4.4.2 配置中心掛掉會影響已發布的項目嗎?
項目啟動后配置會存在緩存中,配置中心掛掉,已發布的項目不影響
4.4.3 是否支持更新端口配置
支持更新端口配置,但是必需要重啟生效,同時也需要考慮服務器的端口占用問題。
以上是“SpringBoot整合Apollo配置中心怎么用”這篇文章的所有內容,感謝各位的閱讀!相信大家都有了一定的了解,希望分享的內容對大家有所幫助,如果還想學習更多知識,歡迎關注億速云行業資訊頻道!
免責聲明:本站發布的內容(圖片、視頻和文字)以原創、轉載和分享為主,文章觀點不代表本網站立場,如果涉及侵權請聯系站長郵箱:is@yisu.com進行舉報,并提供相關證據,一經查實,將立刻刪除涉嫌侵權內容。