您好,登錄后才能下訂單哦!
您好,登錄后才能下訂單哦!
這篇文章主要為大家展示了“idea如何新建聚合項目”,內容簡而易懂,條理清晰,希望能夠幫助大家解決疑惑,下面讓小編帶領大家一起研究并學習一下“idea如何新建聚合項目”這篇文章吧。
首先新建父工程

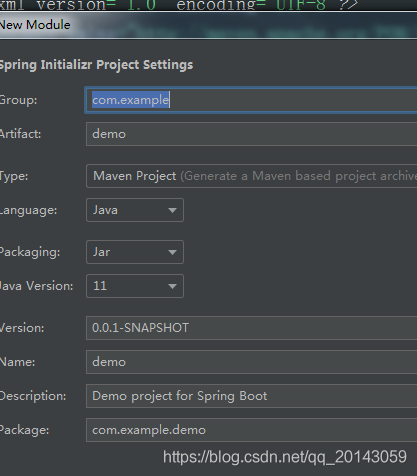
新建spring boot項目

填寫項目信息

指定該子項目的路徑

如果是組件類型的子項目 可以刪除application.xml和啟動類
父工程pom文件
<?xml version="1.0" encoding="UTF-8"?>
<project xmlns="http://maven.apache.org/POM/4.0.0" xmlns:xsi="http://www.w3.org/2001/XMLSchema-instance"
         xsi:schemaLocation="http://maven.apache.org/POM/4.0.0 http://maven.apache.org/xsd/maven-4.0.0.xsd">
    <modelVersion>4.0.0</modelVersion>
    <groupId>com.demo</groupId>
    <artifactId>project</artifactId>
    <version>1.0.0-SNAPSHOT</version>

    <properties>
        <spring-boot.version>2.3.5.RELEASE</spring-boot.version>
    </properties>

    <modules>
        <module>common-mail</module>
    </modules>

    <packaging>pom</packaging>

    <dependencyManagement>
        <dependencies>
            <dependency>
                <groupId>com.xx</groupId>
                <artifactId>common-assembly</artifactId>
                <version>${vanpeng.version}</version>
            </dependency>
        </dependencies>
    </dependencyManagement>

    <dependencies>
        <!-- swagger -->
        <dependency>
            <groupId>io.swagger</groupId>
            <artifactId>swagger-annotations</artifactId>
            <version>1.5.10</version>
        </dependency>
    </dependencies>

    <build>
        <plugins>
            <plugin>
                <groupId>org.apache.maven.plugins</groupId>
                <artifactId>maven-compiler-plugin</artifactId>
                <configuration>
                    <source>${java.version}</source>
                    <target>${java.version}</target>
                    <encoding>${project.build.sourceEncoding}</encoding>
                </configuration>
            </plugin>
        </plugins>
    </build>

</project>
<modules>:為包含的子工程artifactId名
<properties>:指常量 一般為版本號 方便統一修改
<dependencyManagement>:指定子工程有相同jar包時,使用父工程的版本號,而子工程不用在額外指定
<dependencies>:為父子工程可以同時引入的jar包
子工程pom文件
<?xml version="1.0" encoding="UTF-8"?>
<project xmlns="http://maven.apache.org/POM/4.0.0" xmlns:xsi="http://www.w3.org/2001/XMLSchema-instance"
         xsi:schemaLocation="http://maven.apache.org/POM/4.0.0 https://maven.apache.org/xsd/maven-4.0.0.xsd">
    <modelVersion>4.0.0</modelVersion>
    <parent>
        <groupId>com.demo</groupId>
        <artifactId>project</artifactId>
        <version>1.0.0-SNAPSHOT</version>
    </parent>

    <groupId>com.demo</groupId>
    <artifactId>common-assembly</artifactId>
    <version>1.0.0-SNAPSHOT</version>

    <properties>
        <java.version>1.8</java.version>
        <spring-cloud.version>Hoxton.SR8</spring-cloud.version>
    </properties>

    <dependencies>
        <!-- 此處可以引入其他子工程包 -->
	    <dependency>
            <groupId>com.demo</groupId>
            <artifactId>common-resource</artifactId>
        </dependency>
    </dependencies>

    <dependencyManagement>
        <dependencies>
            <dependency>
                <groupId>org.springframework.cloud</groupId>
                <artifactId>spring-cloud-dependencies</artifactId>
                <version>${spring-cloud.version}</version>
                <type>pom</type>
                <scope>import</scope>
            </dependency>
        </dependencies>
    </dependencyManagement>

    <build>
        <finalName>common-assembly-1.0.0-SNAPSHOT</finalName>
        <plugins>
            <plugin>
                <groupId>org.springframework.boot</groupId>
                <artifactId>spring-boot-maven-plugin</artifactId>
                <configuration>
                    <includeSystemScope>true</includeSystemScope>
                    <mainClass>com.demo.assembly.BusinessApplication</mainClass>
                </configuration>
                <executions>
                    <execution>
                        <goals>
                            <goal>repackage</goal>
                        </goals>
                    </execution>
                </executions>
            </plugin>
        </plugins>
    </build>

</project>
<parent>:為父工程的信息 也就是父工程pom中的groupId,artifactId 必填 <build>:為打包時的配置
注意com.vanpeng.assembly.BusinessApplication一定要配置 否則jar包啟動會找不到主函數 pom也必須配置 這是在父子工程中必須配置的 意思是 需要以方式引入 而不是打成jar
以上是“idea如何新建聚合項目”這篇文章的所有內容,感謝各位的閱讀!相信大家都有了一定的了解,希望分享的內容對大家有所幫助,如果還想學習更多知識,歡迎關注億速云行業資訊頻道!
免責聲明:本站發布的內容(圖片、視頻和文字)以原創、轉載和分享為主,文章觀點不代表本網站立場,如果涉及侵權請聯系站長郵箱:is@yisu.com進行舉報,并提供相關證據,一經查實,將立刻刪除涉嫌侵權內容。