您好,登錄后才能下訂單哦!
您好,登錄后才能下訂單哦!
這篇文章主要講解了“Kotlin協程切換為線程的方法”,文中的講解內容簡單清晰,易于學習與理解,下面請大家跟著小編的思路慢慢深入,一起來研究和學習“Kotlin協程切換為線程的方法”吧!
隨著kotlin在Android開發領域越來越火,協程在各個項目中的應用也逐漸變得廣泛
但是協程到底是什么呢?
協程其實是個古老的概念,已經非常成熟了,但大家對它的概念一直存在各種疑問,眾說紛紛
有人說協程是輕量級的線程,也有人說kotlin協程其實本質是一套線程切換方案
顯然這對初學者不太友好,當不清楚一個東西是什么的時候,就很難進入為什么和怎么辦的階段了
本文主要就是回答這個問題,主要包括以下內容
1.關于協程的一些前置知識
2.協程到底是什么?
3.kotlin協程的一些基本概念,掛起函數,CPS轉換,狀態機等
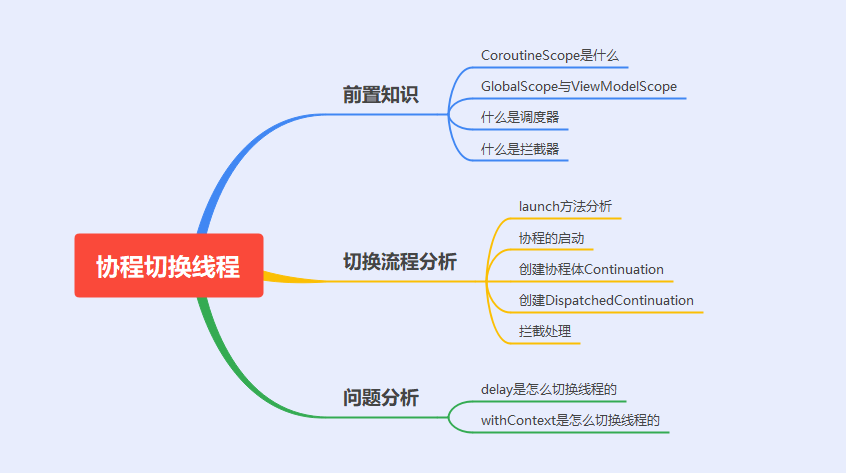
以上問題總結為思維導圖如下:

1.1 CoroutineScope到底是什么?
CoroutineScope即協程運行的作用域,它的源碼很簡單
public interface CoroutineScope {
    public val coroutineContext: CoroutineContext
}可以看出CoroutineScope的代碼很簡單,主要作用是提供CoroutineContext,協程運行的上下文
我們常見的實現有GlobalScope,LifecycleScope,ViewModelScope等
1.2 GlobalScope與ViewModelScope有什么區別?
public object GlobalScope : CoroutineScope {
    /**
     * 返回 [EmptyCoroutineContext].
     */
    override val coroutineContext: CoroutineContext
        get() = EmptyCoroutineContext
}

public val ViewModel.viewModelScope: CoroutineScope
    get() {
        val scope: CoroutineScope? = this.getTag(JOB_KEY)
        if (scope != null) {
            return scope
        }
        return setTagIfAbsent(
            JOB_KEY,
            CloseableCoroutineScope(SupervisorJob() + Dispatchers.Main.immediate)
        )
    }
兩者的代碼都挺簡單,從上面可以看出
1.GlobalScope返回的為CoroutineContext的空實現
2.ViewModelScope則往CoroutineContext中添加了Job與Dispatcher
我們先來看一段簡單的代碼
	fun testOne(){
		GlobalScope.launch {
            print("1:" + Thread.currentThread().name)
            delay(1000)
            print("2:" + Thread.currentThread().name)
        }
	}
	//打印結果為:DefaultDispatcher-worker-1
    fun testTwo(){
        viewModelScope.launch {
            print("1:" + Thread.currentThread().name)
            delay(1000)
            print("2:" + Thread.currentThread().name)
        }
    }
//打印結果為: main上面兩種Scope啟動協程后,打印當前線程名是不同的,一個是線程池中的一個線程,一個則是主線程
這是因為ViewModelScope在CoroutineContext中添加了Dispatchers.Main.immediate的原因
我們可以得出結論:協程就是通過Dispatchers調度器來控制線程切換的
1.3 什么是調度器?
從使用上來講,調度器就是我們使用的Dispatchers.Main,Dispatchers.Default,Dispatcher.IO等
從作用上來講,調度器的作用是控制協程運行的線程
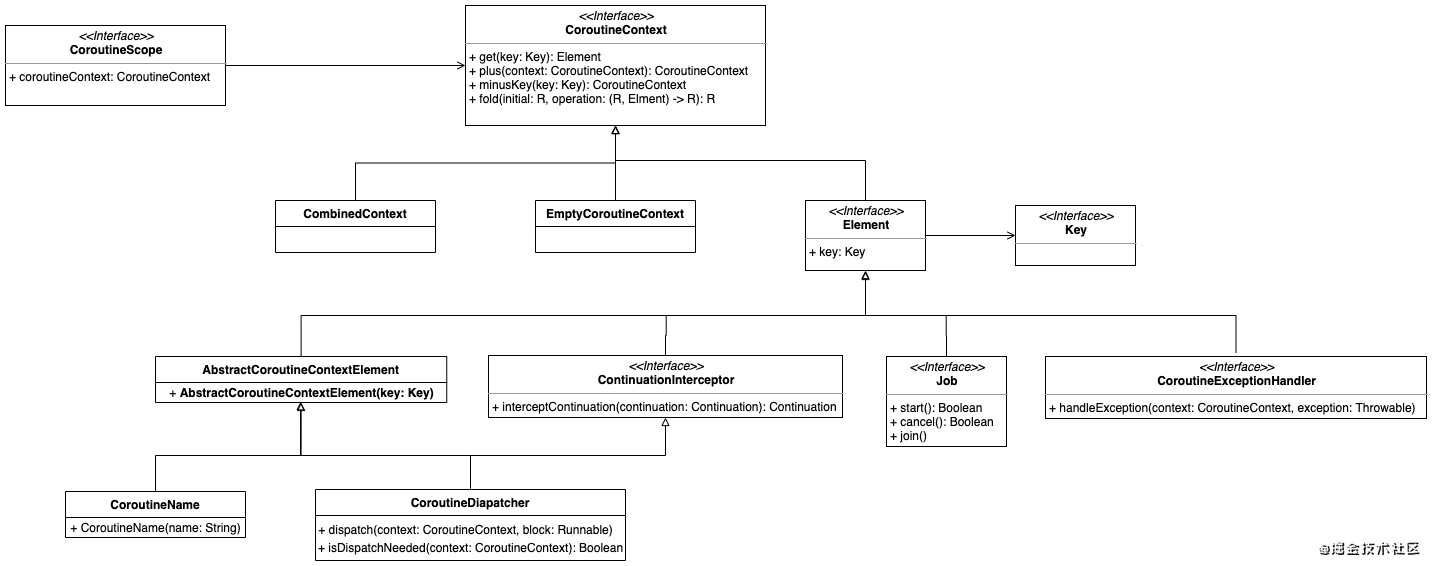
從結構上來講,Dispatchers的父類是ContinuationInterceptor,然后再繼承于CoroutineContext
它們的類結構關系如下:

這也是為什么Dispatchers能加入到CoroutineContext中的原因,并且支持+操作符來完成增加
1.4 什么是攔截器
從命名上很容易看出,ContinuationInterceptor即協程攔截器,先看一下接口
interface ContinuationInterceptor : CoroutineContext.Element {
    // ContinuationInterceptor 在 CoroutineContext 中的 Key
    companion object Key : CoroutineContext.Key<ContinuationInterceptor>
    /**
     * 攔截 continuation
     */
    fun <T> interceptContinuation(continuation: Continuation<T>): Continuation<T>

    //...
}
從上面可以提煉出兩個信息
1.攔截器的Key是單例的,因此當你添加多個攔截器時,生效的只會有一個
2.我們都知道,Continuation在調用其Continuation#resumeWith()方法,會執行其suspend修飾的函數的代碼塊,如果我們提前攔截到,是不是可以做點其他事情?這就是調度器切換線程的原理
上面我們已經介紹了是通過Dispatchers指定協程運行的線程,通過interceptContinuation在協程恢復前進行攔截,從而切換線程
帶著這些前置知識,我們一起來看下協程啟動的具體流程,明確下協程切換線程源碼具體實現
2.1 launch方法解析
我們首先看一下協程是怎樣啟動的,傳入了什么參數
public fun CoroutineScope.launch(
    context: CoroutineContext = EmptyCoroutineContext,
    start: CoroutineStart = CoroutineStart.DEFAULT,
    block: suspend CoroutineScope.() -> Unit
): Job {
    val newContext = newCoroutineContext(context)
    val coroutine = if (start.isLazy)
        LazyStandaloneCoroutine(newContext, block) else
        StandaloneCoroutine(newContext, active = true)
    coroutine.start(start, coroutine, block)
    return coroutine
}
總共有3個參數:
1.傳入的協程上下文
2.CoroutinStart啟動器,是個枚舉類,定義了不同的啟動方法,默認是CoroutineStart.DEFAULT
3.block就是我們傳入的協程體,真正要執行的代碼
這段代碼主要做了兩件事:
1.組合新的CoroutineContext
2.再創建一個 Continuation
2.1.1 組合新的CoroutineContext
public actual fun CoroutineScope.newCoroutineContext(context: CoroutineContext): CoroutineContext {
    val combined = coroutineContext + context
    val debug = if (DEBUG) combined + CoroutineId(COROUTINE_ID.incrementAndGet()) else combined
    return if (combined !== Dispatchers.Default && combined[ContinuationInterceptor] == null)
        debug + Dispatchers.Default else debug
}
從上面可以提煉出以下信息:
1.會將launch方法傳入的context與CoroutineScope中的context組合起來
2.如果combined中沒有攔截器,會傳入一個默認的攔截器,即Dispatchers.Default,這也解釋了為什么我們沒有傳入攔截器時會有一個默認切換線程的效果
2.1.2 創建一個Continuation
val coroutine = if (start.isLazy)
        LazyStandaloneCoroutine(newContext, block) else
        StandaloneCoroutine(newContext, active = true)
    coroutine.start(start, coroutine, block)
默認情況下,我們會創建一個StandloneCoroutine
值得注意的是,這個coroutine其實是我們協程體的complete,即成功后的回調,而不是協程體本身
然后調用coroutine.start,這表明協程開始啟動了
2.2 協程的啟動
public fun <R> start(start: CoroutineStart, receiver: R, block: suspend R.() -> T) {
    initParentJob()
    start(block, receiver, this)
}接著調用CoroutineStart的start來啟動協程,默認情況下調用的是CoroutineStart.Default
經過層層調用,最后到達了:
internal fun <R, T> (suspend (R) -> T).startCoroutineCancellable(receiver: R, completion: Continuation<T>) =
    runSafely(completion) {
        // 外面再包一層 Coroutine
        createCoroutineUnintercepted(receiver, completion)
            // 如果需要,做攔截處理
            .intercepted()
            // 調用 resumeWith 方法
            .resumeCancellableWith(Result.success(Unit))
    }
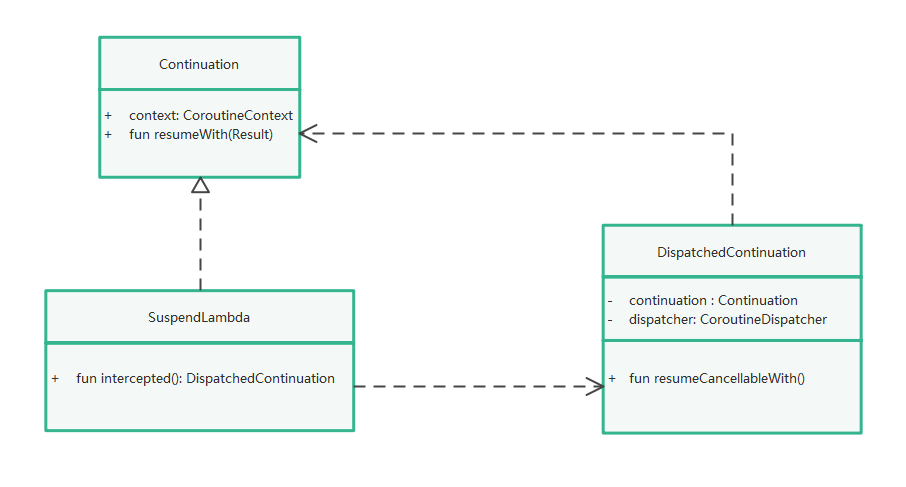
這里就是協程啟動的核心代碼,雖然比較短,卻包括3個步驟:
1.創建協程體Continuation
2.創建攔截 Continuation,即DispatchedContinuation
3.執行DispatchedContinuation.resumeWith方法
2.3 創建協程體Continuation
調用createCoroutineUnintercepted,會把我們的協程體即suspend block轉換成Continuation,它是SuspendLambda,繼承自ContinuationImplcreateCoroutineUnintercepted方法在源碼中找不到具體實現,不過如果你把協程體代碼反編譯后就可以看到真正的實現
詳情可見:字節碼反編譯
2.4 創建DispatchedContinuation
public actual fun <T> Continuation<T>.intercepted(): Continuation<T> =
    (this as? ContinuationImpl)?.intercepted() ?: this

//ContinuationImpl
public fun intercepted(): Continuation<Any?> =
        intercepted
            ?: (context[ContinuationInterceptor]?.interceptContinuation(this) ?: this)
                .also { intercepted = it }

//CoroutineDispatcher
public final override fun <T> interceptContinuation(continuation: Continuation<T>): Continuation<T> =
      DispatchedContinuation(this, continuation)
從上可以提煉出以下信息
1.interepted是個擴展方法,最后會調用到ContinuationImpl.intercepted方法
2.在intercepted會利用CoroutineContext,獲取當前的攔截器
3.因為當前的攔截器是CoroutineDispatcher,因此最終會返回一個DispatchedContinuation,我們其實也是利用它實現線程切換的
4.我們將協程體的Continuation傳入DispatchedContinuation,這里其實用到了裝飾器模式,實現功能的增強

這里其實很明顯了,通過DispatchedContinuation裝飾原有協程,在DispatchedContinuation里通過調度器處理線程切換,不影響原有邏輯,實現功能的增強
2.5 攔截處理
//DispatchedContinuation
    inline fun resumeCancellableWith(
        result: Result<T>,
        noinline onCancellation: ((cause: Throwable) -> Unit)?
    ) {
        val state = result.toState(onCancellation)
        if (dispatcher.isDispatchNeeded(context)) {
            _state = state
            resumeMode = MODE_CANCELLABLE
            dispatcher.dispatch(context, this)
        } else {
            executeUnconfined(state, MODE_CANCELLABLE) {
                if (!resumeCancelled(state)) {
                    resumeUndispatchedWith(result)
                }
            }
        }
}上面說到了啟動時會調用DispatchedContinuation的resumeCancellableWith方法
這里面做的事也很簡單:
1.如果需要切換線程,調用dispatcher.dispatcher方法,這里的dispatcher是通過CoroutineConext取出來的
2.如果不需要切換線程,直接運行原有線程即可
2.5.2 調度器的具體實現
我們首先明確下,CoroutineDispatcher是通過CoroutineContext取出來的,這也是協程上下文作用的體現CoroutineDispater官方提供了四種實現:Dispatchers.Main,Dispatchers.IO,Dispatchers.Default,Dispatchers.Unconfined
我們一起簡單看下Dispatchers.Main的實現
internal class HandlerContext private constructor(
    private val handler: Handler,
    private val name: String?,
    private val invokeImmediately: Boolean
) : HandlerDispatcher(), Delay {
    public constructor(
        handler: Handler,
        name: String? = null
    ) : this(handler, name, false)

    //...

    override fun dispatch(context: CoroutineContext, block: Runnable) {
        // 利用主線程的 Handler 執行任務
        handler.post(block)
    }
}可以看到,其實就是用handler切換到了主線程
如果用Dispatcers.IO也是一樣的,只不過換成線程池切換了

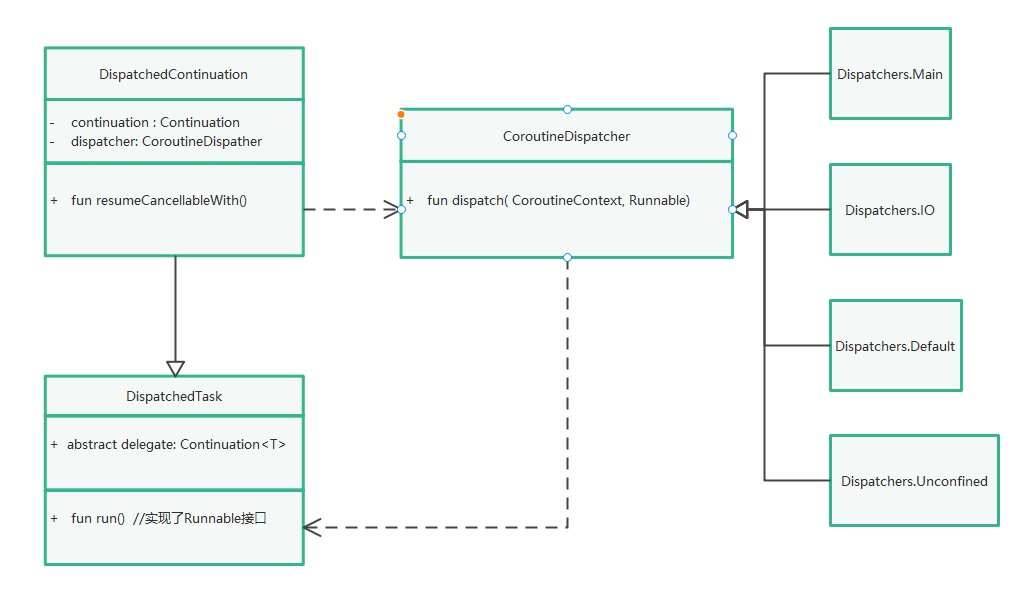
如上所示,其實就是一個裝飾模式
1.調用CoroutinDispatcher.dispatch方法切換線程
2.切換完成后調用DispatchedTask.run方法,執行真正的協程體
3 delay是怎樣切換線程的?
上面我們介紹了協程線程調度的基本原理與實現,下面我們來回答幾個小問題
我們知道delay函數會掛起,然后等待一段時間再恢復。
可以想象,這里面應該也涉及到線程的切換,具體是怎么實現的呢?
public suspend fun delay(timeMillis: Long) {
    if (timeMillis <= 0) return // don't delay
    return suspendCancellableCoroutine sc@ { cont: CancellableContinuation<Unit> ->
        // if timeMillis == Long.MAX_VALUE then just wait forever like awaitCancellation, don't schedule.
        if (timeMillis < Long.MAX_VALUE) {
            cont.context.delay.scheduleResumeAfterDelay(timeMillis, cont)
        }
    }
}

internal val CoroutineContext.delay: Delay get() = get(ContinuationInterceptor) as? Delay ?: DefaultDelayDealy的代碼也很簡單,從上面可以提煉出以下信息delay的切換也是通過攔截器來實現的,內置的攔截器同時也實現了Delay接口
我們來看一個具體實現
internal class HandlerContext private constructor(
    private val handler: Handler,
    private val name: String?,
    private val invokeImmediately: Boolean
) : HandlerDispatcher(), Delay {
    override fun scheduleResumeAfterDelay(timeMillis: Long, continuation: CancellableContinuation<Unit>) {
        // 利用主線程的 Handler 延遲執行任務,將完成的 continuation 放在任務中執行
        val block = Runnable {
            with(continuation) { resumeUndispatched(Unit) }
        }
        handler.postDelayed(block, timeMillis.coerceAtMost(MAX_DELAY))
        continuation.invokeOnCancellation { handler.removeCallbacks(block) }
    }

    //..
}1.可以看出,其實也是通過handler.postDelayed實現延時效果的
2.時間到了之后,再通過resumeUndispatched方法恢復協程
3.如果我們用的是Dispatcher.IO,效果也是一樣的,不同的就是延時效果是通過切換線程實現的
4. withContext是怎樣切換線程的?
我們在協程體內,可能通過withContext方法簡單便捷的切換線程,用同步的方式寫異步代碼,這也是kotin協程的主要優勢之一
fun test(){
        viewModelScope.launch(Dispatchers.Main) {
            print("1:" + Thread.currentThread().name)
            withContext(Dispatchers.IO){
                delay(1000)
                print("2:" + Thread.currentThread().name)
            }
            print("3:" + Thread.currentThread().name)
        }
    }
    //1,2,3處分別輸出main,DefaultDispatcher-worker-1,main
可以看出這段代碼做了一個切換線程然后再切換回來的操作,我們可以提出兩個問題
1.withContext是怎樣切換線程的?
2.withContext內的協程體結束后,線程怎樣切換回到Dispatchers.Main?
public suspend fun <T> withContext(
    context: CoroutineContext,
    block: suspend CoroutineScope.() -> T
): T {
    return suspendCoroutineUninterceptedOrReturn sc@ { uCont ->
        // 創建新的context
        val oldContext = uCont.context
        val newContext = oldContext + context
        ....
        //使用新的Dispatcher,覆蓋外層
        val coroutine = DispatchedCoroutine(newContext, uCont)
        coroutine.initParentJob()
        //DispatchedCoroutine作為了complete傳入
        block.startCoroutineCancellable(coroutine, coroutine)
        coroutine.getResult()
    }
}

private class DispatchedCoroutine<in T>(
    context: CoroutineContext,
    uCont: Continuation<T>
) : ScopeCoroutine<T>(context, uCont) {
	//在complete時會會回調
    override fun afterCompletion(state: Any?) {
        afterResume(state)
    }

    override fun afterResume(state: Any?) {
        //uCont就是父協程,context仍是老版context,因此可以切換回原來的線程上
        uCont.intercepted().resumeCancellableWith(recoverResult(state, uCont))
    }
}
這段代碼其實也很簡單,可以提煉出以下信息
1.withContext其實就是一層Api封裝,最后調用到了startCoroutineCancellable,這就跟launch后面的流程一樣了,我們就不繼續跟了
2.傳入的context會覆蓋外層的攔截器并生成一個newContext,因此可以實現線程的切換
3.DispatchedCoroutine作為complete傳入協程體的創建函數中,因此協程體執行完成后會回調到afterCompletion中
4.DispatchedCoroutine中傳入的uCont是父協程,它的攔截器仍是外層的攔截器,因此會切換回原來的線程中
總結
本文主要回答了kotlin協程到底是怎么切換線程的這個問題,并對源碼進行了分析
簡單來講主要包括以下步驟:
1.向CoroutineContext添加Dispatcher,指定運行的協程
2.在啟動時將suspend block創建成Continuation,并調用intercepted生成DispatchedContinuation
3.DispatchedContinuation就是對原有協程的裝飾,在這里調用Dispatcher完成線程切換任務后,resume被裝飾的協程,就會執行協程體內的代碼了
其實kotlin協程就是用裝飾器模式實現線程切換的
看起來似乎有不少代碼,但是真正的思路其實還是挺簡單的,這大概就是設計模式的作用吧
感謝各位的閱讀,以上就是“Kotlin協程切換為線程的方法”的內容了,經過本文的學習后,相信大家對Kotlin協程切換為線程的方法這一問題有了更深刻的體會,具體使用情況還需要大家實踐驗證。這里是億速云,小編將為大家推送更多相關知識點的文章,歡迎關注!
免責聲明:本站發布的內容(圖片、視頻和文字)以原創、轉載和分享為主,文章觀點不代表本網站立場,如果涉及侵權請聯系站長郵箱:is@yisu.com進行舉報,并提供相關證據,一經查實,將立刻刪除涉嫌侵權內容。