您好,登錄后才能下訂單哦!
您好,登錄后才能下訂單哦!

1.Apache網站服務
2.MySQL服務
3.LAMP架構應用實例
1.源于A Patchy Server,著名的開源Web服務軟件
2.1995年時,發布Apache服務程序的1.0版本
3.由Apache軟件基金會(ASF) 負責維護
4.最新的名稱為"Apache HTTP Server”
5.官方站點: http://httpd.apache.org/
1.開放源代碼、跨平臺應用
2.支持多種網頁編程語言
3.模塊化設計、運行穩定、良好的安全性
1.X:
1.目前最高版本是1.3,運行穩定
2.向下兼容性較好,但缺乏一些較新的功能
2.X:
1.目前最高版本是2.4
2.具有更多的功能特性
3.與1.X相比,配置管理風格存在較大差異
1.具有較大的自由度,功能可定制
2.可及時獲得最新的軟件版本
3.普遍適用于大多數Linux版本,便于移植使用
1.參考地址: http://httpd.apache.org/download.cgi
1.卸載httpd及相關依賴包
[root@www~]# rpm -e httpd --nodeps2.源碼編譯及安裝
[root@www ~]# tar zxf httpd-2.4.25.tar.gz -C /usr/src
[root@www ~]# cd /usr/src/httpd
[root@www httpd-2.4.25]# ./configure --prefix=/usr/local/httpd --enable-so --enable-rewrite --enable-charset-lite --enable-cgi
[root@www httpd-2.4.25]# make && make install [root@www ~]# Is /usr/local/httpd
bin cgi-bin error icons logs manual
build conf htdocs include man modules[root@www ~]# In -S /usr/local/httpd/bin/* /usr/local/bin
[root@www ~]# Is -I /usr/local/bin/httpd /usr/local/bin/apachectl
Irwxrwxrwx 1 root root 30 5月10 06:20 /usr/local/bin/apachectl -> /usr/local/httpd/bin/apachectl
Irwxrwxrwx 1 root root 26 5月10 06:20 /usr/local/bin/httpd -> /usr/local/httpd/bin/httpd1.通過chkconfig進行管理系統服務
2.通過systemctl進行管理系統服務
[root@www ~]# cp /usr/local/httpd/bin/apachectl /etc/init.d/httpd
[root@www ~]# vim /etc/init.d/httpd
#!/bin/bash
#chkconfig: 35 85 21
#description: Startup script for the Apache HTTP Server
[root@www ~]# chkconfig --add httpd
[root@www ~]# chkconfig --list httpd
httpd 0:關 1:關 2:關 3:開 4:關 5:開 6:關1.服務目錄: /usr/local/httpd/
2.主配置文件: /usr/local/httpd/conf/httpd.conf
3.網頁目錄: /usr/local/httpd/htdocs/
4.服務腳本: /usr/local/httpd/bin/apachectl
5.執行程序: /usr/localhttpd/bin/httpd
6.訪問日志: /usr/local/httpd/log/access log
7.錯誤日志: /usr/localhttpd/log/error log
1.確定網站名字、IP地址
2.配置并啟動httpd服務
3.部署網頁文檔s
4.在客戶機中訪問Web站點
5.查看Web站點訪問情況
ServerRoot "/usr/local/httpd"
Listen 80
User daemon
Group daemon
ServerAdmin webmaster@kgc.com
ServerName www.kqc.com
DocumentRoot"/usr/local/httpd/htdocs."
DirectoryIndex index.html index.php
ErrorLog logs/error log
LogLevel warn
1 CustomLog logs/access_ log
common
PidFile logs/httpd.pid
CharsetDefault UTF-8
Include conf/extra/httpd-default.conf
......1.ServerRoot:服務目錄
2.Listen:監聽的IP地址、端口號
3.User:運行服務的用戶身份
4.Group:運行服務的組身份
5.ServerAdmin:管理員郵箱
6.ServerName:網站服務器的域名
7.DocumentRoot:網頁文檔的根目錄
8.DirectoryIndex:默認的索引頁文件
9.ErrorLog:設置錯誤日志文件的路徑
10.LogLevel:記錄日志的級別,默認為warn
1.CustomLog:訪問日志文件的位置
2.PidFile:保存httpd進程PID號的文件
3.AddDefaultCharset:設置站點中的網頁默認使用的字符集編碼
4.Timeout:網絡連接超時,默認為300秒
5.KeepAlive:是否保持連接,可選On或Off
6.MaxKeepAliveRequests:每次連接最多請求文件數
7.KeepAlive' Timeout:保持連接狀態時的超時時間
8.Include:需要包含進來的其他配置文件
1.確認沒有使用RPM方式安裝mysql-server、mysql ,
2.安裝光盤自帶的ncurses-devel包
3.安裝cmake包
[root@www ~]# tar zxf cmake-2.8.6.tar.gz
[root@www ~]# cd cmake-2.8.6
[root@www cmake-2.8.6]# ./configure
[root@www cmake-2.8.6]# gmake && gmake install[root@www ~]# groupadd mysql
[root@www ~ ]# useradd -M -S /sbin/nologin mysql -g mysql
[root@www ~]# tar zxf mysql-5.6.36.tar.gz -C /usr/src
[root@www ~]# cd /usr/src/mysql-5.6.36
[root@www mysql-5.6.36]# cmake -
DCMAKE INSTALL PREFIX=/usr/local/mysql -DSYSCONFDIR=/etc -DDEFAULT CHARSET=utf8 -DDEFAULT_COLLATION=utf8_general ci -DWITH EXTRA CHARSETS=all
[root@www mysql-5 6.36]# make && make install[root@www ~]# chown -R mysql:mysql /usr/local/mysql
[root@www mysql-5.6.36]# rm -rf 7etc/my.cnf
[root@www mysql-5.6.36]# cp support- files/my-default.cnf /etc/my.cnf
[root@www mysql-5.6.36]# /usr/local/mysql/scripts/mysql install db --user=mysql --basedir=/usr/local/mysql --datadir=/usr/local/mysql/data/
[root@www mysql-5.6.36]#echo"PATH=$PATH:/usr/local/mysql/bin" >> /etc/profile
[root@www mysql-5.6.36]# . /etc/ profile[root@www mysql-5.6.36]# cp support-files/mysql.server /etcfred/init.d/ mysqld
[root@www mysql-5.6.36]# chmod +X 7etc/rc.d/init.d/mysqld
[root@www mysql-5.6.36]# chkconfig --add mysqld
[root@www mysql-5.6.36]# service mysqld start
Starting MySQL.Logging to '/usr/local/mysql/data/www.err'.
SUCCESS!
[root@www mysql-5.6.36]# /etc/init.d/mysqld status
SUCCESS! MySQL running (41548)
[root@www mysql-5.6.36]# netstat -anpt | grep mysqld
tcp6 0 0..3306 ...* LISTEN 41 548/mysqld[root@www mysql-5.6.36]# cp support-files/mysql.server /etcfred/init.d/ mysqld
[root@www mysql-5.6.36]# chmod +X 7etc/rc.d/init.d/mysqld
[root@www mysql-5.6.36]# chkconfig --add mysqldmysql-u用戶名_[-p]
提示符: mysql>mysqladmin -u root _[-p] password 新密碼mysql> exit1.目前最為成熟的一種企業網站應用模式,可提供動態Web站點應
用及開發環境
1.Linux、 Apache、 MySQL、 PHP/Perl/Python
1.成本低廉
2.可定制、易于開發
3.方便易用、安全和穩定
首先我們需要準備一臺Linux主機,LAMP架構需要用到的壓縮包(此處可在本人的百度網盤鏈接進行下載),還有最終我們準備搭建的bbs論壇的文件也在其中
百度網盤資源鏈接:https://pan.baidu.com/s/1dGbEwswQeej2qD_UTE-7rQ&shfl=sharepset
提取碼:bjg6
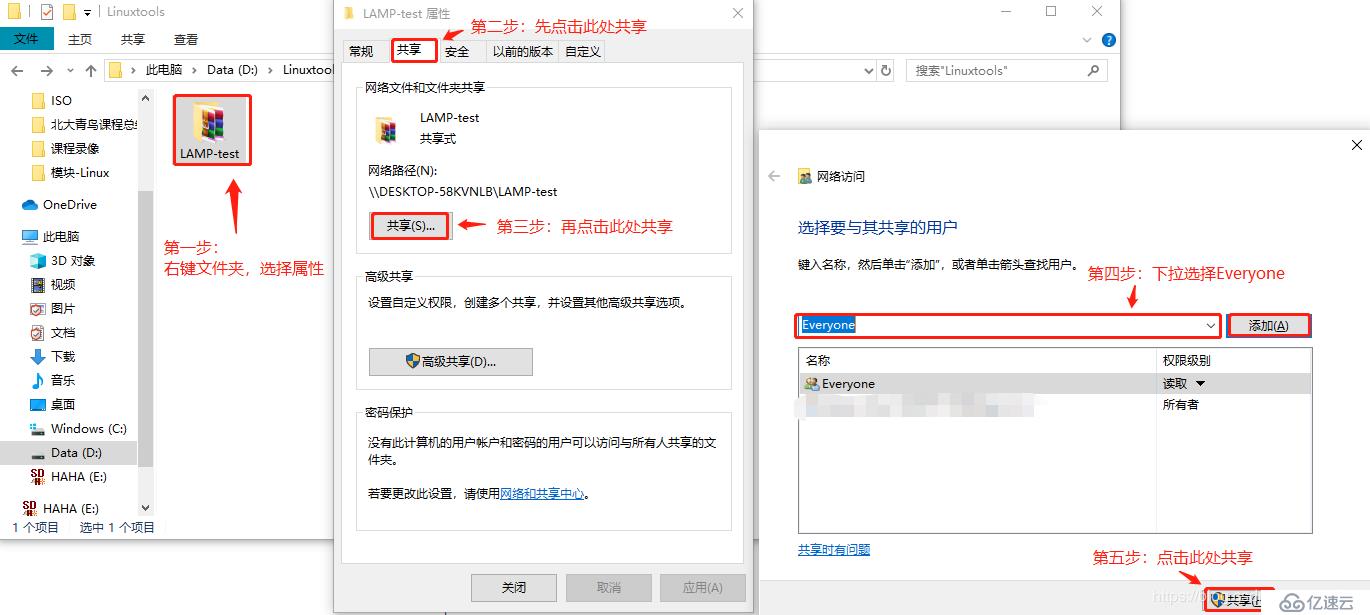
右鍵文件夾,選擇屬性,點擊共享,選擇共享,下拉選項中選擇Everyone,點擊添加,再點擊右下方的共享,點擊完成就可以了,集體操作如下圖:
[root@localhost ~]# smbclient -L //192.168.10.13/       //此處輸入自己宿主機的IP地址
Enter SAMBA\root's password:                            //此處直接回車
OS=[Windows 10 Home China 18362] Server=[Windows 10 Home China 6.3]
    Sharename       Type      Comment
    ---------       ----      -------
    ADMIN$          Disk      遠程管理
    C$              Disk      默認共享
    D$              Disk      默認共享
    IPC$            IPC       遠程 IPC
    LAMP-test       Disk                                //此處可以看到共享出來的文件夾
Connection to 192.168.0.103 failed (Error NT_STATUS_RESOURCE_NAME_NOT_FOUND)
NetBIOS over TCP disabled -- no workgroup available
[root@localhost ~]# ls /mnt/                            //此時我們查看掛載是空的
[root@localhost ~]# mount.cifs //192.168.0.103/LAMP-test /mnt/ //把共享的文件掛載到mnt目錄下
Password for root@//192.168.0.103/LAMP-test:            //此處直接回車
[root@localhost ~]# cd /mnt/                            //進入mnt目錄
[root@localhost mnt]# ls                    //此時查看詳情就可以看到所有我們需要用到的壓縮包了
apr-1.6.2.tar.gz       Discuz_X2.5_SC_UTF8.zip  mysql-5.6.26.tar.gz
apr-util-1.6.0.tar.gz httpd-2.4.29.tar.bz2 php-5.6.11.tar.bz2[root@localhost mnt]# yum install -y gcc gcc-c++ make pcre-devel expat-devel perl
//安裝必要組件
[root@localhost mnt]# tar zxvf apr-1.6.2.tar.gz -C /opt/
[root@localhost mnt]# tar zxvf apr-util-1.6.0.tar.gz -C /opt/
[root@localhost mnt]# tar jxvf httpd-2.4.29.tar.bz2 -C /opt/
//解壓縮以上文件到opt目錄下
[root@localhost mnt]# cd /opt/
[root@localhost opt]# ls
apr-1.6.2 apr-util-1.6.0 dis httpd-2.4.29 rh
[root@localhost opt]# mv apr-1.6.2/ httpd-2.4.29/srclib/apr
[root@localhost opt]# mv apr-util-1.6.0/ httpd-2.4.29/srclib/apr-util
[root@localhost opt]# cd /opt/httpd-2.4.29/
[root@localhost httpd-2.4.29]# ls
ABOUT_APACHE buildconf httpd.dsp libhttpd.mak README.cmake
acinclude.m4 CHANGES httpd.mak LICENSE README.platforms
Apache-apr2.dsw CMakeLists.txt httpd.spec Makefile.in ROADMAP
Apache.dsw config.layout include Makefile.win server
apache_probes.d configure INSTALL modules srclib
ap.d configure.in InstallBin.dsp NOTICE support
build docs LAYOUT NWGNUmakefile test
BuildAll.dsp emacs-style libhttpd.dep os VERSIONING
BuildBin.dsp httpd.dep libhttpd.dsp README
[root@localhost httpd-2.4.29]# ./configure --prefix=/usr/local/httpd --enable-so --enable-rewrite --enable-charset-lite --enable-cgi
//安裝必要組件
[root@localhost httpd-2.4.29]# make
[root@localhost httpd-2.4.29]# make install
[root@localhost httpd-2.4.29]# cp /usr/local/httpd/bin/apachectl /etc/init.d/httpd
cp:是否覆蓋"/etc/init.d/httpd"? yes
[root@localhost httpd-2.4.29]# vim /etc/init.d/httpd
#!/bin/sh
# chkconfig: 35 85 21
# description: Apache is a World Wide Web server
//在#!/bin/sh下行插入這兩行內容,按Esc退出插入模式,按:wq保存退出
[root@localhost httpd-2.4.29]# chkconfig --add httpd
[root@localhost httpd-2.4.29]# vim /usr/local/httpd/conf/httpd.conf
輸入/Server,找到:ServerName www.example.com:80 把前面的#號注釋刪除
輸入/Listen,查找80端口監聽,并開啟監聽本機的80端口:Listen 192.168.56.128: 80
按Esc退出插入模式,按:wq保存退出
[root@localhost httpd-2.4.29]# ln -s /usr/local/httpd/conf/httpd.conf /etc/
[root@localhost httpd-2.4.29]# ln -s /usr/local/httpd/bin/* /usr/local/bin/
//以上操作為創建軟鏈接
[root@localhost httpd-2.4.29]# systemctl stop firewalld.service
[root@localhost httpd-2.4.29]# setenforce 0
//關閉防火墻及增強型安全功能
[root@localhost httpd-2.4.29]# httpd -t
Syntax OK
[root@localhost httpd-2.4.29]# service httpd start
[root@localhost httpd-2.4.29]# netstat -ntuap | grep httpd
tcp 0 0 192.168.56.128:80 0.0.0.0:* LISTEN 22697/httpd [root@localhost httpd-2.4.29]# cd ~
[root@localhost ~]# yum install -y ncurses-devel autoconf cmake
//安裝必須組件
[root@localhost ~]# tar zxvf mysql-5.6.26.tar.gz -C /opt/
[root@localhost ~]# cd /opt/mysql-5.6.26/
[root@localhost mysql-5.6.26]# cmake -DCMAKE_INSTALL_PREFIX=/usr/local/mysql -DDEFAULT_CHARSET=utf8 -DDEFAULT_COLLATION=utf8_general_ci -DEXTRA_CHARSETS=all -DSYSCONFDIR=/etc/ -DMYSQL_DATADIR=/home/mysql/ -DMYSQL_UNIX_ADDR=/home/mysql/mysql.sock
//安裝必須組件
[root@localhost mysql-5.6.26]# make
[root@localhost mysql-5.6.26]# make install
[root@localhost mysql-5.6.26]# cp support-files/my-default.cnf /etc/my.cnf
cp:是否覆蓋"/etc/my.cnf"? yes
[root@localhost mysql-5.6.26]# cp support-files/mysql.server /etc/init.d/mysqld
cp:是否覆蓋"/etc/init.d/mysqld"? yes
[root@localhost mysql-5.6.26]# cd /etc/init.d
[root@localhost init.d]# ls
functions httpd mysqld netconsole network README
[root@localhost init.d]# chmod 755 mysqld
[root@localhost init.d]# ls -ln
總用量 56
-rw-r--r--. 1 0 0 17500 5月 3 2017 functions
-rwxr-xr-x. 1 0 0 3502 10月 18 22:45 httpd
-rwxr-xr-x. 1 0 0 10870 10月 18 23:20 mysqld
-rwxr-xr-x. 1 0 0 4334 5月 3 2017 netconsole
-rwxr-xr-x. 1 0 0 7293 5月 3 2017 network
-rw-r--r--. 1 0 0 1160 8月 5 2017 README
[root@localhost init.d]# chkconfig --add /etc/init.d/mysqld
[root@localhost init.d]# chkconfig --level 235 mysqld on
[root@localhost init.d]# echo "PATH=$PATH:/usr/local/mysql/bin" >> /etc/profile
[root@localhost init.d]# source /etc/profile
[root@localhost init.d]# echo $PATH
/usr/local/bin:/usr/local/sbin:/usr/bin:/usr/sbin:/bin:/sbin:/root/bin:/usr/local/mysql/bin:/root/bin:/usr/local/mysql/bin
[root@localhost init.d]# useradd -s /sbin/nologin mysql
//創建用戶“mysql”
[root@localhost init.d]# chown -R mysql:mysql /usr/local/mysql/
[root@localhost init.d]# /usr/local/mysql/scripts/mysql_install_db --user=mysql --ldata=/var/lib/mysql --basedir=/usr/local/mysql --datadir=/home/mysql
//安裝必要組件
[root@localhost init.d]# vim /etc/init.d/mysqld
[root@localhost init.d]# service mysqld start
Starting MySQL SUCCESS!
[root@localhost init.d]# netstat -ntuap | grep mysqld
tcp6 0 0 :::3306 :::* LISTEN 1310/mysqld
[root@localhost init.d]# mysqladmin -u root -p password "abc123" //給root賬號設置新密碼[root@localhost init.d]# cd ~
[root@localhost ~]# yum install -y gd libpng libpng-devel pcre pcre-devel libxml2-devel libjpeg-devel
[root@localhost ~]# tar jxvf php-5.6.11.tar.bz2 -C /opt/
[root@localhost ~]# cd /opt/php-5.6.11/
[root@localhost php-5.6.11]# ./configure --prefix=/usr/local/php5 --with-gd --with-zlib --with-apxs2=/usr/local/httpd/bin/apxs --with-mysql=/usr/local/mysql --with-config-file-path=/usr/local/php5 --enable-mbstring
[root@localhost php-5.6.11]# make
[root@localhost php-5.6.11]# make install
[root@localhost php-5.6.11]# cp php.ini-development /usr/local/php5/php.ini
cp:是否覆蓋"/usr/local/php5/php.ini"? yes
[root@localhost php-5.6.11]# ln -s /usr/local/php5/bin/* /usr/local/bin/
[root@localhost php-5.6.11]# vim /etc/httpd.conf
AddType application/x-compress .Z
AddType application/x-gzip .gz .tgz
AddType application/x-httpd-php .php
AddType application/x-httpd-php-source .phps
//在上兩行下面插入下面兩行內容
DirectoryIndex index.php index.html
//在DirectoryIndex和index.html中間添加index.php
//按Esc退出插入模式,按:wq保存退出
[root@localhost php-5.6.11]# vim /usr/local/httpd/htdocs/index.php
<?php
phpinfo();
?>
//寫入以上內容,按Esc退出插入模式,按:wq保存退出
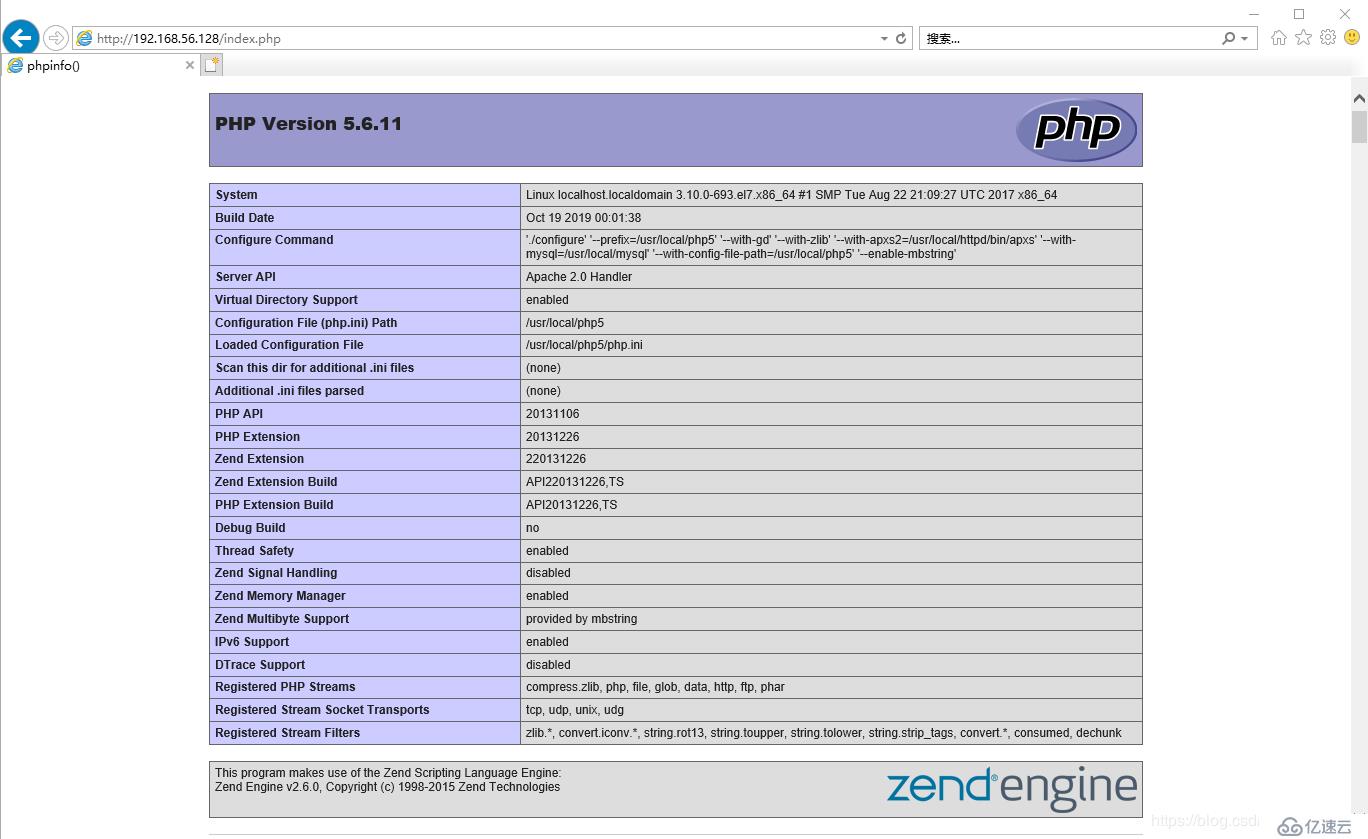
[root@localhost php-5.6.11]# service httpd restart進入網頁進行測試(此處IP地址填寫的是安裝服務的CentOS 7的IP地址):http://192.168.56.128/index.php,如果配置成功因該出現如下界面:
[root@localhost php-5.6.11]# cd ~
[root@localhost ~]# unzip Discuz_X2.5_SC_UTF8.zip -d /opt/Discuz
[root@localhost ~]#cp -r /opt/Discuz/upload/ /usr/local/httpd/htdocs/bbs
[root@localhost ~]#cd /usr/local/httpd/htdocs/bbs/
[root@localhost bbs]# chown -R daemon ./config/
[root@localhost bbs]# chown -R daemon ./data/
[root@localhost bbs]# chown -R daemon ./uc_client/data/cache/
[root@localhost bbs]# chown -R daemon ./uc_server/data/
[root@localhost bbs]# mysql -uroot -pabc123
Warning: Using a password on the command line interface can be insecure.
Welcome to the MySQL monitor.  Commands end with ; or \g.
Your MySQL connection id is 1
Server version: 5.6.26 Source distribution

Copyright (c) 2000, 2015, Oracle and/or its affiliates. All rights reserved.

Oracle is a registered trademark of Oracle Corporation and/or its
affiliates. Other names may be trademarks of their respective
owners.

Type 'help;' or '\h' for help. Type '\c' to clear the current input statement.

mysql> create database zzz;
Query OK, 1 row affected (0.00 sec)

mysql> grant all privileges on bbs.* to 'zzz'@'localhost' identified by '123123';
Query OK, 0 rows affected (0.01 sec)

mysql> grant all privileges on bbs.* to 'zzz'@'%' identified by '123123';
Query OK, 0 rows affected (0.00 sec)

mysql> flush privileges;
Query OK, 0 rows affected (0.00 sec)

mysql> quit
Bye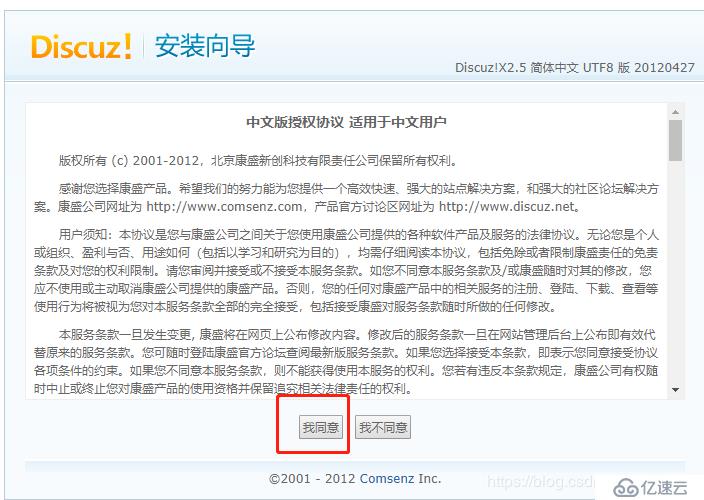
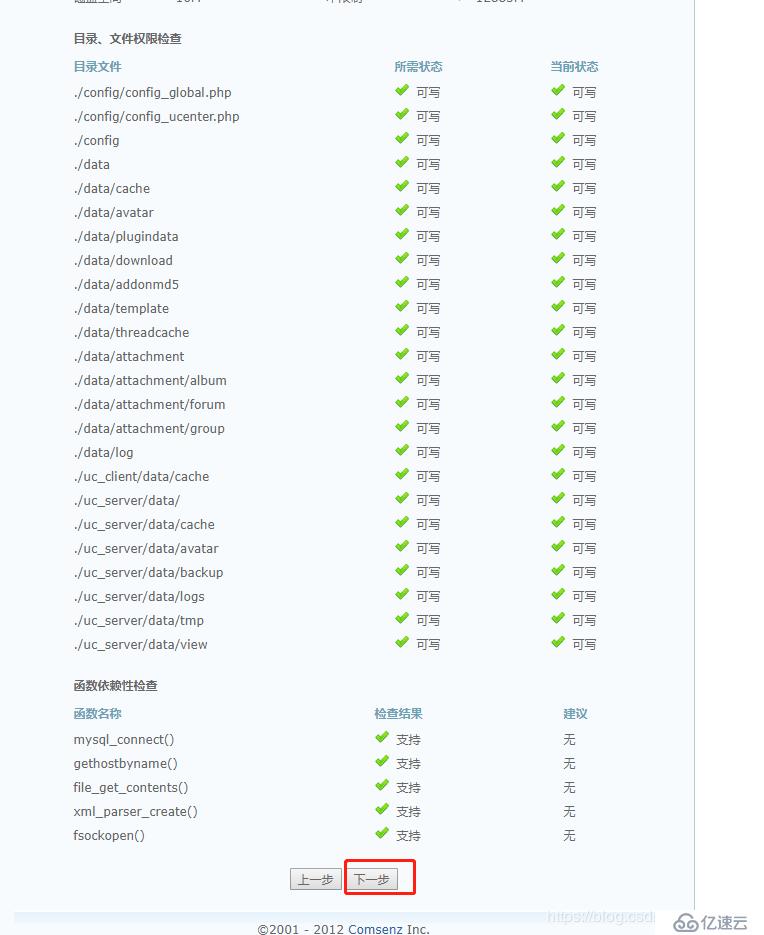
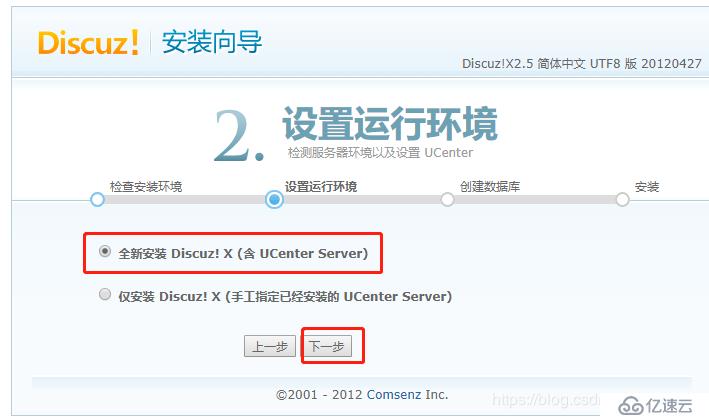
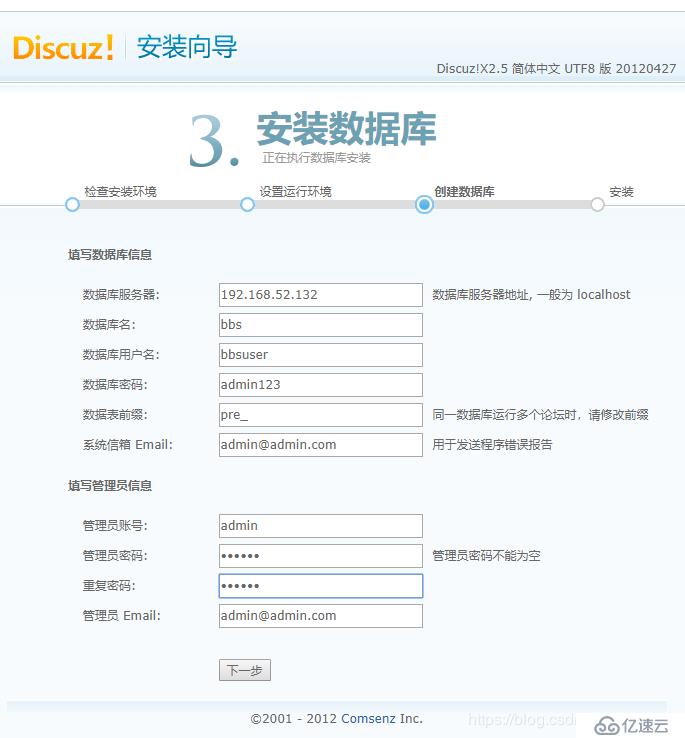
數據服務器:192.168.56.128(此處輸入自己的虛擬機IP)
數據庫名:bbs
數據庫用戶名:bbsuser(此處可在之前的命令中自行定義)
數據庫密碼:admin123(此處可在之前的命令中自行定義)
管理員賬號:admin(默認)
密碼:123123(可自行輸入)
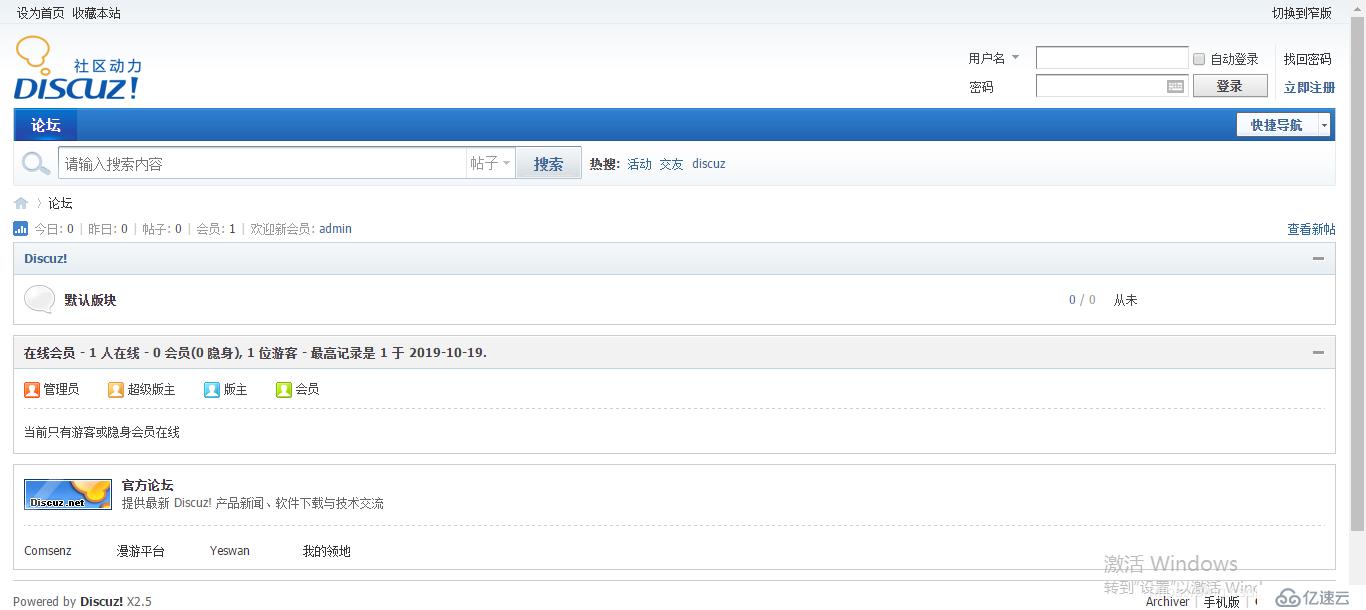
免責聲明:本站發布的內容(圖片、視頻和文字)以原創、轉載和分享為主,文章觀點不代表本網站立場,如果涉及侵權請聯系站長郵箱:is@yisu.com進行舉報,并提供相關證據,一經查實,將立刻刪除涉嫌侵權內容。