您好,登錄后才能下訂單哦!
您好,登錄后才能下訂單哦!
這篇文章主要介紹“怎么用Dubbo與Spring整合解析配置文件”,在日常操作中,相信很多人在怎么用Dubbo與Spring整合解析配置文件問題上存在疑惑,小編查閱了各式資料,整理出簡單好用的操作方法,希望對大家解答”怎么用Dubbo與Spring整合解析配置文件”的疑惑有所幫助!接下來,請跟著小編一起來學習吧!
本專欄分析的Dubbo源碼是基于2.6.x版本
public class Consumer {

    public static void main(String[] args) {
        ClassPathXmlApplicationContext context =
		            new ClassPathXmlApplicationContext(new String[]{"META-INF/spring/dubbo-demo-consumer.xml"});
        context.start();
        DemoService demoService = (DemoService) context.getBean("demoService");

        while (true) {
            try {
                Thread.sleep(1000);
                String hello = demoService.sayHello("world");
                System.out.println(hello);
            } catch (Throwable throwable) {
                throwable.printStackTrace();
            }
        }
    }
}
<?xml version="1.0" encoding="UTF-8"?> <beans xmlns:xsi="http://www.w3.org/2001/XMLSchema-instance" xmlns:dubbo="http://dubbo.apache.org/schema/dubbo" xmlns="http://www.springframework.org/schema/beans" xsi:schemaLocation="http://www.springframework.org/schema/beans http://www.springframework.org/schema/beans/spring-beans-4.3.xsd http://dubbo.apache.org/schema/dubbo http://dubbo.apache.org/schema/dubbo/dubbo.xsd"> <dubbo:application name="demo-consumer"/> <dubbo:registry address="zookeeper://127.0.0.1:2181"/> <dubbo:reference id="demoService" check="false" interface="com.alibaba.dubbo.demo.DemoService"/> </beans>
public class Provider {

    public static void main(String[] args) throws Exception {
        System.setProperty("java.net.preferIPv4Stack", "true");
        ClassPathXmlApplicationContext context =
                            new ClassPathXmlApplicationContext(new String[]{"META-INF/spring/dubbo-demo-provider.xml"});
        context.start();
        System.in.read();
    }
}
<?xml version="1.0" encoding="UTF-8"?> <beans xmlns:xsi="http://www.w3.org/2001/XMLSchema-instance" xmlns:dubbo="http://dubbo.apache.org/schema/dubbo" xmlns="http://www.springframework.org/schema/beans" xsi:schemaLocation="http://www.springframework.org/schema/beans http://www.springframework.org/schema/beans/spring-beans-4.3.xsd http://dubbo.apache.org/schema/dubbo http://dubbo.apache.org/schema/dubbo/dubbo.xsd"> <dubbo:application name="demo-provider"/> <dubbo:registry address="zookeeper://127.0.0.1:2181"/> <dubbo:protocol name="dubbo" port="20880"/> <bean id="demoService" class="com.alibaba.dubbo.demo.provider.DemoServiceImpl"/> <dubbo:service interface="com.alibaba.dubbo.demo.DemoService" ref="demoService"/> </beans>
??先啟動服務提供者,再啟動消費者,發現控制臺可以正常輸出。下面分析一下Spring是如何解析dubbo的消費者和服務提供者的配置文件。Spring容器提供了IOC功能,可以替我們生成bean。通常,我們將bean的定義放在xml文件中,我們來分析一下Spring加載xml配置文件并生成bean過程。Spring提供的容器分為兩種:BeanFactory和ApplicationContext。其中BeanFactory是懶加載,也就是延遲初始化,它在你調用getBean時才會初始化這個bean,而ApplicationContext是初始化容器時就會加載非延遲初始化的bean。先簡單概況下Spring容器生成bean的過程,首先通過loadBeanDefinition過程將bean的信息封裝成一個個BeanDefinition,然后再根據這些BeanDefinition創建bean。下面看Spring解析Dubbo的配置文件并生成bean的過程。
// 1、new ClassPathXmlApplicationContext時Spring容器初始化,此時會先調用loadBeanDefinition方法去加載解析xml配置文件
context = new ClassPathXmlApplicationContext(new String[]{"META-INF/spring/dubbo-demo-provider.xml"});
// 2、加載配置文件最終會走到這里
protected void parseBeanDefinitions(Element root, BeanDefinitionParserDelegate delegate) {
if (delegate.isDefaultNamespace(root)) {
NodeList nl = root.getChildNodes();
// 3、這里其實已經通過dom4j將xml文件解析成了Document,將xml中的一項一項配置解析成了一個個Node去讀取處理.
for (int i = 0; i < nl.getLength(); i++) {
Node node = nl.item(i);
if (node instanceof Element) {
Element ele = (Element) node;
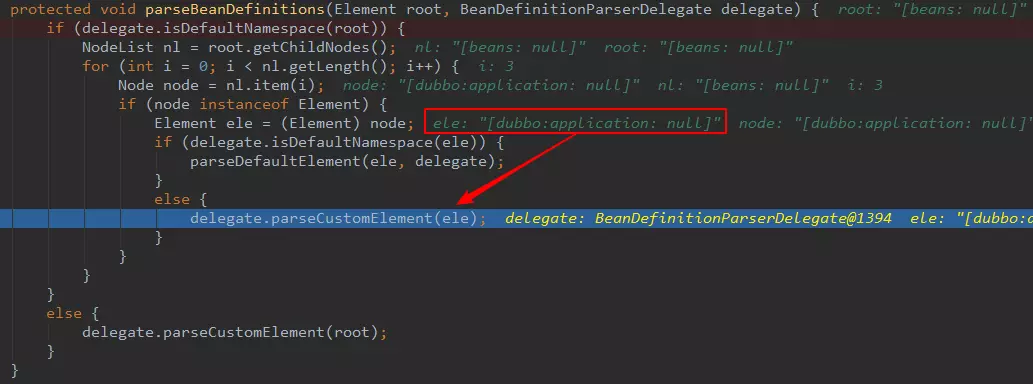
// 4、判斷是否是Spring默認可以處理的Node.這里看下面截圖,由于dubbo:application,
// 是dubbo中定義的,不屬于Spring的命名空間管理
if (delegate.isDefaultNamespace(ele)) {
parseDefaultElement(ele, delegate);
}
else {
delegate.parseCustomElement(ele);
}
}
}
}
}
public BeanDefinition parseCustomElement(Element ele, BeanDefinition containingBd) {
        // http://dubbo.apache.org/schema/dubbo
	String namespaceUri = getNamespaceURI(ele);
        // DubboNameSpaceHandler
        NamespaceHandler handler = this.readerContext.getNamespaceHandlerResolver().resolve(namespaceUri);
	if (handler == null) {
		return null;
	}
	return handler.parse(ele, new ParserContext(this.readerContext, this, containingBd));
}
private static BeanDefinition parse(Element element, ParserContext parserContext,
Class<?> beanClass, boolean required) {
RootBeanDefinition beanDefinition = new RootBeanDefinition();
// class com.alibaba.dubbo.config.ApplicationConfig
beanDefinition.setBeanClass(beanClass);
beanDefinition.setLazyInit(false);
// 解析id屬性
String id = element.getAttribute("id");
if ((id == null || id.length() == 0) && required) {
String generatedBeanName = element.getAttribute("name");
if (generatedBeanName == null || generatedBeanName.length() == 0) {
if (ProtocolConfig.class.equals(beanClass)) {
generatedBeanName = "dubbo";
} else {
generatedBeanName = element.getAttribute("interface");
}
}
if (generatedBeanName == null || generatedBeanName.length() == 0) {
generatedBeanName = beanClass.getName();
}
id = generatedBeanName;
int counter = 2;
while (parserContext.getRegistry().containsBeanDefinition(id)) {
id = generatedBeanName + (counter++);
}
}
if (id != null && id.length() > 0) {
if (parserContext.getRegistry().containsBeanDefinition(id)) {
throw new IllegalStateException("Duplicate spring bean id " + id);
}
// 注冊BeanDefinition
parserContext.getRegistry().registerBeanDefinition(id, beanDefinition);
// 將id屬性放入beanDefinition中,后續getBean創建bean時就是根據這些屬性來創建bean,
// 這里創建的bean是ApplicationConfig
beanDefinition.getPropertyValues().addPropertyValue("id", id);
}
// 刪去一些代碼,reference是解析得到的value值,可見這里將屬性和屬性值都放入了BeanDefinition
beanDefinition.getPropertyValues().addPropertyValue(property, reference);
return beanDefinition;
}到這里就解析完了,Spring將xml中的application節點解析成一個BeanDefinition,并注冊到Registry中,Registry就是一個Map。下面分析Spring創建這個ApplicationConfig的過程。
context = new ClassPathXmlApplicationContext(new String[]{"META-INF/spring/dubbo-demo-provider.xml"});// Spring容器的初始化過程,new ClassPathXmlApplicationContext后會走到這里
public void refresh() throws BeansException, IllegalStateException {
synchronized (this.startupShutdownMonitor) {
prepareRefresh();
// 這里面就會執行上面的分析過程,調用loadBeanDefinition解析BeanDefinition
ConfigurableListableBeanFactory beanFactory = obtainFreshBeanFactory();
prepareBeanFactory(beanFactory);
try {
postProcessBeanFactory(beanFactory);
invokeBeanFactoryPostProcessors(beanFactory);
registerBeanPostProcessors(beanFactory);
initMessageSource();
initApplicationEventMulticaster();
onRefresh();
registerListeners();
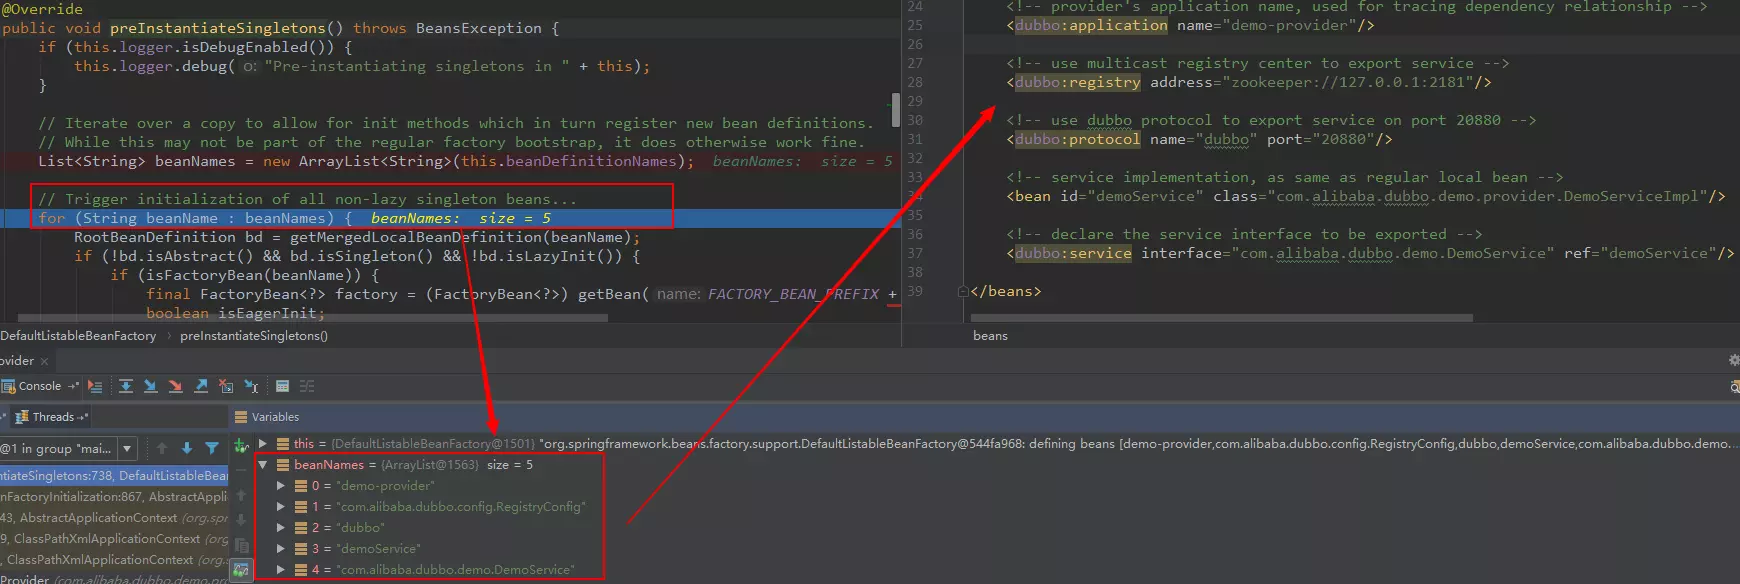
// Instantiate all remaining (non-lazy-init) singletons.可以看到Spring容器初始化
// 的后面會初始化非延遲加載的bean,這里會走到下圖的preInstantiasteSingletons方法
finishBeanFactoryInitialization(beanFactory);
finishRefresh();
}
}
}
// Spring創建bean最終會走到這里
protected Object doCreateBean(final String beanName, final RootBeanDefinition mbd,
                                                     final Object[] args) throws BeanCreationException {
	BeanWrapper instanceWrapper = null;
	if (mbd.isSingleton()) {
		instanceWrapper = this.factoryBeanInstanceCache.remove(beanName);
	}
	if (instanceWrapper == null) {
                // 刪除一些無用代碼,這里會調用反射創建bean,創建完僅是一個空的bean,屬性還沒有賦值
		instanceWrapper = createBeanInstance(beanName, mbd, args);
	}
	final Object bean = (instanceWrapper != null ? instanceWrapper.getWrappedInstance() : null);

	Object exposedObject = bean;
	try {
                // 屬性賦值,最終也是調用反射進行賦值
		populateBean(beanName, mbd, instanceWrapper);
		if (exposedObject != null) {
			exposedObject = initializeBean(beanName, exposedObject, mbd);
		}
	}
	return exposedObject;
}
protected void populateBean(String beanName, RootBeanDefinition mbd, BeanWrapper bw) {
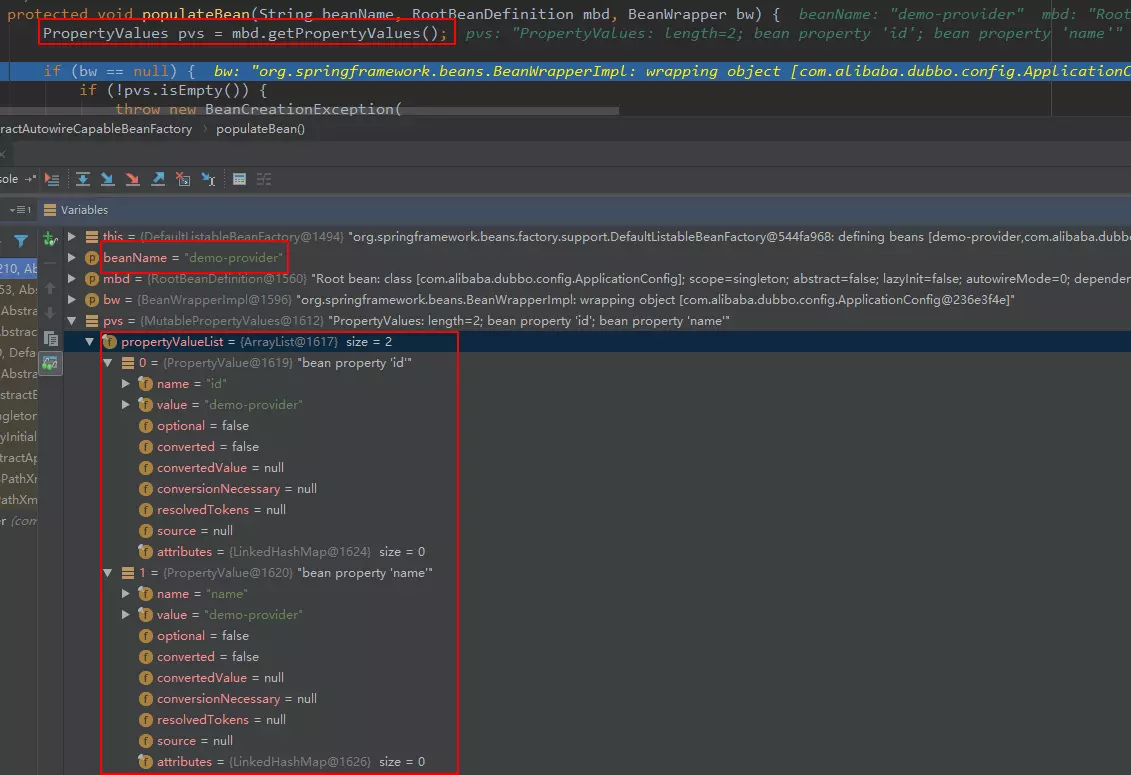
// 這里的pvs就是之前解析配置文件得到BeanDefinition時,給BeanDefinition注入進去的
PropertyValues pvs = mbd.getPropertyValues();
// 刪除一些代碼,最終這里會調用反射賦值,跳來跳去有點復雜
applyPropertyValues(beanName, mbd, bw, pvs);
}protected void addSingleton(String beanName, Object singletonObject) {
// 最終創建完bean以后會將它保存起來(猜測,Spring容器初始化以后,非懶加載的bean已經以如下方式
// 保存到Spring容器中了,后續通過@Autowired注解)來獲取時就是從這里面獲取,只是分析,還沒有看源碼)
synchronized (this.singletonObjects) {
this.singletonObjects.put(beanName, (singletonObject != null ? singletonObject : NULL_OBJECT));
this.singletonFactories.remove(beanName);
this.earlySingletonObjects.remove(beanName);
this.registeredSingletons.add(beanName);
}
}
到此,關于“怎么用Dubbo與Spring整合解析配置文件”的學習就結束了,希望能夠解決大家的疑惑。理論與實踐的搭配能更好的幫助大家學習,快去試試吧!若想繼續學習更多相關知識,請繼續關注億速云網站,小編會繼續努力為大家帶來更多實用的文章!
免責聲明:本站發布的內容(圖片、視頻和文字)以原創、轉載和分享為主,文章觀點不代表本網站立場,如果涉及侵權請聯系站長郵箱:is@yisu.com進行舉報,并提供相關證據,一經查實,將立刻刪除涉嫌侵權內容。