您好,登錄后才能下訂單哦!
您好,登錄后才能下訂單哦!
這篇文章給大家介紹springboot2.0.6如何啟動監聽器,內容非常詳細,感興趣的小伙伴們可以參考借鑒,希望對大家能有所幫助。
public ConfigurableApplicationContext run(String... args) {
   ......//省略
    // 獲取一個run監聽器,主要監聽SpringApplication對象,(內部只有一個EventPublishingRunListener)
   SpringApplicationRunListeners listeners = getRunListeners(args);
    //調用監聽器的啟動,當SpringApplication對象的run方法剛啟動的時候(依靠SimpleApplicationEventMulticaster)
   listeners.starting();
   ......//省略
}SpringApplicationRunListeners 是一個集合類,內部包含一個 log 和包含 SpringApplicationRunListener 的 List。而 SpringApplicationRunListener 主要是監聽 SpringApplication 對象的,里面的方法都定義了在何時調用 SpringApplicationRunListener 的各種方法。
下面的每一個方法 SpringApplicationRunListener 都把其包裝成一個事件,在spring容器還未成功 refreshed 之前都是使用SimpleApplicationEventMulticaster 去尋找對該事件感興趣的ApplicationListener,然后調用其onApplicationEvent方法
starting:當SpringApplication對象的run方法剛啟動的時候(依靠SimpleApplicationEventMulticaster)
environmentPrepared:在environment Prepared 但是spring容器還未創建的時候(依靠SimpleApplicationEventMulticaster)
contextPrepared:當spring容器已經創建且準備好了,(目前是空的實現)
contextLoaded:當spring容器已經loaded 且未refresh 。load就是將我們的primaryClass注冊到spring容器中,(依靠SimpleApplicationEventMulticaster) 同時將之前獲取到的ApplicationListener都加入到spring容器中,此時如果ApplicationListener還是ApplicationContextAware的也要調用其setApplicationContext方法。
started:spring容器已經刷新過且應用已經啟動,但是CommandLineRunners和ApplicationRunners還未調用,直接通過spring容器自己發送(因為ApplicationListener已經加入spring容器)
running:我們已經調用了CommandLineRunners,直接通過spring容器自己發送(因為ApplicationListener已經加入spring容器)
failed:當異常發生的時候就調用這個,如果spring容器沒有loaded 或者沒有激活就使用SimpleApplicationEventMulticaster,否則還是依靠spring容器自己
public class SpringApplication {
    // 獲取監聽
   private SpringApplicationRunListeners getRunListeners(String[] args) {
        // 定義class數組
      Class<?>[] types = new Class<?>[] { SpringApplication.class, String[].class };
        // 創建SpringApplicationRunListeners對象
      return new SpringApplicationRunListeners(logger, getSpringFactoriesInstances(
            SpringApplicationRunListener.class, types, this, args));
   }
}
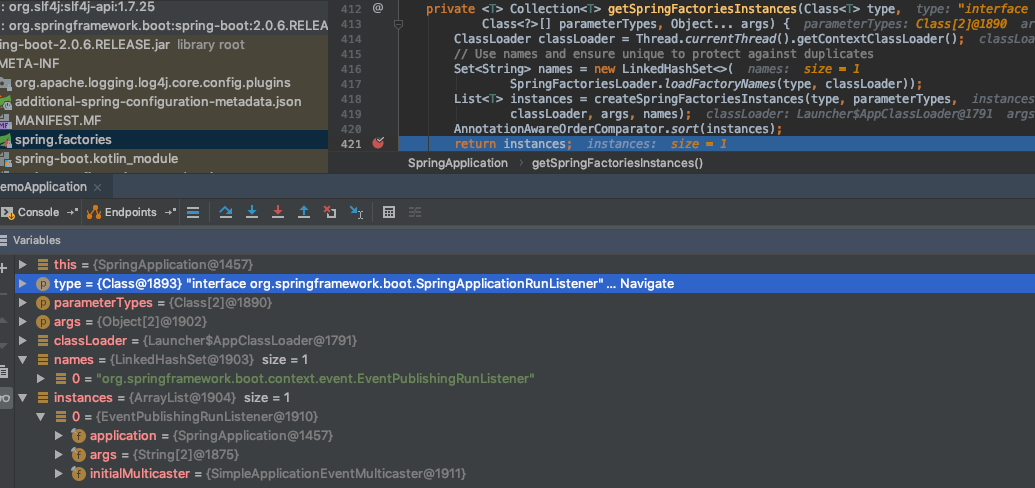
默認情況下,getRunListeners 方法從 spring.factories 文件中找出key為 SpringApplicationRunListener 的類有:
org.springframework.boot.context.event.EventPublishingRunListener
這里我們看到了一個熟悉的方法getSpringFactoriesInstances(SpringApplicationRunListener.class, types, this, args),前面的博文我們已經詳細介紹過該方法是怎么一步步的獲取到META-INF/spring.factories中的指定的key的value,獲取到以后怎么實例化類的(參考)。執行 獲取的值如下圖

從上圖debug結果,我們可以看到我們獲取到了一個監聽器EventPublishingRunListener,該監聽器是Spring容器的啟動監聽器。listeners.starting()方法開啟了監聽事件
public class EventPublishingRunListener implements SpringApplicationRunListener, Ordered {
   private final SpringApplication application;
   private final String[] args;
   private final SimpleApplicationEventMulticaster initialMulticaster;
    // 加載監聽器類
   public EventPublishingRunListener(SpringApplication application, String[] args) {
      this.application = application;
      this.args = args;
      this.initialMulticaster = new SimpleApplicationEventMulticaster();
        // 給initialMulticaster 添加listener
      for (ApplicationListener<?> listener : application.getListeners()) {
         this.initialMulticaster.addApplicationListener(listener);
      }
   }
   // 實現類調用EventPublishingRunListener的方法
   public void starting() {
       this.initialMulticaster.multicastEvent(
           // 創建了一個ApplicationStartingEvent事件,將springapplication的this.application傳入,因此監聽的時候獲取的是SpringApplication實例
         new ApplicationStartingEvent(this.application, this.args));
   }
    ......//省略
}
EventPublishingRunListener的初始化方法中 對application、args進行了賦值,并對SimpleApplicationEventMulticaster進行了初始化,然后獲取application中的監聽器添加給SimpleApplicationEventMulticaster對象。
進入SimpleApplicationEventMulticaster類的初始化方法,如下
public class SimpleApplicationEventMulticaster extends AbstractApplicationEventMulticaster {
   private Executor taskExecutor;
   private ErrorHandler errorHandler;
   public void multicastEvent(ApplicationEvent event) {
      multicastEvent(event, resolveDefaultEventType(event));
   }
   public void multicastEvent(final ApplicationEvent event, @Nullable ResolvableType eventType) {
      ResolvableType type = (eventType != null ? eventType : resolveDefaultEventType(event));
        // 注意getApplicationListeners獲取對應的事件監聽器
      for (final ApplicationListener<?> listener : getApplicationListeners(event, type)) {
         Executor executor = getTaskExecutor();
         if (executor != null) {
            executor.execute(() -> invokeListener(listener, event));
         }
         else {
            invokeListener(listener, event);
         }
      }
   }
}
SimpleApplicationEventMulticaster類繼承 AbstractApplicationEventMulticaster
public abstract class AbstractApplicationEventMulticaster
      implements ApplicationEventMulticaster, BeanClassLoaderAware, BeanFactoryAware {
   protected Collection<ApplicationListener<?>> getApplicationListeners(
         ApplicationEvent event, ResolvableType eventType) {
      Object source = event.getSource();
      Class<?> sourceType = (source != null ? source.getClass() : null);
      ListenerCacheKey cacheKey = new ListenerCacheKey(eventType, sourceType);
      // Quick check for existing entry on ConcurrentHashMap…
       // 快速檢測 COncurrentHashMap 的現有條目
      ListenerRetriever retriever = this.retrieverCache.get(cacheKey);
      if (retriever != null) {
         return retriever.getApplicationListeners();
      }
      if (this.beanClassLoader == null ||
            (ClassUtils.isCacheSafe(event.getClass(), this.beanClassLoader) &&
                  (sourceType == null || ClassUtils.isCacheSafe(sourceType, this.beanClassLoader)))) {
         // Fully synchronized building and caching of a ListenerRetriever
         synchronized (this.retrievalMutex) {
            retriever = this.retrieverCache.get(cacheKey);
            if (retriever != null) {
               return retriever.getApplicationListeners();
            }
            retriever = new ListenerRetriever(true);
            Collection<ApplicationListener<?>> listeners =
                  retrieveApplicationListeners(eventType, sourceType, retriever);
            this.retrieverCache.put(cacheKey, retriever);
            return listeners;
         }
      }
      else {
         // No ListenerRetriever caching -> no synchronization necessary
         return retrieveApplicationListeners(eventType, sourceType, null);
      }
   }
    // 實際上檢索給定事件和源類型的應用程序監聽器是否匹配
   private Collection<ApplicationListener<?>> retrieveApplicationListeners(
         ResolvableType eventType, @Nullable Class<?> sourceType, @Nullable ListenerRetriever retriever) {
      List<ApplicationListener<?>> allListeners = new ArrayList<>();
      Set<ApplicationListener<?>> listeners;
      Set<String> listenerBeans;
      synchronized (this.retrievalMutex) {
            // 這個listener集合就是前文提到的從配置中過濾的10個監聽器(圖1)
         listeners = new LinkedHashSet<>(this.defaultRetriever.applicationListeners);
         listenerBeans = new LinkedHashSet<>(this.defaultRetriever.applicationListenerBeans);
      }
       // 循環10個listener調用supportsEvent方法
      for (ApplicationListener<?> listener : listeners) {
         if (supportsEvent(listener, eventType, sourceType)) {
            if (retriever != null) {
               retriever.applicationListeners.add(listener);
            }
            allListeners.add(listener);
         }
      }
      ......//省略
      AnnotationAwareOrderComparator.sort(allListeners);
      if (retriever != null && retriever.applicationListenerBeans.isEmpty()) {
         retriever.applicationListeners.clear();
         retriever.applicationListeners.addAll(allListeners);
      }
      return allListeners;
   }
   protected boolean supportsEvent(
      ApplicationListener<?> listener, ResolvableType eventType, @Nullable Class<?> sourceType) {
      GenericApplicationListener smartListener = (listener instanceof GenericApplicationListener ?
         (GenericApplicationListener) listener : new GenericApplicationListenerAdapter(listener));
      return (smartListener.supportsEventType(eventType) && smartListener.supportsSourceType(sourceType));
   }
} -->程序啟動
-->調用getRunListeners(args)獲取SpringApplicationRunListeners實例
-->getSpringFactoriesInstances()獲取Spring工廠實例集合
-->loadFactoryNames()通過classLoader加載/META-INF/spring.factories文件,獲取指定class對應的類全限定名稱集合
-->loadSpringFactories() 通過classLoader循環加載/META-INF/spring.factories文件,獲取文件中類全限定名稱集合返回
-->createSpringFactoriesInstances()根據加載文件返回的類全限定名稱集合創建工廠實例,反射
-->listeners.starting()啟動監聽器
-->multicastEvent(ApplicationEvent event)組播ApplicationEvent事件
-->getApplicationListeners()判斷監聽器類型是否與當前監聽器類型相同
-->retrieveApplicationListeners(eventType, sourceType, retriever)檢索給定事件和源類型的應用程序監聽器。
-->supportsEvent(listener, eventType, sourceType)確認給定的監聽器是否支持給定的事件。
-->GenericApplicationListenerAdapter(ApplicationListener<?> delegate)為給定的委托創建一個新的GenericApplicationListener。
-->resolveDeclaredEventType(ApplicationListener<ApplicationEvent> listener)發布事件監聽
-->supportsEventType(eventType)從指定類型解析事件
-->結束
SpringApplicationRunListener的那些方法底層還是依靠spring容器去發布事件
底層還是會被ApplicationListener給監聽到
在spring容器prepareContext調用之后會將ApplicationListener都加入到SimpleApplicationEventMulticaster,在這之后所有的事件都會lazy發送,即先存在earlyApplicationEvents。等到spring容器refresh之后注冊所有ApplicationListener,然后在統一發送之前存儲的事件。
關于springboot2.0.6如何啟動監聽器就分享到這里了,希望以上內容可以對大家有一定的幫助,可以學到更多知識。如果覺得文章不錯,可以把它分享出去讓更多的人看到。
免責聲明:本站發布的內容(圖片、視頻和文字)以原創、轉載和分享為主,文章觀點不代表本網站立場,如果涉及侵權請聯系站長郵箱:is@yisu.com進行舉報,并提供相關證據,一經查實,將立刻刪除涉嫌侵權內容。