您好,登錄后才能下訂單哦!
您好,登錄后才能下訂單哦!
這篇文章主要介紹“Springboot+LDAP調研日志的方法是什么”,在日常操作中,相信很多人在Springboot+LDAP調研日志的方法是什么問題上存在疑惑,小編查閱了各式資料,整理出簡單好用的操作方法,希望對大家解答”Springboot+LDAP調研日志的方法是什么”的疑惑有所幫助!接下來,請跟著小編一起來學習吧!
LDAP是輕量目錄訪問協議,英文全稱是Lightweight Directory Access Protocol,一般都簡稱為LDAP。它是基于X.500標準的,但是簡單得多并且可以根據需要定制。與X.500不同,LDAP支持TCP/IP,這對訪問Internet是必須的。LDAP的核心規范在RFC中都有定義,所有與LDAP相關的RFC都可以在LDAPman RFC網頁中找到。以上內容來源于百度百科
難題
每個企業在運行過程中,會使用郵箱、考勤、CRM、ERP等系統,每個系統都需要賬號去登錄認證,每一個新員工入職的時候,HR需要為其開通好多個系統賬號,一方面,需要開通的賬號比較多,員工離職的時候再挨個去將這些賬號凍結,增加了HR的工作量;另一方面,員工自己擁有這么多賬號和密碼,管理起來也不是很方便,聰明的需要做一個personInfo.txt去維護了。
這個時候搭建一個統一的賬號認證中心,使用一個賬號,可以到處登錄,然后在每個系統中去分配不同的權限即可,這樣就可以解決上述兩個問題。
為什么用LDAP認證
是對讀操作進行優化的種數據庫,讀操作效率高。
可以靈活的改變數據類型,增加字段不會影響到查詢。
LDAP是個開放的標準協議,提供所有的程序語言的標準API接口
LDAP支持強認證方式,可以達到很高的安全別。在國際化方面,LDAP使用了UTF-8編碼來存儲各種語言的字符
先上官網鏈接 http://www.openldap.org/ 本人是在docker中啟動的,如果選擇在linux中啟動,可以參考 https://yq.aliyun.com/articles/549058 這篇帖子
如果對docker命令不是特別熟悉,本人自己另一篇帖子可供簡單了解 https://www.jianshu.com/p/af7977b1075c
拉取鏡像
docker pull osixia/openldap:1.2.2
啟動鏡像
docker run -p 389:389 -p 689:689 --name my-openldap \
 --env LDAP_ORGANISATION="my-company" --env LDAP_DOMAIN="my-company.com" --env LDAP_ADMIN_PASSWORD="123456" --detach osixia/openldap:1.2.2
查看
docker ps -a
CONTAINER ID        IMAGE                   COMMAND                  CREATED             STATUS                      PORTS                                                 NAMES
d90a057443b0        osixia/openldap:1.2.2   "/container/tool/run"    47 hours ago        Up 47 hours                 0.0.0.0:389->389/tcp, 0.0.0.0:689->689/tcp, 636/tcp   my-openldap
可以看到我已經啟動成功,映射出兩個端口,389和689,我們的主要操作就在389上
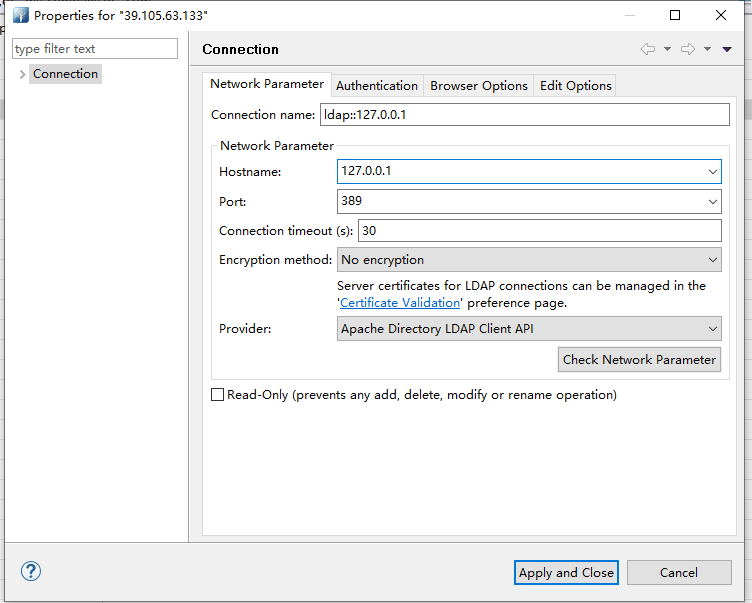
使用客戶端工具進行連接
下載地址:http://directory.apache.org/studio

ConnectionName 是自己給這個連接起個容易記住的名字
Hostname 是自己服務器IP地址,我是本地啟動的
Port 是端口,默認都是389

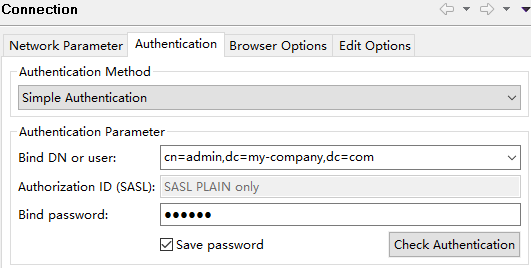
AuthenticationMethod : Simple Authentication 簡單驗證
Bind DN or User: cn=admin,dc=my_company,dc=com 之前設置的管理員用戶名
Bind Password :設置的管理員密碼
簡寫含義
| 屬性 | 含義 | 舉栗子 |
|---|---|---|
| c | Country國家 | c=chinese |
| dc | DomainComponent,常用來指一個域名的一部分 | dc=my_company,dc=com |
| cn | CommonName,一個對象的名字,如果指人,使用全名 | cn=calvin |
| ou | OrganizationalUnit 一個組織單元的名字 | ou = bj_develop(北京研發部) |
| sn | Surname,一個人的姓 | sn=趙、錢、孫、李 |
| uid | Userid,某個用戶的登錄名,與Linux系統中用戶的uid不同 | 給一個唯一的ID |
| o | Organization 組織的名字 | o=develop |
核心Attribute
| 名稱 | 描述 | 必要屬性 |
|---|---|---|
| domain | ||
| organization | o | |
| organizationalUnit | ou | |
| person | sn,cn | |
| organizationPerson | cn,sn | |
| top | 抽象型,頂級ObjectClass | |
| posixAccount | Linux用戶 | cn,gidNumber,homeDirectory,uid,uidNumber |
| posixGroup | Linux用戶組 | cn,gidNumber |
以上資料來源https://cloud.tencent.com/developer/article/1444535
經過上面的安裝,我們就算是成功啟動了一個OpenLdap的服務,環境準備好了,接下來正式開始搭建項目
pom.xml
    <parent>
        <groupId>org.springframework.boot</groupId>
        <artifactId>spring-boot-starter-parent</artifactId>
        <version>1.5.14.RELEASE</version>
        <relativePath/> <!-- lookup parent from repository -->
    </parent>
    <groupId>com.calvin.ldap</groupId>
    <artifactId>ldap-test</artifactId>
    <version>0.0.1-SNAPSHOT</version>
    <name>ldap-test</name>

    <properties>
        <java.version>1.8</java.version>
    </properties>

    <dependencies>
        <dependency>
            <groupId>org.springframework.boot</groupId>
            <artifactId>spring-boot-starter</artifactId>
        </dependency>
        <!-- LDAP 相關配置-->
        <dependency>
            <groupId>org.springframework.ldap</groupId>
            <artifactId>spring-ldap-core</artifactId>
        </dependency>
        <dependency>
            <groupId>com.sun</groupId>
            <artifactId>ldapbp</artifactId>
            <version>1.0</version>
        </dependency>

        <dependency>
            <groupId>org.springframework.boot</groupId>
            <artifactId>spring-boot-starter-test</artifactId>
            <scope>test</scope>
        </dependency>
    </dependencies>

    <build>
        <plugins>
            <plugin>
                <groupId>org.springframework.boot</groupId>
                <artifactId>spring-boot-maven-plugin</artifactId>
            </plugin>
        </plugins>
    </build>
application.yml
calvin:
  ldap:
    url: 'ldap://127.0.0.1:389'
    base: 'dc=my-company,dc=com'
    user_dn: 'cn=admin,dc=my-company,dc=com'
    password: '123456'
LdapConfigruation.java
/**
 * <p>
 *     LDAP配置類
 * </p>
 * @author Calvin
 * @date 2019/10/14
 * @since 1.0
 */
@Configuration
public class LdapConfiguration {

    /**
     * 服務器地址
     */
    @Value("${calvin.ldap.url}")
    private String ldapUrl;

    /**
     * 公司、部門
     */
    @Value("${calvin.ldap.base}")
    private String baseDC;

    /**
     * 管理員用戶
     */
    @Value("${calvin.ldap.user_dn}")
    private String ldapUser;

    /**
     * 管理員密碼
     */
    @Value("${calvin.ldap.password}")
    private String ldapPassword;

    /**
     * LDAP環境配置
     * @return
     */
    @Bean
    public LdapContextSource ldapContextSource(){
        LdapContextSource source = new LdapContextSource();

        Map<String, Object> config = new HashMap<>();
        config.put("java.naming.ldap.attributes.binary", "objectGUID");

        source.setUrl(ldapUrl);
        source.setBase(baseDC);
        source.setPassword(ldapPassword);
        source.setUserDn(ldapUser);
        source.setPooled(true);
        source.setBaseEnvironmentProperties(config);

        return source;
    }

    /**
     * LDAP操作類的Bean定義
     * @return
     */
    @Bean
    public LdapTemplate ldapTemplate(){
        LdapTemplate ldapTemplate = new LdapTemplate();
        ldapTemplate.setContextSource(ldapContextSource());
        return ldapTemplate;
    }
}
JSONObjectMapper.java
/**
 * <p>
 *     JSONObjectMapper,轉換類,將Attributes轉換成一個JSONObject方便接收打印
 * </p>
 *
 * @author Calvin
 * @date 2019/10/17
 * @since
 */
public class JSONObjectMapper implements AttributesMapper<JSONObject> {
    @Override
    public JSONObject mapFromAttributes(Attributes attributes) throws NamingException {
        NamingEnumeration<? extends Attribute> all = attributes.getAll();
        JSONObject jsonObject = new JSONObject();
        while (all.hasMore()){
            Attribute next = all.next();
            jsonObject.put(next.getID(),next.get());
        }
        return jsonObject;
    }
}
LdapTest.java
@RunWith(SpringRunner.class)
@SpringBootTest
public class LdapTest {

    @Autowired
    private LdapTemplate ldapTemplate;

}先查詢一下admin用戶,確保配置正確
/**
 * 查詢一下Admin用戶
 */
@Test
public void test1() {
    AndFilter filter = new AndFilter();
    filter.and(new EqualsFilter("cn", "admin"));
    List search = ldapTemplate.search("", filter.encode(), new JSONObjectMapper());
    search.forEach(System.out::println);
}
上圖中顯示已經能正常查詢admin用戶,所以確定配置正確
開始創建一個組
/**
     * 添加一個組織
     */
    @Test
    public void test2(){
        BasicAttributes attributes = new BasicAttributes();
        BasicAttribute objectClass = new BasicAttribute("objectClass");
        objectClass.add("organizationalUnit");
        objectClass.add("top");
        attributes.put(objectClass);
        attributes.put("description","this is develop dept");
        LdapNameBuilder nameBuilder = LdapNameBuilder.newInstance();
        nameBuilder.add("ou","develop");
        ldapTemplate.bind(nameBuilder.build(),null, attributes);
    }
通過工具查看,就可以看到我們的組織已經添加好了

在這個組中添加一個員工
/**
 * 增加一個員工
 */
@Test
public void test3(){
    //設置objectClass
    BasicAttribute objectClass = new BasicAttribute("objectClass");
    objectClass.add("top");
    objectClass.add("person");
    objectClass.add("inetOrgPerson");
    objectClass.add("organizationalPerson");
    Attributes attr = new BasicAttributes();
    attr.put(objectClass);
    //設置其他屬性
    attr.put("cn", "Jack");
    attr.put("sn", "Ma");
    attr.put("description", "this is first Employee");
    attr.put("userPassword", DigestUtils.md5DigestAsHex("123456".getBytes()));
    attr.put("telephoneNumber", "138 8888 8888");
    //設置dn
    LdapNameBuilder nameBuilder = LdapNameBuilder.newInstance();
    nameBuilder.add("ou","develop");
    nameBuilder.add("uid","0000001");
    //bind方法即是添加一條記錄。
    ldapTemplate.bind(nameBuilder.build(), null, attr);
}
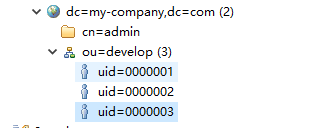
工具客戶端查看,員工已經添加成功 
接下來我們更換uid和cn,sn,多增加幾個員工

使用代碼查詢員工列表
/**
 * 查詢develop部門下的員工
 */
@Test
public void test4(){
    AndFilter filter = new AndFilter();
    filter.and(new EqualsFilter("objectClass", "person"));
    LdapQueryBuilder queryBuilder = LdapQueryBuilder.query();
    List search = ldapTemplate.search(queryBuilder.base("ou=develop").filter(filter), new JSONObjectMapper());
    search.forEach(System.out::println);
}
使用創建的用戶登錄
 /**
  * 嘗試登陸
  */
 @Test
 public void test5(){
     AndFilter filter = new AndFilter();
     filter.and(new EqualsFilter("objectClass", "person"));
     boolean isSuccess = ldapTemplate.authenticate("uid=0000001,ou=develop",
             filter.encode(), DigestUtils.md5DigestAsHex("123456".getBytes()));
     System.out.println(isSuccess);
 }
到此,關于“Springboot+LDAP調研日志的方法是什么”的學習就結束了,希望能夠解決大家的疑惑。理論與實踐的搭配能更好的幫助大家學習,快去試試吧!若想繼續學習更多相關知識,請繼續關注億速云網站,小編會繼續努力為大家帶來更多實用的文章!
免責聲明:本站發布的內容(圖片、視頻和文字)以原創、轉載和分享為主,文章觀點不代表本網站立場,如果涉及侵權請聯系站長郵箱:is@yisu.com進行舉報,并提供相關證據,一經查實,將立刻刪除涉嫌侵權內容。