您好,登錄后才能下訂單哦!
您好,登錄后才能下訂單哦!
這篇文章主要介紹“springboot集成mybatisplus的用法”,在日常操作中,相信很多人在springboot集成mybatisplus的用法問題上存在疑惑,小編查閱了各式資料,整理出簡單好用的操作方法,希望對大家解答”springboot集成mybatisplus的用法”的疑惑有所幫助!接下來,請跟著小編一起來學習吧!
介紹:
Mybatis-Plus(簡稱MP)是一個 Mybatis 的增強工具,在 Mybatis 的基礎上只做增強不做改變,為簡化開發、提高效率而生。(摘自mybatis-plus官網)Mybatis雖然已經給我們提供了很大的方便,但它還是有不足之處,MP的存在就是為了稍稍彌補Mybatis的不足。在我們使用Mybatis時會發現,每當要寫一個業務邏輯的時候都要在DAO層寫一個方法,再對應一個SQL,即使是簡單的條件查詢、即使僅僅改變了一個條件都要在DAO層新增一個方法,針對這個問題,MP這樣一個框架,一種集Mybatis與Hibernate的優點一起的框架。它提供了Hibernate的單表CURD操作的方便同時,又保留了Mybatis的特性。
本章只教大家怎么使用MybatisPlus,如果想深入了解底層是怎么實現的可以去官網下載源代碼進行解讀。
一、創建項目
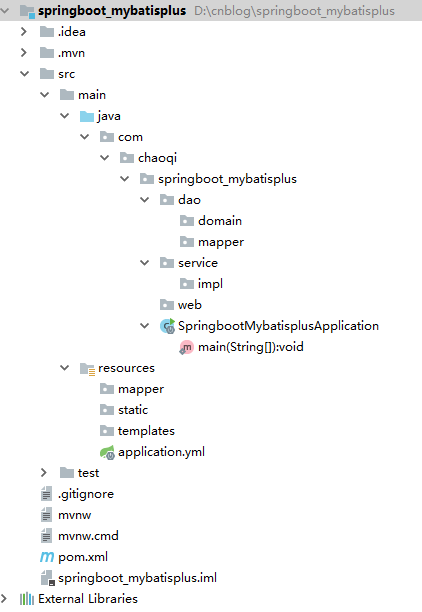
這里就不一步一步來了,我直接給出創建后的項目結構,在本章的最后我會給出源碼地址需要看效果的可以進行下載。
二、引入依賴
<?xml version="1.0">
三、編輯application.yml
server:
  port: 8080

spring:
  mvc:
    view:
      prefix: /WEB-INF/jsp/
      suffix: .jsp
  datasource:
    url: jdbc:mysql://localhost:3306/test?useUnicode=true&characterEncoding=UTF-8&useJDBCCompliantTimezoneShift=true&useLegacyDatetimeCode=false&serverTimezone=UTC
    username: root
    password: dacian821
    driver-class-name: com.mysql.jdbc.Driver

mybatis:
  mapper-locations: classpath:mapper/*.xml
  type-aliases-package: com.cdq.springboot_mybatisplus.domain
四、逆向生成pojo,mapper
創建generatorConfig.xml
<?xml version="1.0" encoding="UTF-8"?>
<!DOCTYPE generatorConfiguration
        PUBLIC "-//mybatis.org//DTD MyBatis Generator Configuration 1.0//EN"
        "http://mybatis.org/dtd/mybatis-generator-config_1_0.dtd">

<generatorConfiguration>

    <properties resource="application.yml"/>
    <classPathEntry location="D:/develop/maven_repository/mysql/mysql-connector-java/5.1.30/mysql-connector-java-5.1.30.jar"/>

    <context id="Mysql" targetRuntime="MyBatis3Simple" defaultModelType="flat">
        <property name="beginningDelimiter" value="`"/>
        <property name="endingDelimiter" value="`"/>
        <property name="javaFileEncoding" value="UTF-8"/>
        <plugin type="tk.mybatis.mapper.generator.MapperPlugin">
            <property name="mappers" value="tk.mybatis.mapper.common.Mapper"/>
        </plugin>
        <!-- 注釋 -->
        <commentGenerator>
            <!-- 是否生成注釋代時間戳 -->
            <property name="suppressDate" value="true"/>
            <!-- 是否去除自動生成的注釋 true:是 : false:否 -->
            <property name="suppressAllComments" value="false"/>
        </commentGenerator>
        <!-- JDBC連接 -->
        <jdbcConnection
                driverClass="com.mysql.jdbc.Driver"
                connectionURL="jdbc:mysql://localhost:3306/test?characterEncoding=UTF-8"
                userId="root"
                password="dacian821">
        </jdbcConnection>
        <!-- 生成實體類地址 -->
        <javaModelGenerator targetPackage="com.cdq.springboot_mybatisplus.dao.domain" targetProject="src/main/java"/>
        <!-- 生成mapper xml文件 -->
        <sqlMapGenerator targetPackage="mapper" targetProject="src/main/resources"/>
        <!-- 生成mapper xml對應Client-->
        <javaClientGenerator targetPackage="com.cdq.springboot_mybatisplus.dao.mapper" targetProject="src/main/java"
                             type="XMLMAPPER"/>
        <!-- 配置表信息 -->
        <table tableName="%">
            <!--mysql 配置-->
            <generatedKey column="id" sqlStatement="Mysql"/>
            <!--oracle 配置-->
            <!--<generatedKey column="id" sqlStatement="select SEQ_{1}.nextval from dual" identity="false" type="pre"/>-->
        </table>
    </context>
</generatorConfiguration>
maven運行generator
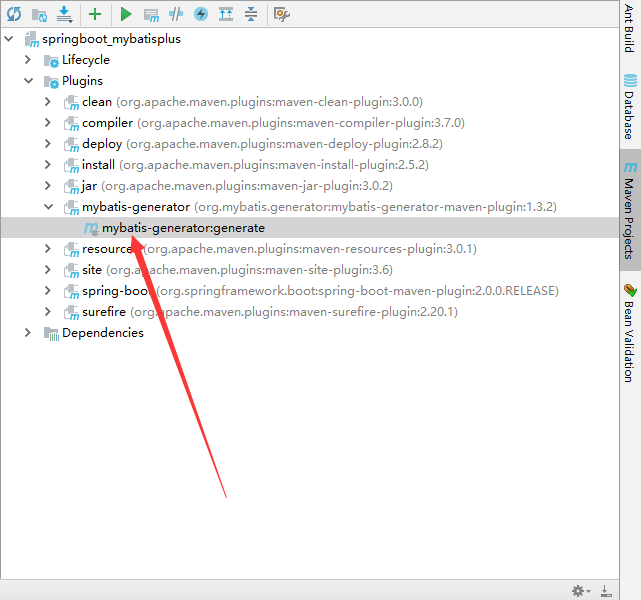
生成完后的項目結構如下
五、整合mybatisplus
創建service接口以及service實現類
package com.cdq.springboot_mybatisplus.service;

import com.cdq.springboot_mybatisplus.dao.domain.Person;

import java.util.List;

public interface PersonService {

    List<Person> getPerson();

    boolean insert(Person person);
}
package com.cdq.springboot_mybatisplus.service.impl;
import com.cdq.springboot_mybatisplus.dao.domain.Person;
import com.cdq.springboot_mybatisplus.dao.mapper.PersonMapper;
import com.cdq.springboot_mybatisplus.service.PersonService;
import org.springframework.beans.factory.annotation.Autowired;
import org.springframework.stereotype.Service;
import java.util.List;
@Service
public class PersonServiceImpl implements PersonService {
@Autowired
private PersonMapper personMapper;
@Override
public List<Person> getPerson() {
return personMapper.selectAll();
}
@Override
public boolean insert(Person person) {
int insert = personMapper.insert(person);
if (insert >= 1) {
return true;
}
return false;
}
}創建Controller
package com.cdq.springboot_mybatisplus.controller;

import com.cdq.springboot_mybatisplus.dao.domain.Person;
import com.cdq.springboot_mybatisplus.service.PersonService;
import com.cdq.springboot_mybatisplus.service.impl.PersonServiceImpl;
import org.springframework.beans.factory.annotation.Autowired;
import org.springframework.web.bind.annotation.RequestMapping;
import org.springframework.web.bind.annotation.RestController;
import org.springframework.web.servlet.ModelAndView;

import java.util.List;

@RestController
@RequestMapping("/person")
public class PersonController {

    @Autowired
    PersonService personService;

    @RequestMapping("/findAllPerson")
    List<Person> findAllPerson() {
        return personService.getPerson();
    }

    boolean insertPerson(Person person) {

        return personService.insert(person);
    }

}
這里我的mapper并不要寫sql,一些簡單的sqlmybatiplus都給封裝好了,節省了許多開發時間,如果是一些復雜的sql,也可以通過寫原生sql來實現
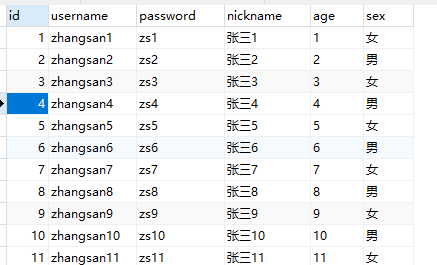
插入一些數據
package com.cdq.springboot_mybatisplus;

import com.cdq.springboot_mybatisplus.dao.domain.Person;
import com.cdq.springboot_mybatisplus.service.PersonService;
import org.junit.Test;
import org.junit.runner.RunWith;
import org.springframework.beans.factory.annotation.Autowired;
import org.springframework.boot.test.context.SpringBootTest;
import org.springframework.test.context.junit4.SpringRunner;

@RunWith(SpringRunner.class)
@SpringBootTest
public class SpringbootMybatisplusApplicationTests {

    @Autowired
    PersonService personService;

    @Test
    public void contextLoads() {
        for (int i = 1; i <= 30; i++) {
            Person person = new Person();
            person.setId(i);
            person.setUsername("zhangsan" + i);
            person.setPassword("zs"+i);
            person.setAge(String.valueOf(i));
            person.setNickname("張三" + i);
            if (i % 2 == 0) {
                person.setSex("男");
            } else {
                person.setSex("女");
            }
            personService.insert(person);

        }


    }

}
查看數據庫
運行SpringbootMybatisplusApplication主函數
import org.mybatis.spring.annotation.MapperScan;
import org.springframework.boot.SpringApplication;
import org.springframework.boot.autoconfigure.SpringBootApplication;

@SpringBootApplication
@MapperScan("com.cdq.springboot_mybatisplus.dao.mapper")
public class SpringbootMybatisplusApplication {

    public static void main(String[] args) {
        SpringApplication.run(SpringbootMybatisplusApplication.class, args);
    }

}
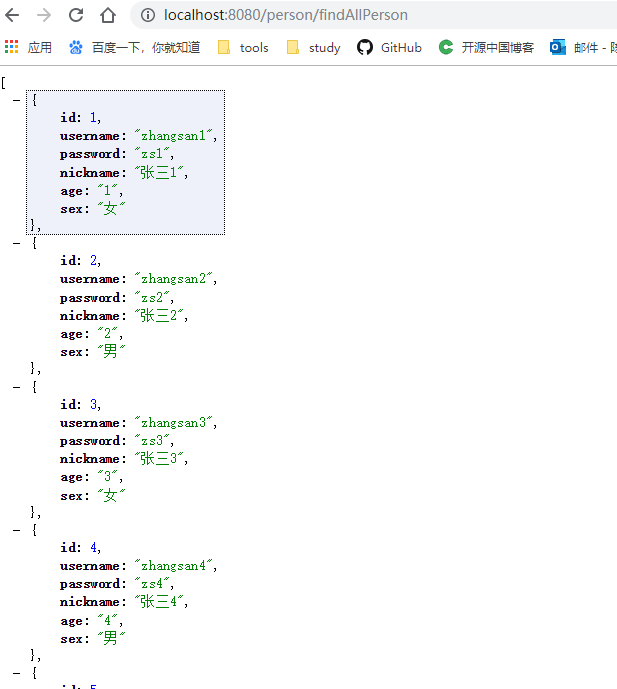
訪問http://localhost:8080/person/findAllPerson
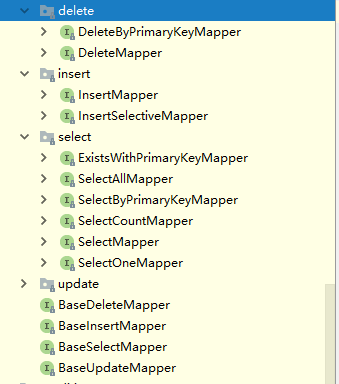
下面給出mybatisplus封裝的一些方法,這些方法具體怎么使用,感興趣的小伙伴可以查看下源代碼,mybatisplus還有一個強大的分頁功能,如果有興趣也可以去學習http://mp.baomidou.com
demo項目地址:https://gitee.com/chendequan0821/springboot_mybatisplus.git
到此,關于“springboot集成mybatisplus的用法”的學習就結束了,希望能夠解決大家的疑惑。理論與實踐的搭配能更好的幫助大家學習,快去試試吧!若想繼續學習更多相關知識,請繼續關注億速云網站,小編會繼續努力為大家帶來更多實用的文章!
免責聲明:本站發布的內容(圖片、視頻和文字)以原創、轉載和分享為主,文章觀點不代表本網站立場,如果涉及侵權請聯系站長郵箱:is@yisu.com進行舉報,并提供相關證據,一經查實,將立刻刪除涉嫌侵權內容。