您好,登錄后才能下訂單哦!
您好,登錄后才能下訂單哦!
這期內容當中小編將會給大家帶來有關什么是Shiro驗證,文章內容豐富且以專業的角度為大家分析和敘述,閱讀完這篇文章希望大家可以有所收獲。
shiro驗證:用戶需要提供系統理解和信任的某種身份證明(密碼、證書等),來證明自己可以登錄該系統。
在驗證階段需要先理解幾個術語:
Subject(主體)- 可以通俗的理解為訪問應用程序的用戶。只不過這個用戶可以是人、第三方進程等等。
Principals(身份)- 主體的唯一標識屬性。例如:身份證號碼、手機號、郵箱等等。
Credentials(憑證)- 只有主體知道的安全值。例如:密碼、數字證書等等。
Realms(領域)- 數據訪問對象。用來獲取Principals和Credentials。例如:用戶名和密碼存放在.ini文件中,可以通過IniRealm獲取用戶名和密碼、用戶名和密碼存放在數據庫中,可以通過JdbcRealm獲取用戶名和密碼等等。
AuthenticationToken(驗證令牌)- 結合Principals(身份)和Credentials(憑證)可獲得的用戶身份令牌。
Authenticator (驗證者) - 驗證用戶驗證令牌是否滿足要求的科目。
AuthenticationStrategy(身份驗證策略)- 表示以何種策略驗證用戶身份。
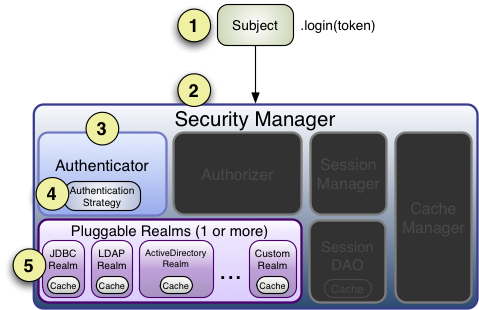
如下是從官網獲取的驗證架構圖:

步驟1:收集主題提交的 Principals 和 Credentials 得到 Token,應用程序代碼調用Subject.login方法,傳入 Token 以進行身份驗證動作。
步驟2:Subject實例,通常是 DelegatingSubject(或子類)通過調用 securityManager.login(token)將實際的身份驗證工作委托給 SecurityManager 處理
步驟3:SecurityManager 作為基本的組件,接收 Token 然后通過調用 authenticate(token)將其委托給 Authenticator。Authenticator 幾乎總是實例 ModularRealmAuthenticator,它支持在身份驗證期間協調一個或多個 Realm 實例。
步驟4:如果為應用配置了多個 Realm ,則 ModularRealmAuthenticator 實例將使用其配置的 AuthenticationStrategy 啟動多領域身份驗證嘗試。在調用 Realms 進行身份驗證之前,期間或者之后,將調用 AuthenticationStrategy 以允許它對每個 Realm 的結果做出反應。
步驟5:將咨詢每個 realm 以查看是否支持已提交的 AuthenticationToken。如果是這樣,將使用提交的 Token 調用 realm 的getauthenticationfo方法。getauthenticationfo方法有效地表示該特定領域的單一身份驗證嘗試。
接下來就開始使用ShiroAPI完成驗證操作了。
環境準備:
本文使用 Maven 構建,因此需要一點 Maven 知識。首先準備環境依賴:
<dependencies>
    <dependency>
        <groupId>junit</groupId>
        <artifactId>junit</artifactId>
        <version>4.9</version>
        <scope>test</scope>
    </dependency>
    <dependency>
        <groupId>commons-logging</groupId>
        <artifactId>commons-logging</artifactId>
        <version>1.2</version>
    </dependency>
    <dependency>
        <groupId>org.apache.shiro</groupId>
        <artifactId>shiro-core</artifactId>
        <version>1.3.2</version>
    </dependency>
</dependencies>
添加 junit 和 shiro-core 依賴即可。
初識:登錄 / 退出
1、首先準備一些用戶身份 / 憑據(shiro.ini)
[users]
zhangsan=123
lisi=123
2、測試用例(com.luther.shiro.authenticator.AuthenticateTest)
/**
 * 底層默認使用ModularRealmAuthenticator驗證模塊(多realm驗證) <br/>
 * AtLeastOneSuccessfulStrategy驗證策略(只要有一個域成功進行身份驗證,
 * 		則認為成功。否則失敗。會返回所有成功的用戶標識)
 * @author luther
 * @time 2019年7月5日  上午9:58:39
 */
@Test
public void testHelloWorld() {
	// 使用Ini配置文件初始化SecurityManager
	Factory<SecurityManager> factory = new IniSecurityManagerFactory("classpath:shiro.ini");
	// 得到SecurityManager實例 并綁定給SecurityUtils
	SecurityManager securityManager = factory.getInstance();
	SecurityUtils.setSecurityManager(securityManager);

	// 得到Subject及創建用戶名/密碼身份驗證Token(即用戶身份/憑證)
	Subject subject = SecurityUtils.getSubject();
	UsernamePasswordToken token = new UsernamePasswordToken("zhangsan", "123");
	// 記住用戶
	token.setRememberMe(Boolean.TRUE);

	try {
		// 登錄
		subject.login(token);
		System.out.println("登錄成功");
	} catch (AuthenticationException e) {
		System.err.println("登錄失敗,失敗原因:");
		e.printStackTrace();
	}

	assertTrue("用戶已驗證成功", subject.isAuthenticated());

	// 退出
	subject.logout();
}
Realm
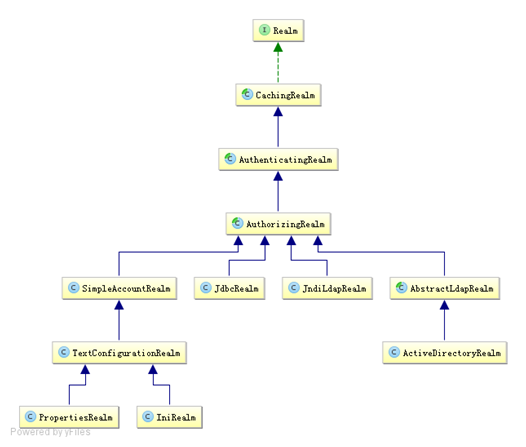
realm 接口結構如下,其下方法有: 
String getName(); //返回一個唯一的Realm名字
boolean supports(AuthenticationToken token); //判斷此Realm是否支持此Token
AuthenticationInfo getAuthenticationInfo(AuthenticationToken token) throws AuthenticationException;  //根據Token獲取認證信息
其中主要默認實現如下:
org.apache.shiro.realm.text.IniRealm:從ini文件獲取用戶權限等信息。
org.apache.shiro.realm.text.PropertiesRealm:從properties文件獲取用戶權限等信息。
org.apache.shiro.realm.jdbc.JdbcRealm:從數據庫獲取用戶權限等信息。
以后開發一般繼承 AuthorizingRealm(授權)抽象類即可;其繼承了 AuthenticatingRealm(即身份驗證),而且也間接繼承了 CachingRealm(帶有緩存實現)。
一、單 Realm 配置
1、自定義 Realm 實現(com.luther.shiro.realm.MyRealm1):
public class MyRealm1 implements Realm {

	@Override
	public String getName() {
		return this.getClass().getName();
	}

	@Override
	public boolean supports(AuthenticationToken token) {
		// 只支持UsernamePasswordToken
		return token instanceof UsernamePasswordToken;
	}

	@Override
	public AuthenticationInfo getAuthenticationInfo(AuthenticationToken token) throws AuthenticationException {
		UsernamePasswordToken usernamePasswordToken = (UsernamePasswordToken) token;

		// 得到用戶名
		String username = usernamePasswordToken.getUsername();
		// 得到密碼
		String password = new String(usernamePasswordToken.getPassword());

		// 戶名錯誤
		if (!"zhangsan".equals(username)) {
			throw new UnknownAccountException();
		}

		// 密碼錯誤
		if (!"123".equals(password)) {
			throw new IncorrectCredentialsException();
		}

		System.out.println("用戶" + username + "驗證成功");

		// 返回
		return new SimpleAccount(username, password, getName());
	}
}
2、ini 配置文件指定自定義 Realm 實現 (shiro-realm.ini)
[main]
#聲明一個realm
myRealm1=com.luther.shiro.realm.MyRealm1
#指定securityManager的realms實現,通過 $name 來引入之前的 realm 定義
securityManager.realms=$myRealm1
3、測試用例請參考 com.luther.shiro.authenticator.AuthenticateTest 的testSingleRealm 測試方法,此方法和 testHelloWorld 除了配置文件其它沒有差異。
二、多 Realm 配置
1、ini 配置文件(shiro-multi-realm.ini)
[main]
#聲明一個realm
myRealm1=com.luther.shiro.realm.MyRealm1
#聲明一個realm
myRealm2=com.luther.shiro.realm.MyRealm2
#指定securityManager的realms實現,通過 $name 來引入之前的 realm 定義
securityManager.realms=$myRealm2,$myRealm1

#此例子中顯視的指定了順序為myRealm2,myRealm1。(可以少指定,比如只指定myRealm2,則myRealm1會被忽略)
#如果不指定securityManager.realms,則會按realm的聲明(無需設置 realms 屬性,其會自動發現)順序來,此處即為myRealm1,myRealm2。
2、測試用例請參考 com.luther.shiro.authenticator.AuthenticateTest 的 testMutiRealm 測試方法。
Authenticator 及 AuthenticationStrategy
一、Authenticator 及 AuthenticationStrategy簡介
Authenticator 的職責是驗證用戶帳號,是 Shiro API 中身份驗證核心的入口點(默認實現為 ModularRealmAuthenticator ),其方法定義為:
public AuthenticationInfo authenticate(AuthenticationToken authenticationToken) throws AuthenticationException;
如果驗證成功,將返回 AuthenticationInfo 驗證信息;此信息中包含了身份及憑證;如果驗證失敗將拋出相應的 AuthenticationException 實現。
AuthenticationStrategy 則是 Authenticator 進行驗證時的驗證策略 (默認實現為:AtLeastOneSuccessfulStrategy),Shiro API 自帶的策略有以下三種:
FirstSuccessfulStrategy:只要有一個 Realm 驗證成功即可,只返回第一個 Realm 身份驗證成功的認證信息,其他的忽略。
AtLeastOneSuccessfulStrategy:只要有一個 Realm 驗證成功即可,和 FirstSuccessfulStrategy 不同,返回所有 Realm 身份驗證成功的認證信息。
AllSuccessfulStrategy:所有 Realm 驗證成功才算成功,且返回所有 Realm 身份驗證成功的認證信息,如果有一個失敗就失敗了。
二、Authenticator 及 AuthenticationStrategy演示
假設我們有三個 realm:
myRealm1: 用戶名/密碼為 zhangsan/123 時成功,且返回身份/憑據為 zhangsan/123;
myRealm2: 用戶名/密碼為 lisi/123 時成功,且返回身份/憑據為 lisi/123;
myRealm3: 用戶名/密碼為 zhangsan/123 時成功,且返回身份/憑據為 zhangsan.qq/123
1、通用化登錄邏輯
private void authentition(String iniConfigPath, String username, String password) {
	// 使用Ini配置文件初始化SecurityManager
	Factory<SecurityManager> factory = new IniSecurityManagerFactory(iniConfigPath);
	// 得到SecurityManager實例 并綁定給SecurityUtils
	SecurityManager securityManager = factory.getInstance();
	SecurityUtils.setSecurityManager(securityManager);

	// 得到Subject及創建用戶名/密碼身份驗證Token(即用戶身份/憑證)
	Subject subject = SecurityUtils.getSubject();
	UsernamePasswordToken token = new UsernamePasswordToken(username, password);
	// 記住用戶
	token.setRememberMe(Boolean.TRUE);

	try {
		// 登錄
		subject.login(token);
		System.out.println("用戶zhangsan登錄成功,其身份標識為" + subject.getPrincipals());
	} catch (AuthenticationException e) {
		System.err.println("登錄失敗,失敗原因:");
		e.printStackTrace();
	}

	assertTrue("用戶已驗證成功", subject.isAuthenticated());

	// 退出
	subject.logout();
}
2、測試 AtLeastOneSuccessfulStrategy
2.1 ini 配置文件 (shiro-firstSuccessfulStrategy.ini)
[main]
#指定securityManager的authenticator實現,可以不指定,因為其默認實現就是ModularRealmAuthenticator
#authenticator=org.apache.shiro.authc.pam.ModularRealmAuthenticator
#securityManager.authenticator=$authenticator

#指定securityManager.authenticator的authenticationStrategy,可以不指定,因為其默認實現就是AtLeastOneSuccessfulStrategy
#authenticationStrategy=org.apache.shiro.authc.pam.AtLeastOneSuccessfulStrategy
#securityManager.authenticator.authenticationStrategy=$authenticationStrategy

#聲明一個realm
myRealm1=com.luther.shiro.realm.MyRealm1
#聲明一個realm
myRealm2=com.luther.shiro.realm.MyRealm2
#聲明一個realm
myRealm3=com.luther.shiro.realm.MyRealm3
#指定securityManager的realms實現,通過 $name 來引入之前的 realm 定義
securityManager.realms=$myRealm3,$myRealm2,$myRealm1
2.2 測試代碼
/**
 * 演示AtLeastOneSuccessfulStrategy的效果
 * 每個realm都會進行驗證,并返回全部的成功用戶標識
 * @author luther
 * @time 2019年7月5日  上午11:30:24
 */
@Test
public void testAtLeastOneSuccessfulStrategy() {
	authentition("classpath:shiro-atLeastOneSuccessfulStrategy.ini", "zhangsan", "123");
}
2.3 測試結果
開始驗證com.luther.shiro.realm.MyRealm3
com.luther.shiro.realm.MyRealm3 - 用戶zhangsan驗證成功
開始驗證com.luther.shiro.realm.MyRealm2
開始驗證com.luther.shiro.realm.MyRealm1
com.luther.shiro.realm.MyRealm1 - 用戶zhangsan驗證成功
用戶zhangsan登錄成功,其身份標識為zhangsan.qq,zhangsan
即 PrincipalCollection 包含了 zhangsan 和 zhangsan.qq 身份信息。
3、測試 AllSuccessfulStrategy
3.1 ini 配置文件 (shiro-allSuccessfulStrategy.ini)
[main]
#指定securityManager的authenticator實現,可以不指定,因為其默認實現就是ModularRealmAuthenticator
#authenticator=org.apache.shiro.authc.pam.ModularRealmAuthenticator
#securityManager.authenticator=$authenticator

#指定securityManager.authenticator的authenticationStrategy為AllSuccessfulStrategy
authenticationStrategy=org.apache.shiro.authc.pam.AllSuccessfulStrategy
securityManager.authenticator.authenticationStrategy=$authenticationStrategy

#聲明一個realm
myRealm1=com.luther.shiro.realm.MyRealm1
#聲明一個realm
myRealm2=com.luther.shiro.realm.MyRealm2
#聲明一個realm
myRealm3=com.luther.shiro.realm.MyRealm3
#指定securityManager的realms實現,通過 $name 來引入之前的 realm 定義
securityManager.realms=$myRealm3,$myRealm2,$myRealm1
3.2 測試代碼
/**
 * 演示AllSuccessfulStrategy的效果
 * 依次對每個realm進行驗證,驗證通過下一個,驗證失敗,直接返回失敗驗證原因,只有全部成功時才返回全部的用戶標識
 * 每個realm都會進行驗證,并返回全部的成功用戶標識
 * @author luther
 * @time 2019年7月5日  上午11:30:24
 */
@Test
public void testAllSuccessfulStrategy() {
	authentition("classpath:shiro-allSuccessfulStrategy.ini", "zhangsan", "123");
}
3.3 測試結果
開始驗證com.luther.shiro.realm.MyRealm3
com.luther.shiro.realm.MyRealm3 - 用戶zhangsan驗證成功
開始驗證com.luther.shiro.realm.MyRealm2
登錄失敗,失敗原因:
org.apache.shiro.authc.UnknownAccountException
	at com.luther.shiro.realm.MyRealm2.getAuthenticationInfo(MyRealm2.java:42)
	······
4、測試 firstSuccessfulStrategy
4.1 ini 配置文件 (shiro-firstSuccessfulStrategy.ini)
[main]
#指定securityManager的authenticator實現,可以不指定,因為其默認實現就是ModularRealmAuthenticator
#authenticator=org.apache.shiro.authc.pam.ModularRealmAuthenticator
#securityManager.authenticator=$authenticator

#指定securityManager.authenticator的authenticationStrategy為FirstSuccessfulStrategy
authenticationStrategy=org.apache.shiro.authc.pam.FirstSuccessfulStrategy
securityManager.authenticator.authenticationStrategy=$authenticationStrategy

#聲明一個realm
myRealm1=com.luther.shiro.realm.MyRealm1
#聲明一個realm
myRealm2=com.luther.shiro.realm.MyRealm2
#聲明一個realm
myRealm3=com.luther.shiro.realm.MyRealm3
#指定securityManager的realms實現,通過 $name 來引入之前的 realm 定義
securityManager.realms=$myRealm3,$myRealm2,$myRealm1
4.2 測試代碼
/**
 * 演示FirstSuccessfulStrategy的效果
 * 會對每個realm進行驗證,全部驗證完后會返回驗證成功的第一個用戶標識(此處需注意,不是依次驗證立馬返回,而是全部驗證再返回)
 * @author luther
 * @time 2019年7月5日  上午11:30:24
 */
@Test
public void testFirstSuccessfulStrategy() {
	authentition("classpath:shiro-firstSuccessfulStrategy.ini", "zhangsan", "123");
}
4.3 測試結果
開始驗證com.luther.shiro.realm.MyRealm3
com.luther.shiro.realm.MyRealm3 - 用戶zhangsan驗證成功
開始驗證com.luther.shiro.realm.MyRealm2
開始驗證com.luther.shiro.realm.MyRealm1
com.luther.shiro.realm.MyRealm1 - 用戶zhangsan驗證成功
用戶zhangsan登錄成功,其身份標識為zhangsan.qq
以上已經演示了API自帶的驗證策略,以下稍微演示下自定義的驗證策略。
自定義 AuthenticationStrategy 實現之前,首先簡單看其 API:
//在所有Realm驗證之前調用
AuthenticationInfo beforeAllAttempts(
Collection<? extends Realm> realms, AuthenticationToken token)
throws AuthenticationException;
//在每個Realm之前調用
AuthenticationInfo beforeAttempt(
Realm realm, AuthenticationToken token, AuthenticationInfo aggregate)
throws AuthenticationException;
//在每個Realm之后調用
AuthenticationInfo afterAttempt(
Realm realm, AuthenticationToken token,
AuthenticationInfo singleRealmInfo, AuthenticationInfo aggregateInfo, Throwable t)
throws AuthenticationException;
//在所有Realm之后調用
AuthenticationInfo afterAllAttempts(
AuthenticationToken token, AuthenticationInfo aggregate)
throws AuthenticationException;
5、自定義驗證策略(com.luther.shiro.authenticationStrategy.LastSuccessfulStrategy)
/**
 * 驗證所有realm,并返回最后一個驗證通過的身份標識
 * @author luther
 * @time 2019年7月5日  下午4:12:31
 */
public class LastSuccessfulStrategy extends AbstractAuthenticationStrategy {

	// 第一種方案修改afterAttempt方法
	@Override
	public AuthenticationInfo afterAttempt(Realm realm, AuthenticationToken token, AuthenticationInfo singleRealmInfo,
			AuthenticationInfo aggregateInfo, Throwable t) throws AuthenticationException {
		return singleRealmInfo;
	}

//	// 第二種方案修改merge方法
//	@Override
//	protected AuthenticationInfo merge(AuthenticationInfo info, AuthenticationInfo aggregate) {
//		if (info != null) {
//			aggregate = info;
//		}
//
//		return aggregate;
//	}

}
5.1 ini 配置文件 (shiro-lastSuccessfulStrategy.ini)
[main]
#指定securityManager的authenticator實現,可以不指定,因為其默認實現就是ModularRealmAuthenticator
#authenticator=org.apache.shiro.authc.pam.ModularRealmAuthenticator
#securityManager.authenticator=$authenticator

#指定securityManager.authenticator的authenticationStrategy為自定義的LastSuccessfulStrategy
authenticationStrategy=com.luther.shiro.authenticationStrategy.LastSuccessfulStrategy
securityManager.authenticator.authenticationStrategy=$authenticationStrategy

#聲明一個realm
myRealm1=com.luther.shiro.realm.MyRealm1
#聲明一個realm
myRealm2=com.luther.shiro.realm.MyRealm2
#聲明一個realm
myRealm3=com.luther.shiro.realm.MyRealm3
#指定securityManager的realms實現,通過 $name 來引入之前的 realm 定義
securityManager.realms=$myRealm3,$myRealm2,$myRealm1
5.2 測試代碼
/**
 * 演示自定義的LastSuccessfulStrategy的效果
 * 會對每個realm進行驗證,全部驗證完后會返回驗證成功的最后一個用戶標識
 * @author luther
 * @time 2019年7月5日  上午11:30:24
 */
@Test
public void testLastSuccessfulStrategy() {
	authentition("classpath:shiro-lastSuccessfulStrategy.ini", "zhangsan", "123");
}
5.3 測試結果
開始驗證com.luther.shiro.realm.MyRealm3
com.luther.shiro.realm.MyRealm3 - 用戶zhangsan驗證成功
開始驗證com.luther.shiro.realm.MyRealm2
開始驗證com.luther.shiro.realm.MyRealm1
com.luther.shiro.realm.MyRealm1 - 用戶zhangsan驗證成功
用戶zhangsan登錄成功,其身份標識為zhangsan
上述就是小編為大家分享的什么是Shiro驗證了,如果剛好有類似的疑惑,不妨參照上述分析進行理解。如果想知道更多相關知識,歡迎關注億速云行業資訊頻道。
免責聲明:本站發布的內容(圖片、視頻和文字)以原創、轉載和分享為主,文章觀點不代表本網站立場,如果涉及侵權請聯系站長郵箱:is@yisu.com進行舉報,并提供相關證據,一經查實,將立刻刪除涉嫌侵權內容。