您好,登錄后才能下訂單哦!
您好,登錄后才能下訂單哦!
這篇文章主要講解了“Spring Cloud常見模塊有哪些”,文中的講解內容簡單清晰,易于學習與理解,下面請大家跟著小編的思路慢慢深入,一起來研究和學習“Spring Cloud常見模塊有哪些”吧!
什么是Spring Cloud :
Spring Cloud 是一系列框架的集合
利用Spring Boot的簡化了開發
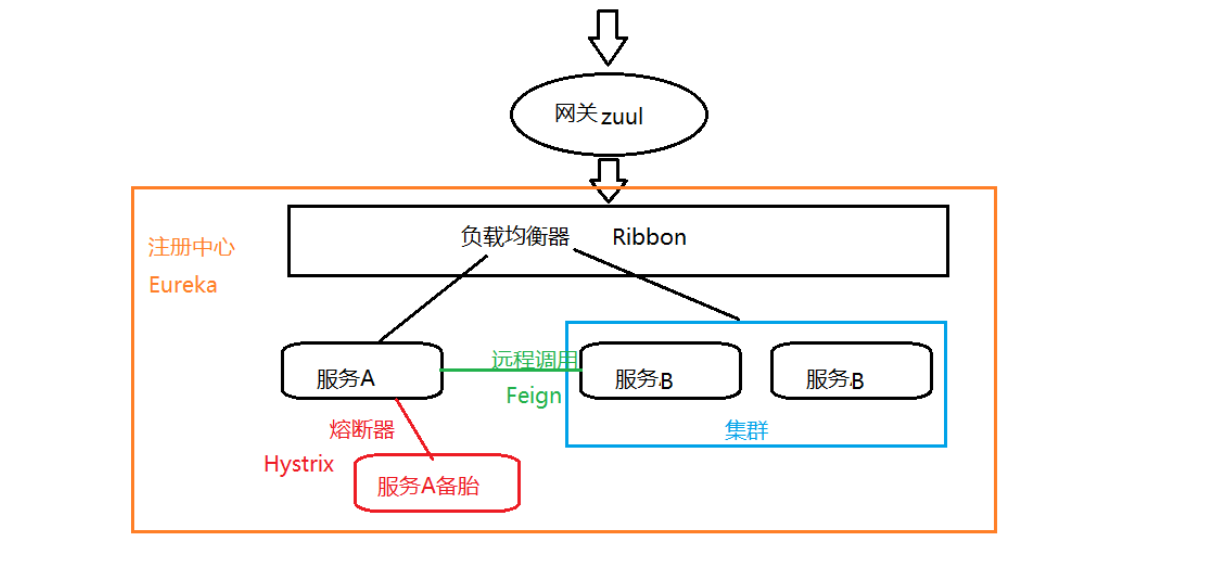
Spring Cloud 常見模塊 :
Eureka:注冊中心,用于注冊所有服務(項目/應用)
Ribbon:負載均衡,用于搭建集群的。(同一個功能多個tomcat,ribbon幫著選擇一個tomcat)
Hystrix:熔斷器,與正主斷了聯系,使用備選方案(備胎)。
Feign:服務與服務之間調用。類似HttpClient
zuul 網關:確定統一入口,方便進行管理。

spring cloud版本 : spring cloud 采用 Greenwich版本,對應spring boot 2.1.*版本
Eureka 入門
Eureka職責:
服務注冊:服務提供方將服務注冊到注冊中心
服務發現:服務調用方法,從注冊中心中,獲得需要的服務
服務檢測:注冊中心與服務之間采用心跳檢測服務狀態
Eureka 入門案例
搭建父項目
步驟一:創建父項目 cloud_parent
步驟二:修改pom.xml文件,確定spring cloud版本
<!--1 確定spring boot的版本-->
    <parent>
        <groupId>org.springframework.boot</groupId>
        <artifactId>spring-boot-starter-parent</artifactId>
        <version>2.1.4.RELEASE</version>
    </parent>

    <!--2  確定sprig cloud版本-->
    <properties>
        <project.build.sourceEncoding>UTF-8</project.build.sourceEncoding>
        <java.version>1.8</java.version>
        <spring-cloud-release.version>Greenwich.RELEASE</spring-cloud-release.version>
    </properties>

    <!-- 3 鎖定sprig cloud版本-->
    <dependencyManagement>
        <dependencies>
            <dependency>
                <groupId>org.springframework.cloud</groupId>
                <artifactId>spring-cloud-dependencies</artifactId>
                <version>${spring-cloud-release.version}</version>
                <type>pom</type>
                <scope>import</scope>
            </dependency>
        </dependencies>
    </dependencyManagement>

    <!-- 4 確定spring cloud私有倉庫-->
    <repositories>
        <repository>
            <id>spring-milestones</id>
            <name>Spring Milestones</name>
            <url>https://repo.spring.io/milestone</url>
            <snapshots>
                <enabled>false</enabled>
            </snapshots>
        </repository>
    </repositories>
搭建注冊中心
步驟一:創建子項目 eureka_demo
步驟二:修改pom.xml文件,添加web和 eureka service 依賴
  <dependencies>
        <!--web起步依賴-->
        <dependency>
            <groupId>org.springframework.boot</groupId>
            <artifactId>spring-boot-starter-web</artifactId>
        </dependency>
        <!-- Eureka服務端 -->
        <dependency>
            <groupId>org.springframework.cloud</groupId>
            <artifactId>spring-cloud-starter-netflix-eureka-server</artifactId>
        </dependency>
    </dependencies>
步驟三:創建yml文件,配置端口號、服務名、eureka注冊地址
#服務端口號
server:
  port: 10086
#服務名稱
spring:
  application:
    name: eurekaDemo
#注冊中心地址
eureka:
  client:
    service-url:
      defaultZone: http://localhost:${server.port}/eureka   #eureka服務注冊地址
    register-with-eureka: false     #關閉將自己注冊到注冊中心中
    fetch-registry: false           #關閉從注冊中心獲得列表(不拉去其他服務信息)
步驟四:創建啟動類,添加開啟 eureka service 注解 @EnableEurekaService
package com.czxy;

import org.springframework.boot.SpringApplication;
import org.springframework.boot.autoconfigure.SpringBootApplication;
import org.springframework.cloud.netflix.eureka.server.EnableEurekaServer;

@SpringBootApplication
@EnableEurekaServer     //開啟eureka服務端
public class EurekaDemoApplication {
    public static void main(String[] args) {
        SpringApplication.run(EurekaDemoApplication.class ,args);
    }
}
搭建服務提供方
步驟一:創建提供方項目,eureka_service
步驟二:修改pom.xml文件,添加 web、eureka client、spring boot 監控依賴 (監控依賴可加可不加)
<dependencies>
        <!--web起步依賴-->
        <dependency>
            <groupId>org.springframework.boot</groupId>
            <artifactId>spring-boot-starter-web</artifactId>
        </dependency>
        <!-- Eureka客戶端 -->
        <dependency>
            <groupId>org.springframework.cloud</groupId>
            <artifactId>spring-cloud-starter-netflix-eureka-client</artifactId>
        </dependency>
        <!--spring boot監控-->
        <dependency>
            <groupId>org.springframework.boot</groupId>
            <artifactId>spring-boot-starter-actuator</artifactId>
        </dependency>
    </dependencies>
步驟三:創建application.yml文件,配置端口號、服務名、eureka注冊中心位置
#端口號
server:
  port: 8080
#服務名稱
spring:
  application:
    name: service
eureka:
  client:
    service-url:
      defaultZone: http://localhost:10086/eureka
步驟四:編寫啟動類,添加啟動客戶端注解 @EnableEurekaClient
package com.czxy;

import org.springframework.boot.SpringApplication;
import org.springframework.boot.autoconfigure.SpringBootApplication;
import org.springframework.cloud.netflix.eureka.EnableEurekaClient;


@SpringBootApplication
@EnableEurekaClient   //開啟eureka客戶端
public class ServiceApplication {
    public static void main(String[] args) {
        SpringApplication.run(ServiceApplication.class,args);
    }
}
步驟五:編寫controller , 測試程序
測試路徑:http://localhost:8080/test
顯示結果: "測試數據"
package com.czxy.controller;

import org.springframework.http.ResponseEntity;
import org.springframework.web.bind.annotation.GetMapping;
import org.springframework.web.bind.annotation.RequestMapping;
import org.springframework.web.bind.annotation.RestController;


@RestController
@RequestMapping("/test")
public class TestController {
    @GetMapping
    public ResponseEntity<String> test(){
        return ResponseEntity.ok("測試數據");
    }
}
搭建 服務調用方
步驟一:創建調用方項目,eureka_client
步驟二:修改pom.xml文件,添加 web、eureka client、spring boot 監控依賴(與eureka_service項目一樣)
<dependencies>
        <!--web起步依賴-->
        <dependency>
            <groupId>org.springframework.boot</groupId>
            <artifactId>spring-boot-starter-web</artifactId>
        </dependency>
        <!-- Eureka客戶端 -->
        <dependency>
            <groupId>org.springframework.cloud</groupId>
            <artifactId>spring-cloud-starter-netflix-eureka-client</artifactId>
        </dependency>
        <!--spring boot監控-->
        <dependency>
            <groupId>org.springframework.boot</groupId>
            <artifactId>spring-boot-starter-actuator</artifactId>
        </dependency>
    </dependencies>
步驟三:創建yml文件,(與eureka_service項目相似,有不同端口和服務名)
#端口號
server:
  port: 9090
#服務名稱
spring:
  application:
    name: client
eureka:
  client:
    service-url:
      defaultZone: http://localhost:10086/eureka
步驟四:編寫啟動類,添加eureka客戶端注解,(與eureka_service項目相似,有不同類名)
package com.czxy;

import org.springframework.boot.SpringApplication;
import org.springframework.boot.autoconfigure.SpringBootApplication;
import org.springframework.cloud.netflix.eureka.EnableEurekaClient;


@SpringBootApplication
@EnableEurekaClient     //開啟eureka客戶端
public class ClientApplication {
    public static void main(String[] args) {
        SpringApplication.run(ClientApplication.class,args);
    }
}
調用方測試數據

步驟一:編寫config配置類,用于配置RestTemplate(遠程調用)實例
package com.czxy.config;

import org.springframework.context.annotation.Bean;
import org.springframework.context.annotation.Configuration;
import org.springframework.stereotype.Component;
import org.springframework.web.client.RestTemplate;


@Configuration
public class HttpConfig {
    @Bean
    public RestTemplate restTemplate(){
        return new RestTemplate();
    }
}
步驟二:編寫DataDao,用于進行遠程調用
package com.czxy.dao;

import org.springframework.http.ResponseEntity;
import org.springframework.stereotype.Component;
import org.springframework.web.client.RestTemplate;

import javax.annotation.Resource;


@Component
public class DataDao {
    @Resource
    private RestTemplate restTemplate;

    public ResponseEntity<String> data(){
                                          //服務提供方地址
        return restTemplate.getForEntity("http://localhost:8080/test",String.class);
    }
}
步驟三:編寫DataController,提供接口進行訪問
package com.czxy.controller;

import com.czxy.dao.DataDao;
import org.springframework.http.ResponseEntity;
import org.springframework.web.bind.annotation.GetMapping;
import org.springframework.web.bind.annotation.RequestMapping;
import org.springframework.web.bind.annotation.RestController;

import javax.annotation.Resource;


@RestController
@RequestMapping("/data")
public class DataController {
    @Resource
    private DataDao dataDao;\

    @GetMapping
    public ResponseEntity data(){
        return dataDao.data();
    }
}
測試路徑 : http://localhost:9090/data
顯示結果 "測試數據" 說明就Eureka入門案例就完成了
追加 ----> 配置eureka instance

yml文件配置
instance-id : 用于配置可視化頁面中,顯示的服務名稱
${spring.application.name} 獲得服務名
${spring.cloud.client.ip-address} 獲得ip地址
${server.port} 獲得端口號
默認服務名稱:計算機名稱:服務名:端口號
自定義服務名稱:
prefer-ip-address:用于配置可視化頁面中,訪問時是否顯示ip地址
默認顯示的是:計算機名稱:端口號
eureka:
  client:
    service-url:
      defaultZone: http://localhost:10086/eureka
  instance:
    instance-id: ${spring.application.name}:${spring.cloud.client.ip-address}:${server.port}
    prefer-ip-address: true   #注冊中心可視化中顯示IP地址
properties文件配置(不建議),參考學習
eureka.client.service-url.defaultZone=http://localhost:10086/eureka
eureka.instance.instance-id=${spring.application.name}:${spring.cloud.client.ip-address}:${server.port}
eureka.instance.prefer-ip-address=true
感謝各位的閱讀,以上就是“Spring Cloud常見模塊有哪些”的內容了,經過本文的學習后,相信大家對Spring Cloud常見模塊有哪些這一問題有了更深刻的體會,具體使用情況還需要大家實踐驗證。這里是億速云,小編將為大家推送更多相關知識點的文章,歡迎關注!
免責聲明:本站發布的內容(圖片、視頻和文字)以原創、轉載和分享為主,文章觀點不代表本網站立場,如果涉及侵權請聯系站長郵箱:is@yisu.com進行舉報,并提供相關證據,一經查實,將立刻刪除涉嫌侵權內容。