您好,登錄后才能下訂單哦!
您好,登錄后才能下訂單哦!
這篇文章將為大家詳細講解有關Unity+shader如何繪制halftone動畫實現星之卡比新星同盟切屏效果,文章內容質量較高,因此小編分享給大家做個參考,希望大家閱讀完這篇文章后對相關知識有一定的了解。
卡比是個好游戲,這次的切屏和loading畫面也是可愛得不行。先放出這篇文章想要重現的效果:
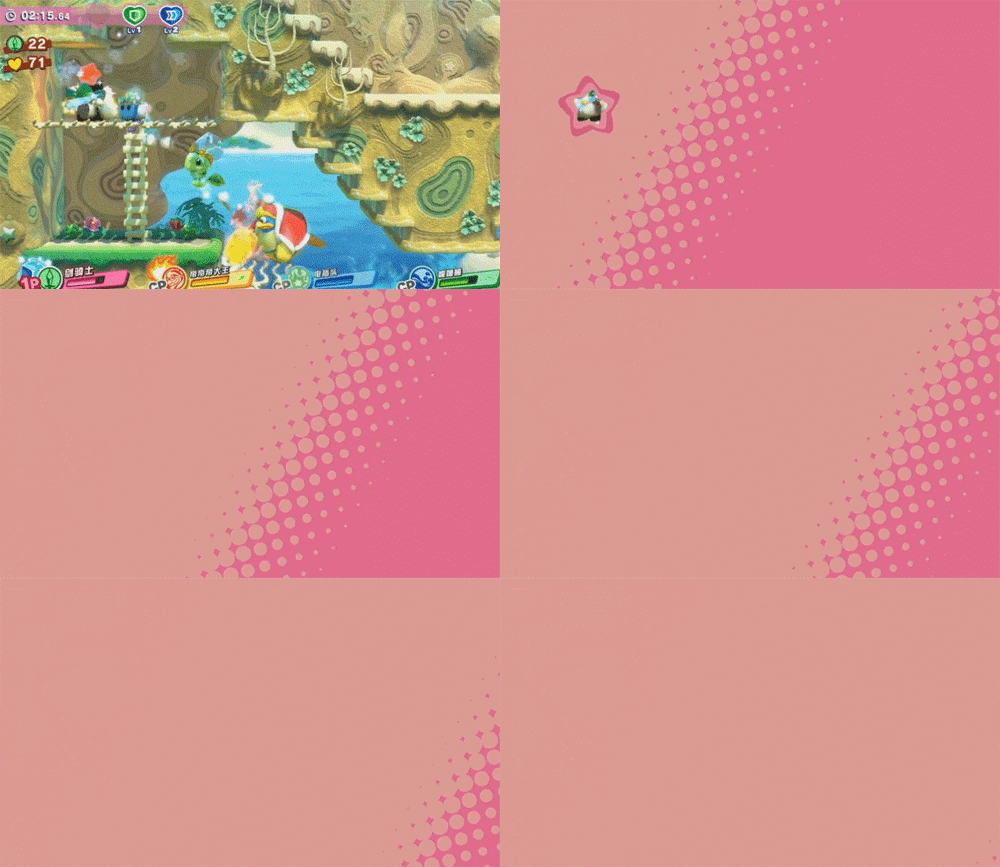
卡比的進門切屏效果
接下來放出我們最終實現的效果:
使用起來也是十分簡單的,以上效果連動畫系統都可以完成。
分析一番后,我們可以將卡比的切屏特效拆分成幾個部分:
1.沿一個方向移動的halftone圖形
2.兩張貼圖/顏色的切換
3.任意形狀的mask貼圖以指定軸旋轉縮放
那么從第一步開始,繪制一個halftone圖形。
要繪制halftone dots 并讓它們在畫面中移動,首先需要一個property來確定圖形的位置。
  Properties {
	 _MainTex ("Texture A", 2D) = "black" {}
	 _MainTexB ("Texture B", 2D) = "black" {}
	 [Space(10)]
	 _Position("Halftone Position", Float)=1
	 _Diameter("Diameter", Range(0,1) )=0.25
	 _Num("Length", Range(1,16)) = 3.0
}struct v2f {
float4 pos : SV_POSITION;
half2 uvTA: TEXCOORD0;
half2 uvTB: TEXCOORD1;
half2 uvORI: TEXCOORD2;//original
};
v2f vert(appdata_img v) {
v2f o;
o.pos = mul(UNITY_MATRIX_MVP, v.vertex);
o.uvTA=(v.texcoord-_MainTex_ST.zw)*_MainTex_ST.xy ;
o.uvTB=(v.texcoord-_MainTexB_ST.zw)*_MainTexB_ST.xy ;
o.uvORI.xy=v.texcoord;
return o;
}這里兩張貼圖可以使用tillng和offset,而繪制halftone的uv則使用原始的值。
之后以position為基礎,將uv劃分為若干網格。最后以每個格子的中心點為圓心畫出圓點。
    fixed4 frag(v2f i) : SV_Target {
	float _rd;
	fixed2 posCenter;
	fixed indexOfGrid=floor((i.uvORI.x-_Position)/_Diameter);//num of grids between uv and PosW
	posCenter.x=_Position+(indexOfGrid + 0.5)*_Diameter;
	posCenter.y=(floor(i.uvORI.y/_Diameter) + 0.5)*_Diameter;
	_rd=0.5*_Diameter* abs(indexOfGrid)/_Num;//radius of the current grid
	fixed inCircle=step(distance(i.uvORI,posCenter),_rd);
	inCircle=clamp(inCircle,0,1);

	fixed4 texA=tex2D(_MainTex, i.uvTA).rgba;
	fixed4 texB=tex2D(_MainTexB, i.uvTB).rgba;
	fixed4 sum= lerp(texB,texA,inCircle);
	return sum;
}
看一下效果,似乎出現了一些問題呢
可以發現,position的左右兩側同時出現了對稱的圓點,解決這個問題,只需要讓uv大于position的部分直接顯示textureB即可。
if(indexOfGrid>=1){
	return tex2D(_MainTexB, i.uvTB).rgba ;//return texture A when uv is in front (larger) of PosW
}
另一個問題是,圓點的半徑根據和position的距離是一個遞增的關系,在后方的格子里,圓點的半徑超過了格子的尺寸時,并不會在相鄰的格子里顯示出來。
這個問題在格子里畫方塊時不會看出異常
這時就需要在計算時將后方法格子一起考慮進去了
	float _rdNext=_rd+0.5*_Diameter/_Num;
	fixed2 posCenterNext= posCenter-fixed2(diameterW,0); //center of up-next grid
	//fixed inCircle=step(abs(i.uvORI.x-posCenter.x),_rd)*step(abs(i.uvORI.y-posCenter.y),_rd); //Square
	fixed inCircle=step(distance(i.uvORI,posCenter),_rd)+step(distance(i.uvORI,posCenterNext),_rdNext); //Dot
現在,一個可以移動的halftone圖形就畫出來了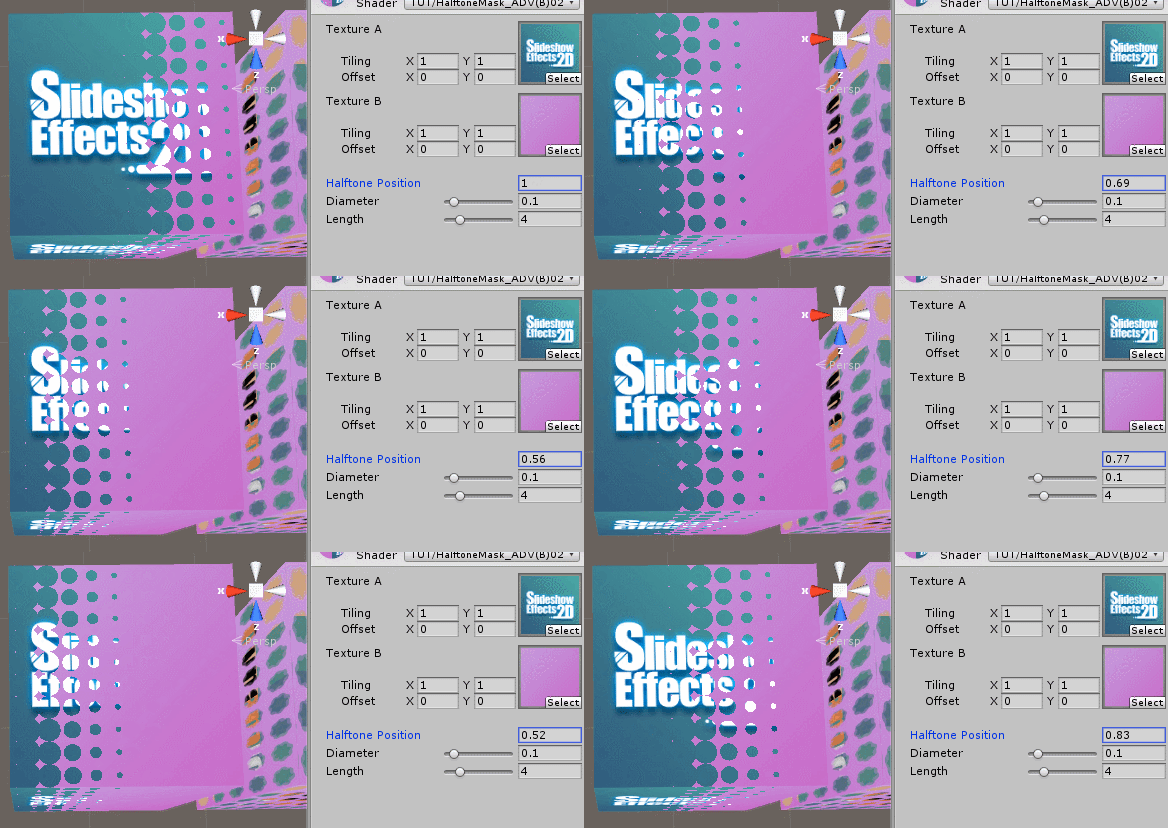 但是這和我們常見的半調圖形還有一些不同……
fixed4 frag(v2f i) : SV_Target {
	float _rd;
	fixed2 posCenter;
	fixed diameterW,diameterH;
	diameterW=_Diameter*(1-_rotOffset/2);//width of grid , reduce when _rotOffset is larger than zero
	diameterH=_Diameter;
	fixed indexOfGrid=floor((i.uvORI.x-_Position)/diameterW);//num of grids between uv and PosW
	if(indexOfGrid>=1){
		return tex2D(_MainTexB, i.uvTB).rgba ;//return texture A when uv is in front (larger) of PosW
	}

	posCenter.x=_Position+(indexOfGrid+0.5)*diameterW;
	fixed modOffset=frac(indexOfGrid*_rotOffset)*_Diameter;
	posCenter.y=(floor((i.uvORI.y-modOffset)/diameterH)+ 0.5)*diameterH+modOffset;

	_rd=0.5*diameterH* abs(indexOfGrid)/_Num;//radius of the current grid
	float _rdNext=_rd+0.5*diameterH/_Num;
	fixed2 posCenterNextUp=posCenter-fixed2(diameterW,_Diameter*(_rotOffset-1));
	fixed2 posCenterNextDown=posCenter-fixed2(diameterW,_Diameter*_rotOffset); //center of down-next grid
	float _rdPrev=_rd-0.5*diameterH/_Num;
	fixed2 posCenterPrevUp=posCenter+fixed2(diameterW,_Diameter*(_rotOffset-1));
	fixed2 posCenterPrevDown=posCenter+fixed2(diameterW,_Diameter*_rotOffset); //center of down-next grid
	//fixed inCircle=step(abs(i.uvORI.x-posCenter.x),_rd)*step(abs(i.uvORI.y-posCenter.y),_rd);//Square
	fixed inCircle=step(distance(i.uvORI,posCenter),_rd);
	inCircle+=step(distance(i.uvORI,posCenterNextUp),_rdNext)+step(distance(i.uvORI,posCenterNextDown),_rdNext);
	inCircle+=step(distance(i.uvORI,posCenterPrevUp),_rdPrev)+step(distance(i.uvORI,posCenterPrevDown),_rdPrev);
	inCircle=clamp(inCircle,0,1);

	fixed4 texA=tex2D(_MainTex, i.uvTA).rgba;
	fixed4 texB=tex2D(_MainTexB, i.uvTB).rgba;
	fixed4 sum= lerp(texB,texA,inCircle);
	return sum;
}
因為在uv方向上都有了偏移,所以繪制一個格子里的內容時需要左上左下、右上右下四個格子。
在properties中,添加
_rotOffset("Offset Between Points", Range(0,0.5)) = 0.0由于圓點是對稱圖形,偏移量的取值范圍只需要是格子尺寸的一半。
至此,一個可以移動位置的halftone切圖效果就完成了。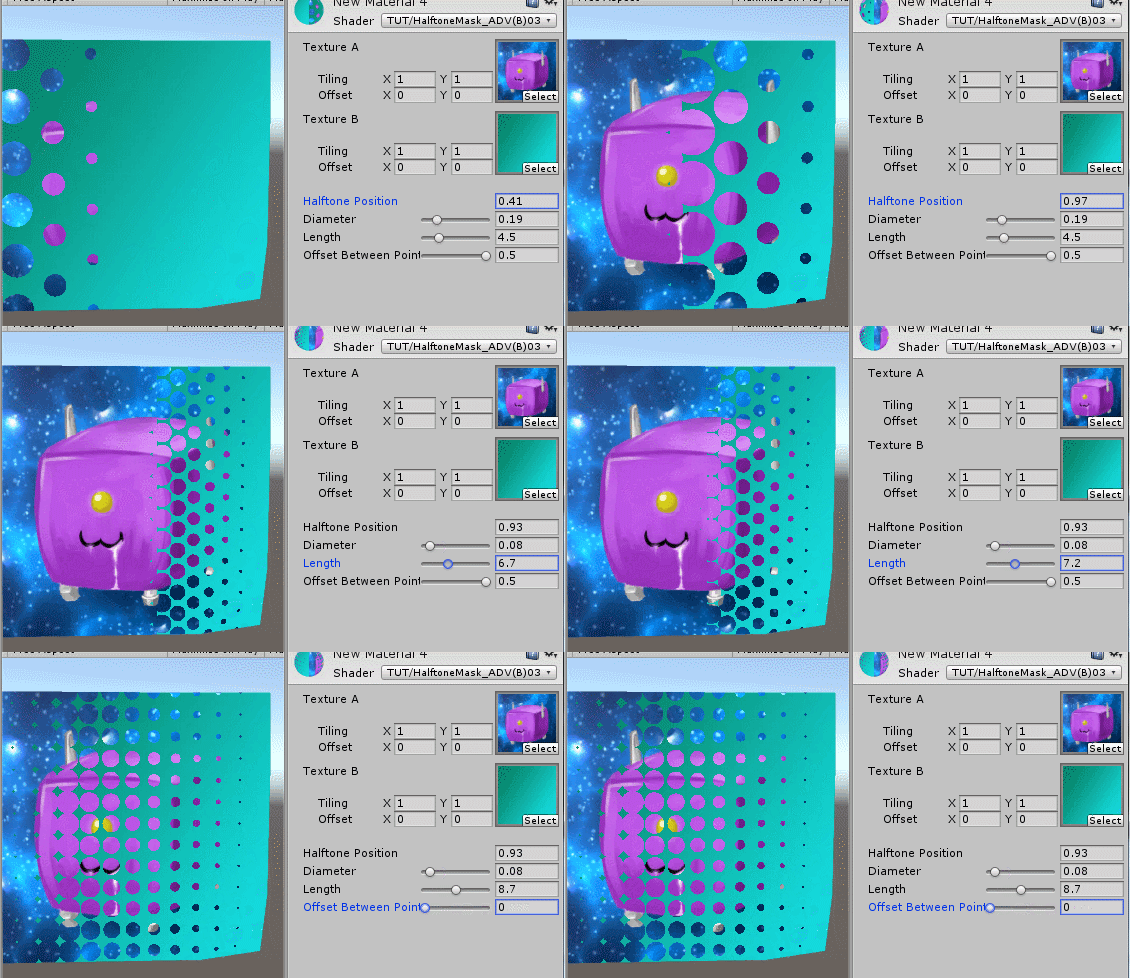 說到這里,大家可能會想,這個跟直接使用一張貼圖作為遮罩有什么不同呢?答案是,確實沒什么不同,目前為止的效果是完全可以使用一張遮罩實現的。使用遮罩甚至還能達成更多花哨的效果,但遮罩也有它所不能完成的事情。接下來修改格子劃分的方法,讓格子的位置不再跟隨position變化,再改變一下計算圓點半徑的方法,作出圓點一個個彈出的效果。
修改一下格子劃分的方法,讓格子的位置不再跟隨position變化:
fixed indexOfGrid=floor((i.uvORI.x)/diameterW);//num of grids between uv and PosW
posCenter.x=(indexOfGrid+0.5)*diameterW;
fixed modOffset=frac(indexOfGrid*_rotOffset)*_Diameter;
posCenter.y=(floor((i.uvORI.y-modOffset)/diameterH)+ 0.5)*diameterH+modOffset;
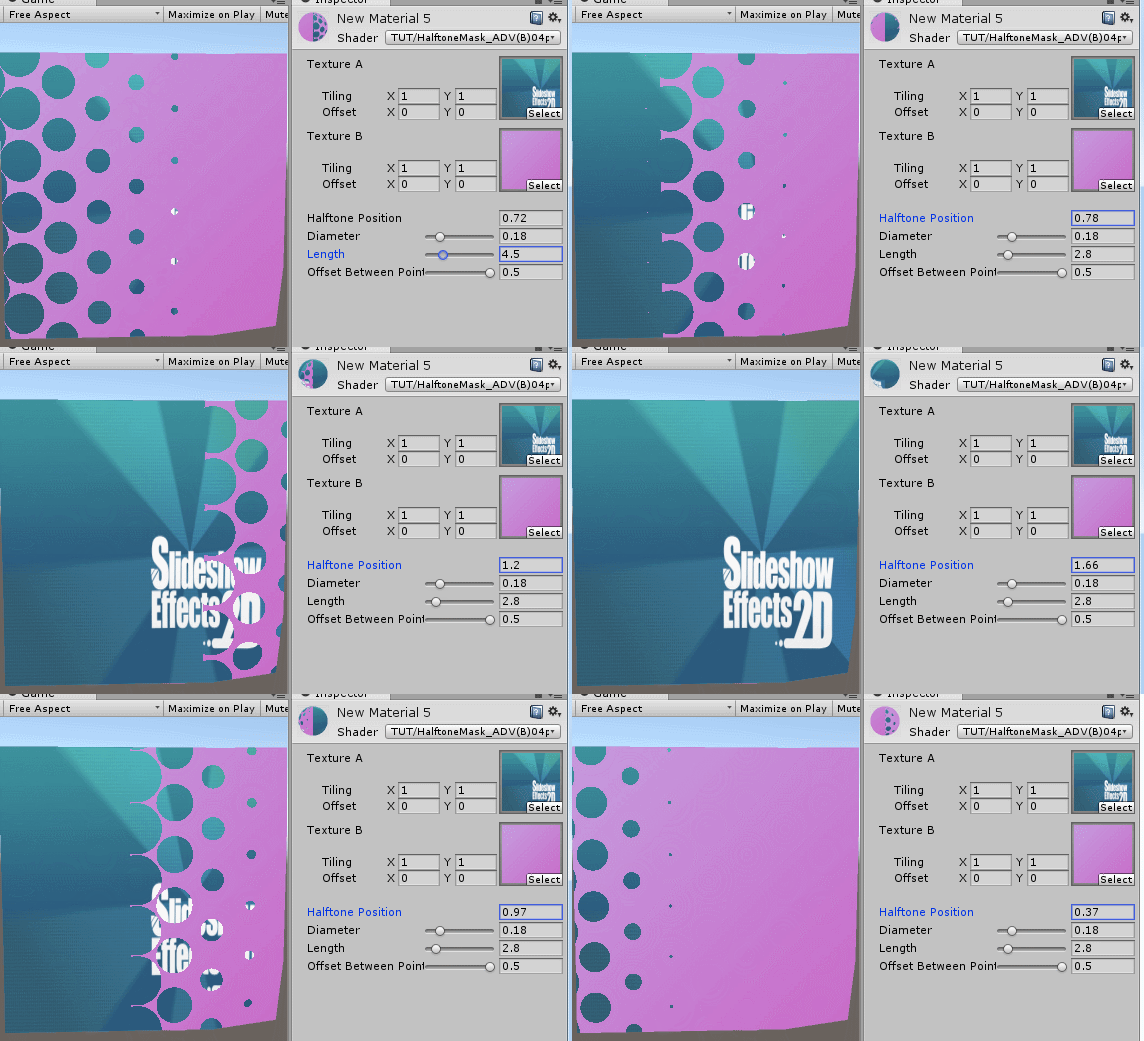
然后再改變一下計算圓點半徑的方法,讓其根據uv和position 的關系變化:
 _rd=0.5*(_Position-posCenter.x)/_Num;//radius of the current grid
 float _rdNext=_rd+0.5*diameterW/_Num;
 float _rdPrev=_rd-0.5*diameterW/_Num;
這里計算前后格子中的半徑時,需要改用壓縮過的diameter,不然就會出現不太對勁的效果。由于劃分格子的方法已經發生了變化,原本的if(indexOfGrid>=1)的時候,直接輸出textureB已經無效了,實際上,判斷的條件應該是圓點半徑小于0。
 接下來,需要一個表明角度的property,來讓圖形按照一個方向移動,而不是只能從左到右。
_Rotation("Rotation", Range(0,360)) = 0.0旋轉角度的算法,在很多地方都可以找到。這里直接轉換計算halftone時使用的uv坐標,而textureA和B的uv不受影響。由于各個頂點之間的uv變化是線性的,這一轉化可以放在vert函數中完成。
o.uvORI.xy=v.texcoord; fixed2 offsetXY=fixed2(0.5,0.5);
 float Rot = _Rotation * (3.1415926f/180.0f);
 float s = sin(Rot);
 float c = cos(Rot);
 float2x2 rMatrix = float2x2(c, -s, s, c);
 rMatrix *= 0.5;
 rMatrix += 0.5;
 rMatrix = rMatrix * 2 - 1;
 o.uvORI.xy = mul(o.uvORI.xy-offsetXY, rMatrix)+offsetXY;
這個_Rotation換成弧度角也是完全可以的。 _Rotation("Rotation", Range(0,6.283)) = 0.0 ,到時候就不需要進行乘PI再除180的計算。
現在看一下 示例場景
SlideshowEffect: Halftone and Popup
https://sakuraplus.github.io/make-terrain-with-google-elevation/webplayershow/webplayershow.html
里面的halftone切圖的效果基本完成了。
關于Unity+shader如何繪制halftone動畫實現星之卡比新星同盟切屏效果就分享到這里了,希望以上內容可以對大家有一定的幫助,可以學到更多知識。如果覺得文章不錯,可以把它分享出去讓更多的人看到。
免責聲明:本站發布的內容(圖片、視頻和文字)以原創、轉載和分享為主,文章觀點不代表本網站立場,如果涉及侵權請聯系站長郵箱:is@yisu.com進行舉報,并提供相關證據,一經查實,將立刻刪除涉嫌侵權內容。