您好,登錄后才能下訂單哦!
您好,登錄后才能下訂單哦!
小編給大家分享一下Nacos性能測試的示例分析,相信大部分人都還不怎么了解,因此分享這篇文章給大家參考一下,希望大家閱讀完這篇文章后大有收獲,下面讓我們一起去了解一下吧!
基礎架構部選擇新的注冊中心,測試組需要配合對業界成熟的注冊中心產品做分析和比較。由于掌門教育采用的是比較純凈的 Spring Cloud 技術棧,所以我們需要圍繞它的注冊中心,從測試角度,進行功能和性能上研究。
Spring Cloud 技術棧官方支持 Netflix Eureka ,HashiCorp Consul ,Zookeeper 三個注冊中心,它們可以相互間實現無縫遷移,Alibaba Nacos 是新加盟 Spring Cloud 技術棧的新成員。測試組的同學們對上述四個注冊中心做了一一研究和分析,鑒于時間緊迫,除了 Eureka 和 Nacos 之外,其它兩個中間件未做深入的功能測試和性能測試。下面提供來自阿里巴巴 Nacos 官方某次業界宣講的資料截圖以供大家參考:
Eureka 介紹

Zookeeper 介紹
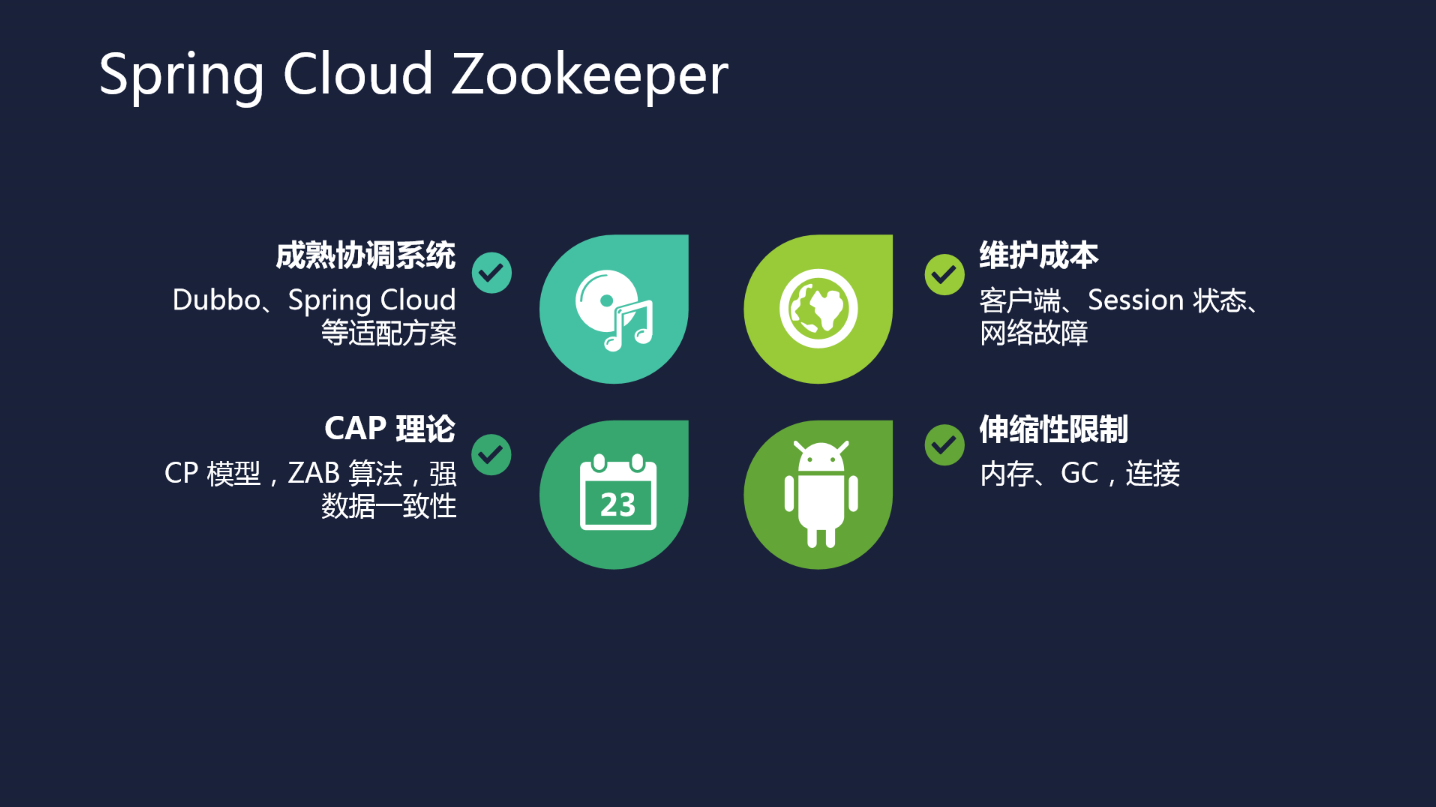
Consul 介紹

上述三個注冊中心比較
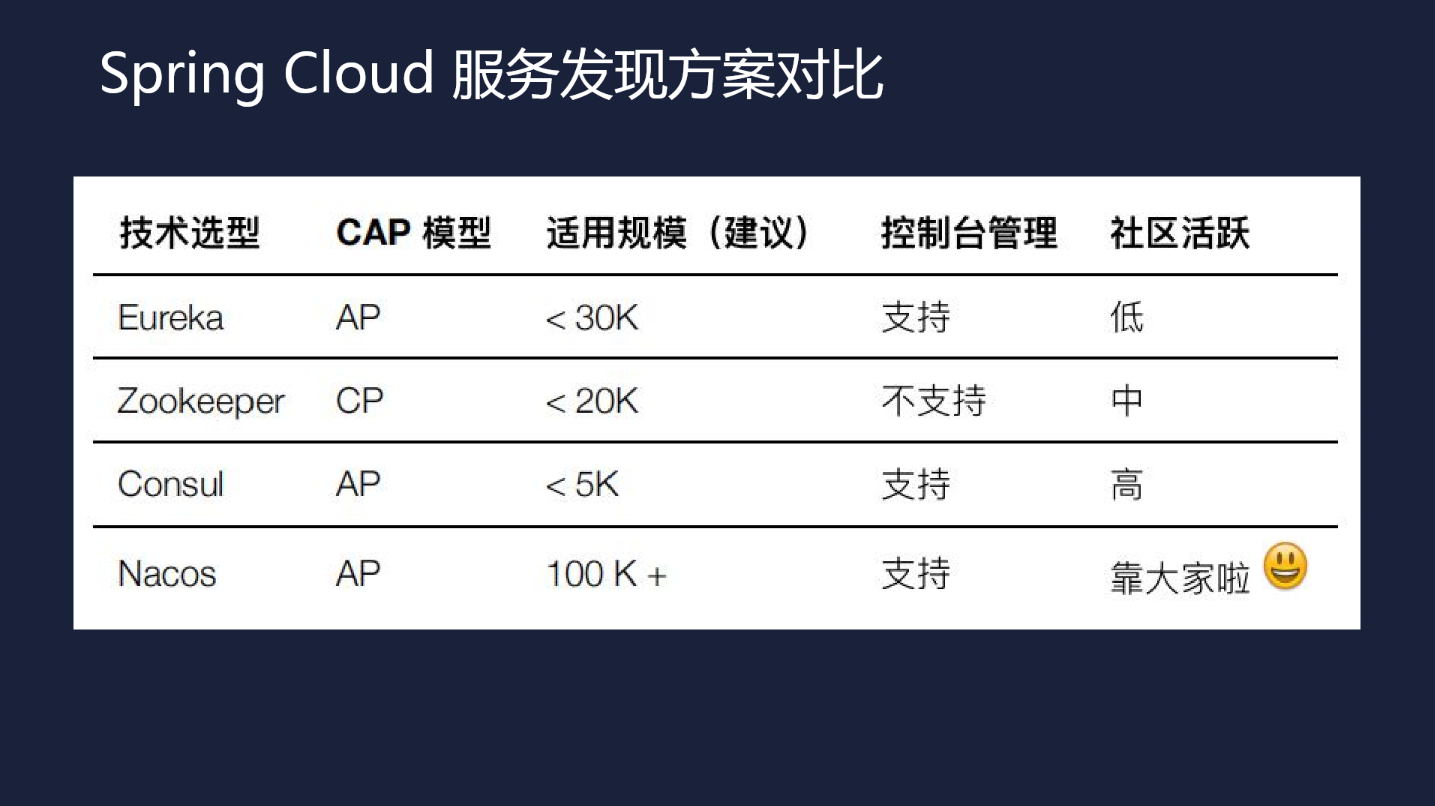
本文將圍繞 Alibaba Nacos 著重針對其功能測試和性能測試兩方面進行剖析和介紹。
開發部署了 UAT 的 Nacos ,測試親自壓測。
核心腳本
def registry(ip):
    fo = open("service_name.txt", "r")
    str = fo.read()
    service_name_list = str.split(";")
    service_name = service_name_list[random.randint(0,len(service_name_list) - 1)]
    fo.close()
    client = nacos.NacosClient(nacos_host, namespace='')
    print(client.add_naming_instance(service_name,ip,333,"default",1.0,{'preserved.ip.delete.timeout':86400000},True,True))
    while True:
      print(client.send_heartbeat(service_name,ip,333,"default",1.0,"{}"))
      time.sleep(5)
壓測數據

壓測結果圖
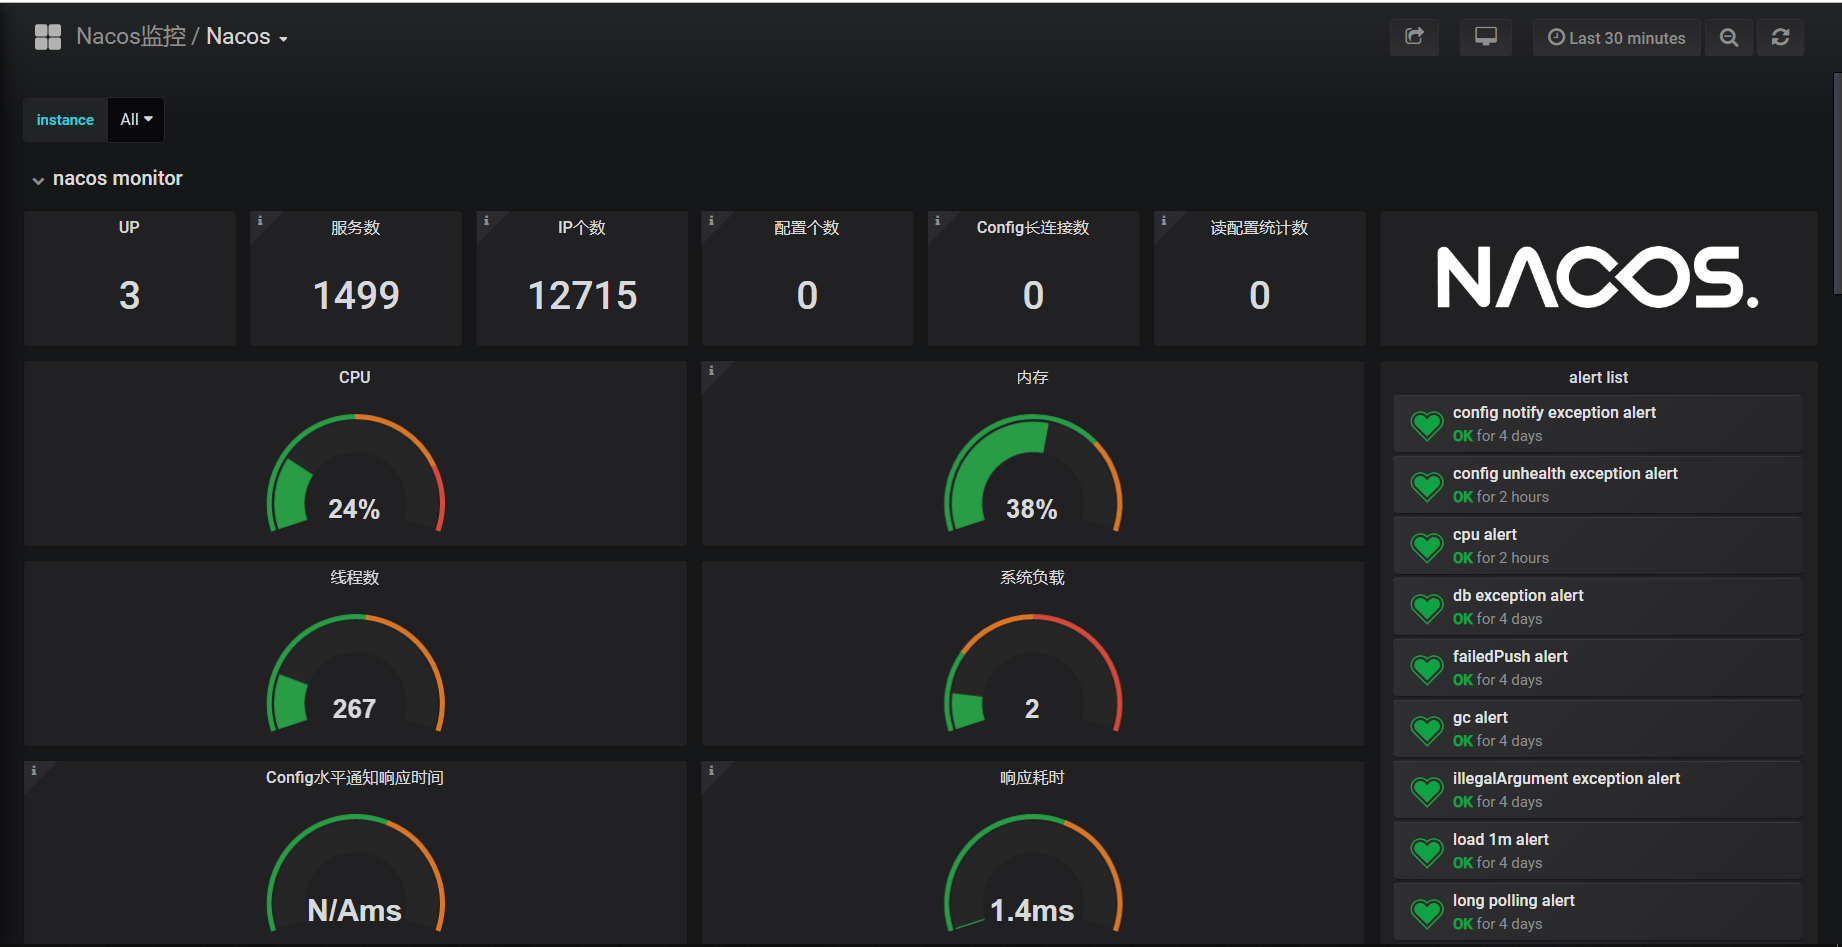
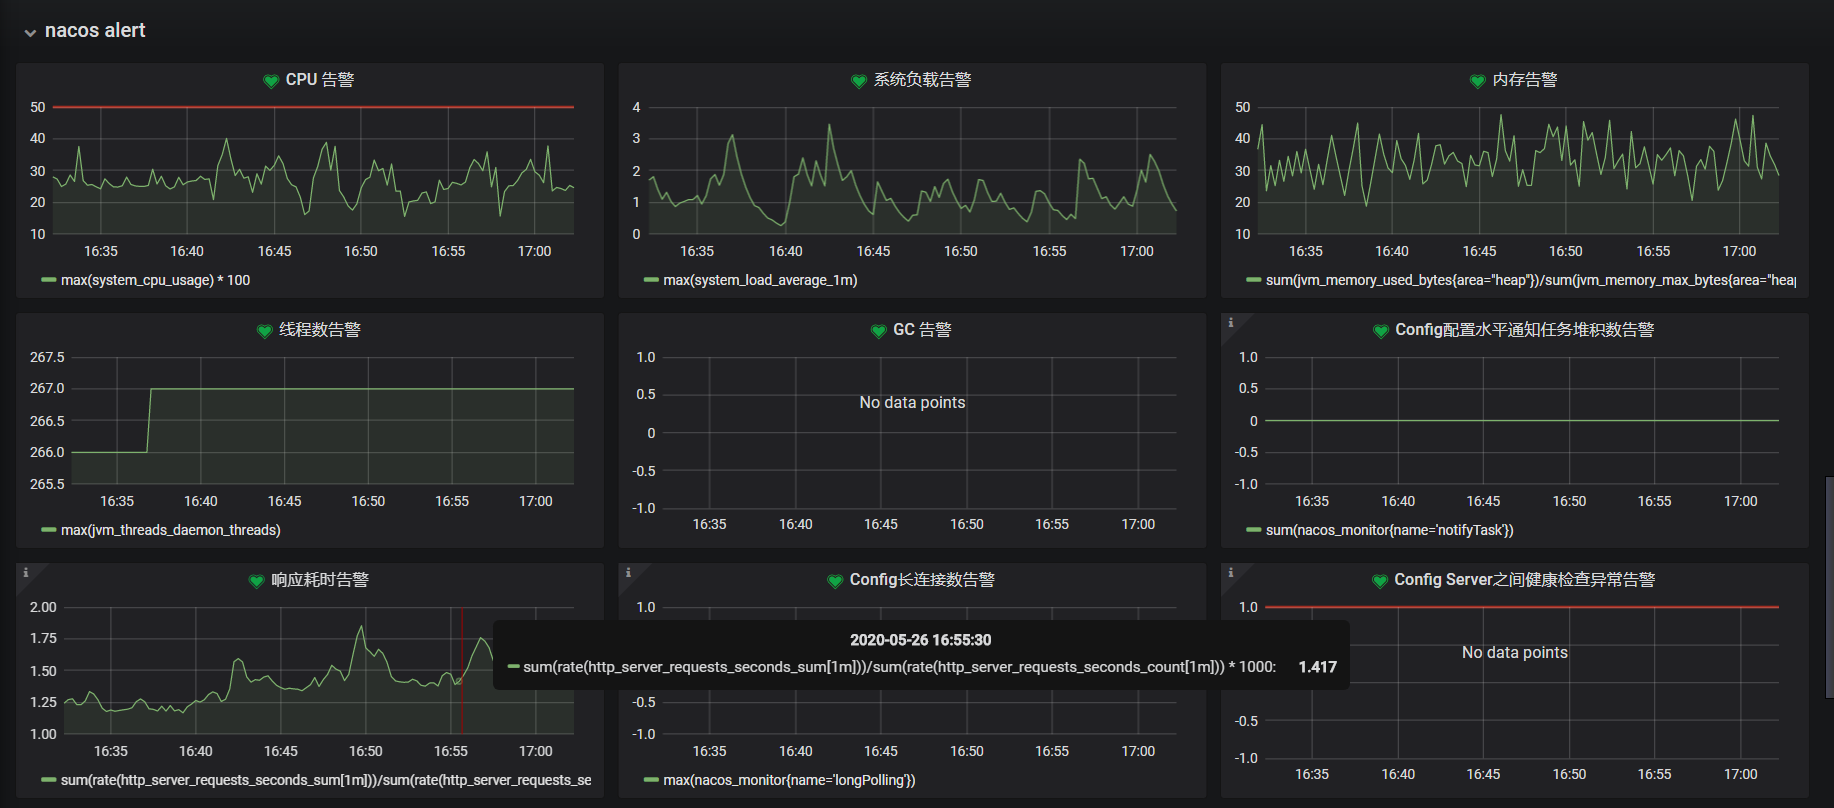
Nacos Server 是3臺 1C4G 集群,同時承受1499個服務和12715個實例注冊,而且 CPU 和內存長期保持在一個合適的范圍內,果真 Nacos 性能是相當 OK 的。

更多更詳 API 請參見 Nacos 官方文檔: Open API 指南
https://nacos.io/zh-cn/docs/open-api.html
交叉注冊
網關,服務 A ,服務 B 各10臺實例,網關注冊 Eureka , A 注冊 Nacos , B 注冊 Eureka ,同步正常,可調用。
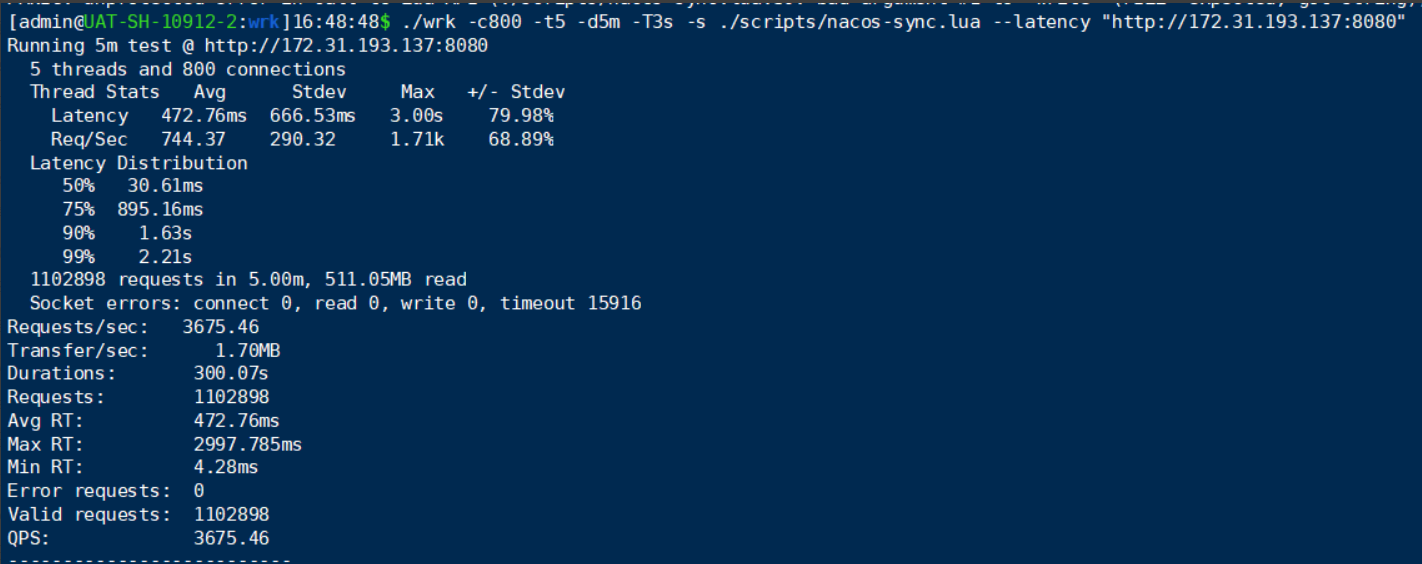
壓力測試
請求大于100萬次,查看 Sync Server 會不會受到影響,結果 ErrorRequest = 0,同步服務數和實例數沒有變化。
有無損調用
網關 Sync Server 掛掉,網關服務 Eureka 同步 Nacos 失敗,不影響網關 -> A -> B 調用。
自動創建同步
發布系統第一次發布應用到 Eureka / Nacos ,會自動創建 Eureka -> Nacos 的同步任務或 Nacos -> Eureka 的同步任務

減少 Sync Server
Sync Server 4C8G ,停止機器,逐臺遞減,結論:平均1臺 4C8G 機器最大可同步100個服務。
增加 Sync Server
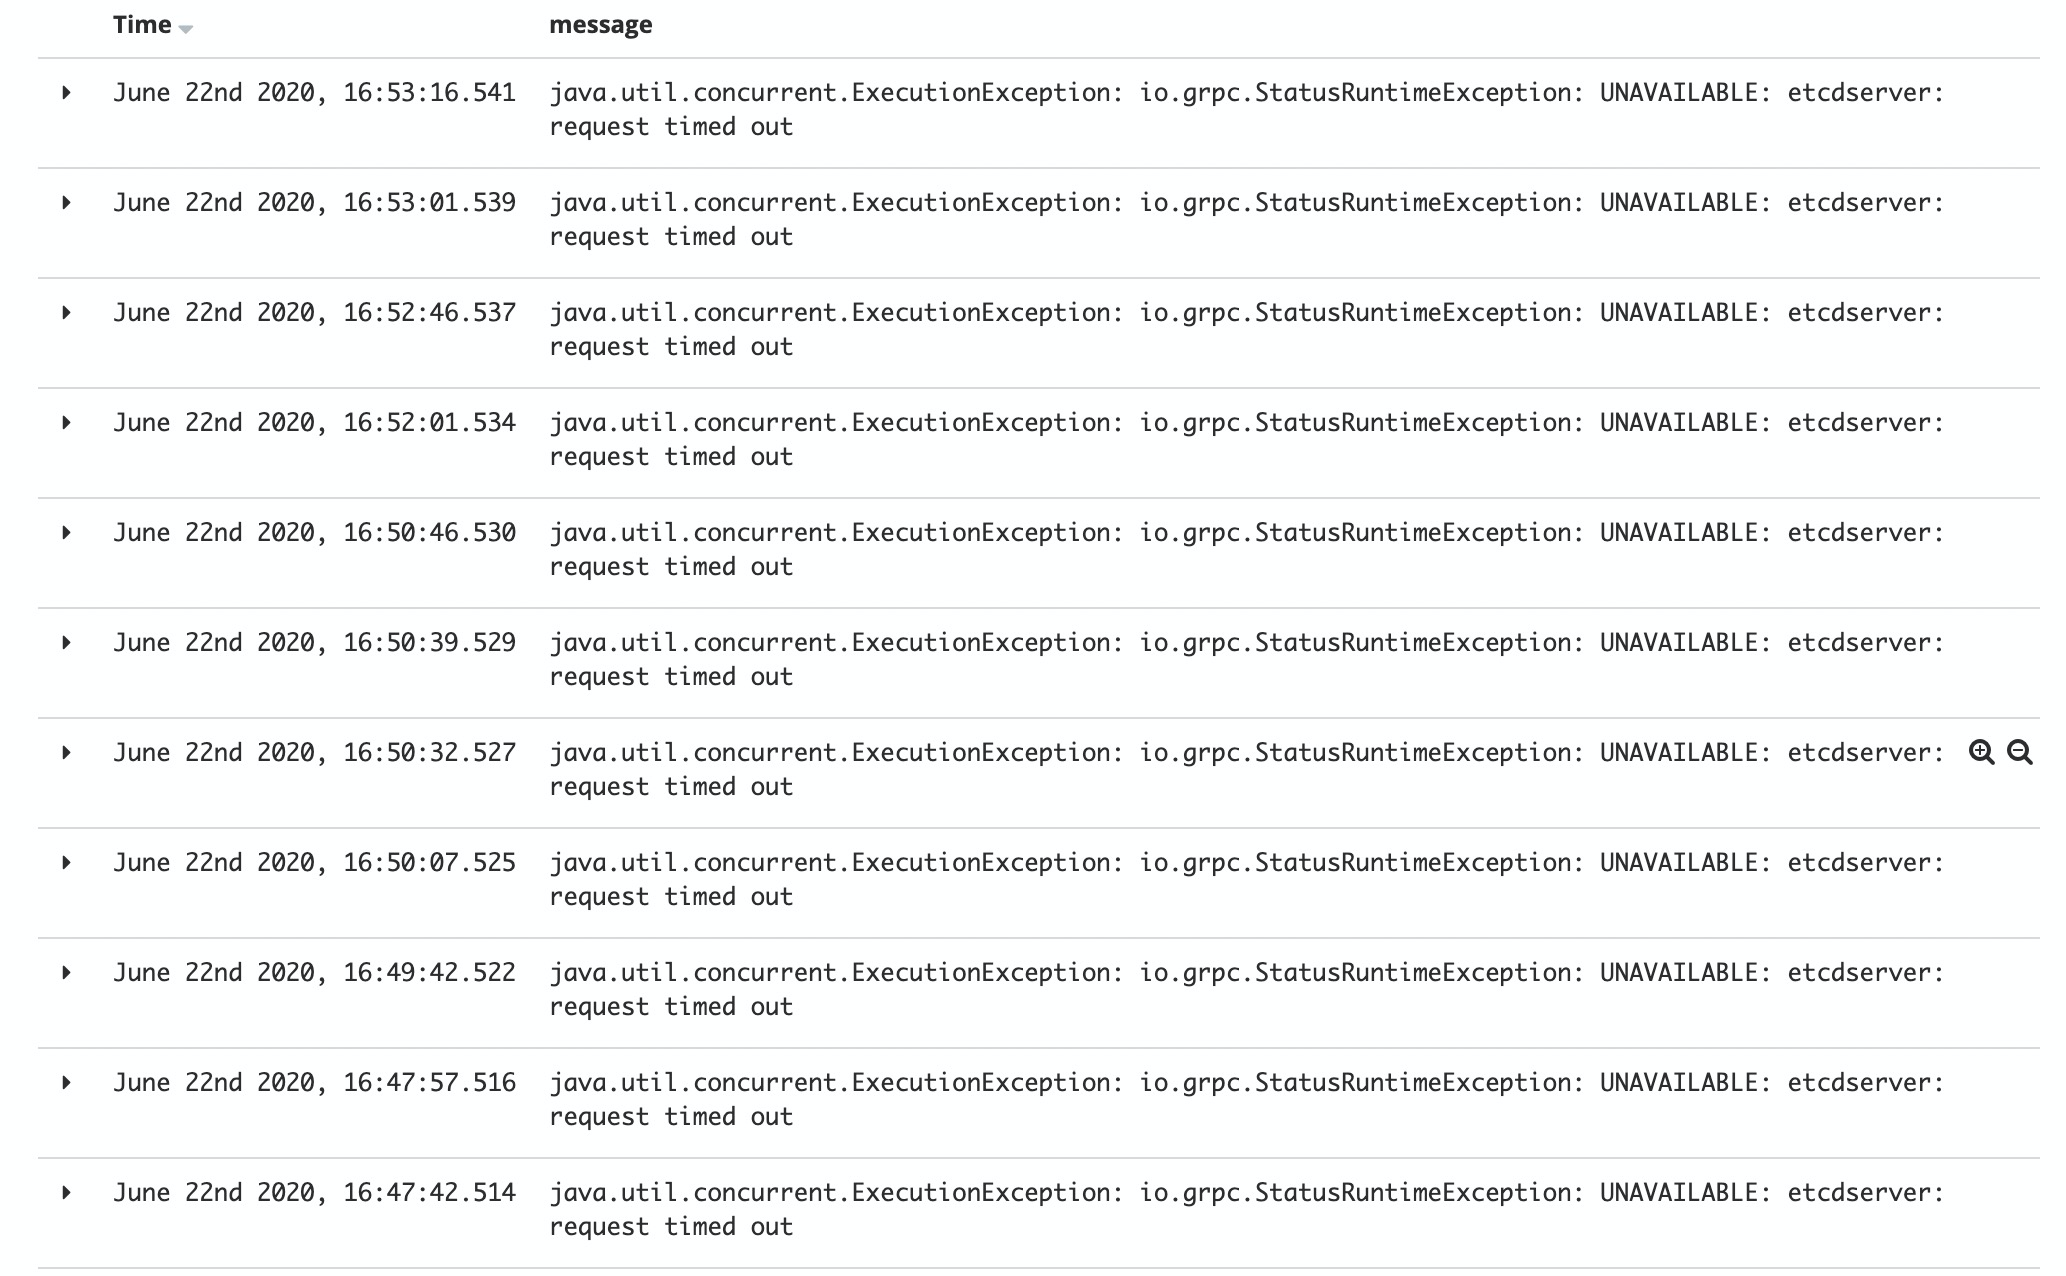
2臺 Etcd 節點,停機一臺,Etcd 讀取超時,結論:600個服務至少2臺 Etcd 節點,這里重點強調,新增服務時, Hash 算法虛擬節點數,務必和原有的保持一致,不然會出現同步失敗,影響跨注冊中心調用。
重啟 Sync Server
增加 Sync Server 個數,重啟 Sync Server ,各節點同步數重新計算且均衡。
Nacos Client 界面重點測試集群管理,服務列表和權限控制。
Nacos Server 重啟后,集群管理界面正常展示3臺集群節點 IP 。
服務注冊 Nacos Server 后,服務列表新增注冊上去的服務名和實例個數,而且可查看詳情。

服務上下線操作,健康狀態和元數據等展示正常。
編輯,刪除等操作只有具備 Admin 權限的人員才可操作。
自動化測試鏈路
全鏈路測試路徑
API網關 -> 服務A(兩個實例) -> 服務B(兩個實例)
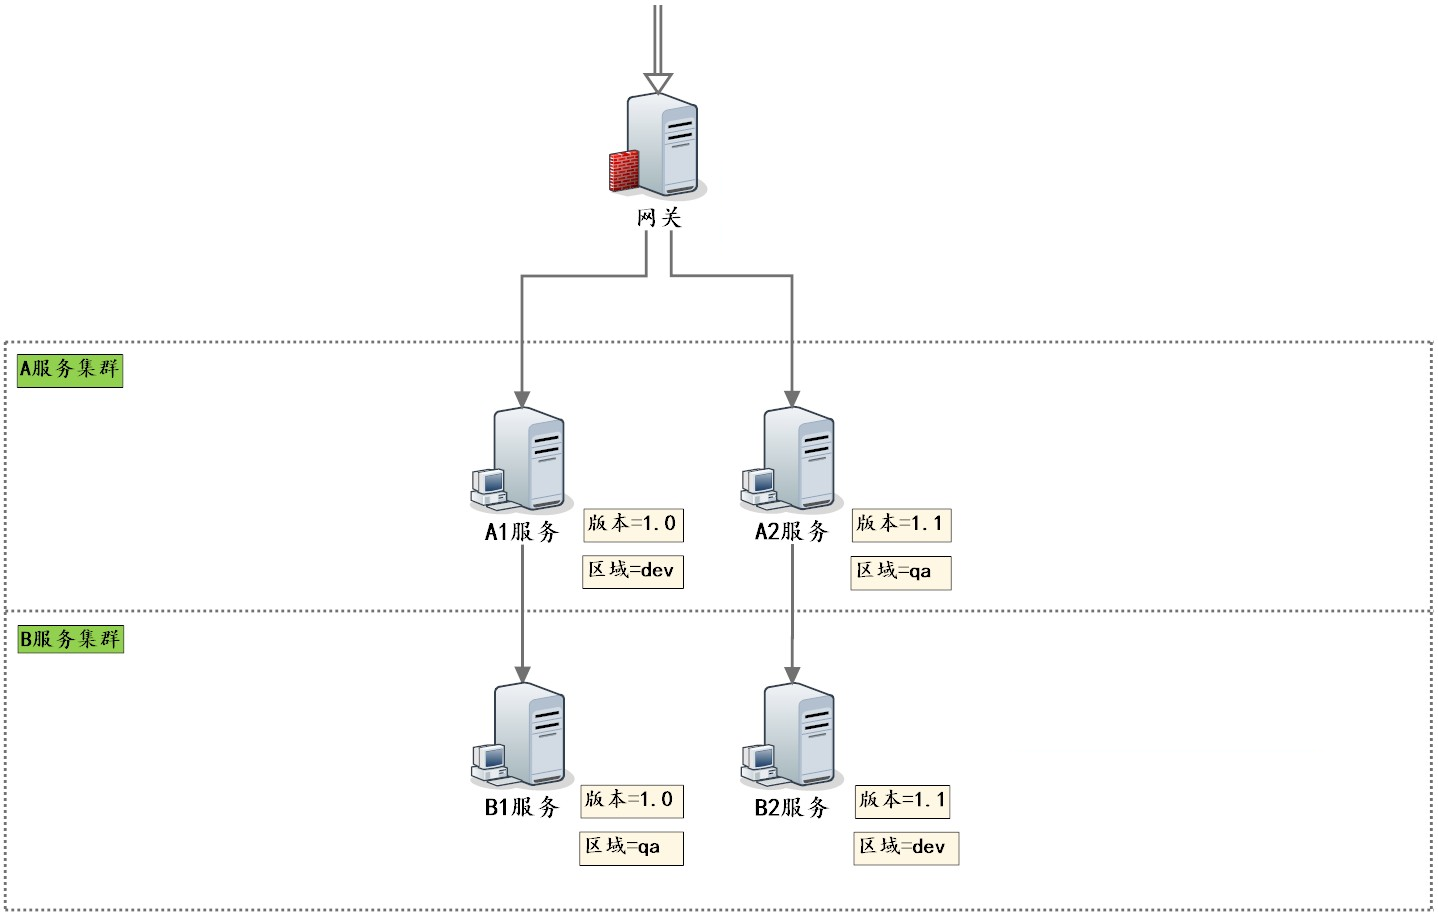
全鏈路服務部署

自動化測試入口
結合 Spring Boot Junit , TestApplication.class 為測試框架內置應用啟動程序, MyTestConfiguration 用于初始化所有測試用例類。在測試方法上面加入 JUnit 的 @Test注解
@RunWith(SpringRunner.class)
@SpringBootTest(classes = { TestApplication.class, MyTestConfiguration.class }, webEnvironment = SpringBootTest.WebEnvironment.RANDOM_PORT)
public class MyTest {
    @Autowired
    private MyTestCases myTestCases;

    private static long startTime;

    @BeforeClass
    public static void beforeTest() {
        startTime = System.currentTimeMillis();
    }

    @AfterClass
    public static void afterTest() {
        LOG.info("* Finished automation test in {} seconds", (System.currentTimeMillis() - startTime) / 1000);
    }

    @Test
    public void testNoGray() throws Exception {
        myTestCases.testNoGray(gatewayTestUrl);
        myTestCases.testNoGray(zuulTestUrl);
    }

    @Test
    public void testVersionStrategyGray() throws Exception {
        myTestCases.testVersionStrategyGray1(gatewayGroup, gatewayServiceId, gatewayTestUrl);
        myTestCases.testVersionStrategyGray1(zuulGroup, zuulServiceId, zuulTestUrl);
    }
}
@Configuration
public class MyTestConfiguration {
@Bean
public MyTestCases myTestCases() {
return new MyTestCases();
}
}基于 Nacos Client 的普通調用自動化測試
在測試方法上面增加注解 @DTest ,通過斷言 Assert 來判斷測試結果。注解 @DTest 內容如下:
@Target({ ElementType.METHOD, ElementType.TYPE })
@Retention(RetentionPolicy.RUNTIME)
@Inherited
@Documented
public @interface DTest {

}
代碼如下:
public class MyTestCases {
    @Autowired
    private TestRestTemplate testRestTemplate;

    @DTest
    public void testNoGray(String testUrl) {
        int noRepeatCount = 0;
        List<String> resultList = new ArrayList<String>();
        for (int i = 0; i < 4; i++) {
            String result = testRestTemplate.getForEntity(testUrl, String.class).getBody();

            LOG.info("Result{} : {}", i + 1, result);

            if (!resultList.contains(result)) {
                noRepeatCount++;
            }
            resultList.add(result);
        }

        Assert.assertEquals(noRepeatCount, 4);
    }
}
基于 Nacos Client 的灰度藍綠調用自動化測試
在測試方法上面增加注解 @DTestConfig ,通過斷言 Assert 來判斷測試結果。注解 DTestConfig 注解內容如下:
@Target({ ElementType.METHOD, ElementType.TYPE })
@Retention(RetentionPolicy.RUNTIME)
@Inherited
@Documented
public @interface DTestConfig {
    // 組名
    String group();

    // 服務名
    String serviceId();

    // 組名-服務名組合鍵值的前綴
    String prefix() default StringUtils.EMPTY;

    // 組名-服務名組合鍵值的后綴
    String suffix() default StringUtils.EMPTY;

    // 執行配置的文件路徑。測試用例運行前,會把該文件里的內容推送到遠程配置中心或者服務
    String executePath();

    // 重置配置的文件路徑。測試用例運行后,會把該文件里的內容推送到遠程配置中心或者服務。該文件內容是最初的默認配置
    // 如果該注解屬性為空,則直接刪除從配置中心刪除組名-服務名組合鍵值
    String resetPath() default StringUtils.EMPTY;
}
代碼如下:
public class MyTestCases {
    @Autowired
    private TestRestTemplate testRestTemplate;

    @DTestConfig(group = "#group", serviceId = "#serviceId", executePath = "gray-strategy-version.xml", resetPath = "gray-default.xml")
    public void testVersionStrategyGray(String group, String serviceId, String testUrl) {
        for (int i = 0; i < 4; i++) {
            String result = testRestTemplate.getForEntity(testUrl, String.class).getBody();

            LOG.info("Result{} : {}", i + 1, result);

            int index = result.indexOf("[V=1.0]");
            int lastIndex = result.lastIndexOf("[V=1.0]");

            Assert.assertNotEquals(index, -1);
            Assert.assertNotEquals(lastIndex, -1);
            Assert.assertNotEquals(index, lastIndex);
        }
    }
}
初始默認無灰度藍綠的配置文件 gray-default.xml
<?xml version="1.0" encoding="UTF-8"?>
<rule>

</rule>
灰度藍綠生效的配置文件 gray-strategy-version.xml
<?xml version="1.0" encoding="UTF-8"?>
<rule>
    <strategy>
        <version>1.0</version>
    </strategy>
</rule>
基于 Nacos Client 的自動化測試報告樣例
---------- Run automation testcase :: testStrategyCustomizationGray() ----------
Header : [a:"1", b:"2"]
Result1 : zuul -> solar-service-a[192.168.0.107:3002][V=1.1][R=qa][G=solar-group] -> solar-service-b[192.168.0.107:4002][V=1.1][R=dev][G=solar-group]
Result2 : zuul -> solar-service-a[192.168.0.107:3002][V=1.1][R=qa][G=solar-group] -> solar-service-b[192.168.0.107:4002][V=1.1][R=dev][G=solar-group]
Result3 : zuul -> solar-service-a[192.168.0.107:3002][V=1.1][R=qa][G=solar-group] -> solar-service-b[192.168.0.107:4002][V=1.1][R=dev][G=solar-group]
Result4 : zuul -> solar-service-a[192.168.0.107:3002][V=1.1][R=qa][G=solar-group] -> solar-service-b[192.168.0.107:4002][V=1.1][R=dev][G=solar-group]
* Passed
---------- Run automation testcase :: testVersionRuleGray() ----------
Result1 : zuul -> solar-service-a[192.168.0.107:3002][V=1.1][R=qa][G=solar-group] -> solar-service-b[192.168.0.107:4002][V=1.1][R=dev][G=solar-group]
Result2 : zuul -> solar-service-a[192.168.0.107:3001][V=1.0][R=dev][G=solar-group] -> solar-service-b[192.168.0.107:4001][V=1.0][R=qa][G=solar-group]
Result3 : zuul -> solar-service-a[192.168.0.107:3002][V=1.1][R=qa][G=solar-group] -> solar-service-b[192.168.0.107:4002][V=1.1][R=dev][G=solar-group]
Result4 : zuul -> solar-service-a[192.168.0.107:3001][V=1.0][R=dev][G=solar-group] -> solar-service-b[192.168.0.107:4001][V=1.0][R=qa][G=solar-group]
* Passed
Nacos 不僅性能好,而且界面簡潔,這樣的注冊中心你值得擁有。
以上是“Nacos性能測試的示例分析”這篇文章的所有內容,感謝各位的閱讀!相信大家都有了一定的了解,希望分享的內容對大家有所幫助,如果還想學習更多知識,歡迎關注億速云行業資訊頻道!
免責聲明:本站發布的內容(圖片、視頻和文字)以原創、轉載和分享為主,文章觀點不代表本網站立場,如果涉及侵權請聯系站長郵箱:is@yisu.com進行舉報,并提供相關證據,一經查實,將立刻刪除涉嫌侵權內容。