您好,登錄后才能下訂單哦!
您好,登錄后才能下訂單哦!
背景:在vcenter6.5中創建兩個虛擬機,如下圖,
目的:創建一名用戶同時能夠實現chroot來限制ssh及sftp至指定目錄,可以實現系統安全。
其中,我們將在pool-test(ip:172.16.6.11)中進行配置,用vsan-test1(ip:172.16.6.10)用來測試。

接下來開始在pool-test中開始進行配置ssh
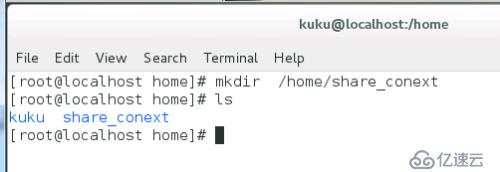
首先,建立一個指定目錄
mkdir /home/share_conext

列出指定目錄必須包含支持用戶會話所必需的文件和目錄
ls -l /dev/{null,zero,stdin,stdout,stderr,random,tty}
用 mknod 命令創建 /dev 下的文件。-m 標志用來指定文件權限位,c意思是字符文件,兩個數字分別是文件指向的主要號和次要號
mkdir -p /home/share_conext/dev/
cd /home/share_conext/dev/
mknod -m 666 null c 1 3
mknod -m 666 tty c 5 0
mknod -m 666 zero c 1 5
mknod -m 666 random c 1 8
ls

在 chroot 監獄中設置合適的權限。注意 chroot 監獄和它的子目錄以及子文件必須被 root 用戶所有,并且對普通用戶或用戶組不可寫:
chown root:root /home/share_conext/
chmod 755 /home/share_conext/

為SSH設置交互式shell
mkdir -p /home/share_conext/bin
cp -v /bin/bash /home/share_conext/bin/

mkdir -p /home/share_conext/lib64
ldd /bin/bash

將識別出的共享庫復制到lib64目錄下方
cp -v /lib64/libtinfo.so.5 /lib64/libdl.so.2 /lib64/libc.so.6 /lib64/ld-linux-x86-64.so.2 /share_conext/lib64

創建并配置sshuser用戶并設置安全密碼
useradd sshuser
passwd sshuser

mkdir /home/share_conext/etc
cp -vf /etc/{group,passwd} /home/share_conext/etc/
注:若添加更多用戶,則需要再次執行上步操作。
配置ssh使用chroot
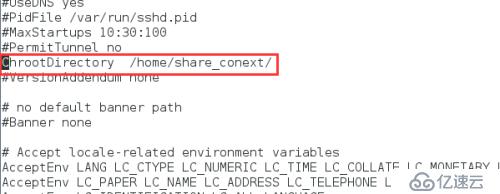
vi /etc/ssh/sshd_config

在文件中修改 Match User sshuser,及指定目錄 ChrootDirectory /home/share_context/
并保存退出


重啟sshd.service
systemctl restart sshd.service

在vsan-test1中進行測試
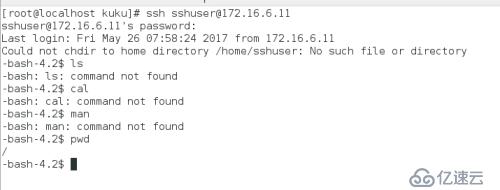
ssh sshuser@172.16.6.11

可以看到當前目錄已經是“根目錄”了。
接下來開始在pool-test中配置sftp
vi /etc/ssh/sshd_config
在文件中添加
 # 找到如下行,并注釋掉
 Subsystem      sftp    /usr/libexec/openssh/sftp-server # 添加如下幾行
 Subsystem   sftp  internal-sftp  #指定使用sftp服務使用系統自帶的internal-sftp
 Match Group sshuser   #之前默認創建的組
 ForceCommand    internal-sftp  #指定sftp命令

然后,重啟sshd服務
service restart sshd.service
重啟完畢后用戶sshuser就可以正常通過sftp客戶端登錄了。
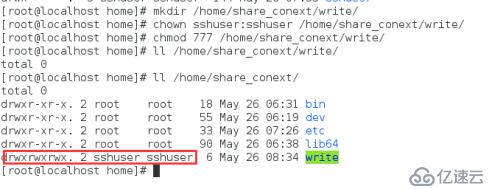
但是因為/home/share_conext都屬于root用戶組,所以無寫權限。進行如下處理:
在/home/share_conext目錄下創建上傳目錄,并修改目錄權限控制
mkdir /home/share_conext/write/
chown sshuser:sshuser /home/share_conext/write
chmod 777 /home/share_conext/write

至此,可以使用sftp登錄,并能夠進行上傳文件或者下載文件。
在vsan-test1中驗證
sftp sshuser@172.16.6.11

驗證下載功能
在pool-test中的/home/share_conext/write/下生成兩個文件
vi /home/share_conext/write/helloworld.py
vi /home/share_conext/write/hehe.txt
ls /home/share_conext/write/

切換到vsan-test中
get write/helloworld.py /home/ #指定文件存儲的目錄

查看

驗證上傳功能
在剛才的/home/中創建startd.py

重新連接
sftp sshuser@172.16.6.11
put /home/startd.py /write/    # 因為此時的根目錄是share_conext/ ,所以可以直接寫成/write/

切換到pool-test虛擬機中查看剛才上傳的文件

至此已經全部配置完畢了!
注:部分內容參考鏈接http://blog.csdn.net/akeyile2010/article/details/50751834、http://blog.sina.com.cn/s/blog_67e34ceb01013m3v.html、http://jingyan.baidu.com/article/fa4125acf068c328ac7092d8.html
免責聲明:本站發布的內容(圖片、視頻和文字)以原創、轉載和分享為主,文章觀點不代表本網站立場,如果涉及侵權請聯系站長郵箱:is@yisu.com進行舉報,并提供相關證據,一經查實,將立刻刪除涉嫌侵權內容。