您好,登錄后才能下訂單哦!
您好,登錄后才能下訂單哦!
這期內容當中小編將會給大家帶來有關如何正確的使用ElastchSearch,文章內容豐富且以專業的角度為大家分析和敘述,閱讀完這篇文章希望大家可以有所收獲。
首次添加文檔時,若索引不存在會自動創建; 借助 kibana 的dev-tools來實現 es 的交互
POST first-index/_doc
{
  "@timestamp": "2021-03-31T01:12:00",
  "message": "GET /search HTTP/1.1 200 1070000",
  "user": {
    "id": "YiHui",
    "name": "一灰灰Blog"
  },
  "addr": {
    "country": "cn",
    "province": "hubei",
    "city": "wuhan"
  },
  "age": 18
}

## 添加兩個數據進行測試
POST first-index/_doc
{
  "@timestamp": "2021-03-31T02:12:00",
  "message": "GET /search HTTP/1.1 200 1070000",
  "user": {
    "id": "ErHui",
    "name": "二灰灰Blog"
  },
  "addr": {
    "country": "cn",
    "province": "hubei",
    "city": "wuhan"
  },
  "age": 19
}
當然也可以直接使用 http 進行交互,下面的方式和上面等價(后面都使用 kibanan 進行交互,更直觀一點)
curl  -X POST 'http://localhost:9200/first-index/_doc?pretty' -H 'Content-Type: application/json' -d '
{
  "@timestamp": "2021-03-31T01:12:00",
  "message": "GET /search HTTP/1.1 200 1070000",
  "user": {
    "id": "YiHui",
    "name": "一灰灰Blog"
  },
  "addr": {
    "country": "cn",
    "province": "hubei",
    "city": "wuhan"
  },
  "age": 18
}'
除了基礎的查詢語法之外,直接使用 kibana 進行查詢,對于使用方而言,門檻最低;首先配置上面的 es 索引
Management -> Stack Management -> Kiabana Index Patterns
index pattern name
時間字段,選擇 @timestamp 這個與實際的文檔中的 field 有關
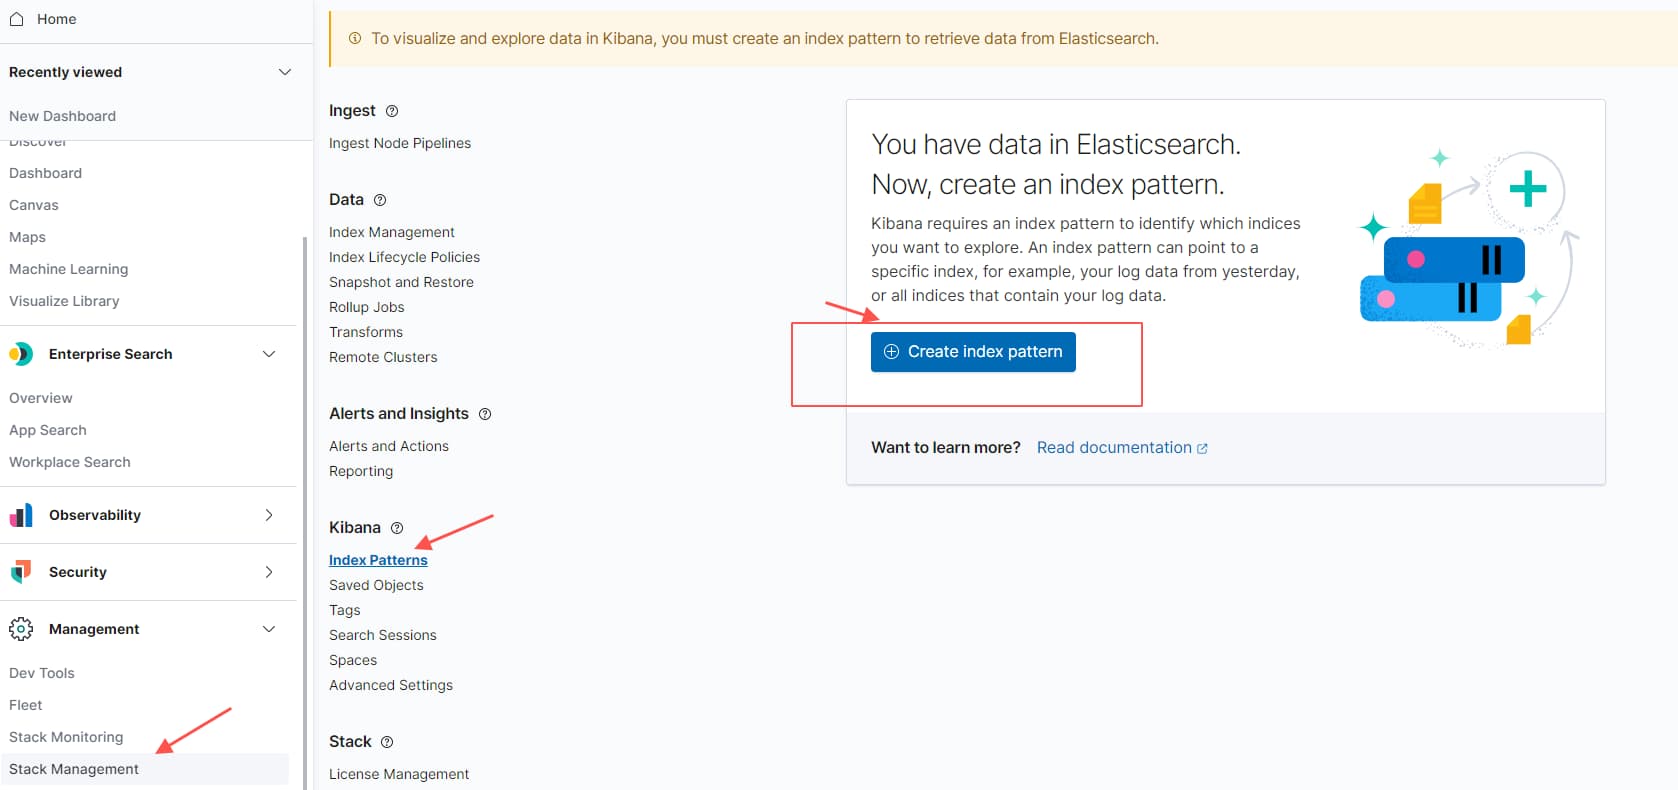


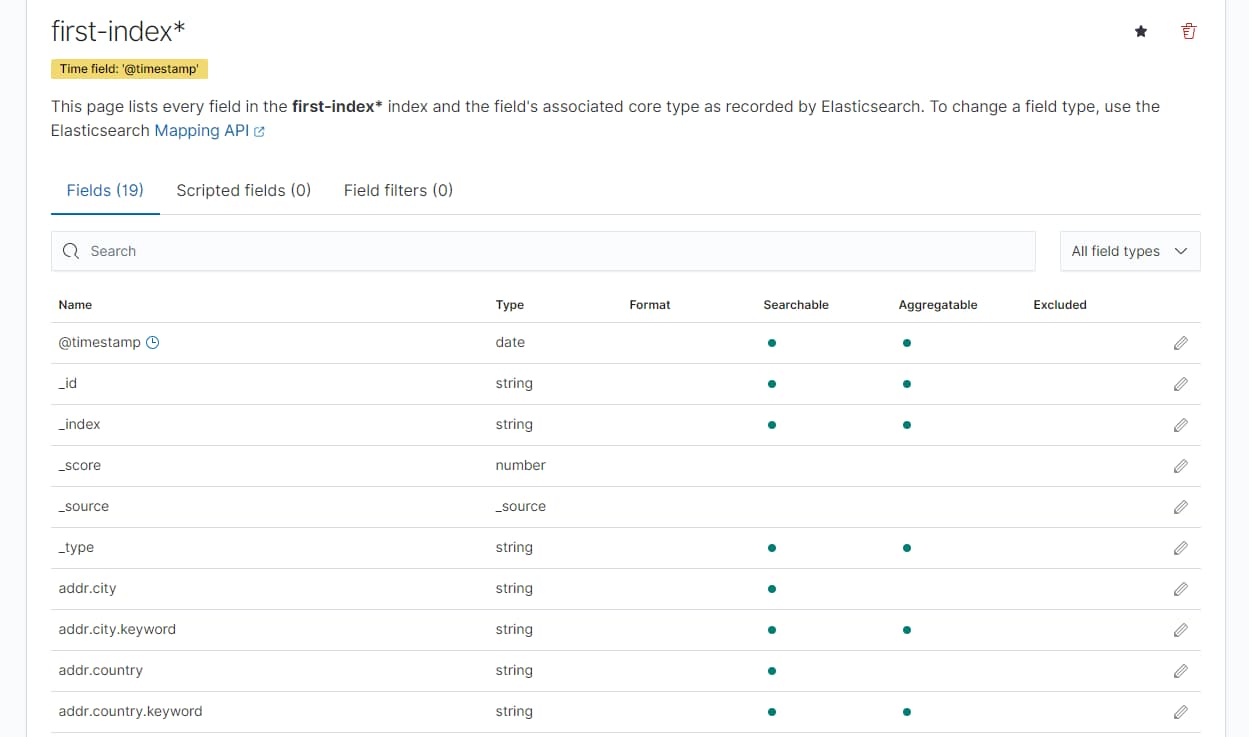
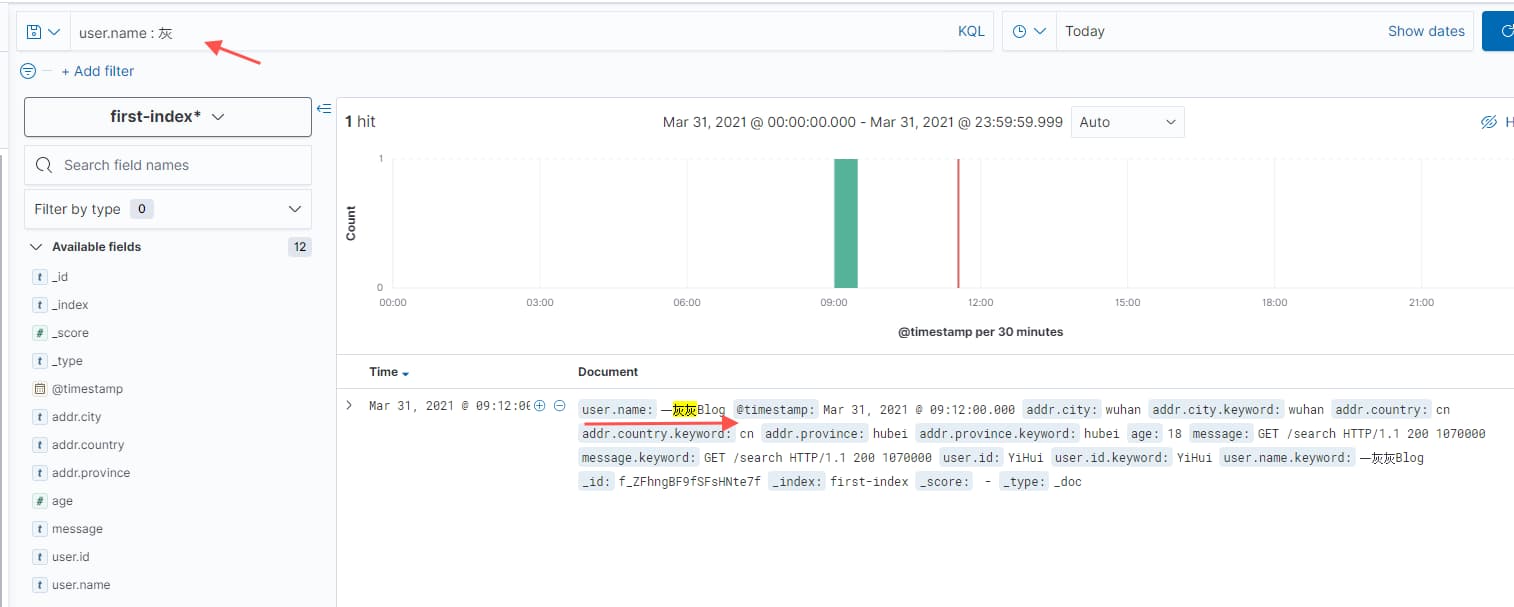
接下來進入Discover 進行查詢

比如字段查詢
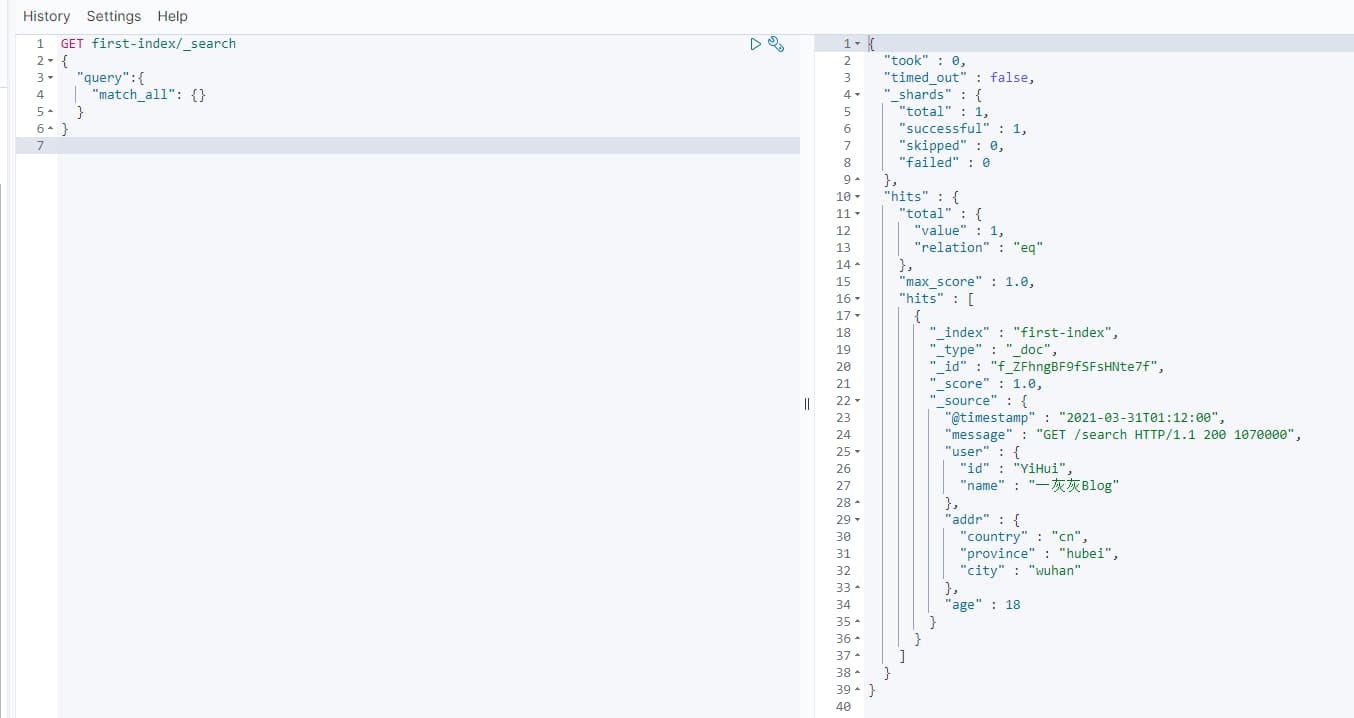
不加任何匹配,撈出文檔(當數據量很多時,當然也不會真的全部返回,也是會做分頁的)
GET my-index/_search
{
  "query": {
    "match_all": {
    }
  }
}
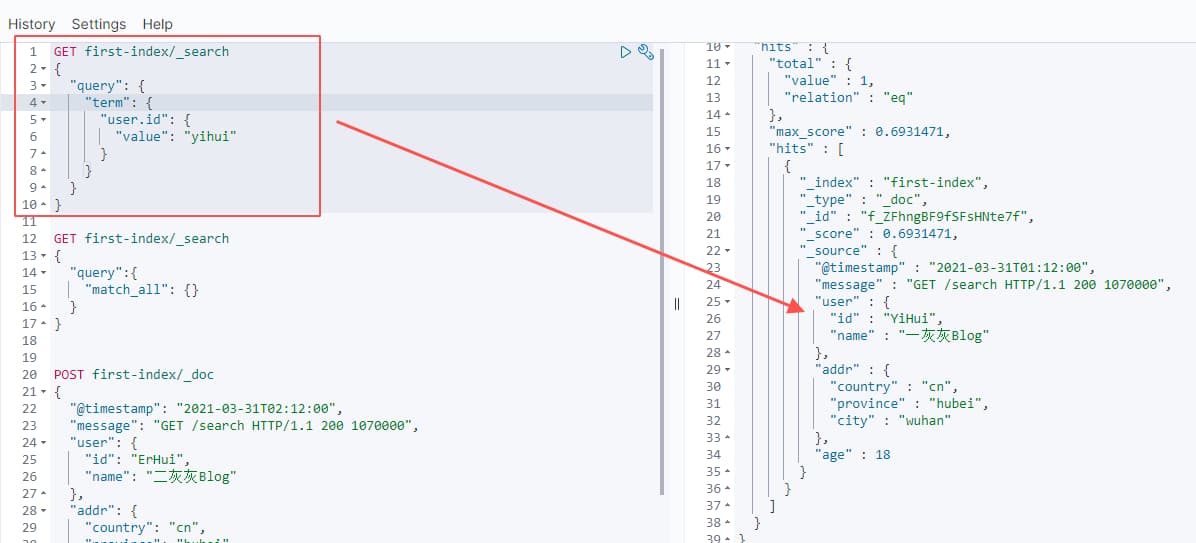
根據 field 進行 value 匹配,忽略大小寫;
查詢語法,形如: `{"query": {"term": {"成員名": {"value": "查詢值"}}}}
query, term, value 三個 key 為固定值
成員名: 為待查詢的成員
查詢值: 需要匹配的值
(說明:后面語法中,中文的都是需要替換的,英文的為固定值)
GET first-index/_search
{
  "query": {
    "term": {
      "user.id": {
        "value": "yihui"
      }
    }
  }
}
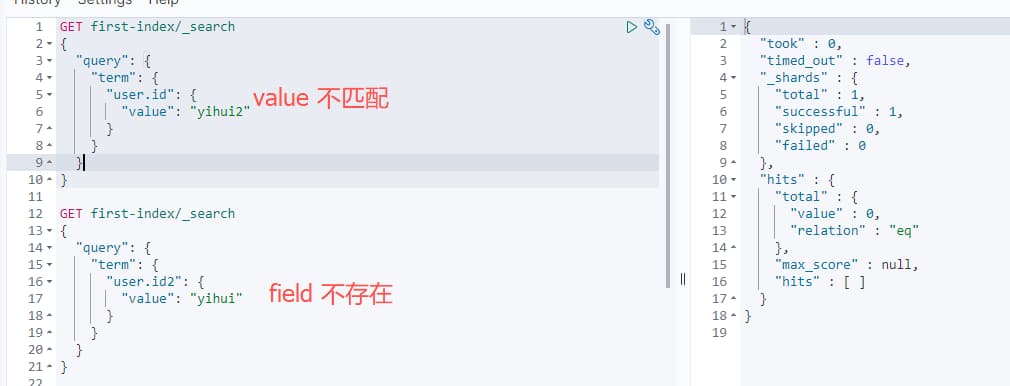
當 value 不匹配,或者查詢的 field 不存在,則查不到的對應的信息,如
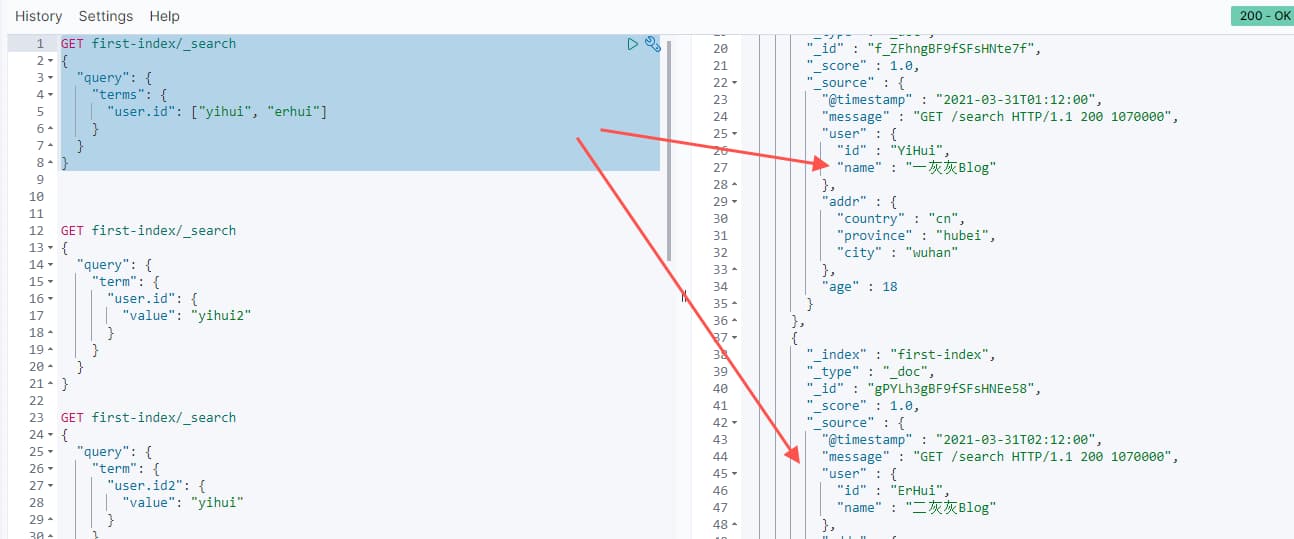
term 表示 value 的精確匹配,如果我希望類似value in (xxx)的查詢,則可以使用 terms
語法:
{
	"query": {
		"terms": {
			"成員名": [成員值, 成員值]
		}
	}
}
實例如
GET first-index/_search
{
  "query": {
    "terms": {
      "user.id": ["yihui", "erhui"]
    }
  }
}
適用于數值、日期的比較查詢,如常見的 >, >=, <, <=
查詢語法
{
	"query": {
        "range": {
            "成員名": {
                "gte": "查詢下界" ,
                "lte": "查詢下界"
            }
        }
	}
}| 范圍操作符 | 說明 |
|---|---|
gt | 大于 > |
gte | 大于等于 >= |
lt | 小于 < |
lte | 小于等于 <= |
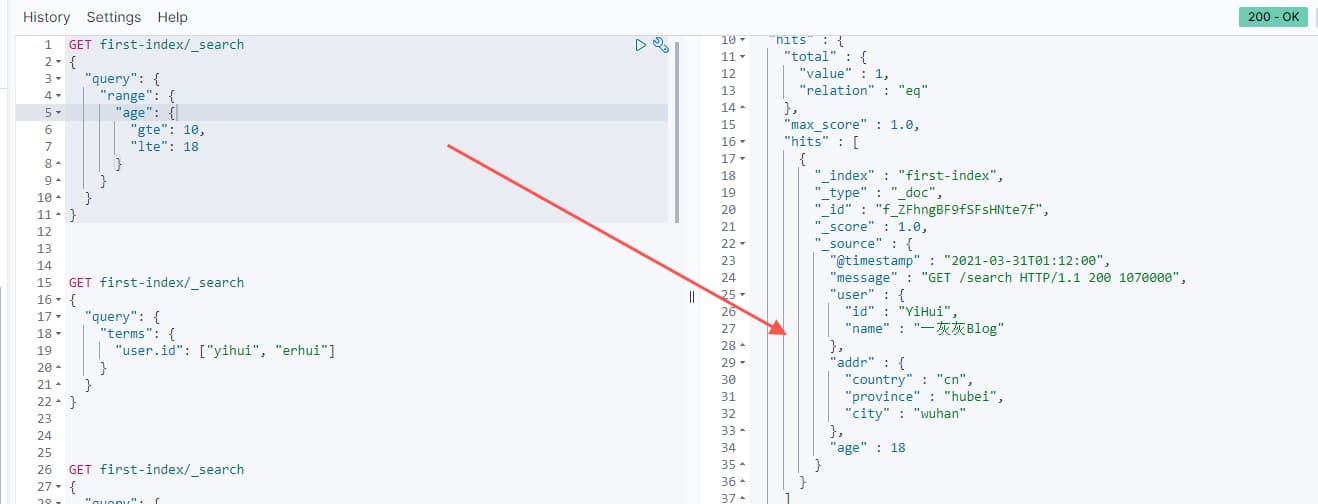
實例如下
GET first-index/_search
{
  "query": {
    "range": {
      "age": {
        "gte": 10,
        "lte": 18
      }
    }
  }
}
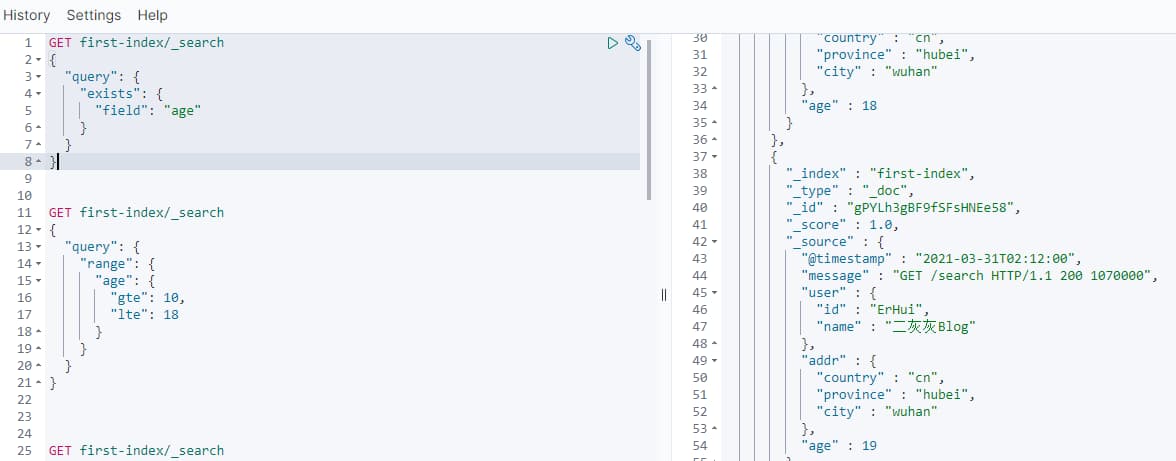
根據是否包含某個字段來查詢, 主要有兩個 exists 表示要求存在, missing表示要求不存在
查詢語法
{
    "query": {
        "exists/missing": {
            "field": "字段值"
        }
    }
}
實例如下
GET first-index/_search
{
  "query": {
    "exists": {
      "field": "age"
    }
  }
}
上面都是單個查詢條件,單我們需要多個查詢條件組合使用時,可以使用bool + must/must_not/should來實現
查詢語法
{
    "query": {
        "bool": {
            "must": [ # 相當于and查詢
                "查詢條件1",
                "查詢條件2"
            ],
            "must_not": [ # 多個查詢條件相反匹配,相當與not
                ...
            ],
            "should": [ # 有一個匹配即可, 相當于or
                ...
            ]
        }
    }
}
實例如下
## user.id = yihui and age < 20
GET first-index/_search
{
  "query": {
    "bool": {
      "must": [
        {
          "term": {
            "user.id": {
              "value": "yihui"
            }
          }
        },
        {
          "range": {
            "age": {
              "lt": 20
            }
          }
        }
      ]
    }
  }
}

# !(user.id) = yihui and !(age>20)
GET first-index/_search
{
  "query": {
    "bool": {
      "must_not": [
        {
          "term": {
            "user.id": {
              "value": "yihui"
            }
          }
        },
        {
          "range": {
            "age": {
              "gt": 20
            }
          }
        }
      ]
    }
  }
}

# user.id = 'yihui' or age>20
GET first-index/_search
{
  "query": {
    "bool": {
      "should": [
        {
          "term": {
            "user.id": {
              "value": "yihui"
            }
          }
        },
        {
          "range": {
            "age": {
              "gt": 20
            }
          }
        }
      ]
    }
  }
}
下面截圖以 must_not 輸出示意
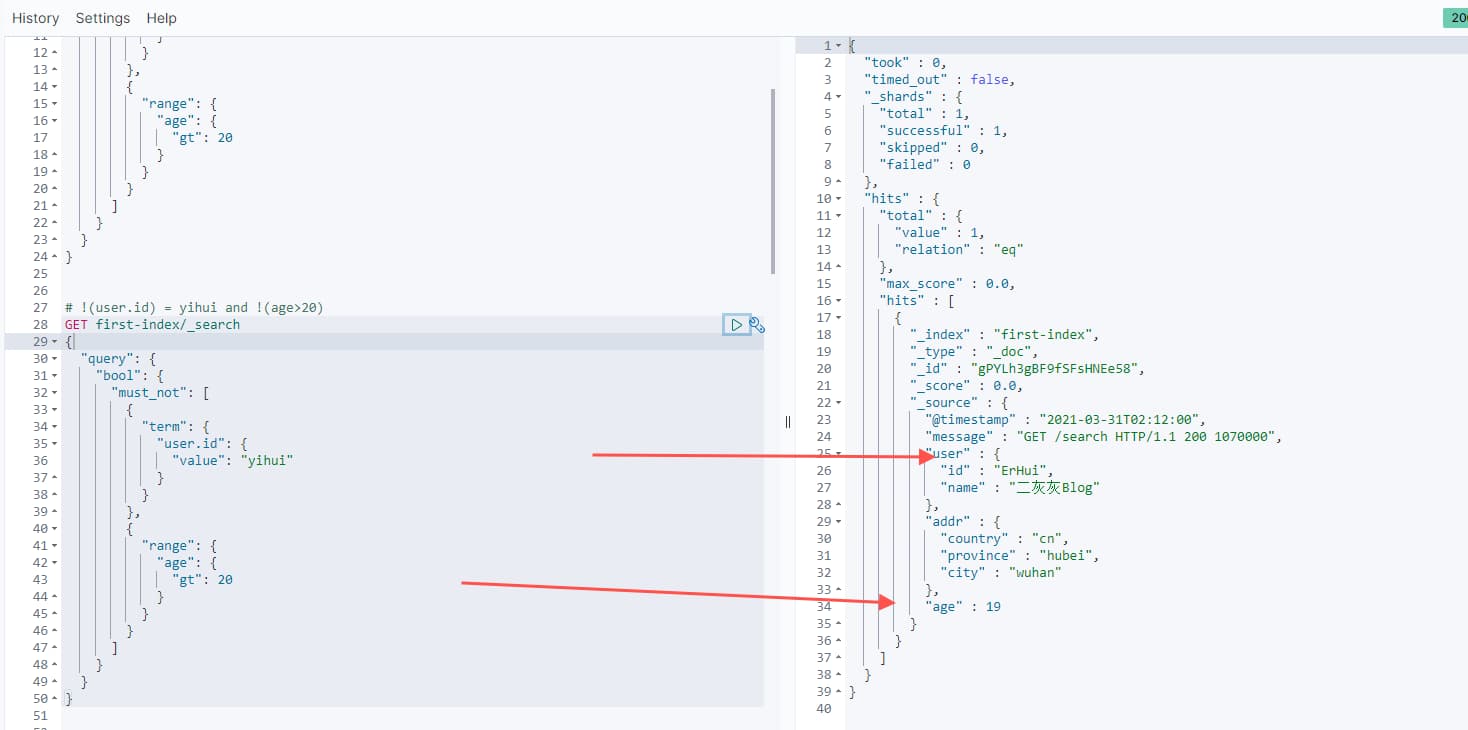
說明
前面根據字段查詢 existing 只能單個匹配,可以借助這里的組合來實現多個的判斷
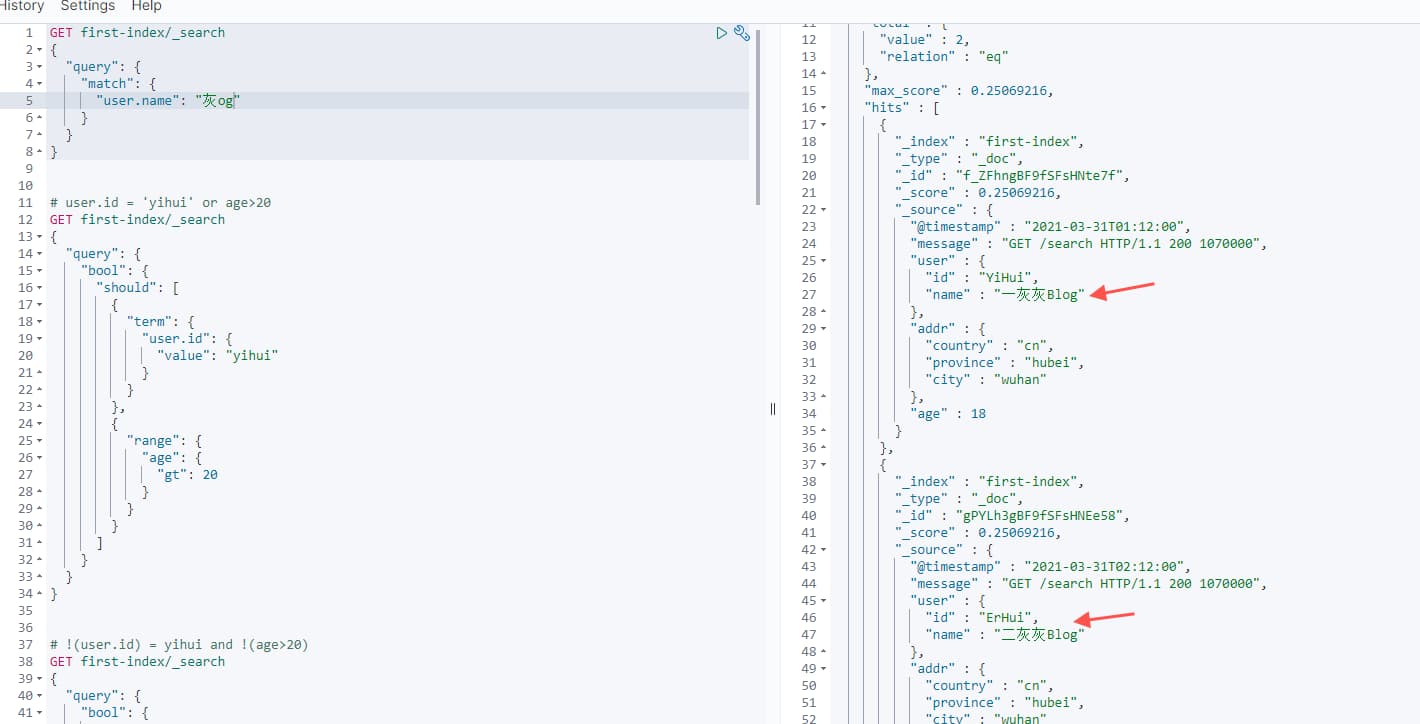
最大的特點是它更適用于模糊查詢,比如查詢某個 field 中的字段匹配
語法
{
    "query": {
        "match": {
            "字段名": "查詢值"
        }
    }
}
舉例說明
GET first-index/_search
{
  "query": {
    "match": {
      "user.name": "灰og"
    }
  }
}
說明,如果有精確查詢的需求,使用前面的 term,可以緩存結果
更多相關信息,可以查看: 官網-multi_match 查詢
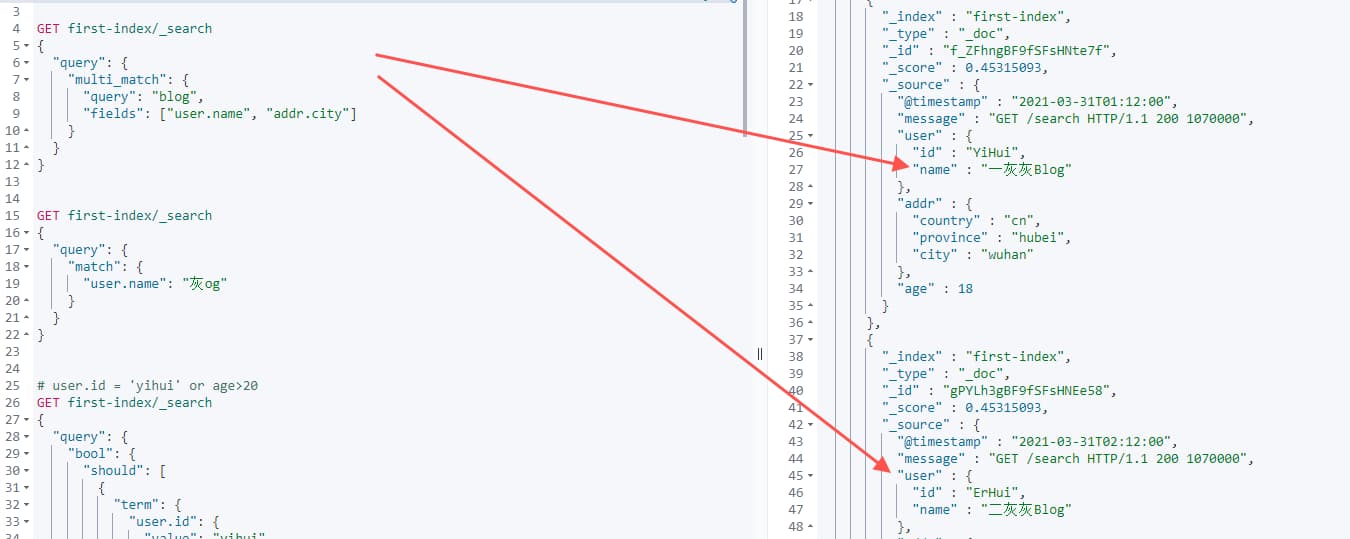
多個字段中進行查詢
語法
type: best_fields 、 most_fields 和 cross_fields (最佳字段、多數字段、跨字段)
最佳字段 :當搜索詞語具體概念的時候,比如 “brown fox” ,詞組比各自獨立的單詞更有意義
多數字段:為了對相關度進行微調,常用的一個技術就是將相同的數據索引到不同的字段,它們各自具有獨立的分析鏈。
混合字段:對于某些實體,我們需要在多個字段中確定其信息,單個字段都只能作為整體的一部分
{
    "query": {
        "multi_match": {
            "query":                "Quick brown fox",
            "type":                 "best_fields",
            "fields":               [ "title", "body" ],
            "tie_breaker":          0.3,
            "minimum_should_match": "30%"
        }
    }
}
實例演示
GET first-index/_search
{
  "query": {
    "multi_match": {
      "query": "漢",
      "fields": ["user.id", "addr.city"]
    }
  }
}
上面除了寫上精確的字段之外,還支持模糊匹配,比如所有字段中進行匹配
GET first-index/_search
{
  "query": {
    "multi_match": {
      "query": "blog",
      "fields": ["*"]
    }
  }
}shell 統配符
?: 0/1 個字符
*: 0/n 個字符
GET first-index/_search
{
  "query": {
    "wildcard": {
      "user.id": {
        "value": "*Hu?"
      }
    }
  }
}
說明,對中文可能有問題
正則匹配
GET first-index/_search
{
  "query": {
    "regexp": {
      "user.name": ".*log"
    }
  }
}前綴匹配
GET first-index/_search
{
  "query": {
    "prefix": {
      "user.name": "一"
    }
  }
}查詢結果排序,根據 sort 來指定
{
	"sort": [
        {
          "成員變量": {
            "order": "desc"
          }
        }
  	]
}
實例如下
GET first-index/_search
{
  "query":{
    "match_all": {}
  },
  "sort": [
    {
      "@timestamp": {
        "order": "desc"
      }
    }
  ]
}更多操作姿勢,可以在官方文檔上獲取
官方教程
需要根據文檔 id 進行指定刪除
DELETE first-index/_doc/gPYLh4gBF9fSFsHNEe58
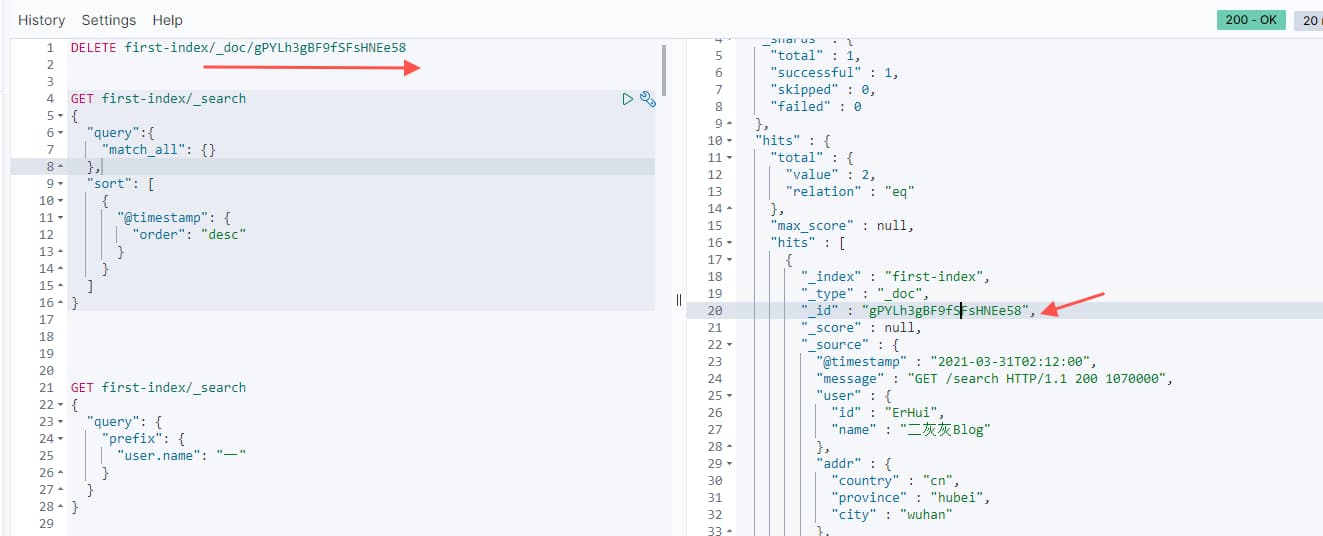
刪除成功

使用 PUT 來實現更新,同樣通過 id 進行
覆蓋更新
version 版本會+1
如果 id 對應的文檔不存在,則新增
PUT first-index/_doc/f_ZFhngBF9fSFsHNte7f
{
  "age": 28
}
采用 POST 來實現增量更新
field 存在,則更新
field 不存在,則新增
POST first-index/_update/gvarh4gBF9fSFsHNuO49
{
  "doc": {
    "age": 25
  }
}
此外還可以采用 script 腳本更新
在原來的 age 基礎上 + 5
POST first-index/_update/gvarh4gBF9fSFsHNuO49
{
  "script": "ctx._source.age += 5"
}
上述就是小編為大家分享的如何正確的使用ElastchSearch了,如果剛好有類似的疑惑,不妨參照上述分析進行理解。如果想知道更多相關知識,歡迎關注億速云行業資訊頻道。
免責聲明:本站發布的內容(圖片、視頻和文字)以原創、轉載和分享為主,文章觀點不代表本網站立場,如果涉及侵權請聯系站長郵箱:is@yisu.com進行舉報,并提供相關證據,一經查實,將立刻刪除涉嫌侵權內容。