您好,登錄后才能下訂單哦!
您好,登錄后才能下訂單哦!
這篇文章主要講解了“如何對eureka管理界面進行定制化改造”,文中的講解內容簡單清晰,易于學習與理解,下面請大家跟著小編的思路慢慢深入,一起來研究和學習“如何對eureka管理界面進行定制化改造”吧!
在nacos還未面世之前,eureka基本上就是springcloud全家桶體系注冊中心的首選,隨著nacos的橫空出世,越來越多基于springcloud的微服務項目采用nacos作為注冊中心,但這是不是意味著eureka就沒用武之地,其實并不是的,從springcloud截止目前最新版本2020.0.2來看,該版本廢棄了netflix諸如hytrix、ribbon、zuul等組件,而eureka仍然堅挺著,這就說明eureka作為注冊中心,在springcloud體系中仍然發揮著重要的作用。今天就來聊聊如何對eureka管理界面進行定制化改造
eureka默認是沒有登陸鑒權的,我們可以引入spring security來為eureka添加登陸鑒權功能
1、pom引入spring security
  <dependency>
            <groupId>org.springframework.boot</groupId>
            <artifactId>spring-boot-starter-security</artifactId>
        </dependency>
2、在application.yml配置認證用戶名密碼
spring:
  security:
    user:
      # 認證的用戶名
      name: lybgeek
      # 認證的密碼
      password: lybgeek
僅需這兩步,就可以實現一個帶有登陸界面的eureka管理界面。但是spring security的登陸界面css引用
https://maxcdn.bootstrapcdn.com/bootstrap/4.0.0-beta/css/bootstrap.min.css
在網絡不好的情況下,會出現eureka登陸頁面樣式會加載不出來,很影響用戶體驗。因此我們要自定義登陸頁面
ps: spring security的頁面生成,如果感興趣的朋友,可以查看如下類
org.springframework.security.web.server.ui.LoginPageGeneratingWebFilter
它的登陸頁面生成是通過該過濾器渲染生成。
3、自定義登陸頁
因為不是專業前端,因此就把spring security默認頁面拿來簡單修改一下。
<html lang="en" xmlns:th="http://www.thymeleaf.org">
<head>
    <meta charset="utf-8">
    <meta name="viewport" content="width=device-width, initial-scale=1, shrink-to-fit=no">
    <meta name="description" content="">
    <meta name="author" content="">
    <title>請登錄</title>
    <link href="../css/bootstrap.min.css" rel="stylesheet">
    <link href="../css/signin.css" rel="stylesheet">
</head>
<body>
<div class="container">
    <form class="form-signin" method="post" action="/login">
        <!--<h3 class="form-signin-heading">請登錄</h3>-->
        <div class="alert alert-danger" role="alert" id="errorMsgAlert"  ></div>
        <p>
            <label for="username" class="sr-only">用戶名</label>
            <input type="text" id="username" name="username" class="form-control" placeholder="Username" required=""
                   autofocus="">
        </p>
        <p>
            <label for="password" class="sr-only">密碼</label>
            <input type="password" id="password" name="password" class="form-control" placeholder="Password"
                   required="">
        </p>
        <button class="btn btn-lg btn-primary btn-block" type="submit">登錄</button>
    </form>
</div>
</body>
<script src="../js/jquery-3.5.1.min.js"></script>
4、編寫跳轉登陸頁controller
@Controller
@Slf4j
public class LoginController {

    @GetMapping("/toLogin")
    public String login(HttpServletRequest request) {
        return "login";
    }

}
5、配置WebSecurity
@EnableWebSecurity
@Configuration
public class WebSecurityConfig extends WebSecurityConfigurerAdapter {
    @Override
    protected void configure(HttpSecurity http) throws Exception {
        http.csrf().disable()
                .authorizeRequests()
                .antMatchers("/toLogin*","/login*","/css/*","/js/*","/actuator/**").permitAll()
                .and()
                .formLogin()
                .loginPage("/toLogin")
                .permitAll();
        super.configure(http);
    }
注: loginPage("/toLogin")中的toLogin,對應的就是我們寫的LoginController 路由。
此時訪問eureka,可以看到如下頁面

6、配置登陸邏輯以及登陸失敗配置
注: 登陸邏輯直接采用spring security默認的登陸邏輯login,自定義頁面的用戶名name要取名為username,密碼要取名為password,不能自定義,比如password改成pwd,這樣就無法走默認的登陸邏輯。其次因為我們使用自定義登陸頁面,原生自帶校驗失敗的頁面渲染邏輯會失效,因此我們要自定義校驗失敗渲染邏輯
在原先的WebSecurityConfig 加上登陸邏輯配置和登陸失敗配置
@EnableWebSecurity
@Configuration
public class WebSecurityConfig extends WebSecurityConfigurerAdapter {
    @Override
    protected void configure(HttpSecurity http) throws Exception {
        http.csrf().disable()
                .authorizeRequests()
                .antMatchers("/toLogin*","/login*","/css/*","/js/*","/actuator/**").permitAll()
                .and()
                .formLogin()
                .loginPage("/toLogin")
                .loginProcessingUrl("/login").failureUrl("/login/error").permitAll();
        super.configure(http);
    }

}
7、自定義登陸失敗跳轉邏輯controller
@Controller
@Slf4j
public class LoginController {

    @GetMapping("/login/error")
    public String loginError(HttpServletRequest request) {
        AuthenticationException authenticationException = (AuthenticationException) request.getSession().getAttribute(WebAttributes.AUTHENTICATION_EXCEPTION);
        log.info("authenticationException={}", authenticationException);
        String errorMsg;

        if (authenticationException instanceof UsernameNotFoundException || authenticationException instanceof BadCredentialsException) {
            errorMsg = "用戶名或密碼錯誤";
        } else if (authenticationException instanceof DisabledException) {
            errorMsg = "用戶已被禁用";
        } else if (authenticationException instanceof LockedException) {
            errorMsg = "賬戶被鎖定";
        } else if (authenticationException instanceof AccountExpiredException) {
            errorMsg = "賬戶過期";
        } else if (authenticationException instanceof CredentialsExpiredException) {
            errorMsg = "證書過期";
        } else {
            errorMsg = "登錄失敗";
        }
        request.setAttribute("errorMsg",errorMsg);
        return "login";
    }
    }
當用戶名或者密碼錯誤,頁面會有如下提示


上圖是eureka原生自帶的環境信息。但我們在日常開發中,有時候會區分dev、sit、uat、prod環境,顯然上圖是沒法滿足我們要求。因此我們可以在application.yml配置如下內容
eureka:
  #此處設置會改變eureka控制臺的顯示
  datacenter: ${DATA_CENTER:LYBGEEK DATA CENTER}
  #此處設置會改變eureka控制臺的顯示
  environment: ${ENV:dev}
此時再查看頁面

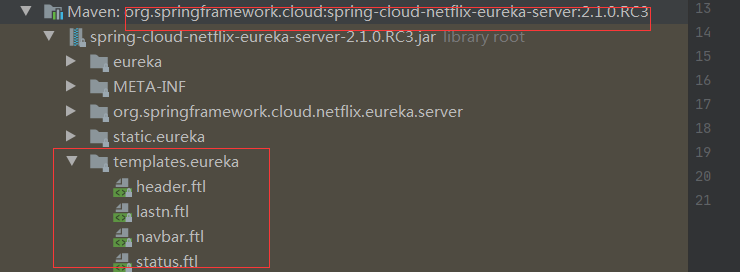
eureka的管理界面默認是使用使用freemarker來做模板渲染,其模板頁面在
spring-cloud-netflix-eureka-server-具體版本.jar
如圖

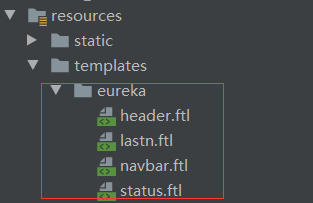
因此我們如果要進行定制,僅需把eureka的模板配置挪到我們代碼的templates中,如圖

然后根據我們的需要,進行修改,比如在本示例中,我就新增了一個登出按鈕和一個版權信息列表,如下圖


在自定義登陸頁面時,出現如下異常
org.thymeleaf.exceptions.TemplateInputException: Error resolving template [eureka/status], template might not exist or might not be accessible by any of the configured Template Resolvers
解決方案有兩種,一種是在yml文件配置如下內容
spring:
  freemarker:
    prefer-file-system-access: false
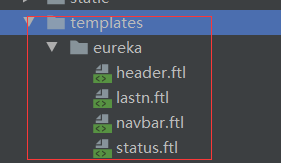
一種在把eureka的模板頁面都放置在如下下圖的位置

最近和朋友聊天,他知道我所在的公司注冊中心還是用eureka的時候,他就很詫異說怎么不用nacos,然后我就問他說為什么要用nacos,他給我的答案是現在eureka已經閉源了,nacos現在很火,可以做配置中心也可以做注冊中心,erueka后面基本上不會有人用了。
其實所謂eureka的閉源,是指eureka2版本的閉源,而目前大部分用的eureka都是版本一,我們可以去看netflix對eureka的最近更新

截止當前,他更新時間是11天前,再來看看spring-cloud-netflix-eureka的最近更新

對技術選型,有時候并不是哪個火就用哪個,而是要滿足當前業務需要,還有一點比如你正式環境已經穩定運行項目,你會因為出現更火的技術,就把當前項目技術棧替換掉嗎?我所在項目組,eureka作為注冊中心,因為注冊上去的業務項目就那么一些,用eureka就完全滿足需求了。
我這邊并不是排斥nacos的意思,畢竟nacos也有一些其他注冊中心所不具備的特性,比如動態DNS服務,同時支持AP和CP,nacos2的高性能,這些都是很值得去關注
https://github.com/lyb-geek/springboot-learning/tree/master/springboot-custom-eureka
感謝各位的閱讀,以上就是“如何對eureka管理界面進行定制化改造”的內容了,經過本文的學習后,相信大家對如何對eureka管理界面進行定制化改造這一問題有了更深刻的體會,具體使用情況還需要大家實踐驗證。這里是億速云,小編將為大家推送更多相關知識點的文章,歡迎關注!
免責聲明:本站發布的內容(圖片、視頻和文字)以原創、轉載和分享為主,文章觀點不代表本網站立場,如果涉及侵權請聯系站長郵箱:is@yisu.com進行舉報,并提供相關證據,一經查實,將立刻刪除涉嫌侵權內容。