您好,登錄后才能下訂單哦!
您好,登錄后才能下訂單哦!
spring batch中基于RabbitMQ遠程分區Step是怎樣的,相信很多沒有經驗的人對此束手無策,為此本文總結了問題出現的原因和解決方法,通過這篇文章希望你能解決這個問題。
前言碎語
小編構建的實例可為主服務,從服務,主從混用等模式,可以大大提高spring batch在單機處理時的時效。
項目源碼:https://gitee.com/kailing/partitionjob
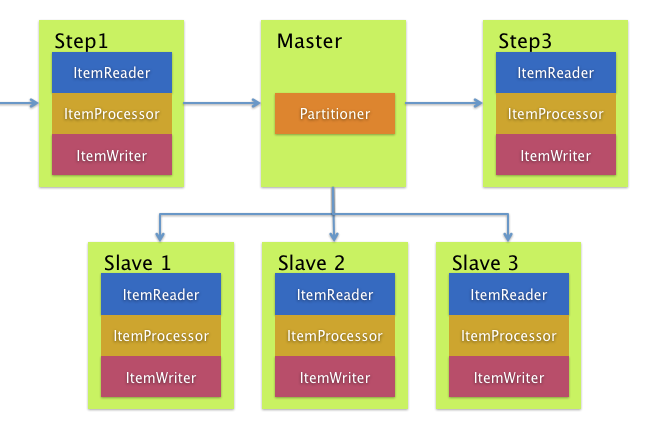
spring batch遠程分區Step的原理
master節點將數據根據相關邏輯(ID,hash),拆分成一段一段要處理的數據集,然后將數據集放到消息中間件中(ActiveMQ,RabbitMQ ),從節點監聽到消息,獲取消息,讀取消息中的數據集處理并發回結果。如下圖:

下面按原理分步驟實施,完成spring batch的遠程分區實例
第一步,首先引入相關依賴
見:https://gitee.com/kailing/partitionjob/blob/master/pom.xml
分區job主要依賴為:spring-batch-integration,提供了遠程通訊的能力
第二步,Master節點數據分發
@Profile({"master", "mixed"})
    @Bean
    public Job job(@Qualifier("masterStep") Step masterStep) {
        return jobBuilderFactory.get("endOfDayjob")
                .start(masterStep)
                .incrementer(new BatchIncrementer())
                .listener(new JobListener())
                .build();
    }

    @Bean("masterStep")
    public Step masterStep(@Qualifier("slaveStep") Step slaveStep,
                           PartitionHandler partitionHandler,
                           DataSource dataSource) {
        return stepBuilderFactory.get("masterStep")
                .partitioner(slaveStep.getName(), new ColumnRangePartitioner(dataSource))
                .step(slaveStep)
                .partitionHandler(partitionHandler)
                .build();
    }
master節點關鍵部分是,他的Step需要設置從節點Step的Name,和一個數據分區器,數據分區器需要實現Partitioner接口,它返回一個Map<String, ExecutionContext>的數據結構,這個結構完整的描述了每個從節點需要處理的分區片段。ExecutionContext保存了從節點要處理的數據邊界,當然,ExecutionContext里的參數是根據你的業務來的,我這里,已數據ID為邊界劃分了每個區。具體的Partitioner實現如下:
/**
 * Created by kl on 2018/3/1.
 * Content :根據數據ID分片
 */
public class ColumnRangePartitioner implements Partitioner {
    private JdbcOperations jdbcTemplate;
    ColumnRangePartitioner(DataSource dataSource){
        this.jdbcTemplate = new JdbcTemplate(dataSource);
    }
    @Override
    public Map<String, ExecutionContext> partition(int gridSize) {
        int min = jdbcTemplate.queryForObject("SELECT MIN(arcid) from  kl_article", Integer.class);
        int max = jdbcTemplate.queryForObject("SELECT MAX(arcid) from  kl_article", Integer.class);
        int targetSize = (max - min) / gridSize + 1;
        Map<String, ExecutionContext> result = new HashMap<String, ExecutionContext>();
        int number = 0;
        int start = min;
        int end = start + targetSize - 1;

        while (start <= max) {
            ExecutionContext value = new ExecutionContext();
            result.put("partition" + number, value);

            if (end >= max) {
                end = max;
            }
            value.putInt("minValue", start);
            value.putInt("maxValue", end);
            start += targetSize;
            end += targetSize;
            number++;
        }
        return result;
    }
}
第三步,Integration配置
spring batch Integration提供了遠程分區通訊能力,Spring Integration擁有豐富的通道適配器(例如JMS和AMQP),基于ActiveMQ,RabbitMQ等中間件都可以實現遠程分區處理。本文使用RabbitMQ來做為通訊的中間件。關于RabbitMQ的安裝等不在本篇范圍,下面代碼描述了如何配置MQ連接,以及spring batch分區相關隊列,消息適配器等。
/**
 * Created by kl on 2018/3/1.
 * Content :遠程分區通訊
 */
@Configuration
@ConfigurationProperties(prefix = "spring.rabbit")
public class IntegrationConfiguration {
    private String host;
    private Integer port=5672;
    private String username;
    private String password;
    private String virtualHost;
    private int connRecvThreads=5;
    private int channelCacheSize=10;

    @Bean
    public ConnectionFactory connectionFactory() {
        CachingConnectionFactory connectionFactory = new CachingConnectionFactory(host, port);
        connectionFactory.setUsername(username);
        connectionFactory.setPassword(password);
        connectionFactory.setVirtualHost(virtualHost);
        ThreadPoolTaskExecutor executor = new ThreadPoolTaskExecutor();
        executor.setCorePoolSize(connRecvThreads);
        executor.initialize();
        connectionFactory.setExecutor(executor);
        connectionFactory.setPublisherConfirms(true);
        connectionFactory.setChannelCacheSize(channelCacheSize);
        return connectionFactory;
    }
    @Bean
    public MessagingTemplate messageTemplate() {
        MessagingTemplate messagingTemplate = new MessagingTemplate(outboundRequests());
        messagingTemplate.setReceiveTimeout(60000000l);
        return messagingTemplate;
    }
    @Bean
    public DirectChannel outboundRequests() {
        return new DirectChannel();
    }
    @Bean
    @ServiceActivator(inputChannel = "outboundRequests")
    public AmqpOutboundEndpoint amqpOutboundEndpoint(AmqpTemplate template) {
        AmqpOutboundEndpoint endpoint = new AmqpOutboundEndpoint(template);
        endpoint.setExpectReply(true);
        endpoint.setOutputChannel(inboundRequests());
        endpoint.setRoutingKey("partition.requests");
        return endpoint;
    }
    @Bean
    public Queue requestQueue() {
        return new Queue("partition.requests", false);
    }

    @Bean
    @Profile({"slave","mixed"})
    public AmqpInboundChannelAdapter inbound(SimpleMessageListenerContainer listenerContainer) {
        AmqpInboundChannelAdapter adapter = new AmqpInboundChannelAdapter(listenerContainer);
        adapter.setOutputChannel(inboundRequests());
        adapter.afterPropertiesSet();
        return adapter;
    }

    @Bean
    public SimpleMessageListenerContainer container(ConnectionFactory connectionFactory) {
        SimpleMessageListenerContainer container = new SimpleMessageListenerContainer(connectionFactory);
        container.setQueueNames("partition.requests");
        container.setAutoStartup(false);
        return container;
    }

    @Bean
    public PollableChannel outboundStaging() {
        return new NullChannel();
    }

    @Bean
    public QueueChannel inboundRequests() {
        return new QueueChannel();
    }
第四步,從節點接收分區信息并處理
@Bean
    @Profile({"slave","mixed"})
    @ServiceActivator(inputChannel = "inboundRequests", outputChannel = "outboundStaging")
    public StepExecutionRequestHandler stepExecutionRequestHandler() {
        StepExecutionRequestHandler stepExecutionRequestHandler = new StepExecutionRequestHandler();
        BeanFactoryStepLocator stepLocator = new BeanFactoryStepLocator();
        stepLocator.setBeanFactory(this.applicationContext);
        stepExecutionRequestHandler.setStepLocator(stepLocator);
        stepExecutionRequestHandler.setJobExplorer(this.jobExplorer);
        return stepExecutionRequestHandler;
    }
    @Bean("slaveStep")
    public Step slaveStep(MyProcessorItem processorItem,
                          JpaPagingItemReader reader) {
        CompositeItemProcessor itemProcessor = new CompositeItemProcessor();
        List<ItemProcessor> processorList = new ArrayList<>();
        processorList.add(processorItem);
        itemProcessor.setDelegates(processorList);
        return stepBuilderFactory.get("slaveStep")
                .<Article, Article>chunk(1000)//事務提交批次
                .reader(reader)
                .processor(itemProcessor)
                .writer(new PrintWriterItem())
                .build();
    }
從節點最關鍵的地方在于StepExecutionRequestHandler,他會接收MQ消息中間件中的消息,并從分區信息中獲取到需要處理的數據邊界,如下ItemReader:
@Bean(destroyMethod = "")
    @StepScope
    public JpaPagingItemReader<Article> jpaPagingItemReader(
            @Value("#{stepExecutionContext['minValue']}") Long minValue,
            @Value("#{stepExecutionContext['maxValue']}") Long maxValue) {
        System.err.println("接收到分片參數["+minValue+"->"+maxValue+"]");
        JpaPagingItemReader<Article> reader = new JpaPagingItemReader<>();
        JpaNativeQueryProvider queryProvider = new JpaNativeQueryProvider<>();
        String sql = "select * from kl_article where  arcid >= :minValue and arcid <= :maxValue";
        queryProvider.setSqlQuery(sql);
        queryProvider.setEntityClass(Article.class);
        reader.setQueryProvider(queryProvider);
        Map queryParames= new HashMap();
        queryParames.put("minValue",minValue);
        queryParames.put("maxValue",maxValue);
        reader.setParameterValues(queryParames);
        reader.setEntityManagerFactory(entityManagerFactory);
        return  reader;
    }
中的minValuemin,maxValue,正是前文中Master節點分區中設置的值
如上,已經完成了整個spring batch 遠程分區處理的實例,需要注意的是,一個實例,即可主可從可主從,是有spring profile來控制的,細心的人可能會發現@Profile({"master", "mixed"})等注解,所以如果你在測試的時候,別忘了在spring boot中配置好spring.profiles.active=slave等。
看完上述內容,你們掌握spring batch中基于RabbitMQ遠程分區Step是怎樣的的方法了嗎?如果還想學到更多技能或想了解更多相關內容,歡迎關注億速云行業資訊頻道,感謝各位的閱讀!
免責聲明:本站發布的內容(圖片、視頻和文字)以原創、轉載和分享為主,文章觀點不代表本網站立場,如果涉及侵權請聯系站長郵箱:is@yisu.com進行舉報,并提供相關證據,一經查實,將立刻刪除涉嫌侵權內容。