您好,登錄后才能下訂單哦!
您好,登錄后才能下訂單哦!
本篇內容主要講解“Android APT怎么使用”,感興趣的朋友不妨來看看。本文介紹的方法操作簡單快捷,實用性強。下面就讓小編來帶大家學習“Android APT怎么使用”吧!
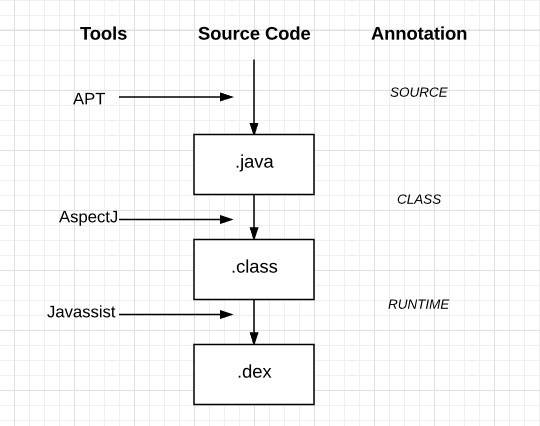
安卓AOP三劍客: APT, AspectJ, Javassist

Android APT
APT(Annotation Processing Tool 的簡稱),可以在代碼編譯期解析注解,并且生成新的 Java 文件,減少手動的代碼輸入。現在有很多主流庫都用上了 APT,比如 Dagger2, ButterKnife, EventBus3 等
代表框架:
DataBinding
Dagger2
ButterKnife
EventBus3
DBFlow
AndroidAnnotation
使用姿勢
1,在android工程中,創建一個java的Module,寫一個類繼承AbstractProcessor
@AutoService(Processor.class) // javax.annotation.processing.IProcessor @SupportedSourceVersion(SourceVersion.RELEASE_7) //java @SupportedAnnotationTypes({ // 標注注解處理器支持的注解類型 "com.annotation.SingleDelegate", "com.annotation.MultiDelegate" }) public class AnnotationProcessor extends AbstractProcessor { public static final String PACKAGE = "com.poet.delegate"; public static final String CLASS_DESC = "From poet compiler"; public Filer filer; //文件相關的輔助類 public Elements elements; //元素相關的輔助類 public Messager messager; //日志相關的輔助類 public Types types; @Override public boolean process(Set<? extends TypeElement> set, RoundEnvironment roundEnvironment) { filer = processingEnv.getFiler(); elements = processingEnv.getElementUtils(); messager = processingEnv.getMessager(); types = processingEnv.getTypeUtils(); new SingleDelegateProcessor().process(set, roundEnvironment, this); new MultiDelegateProcessor().process(set, roundEnvironment, this); return true; } }2,在繼承AbstractProcessor類中的process方法,處理我們自定義的注解,生成代碼:
public class SingleDelegateProcessor implements IProcessor { @Override public void process(Set<? extends TypeElement> set, RoundEnvironment roundEnv, AnnotationProcessor abstractProcessor) { // 查詢注解是否存在 Set<? extends Element> elementSet = roundEnv.getElementsAnnotatedWith(SingleDelegate.class); Set<TypeElement> typeElementSet = ElementFilter.typesIn(elementSet); if (typeElementSet == null || typeElementSet.isEmpty()) { return; } // 循環處理注解 for (TypeElement typeElement : typeElementSet) { if (!(typeElement.getKind() == ElementKind.INTERFACE)) { // 只處理接口類型 continue; } // 處理 SingleDelegate,只處理 annotation.classNameImpl() 不為空的注解 SingleDelegate annotation = typeElement.getAnnotation(SingleDelegate.class); if ("".equals(annotation.classNameImpl())) { continue; } Delegate delegate = annotation.delegate(); // 添加構造器 MethodSpec.Builder constructorBuilder = MethodSpec.constructorBuilder() .addModifiers(Modifier.PUBLIC); // 創建類名相關 class builder TypeSpec.Builder builder = ProcessUtils.createTypeSpecBuilder(typeElement, annotation.classNameImpl()); // 處理 delegate builder = ProcessUtils.processDelegate(typeElement, builder, constructorBuilder, delegate); // 檢查是否繼承其它接口 builder = processSuperSingleDelegate(abstractProcessor, builder, constructorBuilder, typeElement); // 完成構造器 builder.addMethod(constructorBuilder.build()); // 創建 JavaFile JavaFile javaFile = JavaFile.builder(AnnotationProcessor.PACKAGE, builder.build()).build(); try { javaFile.writeTo(abstractProcessor.filer); } catch (IOException e) { e.printStackTrace(); } } }3,在項目Gradle中添加 annotationProcessor project 引用
compile project(':apt-delegate-annotation') annotationProcessor project(':apt-delegate-compiler')4,如果有自定義注解的話,創建一個java的Module,專門放入自定義注解。項目與apt Module都需引用自定義注解Module
4-1,主工程:
compile project(':apt-delegate-annotation') annotationProcessor project(':apt-delegate-compiler')4-2,apt Module:
compile project(':apt-delegate-annotation') compile 'com.google.auto.service:auto-service:1.0-rc2' compile 'com.squareup:javapoet:1.4.0'5,生成的源代碼在build/generated/source/apt下可以看到

難點
就apt本身來說沒有任何難點可言,難點一在于設計模式和解耦思想的靈活應用,二在與代碼生成的繁瑣,你可以手動字符串拼接,當然有更高級的玩法用squareup的javapoet,用建造者的模式構建出任何你想要的源代碼
優點
它的強大之處無需多言,看代表框架的源碼,你可以學到很多新姿勢。總的一句話:它可以做任何你不想做的繁雜的工作,它可以幫你寫任何你不想重復代碼。懶人福利,老司機必備神技,可以提高車速,讓你以任何姿勢漂移。它可以生成任何源代碼供你在任何地方使用,就像劍客的劍,快疾如風,無所不及
我想稍微研究一下,APT還可以在哪些地方使用,比如:Repository層?
APT在Repository層的嘗試
了解APT與簡單學習之后,搭建Repository層時,發現有一些簡單,重復模版的代碼
每一次添加新接口都需要簡單地修改很多地方,能不能把一部分代碼自動生成,減少改動的次數呢?
Repository層

IRemoteDataSource, RemoteDataSourceImpl
遠程數據源,屬于網絡請求相關
ILocalDataSource, LocalDataSourceImpl
本地數據源,屬于本地數據持久化相關
IRepository,RepositoryImpl
倉庫代理類,代理遠程數據源與本地數據源
Repository層APT設計思路
發現在具體實現類中,大多都是以代理類的形式調用:方法中調用代理對象,方法名稱與參數,返回值類型都相同。顯然可以進行APT的嘗試
簡單的情況,具體實現類中只有一個代理對象
復雜的情況,有多個代理對象,方法內并有一些變化
期望結果:
把RemoteDataSourceImpl自動化生成
把LocalDataSourceImpl自動化生成
把RepositoryImpl自動化生成
自定義注解設計
要想具體實現類自動生成,首先要知道需要什么:
方便自動生成java文件的類庫
自動生成類名字是什么
需要注入的代理對象
讓代理對象代理的方法集
自動生成java文件的類庫,可以使用 squareup javapoet
自動生成類名字,代理對象,方法集需要通過自定義注解配置參數的形成,在AbstractProcessor中獲取
Delegate
@Retention(RetentionPolicy.SOURCE) @Target(ElementType.TYPE) public @interface Delegate { /** * delegate class package */ String delegatePackage(); /** * delegate class name */ String delegateClassName(); /** * delegate simple name */ String delegateSimpleName(); }SingleDelegate
@Retention(RetentionPolicy.SOURCE) @Target(ElementType.TYPE) public @interface SingleDelegate { /** * impl class name */ String classNameImpl(); /** * delegate data */ Delegate delegate(); }MultiDelegate
@Retention(RetentionPolicy.SOURCE) @Target(ElementType.TYPE) public @interface MultiDelegate { /** * impl class name */ String classNameImpl(); /** * delegate list */ Delegate[] Delegates(); }處理自定義的注解、生成代碼
AnnotationProcessor
@AutoService(Processor.class) // javax.annotation.processing.IProcessor @SupportedSourceVersion(SourceVersion.RELEASE_7) //java @SupportedAnnotationTypes({ // 標注注解處理器支持的注解類型 "com.annotation.SingleDelegate", "com.annotation.MultiDelegate" }) public class AnnotationProcessor extends AbstractProcessor { public static final String PACKAGE = "com.poet.delegate"; public static final String CLASS_DESC = "From poet compiler"; public Filer filer; //文件相關的輔助類 public Elements elements; //元素相關的輔助類 public Messager messager; //日志相關的輔助類 public Types types; @Override public boolean process(Set<? extends TypeElement> set, RoundEnvironment roundEnvironment) { filer = processingEnv.getFiler(); elements = processingEnv.getElementUtils(); messager = processingEnv.getMessager(); types = processingEnv.getTypeUtils(); new SingleDelegateProcessor().process(set, roundEnvironment, this); new MultiDelegateProcessor().process(set, roundEnvironment, this); return true; } }到此,相信大家對“Android APT怎么使用”有了更深的了解,不妨來實際操作一番吧!這里是億速云網站,更多相關內容可以進入相關頻道進行查詢,關注我們,繼續學習!
免責聲明:本站發布的內容(圖片、視頻和文字)以原創、轉載和分享為主,文章觀點不代表本網站立場,如果涉及侵權請聯系站長郵箱:is@yisu.com進行舉報,并提供相關證據,一經查實,將立刻刪除涉嫌侵權內容。