您好,登錄后才能下訂單哦!
您好,登錄后才能下訂單哦!
本篇內容主要講解“HTML5怎么實現歌詞同步的效果 ”,感興趣的朋友不妨來看看。本文介紹的方法操作簡單快捷,實用性強。下面就讓小編來帶大家學習“HTML5怎么實現歌詞同步的效果 ”吧!
HTML5的最強大之處莫過于對媒體文件的處理,如利用一個簡單的vedio標簽就可以實現視頻播放。類似地,在HTML5中也有對應的處理音頻文件的標簽,那就是audio標簽
HTML5出來這么久了,但是關于它里面的audio標簽也就用過那么一次,當然還僅僅只是把這個標簽插入到了頁面中。這次呢就剛好趁著幫朋友做幾個頁面,拿這個audio標簽來練練手。
首先你需要向頁面中插入一個audio標簽,注意這里最好不要設置loop='loop',這個屬性使用來設置循環播放的,因為到后面需要使用ended屬性的時候,如果loop被設置為loop的話,ended屬性將一直是false。
autoplay='autoplay'設置頁面加載后自動播放音樂,preload和autoplay屬性的作用是一樣的,如果標簽中出現了autoplay屬性,那么preload屬性將被忽略。
controls='controls'設置顯示音樂的控制條。
XML/HTML Code復制內容到剪貼板
<audio src="music/Yesterday Once More.mp3" id="aud" autoplay="autoplay" controls="controls" preload="auto">
您的瀏覽器不支持audio屬性,請更換瀏覽器在進行瀏覽。
</audio>
有了這個標簽之后,那么恭喜你,你的頁面已經可以播放音樂了。但是這樣會不會顯得頁面太過于單調了,于是我又給頁面添加了一些東西,讓歌詞能夠同步的顯示在頁面上,還能夠選擇要播放的音樂。那么先要做成這樣的效果,我們就得要去下載一些lrc格式的歌詞文件,然后你需要把這些音樂格式化一番。因為剛開始的音樂文件是這樣的

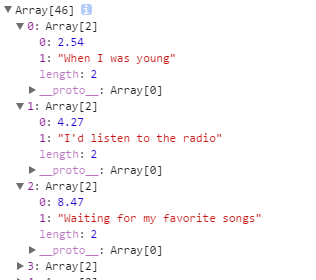
我們需要把每一句歌詞插入到一個二位數組里面,經過格式化之后歌詞就變成這樣的格式了
這里附上格式化歌詞的代碼

XML/HTML Code復制內容到剪貼板
//歌詞同步部分
function parseLyric(text) {
//將文本分隔成一行一行,存入數組
var lines = text.split('\n'),
//用于匹配時間的正則表達式,匹配的結果類似[xx:xx.xx]
pattern = /\[\d{2}:\d{2}.\d{2}\]/g,
//保存最終結果的數組
result = [];
//去掉不含時間的行
while (!pattern.test(lines[0])) {
lineslines = lines.slice(1);
};
//上面用'\n'生成生成數組時,結果中最后一個為空元素,這里將去掉
lines[lines.length - 1].length === 0 && lines.pop();
lines.forEach(function(v /*數組元素值*/ , i /*元素索引*/ , a /*數組本身*/ ) {
//提取出時間[xx:xx.xx]
var time = v.match(pattern),
//提取歌詞
vvalue = v.replace(pattern, '');
//因為一行里面可能有多個時間,所以time有可能是[xx:xx.xx][xx:xx.xx][xx:xx.xx]的形式,需要進一步分隔
time.forEach(function(v1, i1, a1) {
//去掉時間里的中括號得到xx:xx.xx
var t = v1.slice(1, -1).split(':');
//將結果壓入最終數組
result.push([parseInt(t[0], 10) * 60 + parseFloat(t[1]), value]);
});
});
//最后將結果數組中的元素按時間大小排序,以便保存之后正常顯示歌詞
result.sort(function(a, b) {
return a[0] - b[0];
});
return result;
}
到了這里我們就能夠很容易的使用每首音樂的歌詞了,我們需要有一個function來獲得歌詞,并且讓他同步的顯示在頁面上,能夠正常的切換音樂。下面附上代碼。
XML/HTML Code復制內容到剪貼板
function fn(sgname){
$.get('music/'+sgname+'.lrc',function(data){
var str=parseLyric(data);
for(var i=0,li;i<str.length;i++){
li=$('<li>'+str[i][1]+'</li>');
$('#gc ul').append(li);
}
$('#aud')[0].ontimeupdate=function(){//視屏 音頻當前的播放位置發生改變時觸發
for (var i = 0, l = str.length; i < l; i++) {
if (this.currentTime /*當前播放的時間*/ > str[i][0]) {
//顯示到頁面
$('#gc ul').css('top',-i*40+200+'px'); //讓歌詞向上移動
$('#gc ul li').css('color','#fff');
$('#gc ul li:nth-child('+(i+1)+')').css('color','red'); //高亮顯示當前播放的哪一句歌詞
}
}
if(this.ended){ //判斷當前播放的音樂是否播放完畢
var songslen=$('.songs_list li').length;
for(var i= 0,val;i<songslen;i++){
val=$('.songs_list li:nth-child('+(i+1)+')').text();
if(val==sgname){
i=(i==(songslen-1))?1:i+2;
sgname=$('.songs_list li:nth-child('+i+')').text(); //音樂播放完畢之后切換下一首音樂
$('#gc ul').empty(); //清空歌詞
$('#aud').attr('src','music/'+sgname+'.mp3');
fn(sgname);
return;
}
}
}
};
});
} fn($('.songs_list li:nth-child(1)').text());
那么到了這里你的音樂歌詞已經能夠正常的同步顯示在頁面上了。不過還缺少一個東西,就是一個音樂的列表,我希望能夠點擊這個列表里的音樂,從而播放該音樂,下面附上代碼。
HTML代碼
XML/HTML Code復制內容到剪貼板
<div class="songs_cnt">
<ul class="songs_list">
<li>Yesterday Once More</li>
<li>You Are Beautiful</li>
</ul>
<button class="sel_song">點<br/><br/>我</button>
</div>
<div id="gc">
<ul></ul>
</div>
css代碼
XML/HTML Code復制內容到剪貼板
#gc{
width: 400px;
height: 400px;
background: transparent;
margin: 100px auto;
color: #fff;
font-size: 18px;
overflow: hidden;
position: relative;
}
#gc ul{
position: absolute;
top: 200px;
}
#gc ul li{
text-align: center;
height: 40px;
line-height: 40px;
}
.songs_cnt{
float: left;
margin-top: 200px;
position: relative;
}
.songs_list{
background-color: rgba(0,0,0,.2);
border-radius: 5px;
float: left;
width: 250px;
padding: 15px;
margin-left: -280px;
}
.songs_list li{
height: 40px;
line-height: 40px;
font-size: 16px;
color: rgba(255,255,255,.8);
cursor: pointer;
}
.songs_list li:hover{
font-size: 20px;
color: rgba(255,23,140,.6);
}
.sel_song{
position: absolute;
top: 50%;
width: 40px;
height: 80px;
margin-top: -40px;
font-size: 16px;
text-align: center;
background-color: transparent;
border: 1px solid #2DCB70;
font-weight: bold;
cursor: pointer;
border-radius: 3px;
font-family: sans-serif;
transition:all 2s;
-moz-transition:all 2s;
-webkit-transition:all 2s;
-o-transition:all 2s;
}
.sel_song:hover{
color: #fff;
background-color: #2DCB70;
}
.songs_list li.active{
color: #f00;
}
js代碼
XML/HTML Code復制內容到剪貼板
$('.songs_list li:nth-child(1)').addClass('active');
$('.songs_cnt').mouseenter(function () {
var e=event||window.event;
var tag= e.target||e.srcElement;
if(tag.nodeName=='BUTTON'){
$('.songs_list').animate({'marginLeft':'0px'},'slow');
}
});
$('.songs_cnt').mouseleave(function () {
$('.songs_list').animate({'marginLeft':'-280px'},'slow');
});
$('.songs_list li').each(function () {
$(this).click(function () {
$('#aud').attr('src','music/'+$(this).text()+'.mp3');
$('#gc ul').empty();
fn($(this).text());
$('.songs_list li').removeClass('active');
$(this).addClass('active');
});
})
到此,相信大家對“HTML5怎么實現歌詞同步的效果 ”有了更深的了解,不妨來實際操作一番吧!這里是億速云網站,更多相關內容可以進入相關頻道進行查詢,關注我們,繼續學習!
免責聲明:本站發布的內容(圖片、視頻和文字)以原創、轉載和分享為主,文章觀點不代表本網站立場,如果涉及侵權請聯系站長郵箱:is@yisu.com進行舉報,并提供相關證據,一經查實,將立刻刪除涉嫌侵權內容。