您好,登錄后才能下訂單哦!
您好,登錄后才能下訂單哦!
這篇文章給大家分享的是有關HTML5如何實現旋轉立體魔方3D模型的內容。小編覺得挺實用的,因此分享給大家做個參考,一起跟隨小編過來看看吧。
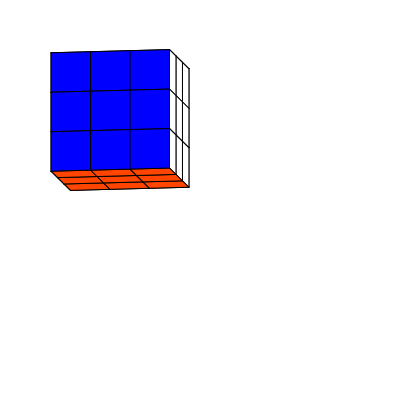
下面是預覽畫面。

制作流程
首先你需要下載Html5開源庫件lufylegend-1.4.0
魔方分為6個面,每個面由9個小矩形組成,現在我把每個小矩形當做一個類封裝起來,
因為現在建立的是一個3D魔方,所以要畫出每個小矩形,需要知道小矩形的4個定點,而這4個定點會根據空間的旋轉角度而變換,所以為了計算出這4個定點坐標,需要知道魔方繞x軸和z軸旋轉的角度。
所以,建立矩形類如下
function Rect(pointA,pointB,pointC,pointD,angleX,angleZ,color){
    base(this,LSprite,[]);
    this.pointZ=[(pointA[0]+pointB[0]+pointC[0]+pointD[0])/4,(pointA[1]+pointB[1]+pointC[1]+pointD[1])/4,(pointA[2]+pointB[2]+pointC[2]+pointD[2])/4];
    this.z = this.pointZ[2];
    this.pointA=pointA,this.pointB=pointB,this.pointC=pointC,this.pointD=pointD,this.angleX=angleX,this.angleZ=angleZ,this.color=color;
}

Rect.prototype.setAngle = function(a,b){
    this.angleX = a;
    this.angleZ = b;
    this.z=this.getPoint(this.pointZ)[2];
};
pointA,pointB,pointC,pointD是小矩形的四個頂點,angleX,angleZ分別是x軸和z軸旋轉的角度,color是小矩形的顏色。
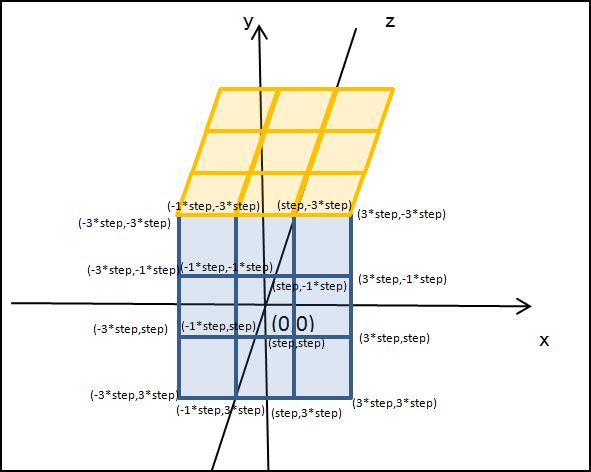
魔方分為6個面,先看一下最前面的一面,如果以立方體的中心作為3D坐標系的中心,那么9個小矩形的各個定點所對應的坐標如下圖所示

所以,前面這個面的9個小矩形可以由下面的代碼來建立
for(var x=0;x<3;x++){
    for(var y=0;y<3;y++){
        z = 3;
        var rect = new Rect([-3*step + x*2*step,-3*step + y*2*step,-3*step + z*2*step],[-step + x*2*step,-3*step + y*2*step,-3*step + z*2*step],[-step + x*2*step,-step + y*2*step,-3*step + z*2*step],[-3*step + x*2*step,-step + y*2*step,-3*step + z*2*step],0,0,"#FF0000");
        backLayer.addChild(rect);
    }
}
其中backLayer是一個LSprite類,step是半個小矩形的長,同樣的道理,可以也得到其他5個面。
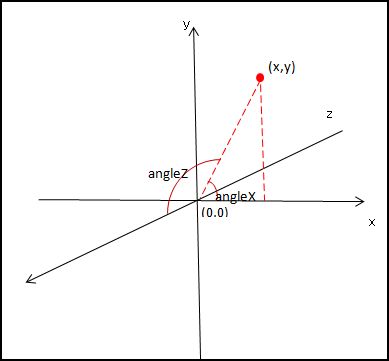
6個面都建立了,在繪制這6個面之前,首先要根據旋轉的角度來計算各個定點的坐標,看下面的圖

根據上面的圖,用下面的公式即可得到變換后的定點坐標
Rect.prototype.getPoint = function(p){
    var u2,v2,w2,u=p[0],v=p[1],w=p[2];
    u2 = u * Math.cos(this.angleX) - v * Math.sin(this.angleX);
    v2 = u * Math.sin(this.angleX) + v * Math.cos(this.angleX);
    w2 = w;
    u = u2; v = v2; w = w2;
    u2 = u;
    v2 = v * Math.cos(this.angleZ) - w * Math.sin(this.angleZ);
    w2 = v * Math.sin(this.angleZ) + w * Math.cos(this.angleZ);
    u = u2; v = v2; w = w2;
    return [u2,v2,w2];
};
最后根據小矩形的四個定點坐標,來繪制這個矩形,
Rect.prototype.draw = function(layer){
    this.graphics.clear();
    this.graphics.drawVertices(1,"#000000",[this.getPoint(this.pointA),this.getPoint(this.pointB),this.getPoint(this.pointC),this.getPoint(this.pointD)],true,this.color);
};
其中drawVertices是lufylegend.js庫件中LGraphics類的一個方法,它可以根據傳入的定點坐標數組來繪制一個多邊形。
最后,給出完整代碼,代碼很少,JS代碼一共91行。
一,index.html
<!DOCTYPE html> <html> <head> <meta charset="UTF-8"> <title>3D魔方</title> </head> <body> <div id="mylegend">loading……</div> <script type="text/javascript" src="../lufylegend-1.4.0.min.js"></script> <script type="text/javascript" src="./Main.js"></script> <script type="text/javascript" src="./Rect.js"></script> </body> </html>
二,Rect類
function Rect(pointA,pointB,pointC,pointD,angleX,angleZ,color){
    base(this,LSprite,[]);
    this.pointZ=[(pointA[0]+pointB[0]+pointC[0]+pointD[0])/4,(pointA[1]+pointB[1]+pointC[1]+pointD[1])/4,(pointA[2]+pointB[2]+pointC[2]+pointD[2])/4];
    this.z = this.pointZ[2];
    this.pointA=pointA,this.pointB=pointB,this.pointC=pointC,this.pointD=pointD,this.angleX=angleX,this.angleZ=angleZ,this.color=color;
}
Rect.prototype.draw = function(layer){
    this.graphics.clear();
    this.graphics.drawVertices(1,"#000000",[this.getPoint(this.pointA),this.getPoint(this.pointB),this.getPoint(this.pointC),this.getPoint(this.pointD)],true,this.color);
};
Rect.prototype.setAngle = function(a,b){
    this.angleX = a;
    this.angleZ = b;
    this.z=this.getPoint(this.pointZ)[2];
};
Rect.prototype.getPoint = function(p){
    var u2,v2,w2,u=p[0],v=p[1],w=p[2];
    u2 = u * Math.cos(this.angleX) - v * Math.sin(this.angleX);
    v2 = u * Math.sin(this.angleX) + v * Math.cos(this.angleX);
    w2 = w;
    u = u2; v = v2; w = w2;
    u2 = u;
    v2 = v * Math.cos(this.angleZ) - w * Math.sin(this.angleZ);
    w2 = v * Math.sin(this.angleZ) + w * Math.cos(this.angleZ);
    u = u2; v = v2; w = w2;
    return [u2,v2,w2];
};
三,Main.js
init(50,"mylegend",400,400,main);
var a = 0,b=0,backLayer,step = 20,key = null;
function main(){
    backLayer = new LSprite();
    addChild(backLayer);
    backLayer.x = 120,backLayer.y = 120;
    //后
    for(var x=0;x<3;x++){
        for(var y=0;y<3;y++){
            z = 0;
            var rect = new Rect([-3*step + x*2*step,-3*step + y*2*step,-3*step + z*2*step],[-step + x*2*step,-3*step + y*2*step,-3*step + z*2*step],[-step + x*2*step,-step + y*2*step,-3*step + z*2*step],[-3*step + x*2*step,-step + y*2*step,-3*step + z*2*step],0,0,"#FF4500");
            backLayer.addChild(rect);
        }
    }
    //前
    for(var x=0;x<3;x++){
        for(var y=0;y<3;y++){
            z = 3;
            var rect = new Rect([-3*step + x*2*step,-3*step + y*2*step,-3*step + z*2*step],[-step + x*2*step,-3*step + y*2*step,-3*step + z*2*step],[-step + x*2*step,-step + y*2*step,-3*step + z*2*step],[-3*step + x*2*step,-step + y*2*step,-3*step + z*2*step],0,0,"#FF0000");
            backLayer.addChild(rect);
        }
    }
    //上
    for(var x=0;x<3;x++){
        for(var z=0;z<3;z++){
            y = 0;
            var rect = new Rect([-3*step + x*2*step,-3*step + y*2*step,-3*step + z*2*step],[-step + x*2*step,-3*step + y*2*step,-3*step + z*2*step],[-step + x*2*step,-3*step + y*2*step,-step + z*2*step],[-3*step + x*2*step,-3*step + y*2*step,-step + z*2*step],0,0,"#FFFFFF");
            backLayer.addChild(rect);
        }
    }
    //下
    for(var x=0;x<3;x++){
        for(var z=0;z<3;z++){
            y = 3;
            var rect = new Rect([-3*step + x*2*step,-3*step + y*2*step,-3*step + z*2*step],[-step + x*2*step,-3*step + y*2*step,-3*step + z*2*step],[-step + x*2*step,-3*step + y*2*step,-step + z*2*step],[-3*step + x*2*step,-3*step + y*2*step,-step + z*2*step],0,0,"#FFFF00");
            backLayer.addChild(rect);
        }
    }
    //左
    for(var y=0;y<3;y++){
        for(var z=0;z<3;z++){
            x = 0;
            var rect = new Rect([-3*step + x*2*step,-3*step + y*2*step,-3*step + z*2*step],[-3*step + x*2*step,-3*step + y*2*step,-step + z*2*step],[-3*step + x*2*step,-step + y*2*step,-step + z*2*step],[-3*step + x*2*step,-step + y*2*step,-3*step + z*2*step],0,0,"#008000");
            backLayer.addChild(rect);
        }
    }
    //右
    for(var y=0;y<3;y++){
        for(var z=0;z<3;z++){
            x = 3;
            var rect = new Rect([-3*step + x*2*step,-3*step + y*2*step,-3*step + z*2*step],[-3*step + x*2*step,-3*step + y*2*step,-step + z*2*step],[-3*step + x*2*step,-step + y*2*step,-step + z*2*step],[-3*step + x*2*step,-step + y*2*step,-3*step + z*2*step],0,0,"#0000FF");
            backLayer.addChild(rect);
        }
    }
    backLayer.addEventListener(LEvent.ENTER_FRAME,onframe);
}
function onframe(){
    a += 0.1 , b += 0.1;
    backLayer.childList = backLayer.childList.sort(function(a,b){return a.z - b.z;});
    for(key in backLayer.childList){
        backLayer.childList[key].setAngle(a,b);
        backLayer.childList[key].draw(backLayer);
   }
}
感謝各位的閱讀!關于“HTML5如何實現旋轉立體魔方3D模型”這篇文章就分享到這里了,希望以上內容可以對大家有一定的幫助,讓大家可以學到更多知識,如果覺得文章不錯,可以把它分享出去讓更多的人看到吧!
免責聲明:本站發布的內容(圖片、視頻和文字)以原創、轉載和分享為主,文章觀點不代表本網站立場,如果涉及侵權請聯系站長郵箱:is@yisu.com進行舉報,并提供相關證據,一經查實,將立刻刪除涉嫌侵權內容。