您好,登錄后才能下訂單哦!
您好,登錄后才能下訂單哦!
這篇文章主要講解了“怎么使用CSS實現中間鏤空的圖片遮罩效果”,文中的講解內容簡單清晰,易于學習與理解,下面請大家跟著小編的思路慢慢深入,一起來研究和學習“怎么使用CSS實現中間鏤空的圖片遮罩效果”吧!
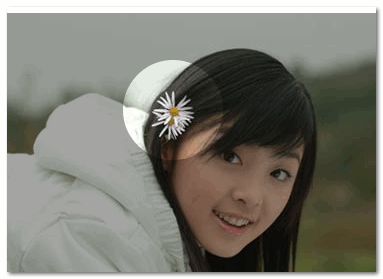
中間鏤空的圖片遮罩指的大概就是這樣一個效果:

鏤空一個洞的代碼
CSS Code復制內容到剪貼板
<div id="container" style="position: relative; margin: 550px 0 0 50px;">
<svg style="position: absolute;" width="400" height="280">
<defs>
<mask id="mask3">
<rect x="0" y="0" width="100%" height="100%" style="stroke:none; fill: #ccc"></rect>
<circle id="circle1" cx="100" cy="100" r="50" style="fill: #000" />
</mask>
</defs>
<rect x="0" y="0" width="100%" height="100%" style="stroke: none; fill: #ccc; mask: url(#mask3)"></rect>
</svg>
<img src="http://img6.cache.netease.com/cnews/2014/11/3/20141103100737855b7.jpg" />
</div>
鏤空多個洞的代碼
CSS Code復制內容到剪貼板
<div id="container" style="position: relative;">
<svg style="position: absolute;" width="400" height="280">
<defs>
<mask id="mask3">
<rect x="0" y="0" width="100%" height="100%" style="stroke:none; fill: #ccc"></rect>
<circle id="circle1" cx="100" cy="50" r="50" style="fill: #000" />
<circle id="circle1" cx="300" cy="100" r="50" style="fill: #000" />
<circle id="circle1" cx="100" cy="200" r="50" style="fill: #000" />
</mask>
</defs>
<rect x="0" y="0" width="100%" height="100%" style="stroke: none; fill: #ccc; mask: url(#mask3)"></rect>
</svg>
<img src="http://img6.cache.netease.com/cnews/2014/11/3/20141103100737855b7.jpg" />
</div>
CSS3 版
用 box-shadow ,代碼如下:
CSS Code復制內容到剪貼板
position: fixed;
left: 150px;
top: 35px;
width: 100px;
height: 100px;
border-radius: 100px;
box-shadow: rgba(0,0,0,.8) 0px 0px 0px 2005px;
z-index: 100;
缺點是只能鏤空一個洞。
感謝各位的閱讀,以上就是“怎么使用CSS實現中間鏤空的圖片遮罩效果”的內容了,經過本文的學習后,相信大家對怎么使用CSS實現中間鏤空的圖片遮罩效果這一問題有了更深刻的體會,具體使用情況還需要大家實踐驗證。這里是億速云,小編將為大家推送更多相關知識點的文章,歡迎關注!
免責聲明:本站發布的內容(圖片、視頻和文字)以原創、轉載和分享為主,文章觀點不代表本網站立場,如果涉及侵權請聯系站長郵箱:is@yisu.com進行舉報,并提供相關證據,一經查實,將立刻刪除涉嫌侵權內容。