您好,登錄后才能下訂單哦!
您好,登錄后才能下訂單哦!
這篇文章給大家介紹利用laravel框架怎么實現一個郵箱認證功能,內容非常詳細,感興趣的小伙伴們可以參考借鑒,希望對大家能有所幫助。
具體如下:
修改 User 模型,將 Laravel 自帶的郵箱認證功能集成到我們的程序中
<?php

namespace App\Models;

use Illuminate\Notifications\Notifiable;
use Illuminate\Auth\MustVerifyEmail as MustVerifyEmailTrait;
use Illuminate\Foundation\Auth\User as Authenticatable;
use Illuminate\Contracts\Auth\MustVerifyEmail as MustVerifyEmailContract;

class User extends Authenticatable implements MustVerifyEmailContract{
  use Notifiable, MustVerifyEmailTrait;

  /**
   * The attributes that are mass assignable.
   *
   * @var array
   */
  protected $fillable = [
    'name', 'email', 'password',
  ];

  /**
   * The attributes that should be hidden for arrays.
   *
   * @var array
   */
  protected $hidden = [
    'password', 'remember_token',
  ];

  /**
   * The attributes that should be cast to native types.
   *
   * @var array
   */
  protected $casts = [
    'email_verified_at' => 'datetime',
  ];
}
代碼詳解:

加載使用 MustVerifyEmail trait,打開 vendor/laravel/framework/src/Illuminate/Auth/MustVerifyEmail.php 文件,可以看到以下三個方法:
hasVerifiedEmail() 檢測用戶 Email 是否已認證;
markEmailAsVerified() 將用戶標示為已認證;
sendEmailVerificationNotification() 發送 Email 認證的消息通知,觸發郵件的發送。
得益于 PHP 的 trait 功能,User 模型在 use 以后,即可使用以上三個方法。

可以打開 vendor/laravel/framework/src/Illuminate/Contracts/Auth/MustVerifyEmail.php ,可以看到此文件為 PHP 的接口類,繼承此類將確保 User 遵守契約,擁有上面提到的三個方法。
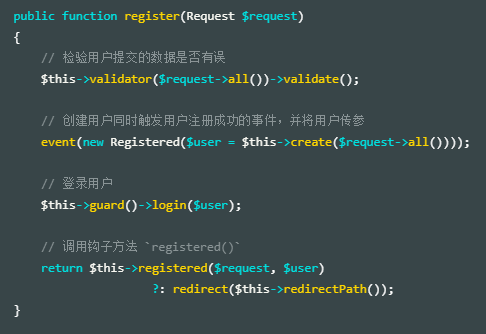
如果我們使用了 Laravel 自帶的 RegisterController ,控制器通過加載 Illuminate\Foundation\Auth\RegistersUsers trait 來引入框架的注冊功能,此時我們打開此 trait 來翻閱源碼并定位到 register(Request $request) 方法:

此方法處理了用戶提交表單后的邏輯,我們把重點放在 event(new Registered($user = $this->create($request->all())));,這里使用了 Laravel 的事件系統,觸發了 Registered 事件。
打開 app/Providers/EventServiceProvider.php 文件,此文件的 $listen 屬性里我們可以看到注冊了Registered 事件的監聽器:

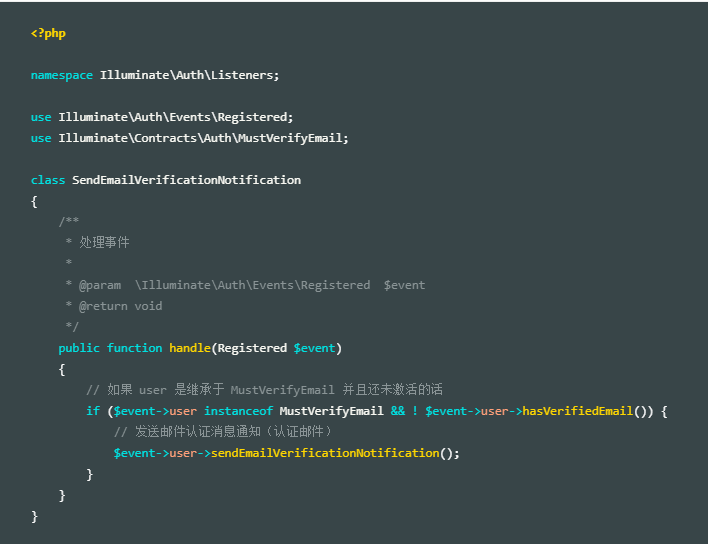
打開 SendEmailVerificationNotification 類,閱讀其源碼:
vendor/laravel/framework/src/Illuminate/Auth/Listeners/SendEmailVerificationNotification.php

可以看出 Laravel 默認已經為我們設置了郵件發送的邏輯
我們希望用戶認證郵箱后,才能使用網站。
我們將使用 Laravel 中間件 來過濾用戶的所有請求,如果用戶未認證的話,就跳轉到郵件認證提醒的頁面中
可以使用以下命令來新建一個中間件:
php artisan make:middleware EnsureEmailIsVerified
打開生成的文件并代入以下內容:
app/Http/Middleware/EnsureEmailIsVerified.php
<?php

namespace App\Http\Middleware;

use Closure;

class EnsureEmailIsVerified
{
  public function handle($request, Closure $next)
  {
    // 三個判斷:
    // 1. 如果用戶已經登錄
    // 2. 并且還未認證 Email
    // 3. 并且訪問的不是 email 驗證相關 URL 或者退出的 URL。
    if ($request->user() &&
      ! $request->user()->hasVerifiedEmail() &&
      ! $request->is('email/*', 'logout')) {

      // 根據客戶端返回對應的內容
      return $request->expectsJson()
            ? abort(403, 'Your email address is not verified.')
            : redirect()->route('verification.notice');
    }

    return $next($request);
  }
}
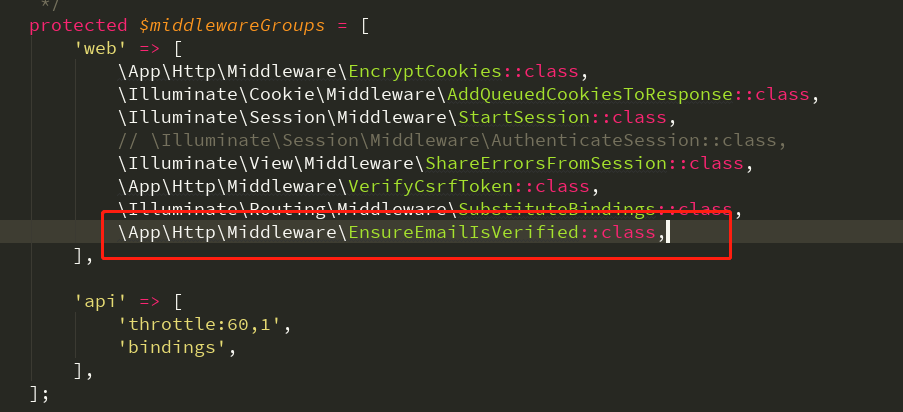
接下來注冊中間件,注冊的時機確保在 StartSession 后面即可:
app/Http/Kernel.php

此時如果我們沒有認證郵箱就會看到認證提醒,并且除了我們上面代碼中設置的 URL 外都會進入此頁面:

關于利用laravel框架怎么實現一個郵箱認證功能就分享到這里了,希望以上內容可以對大家有一定的幫助,可以學到更多知識。如果覺得文章不錯,可以把它分享出去讓更多的人看到。
免責聲明:本站發布的內容(圖片、視頻和文字)以原創、轉載和分享為主,文章觀點不代表本網站立場,如果涉及侵權請聯系站長郵箱:is@yisu.com進行舉報,并提供相關證據,一經查實,將立刻刪除涉嫌侵權內容。