您好,登錄后才能下訂單哦!
您好,登錄后才能下訂單哦!
本篇文章為大家展示了如何進行TokuDB的安裝,內容簡明扼要并且容易理解,絕對能使你眼前一亮,通過這篇文章的詳細介紹希望你能有所收獲。
一:緣由
監控系統產生的數據相對普通業務數據,具有寫入需求占絕對多數,讀取相對較少的特點。
之前使用的PMM監控系統,其docker版解決方案,內置的不僅不是其自家的percona分支數據庫,而且使用的是較舊的5.5官方分支版本。監控了6個實例的庫和主機后。3周后就占用了9GB的空間。
欣慰的是,Percona公司考慮到這個情況,將會自動根據PMM服務器的硬盤可用容量大小自動定期刪除備份的歷史數據。
對一個DBA而言,需要關注到一個庫的歷史負載情況,方便同比環比進行硬件擴容規劃。最起碼要2年的完整數據吧。
二:解決方法,
采用高壓縮的TokuDB引擎進行壓縮存儲歷史數據。
TokuDB is a highly scalable, zero-maintenance downtime MySQL storage engine that delivers indexing-based query acceleration, improved replication performance, unparalleled compression, and live schema modification. The TokuDB storage engine is a scalable, ACID and MVCC compliant storage engine that provides indexing-based query improvements, offers online schema modifications, and reduces slave lag for both hard disk drives and flash memory.
This storage engine is specifically designed for high performance on write-intensive workloads which is achieved with Fractal Tree indexing.
三:安裝步驟
tokudb既可以在官方社區版本的MySQL上啟用,也可以在percona分區上啟用,考慮到要見識下percona分支版本相對官方版本支持較多的監控特性, 這次使用percona-mysql-server版本
安裝前準備
#systemctl
stop firewalld  #停掉系統防火墻
#systemctl mask firewalld  #屏蔽防火墻自啟動
#setenforce 0              #關閉SELinux
#sed -i 's/Enforcing/Permissive/g' /etc/selinux/config  #永久關閉SELinux
#創建percona軟件源
#cat>/etc/yum.repos.d/percona-release.repo<<EOF
    [percona-release-x86_64]
        name = Percona-Release
YUM repository - x86_64
        baseurl = http://repo.percona.com/release/7Server/RPMS/x86_64
        enabled = 1
        gpgcheck = 1
        gpgkey = file:///etc/pki/rpm-gpg/RPM-GPG-KEY-Percona

       [percona-release-noarch]
       name = Percona-Release
YUM repository - noarch
       baseurl = http://repo.percona.com/release/7Server/RPMS/noarch
       enabled = 1
       gpgcheck = 1
       gpgkey = file:///etc/pki/rpm-gpg/RPM-GPG-KEY-Percona

       [percona-release-source]
       name = Percona-Release
YUM repository - Source packages
       baseurl = http://repo.percona.com/release/7Server/SRPMS
       enabled = 0
       gpgcheck = 1
       gpgkey = file:///etc/pki/rpm-gpg/RPM-GPG-KEY-Percona
       EOF
創建軟件源倒是有個哏,本來Cent7的系統可以直接在網站上下載epel-release.rpm
進行安裝。但是FedoraServer26的版本與repo的自判斷特性不太兼容。這里我手動將
系統變量判斷手動改成了7Server,即與RHCE/Cent7使用同樣的源。
3.開始安裝
#安裝percona分支MySQL,和相關的備份與工具軟件
#yum -y install  percona-toolkit percona-xtrabackup
Percona-Server-server-57
#安裝依賴庫,這也是坑,fedora源中jemalloc是4.5版本,不兼容。需要手動安裝4.0版本以下的
大家如果用的CentOS/RHCE應該沒問題的。
#yum -y install ftp://rpmfind.net/linux/fedora/linux/releases/23/Everything/x86_64/os/Packages/j/jemalloc-3.6.0-9.fc23.x86_64.rpm
#安裝TokuDB引擎插件
#yum -y install Percona-Server-tokudb-57
#啟用插件(mysqld進程需要在運行狀態)
#ps-admin --enable-tokudb -u root -p
#systemctl restart mysqld
#ps-admin --enable-tokudb -u root -p
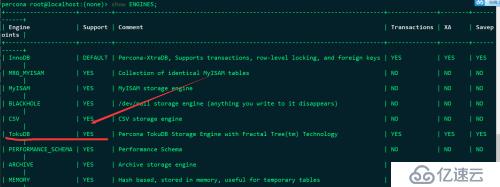
4. 到此為止,安裝結束了,大家可以在登入服務器查看

4.5:更改zabbix的建表語句,設置默認引擎為tokuDB,同時更改MySQL默認的引擎
#更改默認引擎:
#在my.cnf中添加
default_storage_engine=TokuDB
并重啟mysqld服務
#更改zabbix建表語句,設置默認引擎為tokuDB
#sed -i 's/InnoDB/TokuDB/g' /usr/share/zabbix-mysql/schema.sql
5.付:若jemalloc版本不對,會出下面錯誤,大家引以為戒
Checking TokuDB engine plugin status...
INFO: TokuDB engine
plugin is not installed.
Installing TokuDB  engine...
ERROR: Failed to install TokuDB engine plugin. Please check error log.
但是錯誤日志中沒有記錄。
嘗試通過手動添加的方式安裝插件:
mysql>INSTALL PLUGIN tokudb SONAME 'ha_tokudb.so';
ERROR 1126 (HY000):
退出MySQL客戶端查看錯誤代碼:
# perror 1126
輸出如下
(ER_CANT_OPEN_LIBRARY): Can't open shared library '%-.192s' (errno: %d %-.128s)
就是找不到庫文件,回去安裝3.6版本的jemalloc
注意:
vim /etc/sysconfig/mysql中應為:
LD_PRELOAD=/usr/lib64/libjemalloc.so.1
THP_SETTING=never
(my.cnf中注釋掉basedir=/usr/local/mysql)
上述內容就是如何進行TokuDB的安裝,你們學到知識或技能了嗎?如果還想學到更多技能或者豐富自己的知識儲備,歡迎關注億速云行業資訊頻道。
免責聲明:本站發布的內容(圖片、視頻和文字)以原創、轉載和分享為主,文章觀點不代表本網站立場,如果涉及侵權請聯系站長郵箱:is@yisu.com進行舉報,并提供相關證據,一經查實,將立刻刪除涉嫌侵權內容。