您好,登錄后才能下訂單哦!
您好,登錄后才能下訂單哦!
本篇文章為大家展示了Spring Cloud如何實現遠程調用負載均衡,內容簡明扼要并且容易理解,絕對能使你眼前一亮,通過這篇文章的詳細介紹希望你能有所收獲。
負載均衡
使用微服務后,為了能夠承擔高并發的壓力,同一個服務可能會啟動多個實例。這時候消費者就需要負載均衡,把請求分散到各個實例。負載均衡主要有兩種設計:
服務端負載均衡客戶端負載均衡
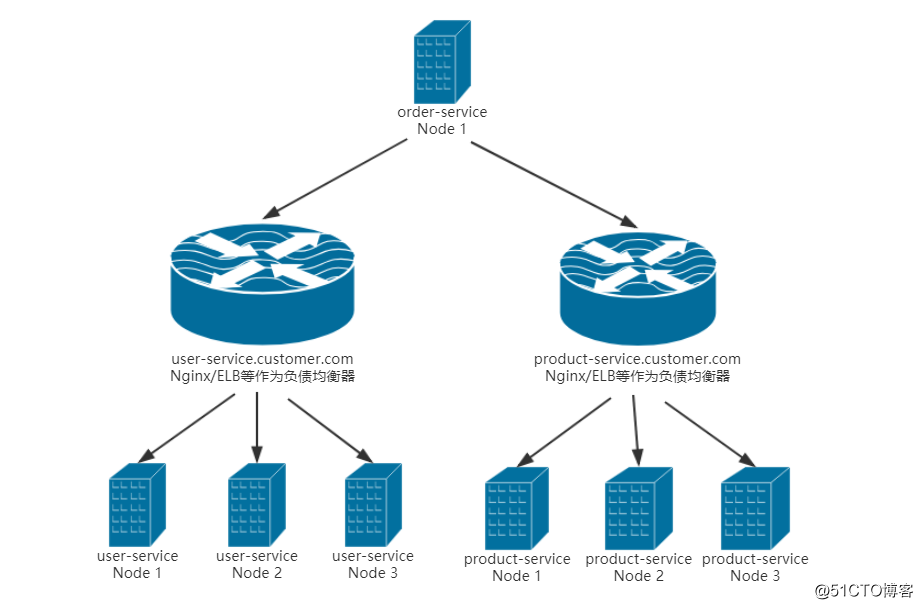
對于傳統的分布式服務來說,大多使用服務端負載均衡。一般會使用Nginx或者ELB等工具作為負載均衡器,如下圖:

傳統負載均衡
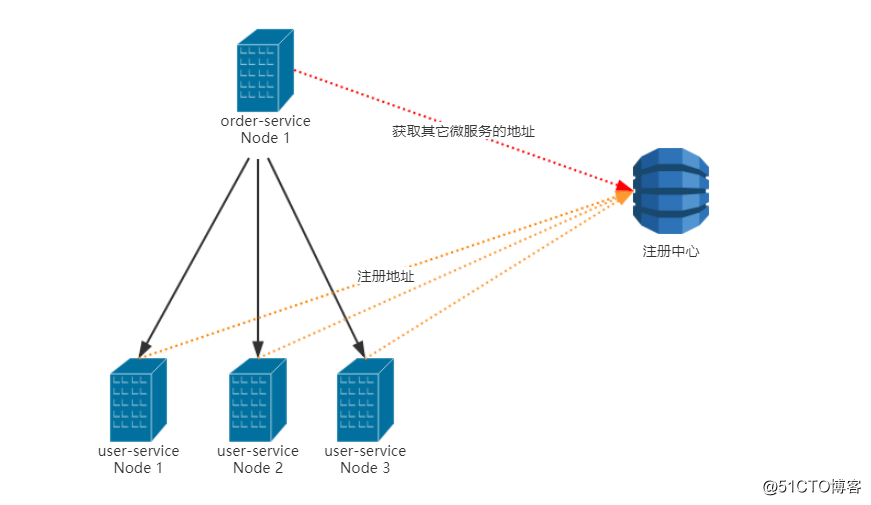
而在Spring Cloud中,使用的是「客戶端負載均衡」的方式,使用「Ribbon」組件來實現客戶端的負載均衡。只要引入了微服務注冊中心依賴,就會自動引入Ribbon依賴。客戶端負載均衡原理如下圖:

客戶端負載均衡
Ribbon的原理
Ribbon利用了RestTemplate的攔截器(接口是ClientHttpRequestInterceptor)機制,在攔截器中實現的負載均衡。負載均衡的基本實現就是利用從「服務注冊中心」獲取可用的服務地址列表,然后通過一定算法負載,決定使用哪一個服務地址來進行HTTP調用。
詳情可以查看LoadBalancerInterceptor這個類,位于org.springframework.cloud.client.loadbalancer包下。
使用Ribbon
首先定義一下生產者「service-user」,我這里使用容器啟動了多個生產者實例,每個實例具有不同的id,我的示例代碼里面啟動了兩個實例:
service-user-1
service-user-2
代碼:
@RestController
@RequestMapping
public class HelloController {

  @Value("${spring.cloud.consul.discovery.instanceId}")
  private String instanceId;

  @GetMapping("hello")
  public String hello() {
    return String.format("hello, this is %s", instanceId);
  }
}
然后對于消費者「service-order」,可以使用Java聲明式注解的方式來使用Ribbon,只需要在消費者給RestTemplate類型的Bean配上一個@LoadBalanced就可以了。然后再配置一下負載均衡策略:
@Configuration
public class RibbonConfig {

  @Bean
  @LoadBalanced
  public RestTemplate ribbonRestTemplate(){
    return new RestTemplate();
  }

  @Bean
  public IRule ribbonRule() {
    return new RandomRule(); // 隨機負載均衡
  }
}
然后就可以直接使用自動注入的RestTemplate類型的Bean了:
@RestController
@RequestMapping
public class HelloController {

  @Autowired
  RestTemplate restTemplate;

  @GetMapping("/ribbon/service-user")
  public String ribbonService(){
    return restTemplate.getForObject("http://service-user/hello", String.class);
  }
}
這個時候訪問消費者的/ribbon/service-user,刷新幾次,就會看到下面兩個隨機的響應:
hello, this is service-user-2
hello, this is service-user-1
負載均衡策略
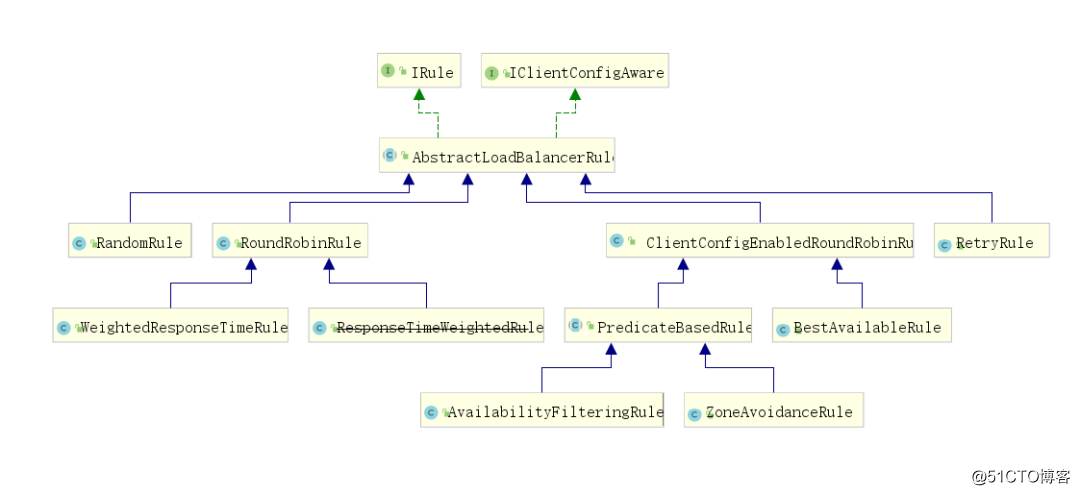
查看IRule接口的實現類,可以看到Ribbon的所有負載均衡策略,查看各實現類頂部的注釋可以看到它的具體策略:

負載均衡器
遠程調用
Spring Cloud提供了OpenFeign組件(以前叫Feign)來進行遠程的HTTP調用。它是對RestTemplate的一個封裝。
Feign是一個聲明式Web Service客戶端。使用Feign能讓編寫Web Service客戶端更加簡單。Spring Cloud對Feign進行了封裝,使其支持了Spring MVC標準注解和HttpMessageConverters。Feign可以與微服務注冊中心和Ribbon組合使用以支持負載均衡。
使用OpenFeign
第一步,引入依賴:
implementation 'org.springframework.cloud:spring-cloud-starter-openfeign'
第二步,啟動配置,在啟動類上添加@EnableFeignClients注解:
@SpringBootApplicationbr/>@EnableFeignClients
public class ServiceOrderApplication {
public static void main(String[] args) {
  SpringApplication.run(ServiceOrderApplication.class, args);
}
}
第三步:聲明調用接口,我這里案例是service-order調用service-user的/hello接口,這里的注解就跟Spring MVC的注解一致:
注意Feign在做POST請求的時候有一個小坑,詳情參考:SpringCloud Feign Post表單請求。
@FeignClient("service-user")
public interface UserClient {
  @GetMapping("hello")
  String getUserHello();
}
第四步:使用,注解使用@Autowired注解注入就可以了:
@RestController
@RequestMapping
public class HelloController {

  @Autowired
  UserClient userClient;

  @GetMapping("hello")
  public String hello() {
    return "hello, this is order service";
  }

  @GetMapping("userHello")
  public String user() {
    return userClient.getUserHello() + ", this is order-service";
  }
}
是不是看起來非常簡單?
OpenFeign集成Ribbon
前面我們提到,OpenFeign底層是對RestTemplate的一個封裝,而Ribbon是通過給RestTemplate添加過濾器來實現的,所以OpenFeign天生就自動集成了Ribbon,我們不需要任何額外的配置。
在上述代碼中,啟動后,可以訪問service-order的/userHello端口,不斷刷新,發現已經實現了負載均衡。
上述內容就是Spring Cloud如何實現遠程調用負載均衡,你們學到知識或技能了嗎?如果還想學到更多技能或者豐富自己的知識儲備,歡迎關注億速云行業資訊頻道。
免責聲明:本站發布的內容(圖片、視頻和文字)以原創、轉載和分享為主,文章觀點不代表本網站立場,如果涉及侵權請聯系站長郵箱:is@yisu.com進行舉報,并提供相關證據,一經查實,將立刻刪除涉嫌侵權內容。