溫馨提示×
您好,登錄后才能下訂單哦!
點擊 登錄注冊 即表示同意《億速云用戶服務條款》
您好,登錄后才能下訂單哦!
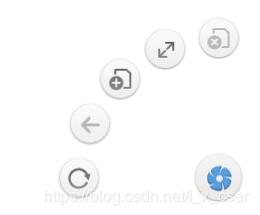
這篇文章主要介紹js+css實現扇形導航效果的方法,文中介紹的非常詳細,具有一定的參考價值,感興趣的小伙伴們一定要看完!
<!DOCTYPE html>
<html>
 <head>
 <meta charset="utf-8">
 <title>扇形導航</title>
 <style type="text/css">
  *{
  margin: 0;
  padding: 0;
  }
  html,body{
  height: 100%;
  overflow: hidden;
  }
  #wrap{
  height: 50px;
  width: 50px;
  /* background-color: pink; */
  position: fixed;
  right: 15px;
  bottom: 15px;
  /* overflow: hidden; */
  }
  #wrap>.home{
  height: 49px;
  width: 49px;
  /* margin: auto; */
  background: url(img/home.png) ;
  background-position: center;
  border-radius: 50%;
  transition: 1s;
  position: absolute;
  z-index: 1;
  }
  #wrap>.nav{
  height: 100%;
  position: relative;
  }
  #wrap>.nav>img{
  position: absolute ;
  right: 0px;
  bottom: 0px;
  margin: 4px;
  border-radius: 50% ;
  }
  .home:hover{
  transform: rotate(360);
  }
 </style>
 </head>
 <body>
 <div id="wrap">
  <div class="home"></div>
  <div class="nav">
  <img src="img/clos.png" >
  <img src="img/full.png" >
  <img src="img/open.png" >
  <img src="img/prev.png" >
  <img src="img/refresh.png" >
  </div>
 </div>
 </body>
 <script type="text/javascript">
 window.onload =function(){
  var homeEle = document.querySelector("#wrap>.home");
  var flag= true;
  var imgs =document.querySelectorAll("#wrap>.nav>img");


  function fn(){
  this.style.transition=0.3+"s";
  this.style.transform ="rotate(-360deg) scale(1)";
  this.style.opacity =1;
  this.removeEventListener("transitionend",fn);
  }

  for (var i=0;i<imgs.length;i++) {
  imgs[i].onclick =function(){
   this.style.transform ="rotate(-360deg) scale(2)";
   this.style.transition ="0.3s";
   this.style.opacity =0.1;

   this.addEventListener("transitionend",fn);
  }
  }

  homeEle.onclick =function(){
  console.log(imgs.length);
  if(flag){
   this.style.transform="rotate(-720deg) ";
   imgs.forEach((index,No)=>{
   imgs[No].style.right = getLocation(140,No*22.5/180*Math.PI).left+"px";
   imgs[No].style.bottom = getLocation(140,No*22.5/180*Math.PI).top+"px";
   imgs[No].style.transform ="rotate(-360deg) scale(1)";
   imgs[No].style.transition ="1s "+No*0.1+"s";
   });
  }else{
   this.style.transform="rotate(0)";
   imgs.forEach((index,No)=>{
   imgs[No].style.right = 0+"px";
   imgs[No].style.bottom = 0+"px";
   imgs[No].style.transform ="rotate(0deg) scale(1)";
   imgs[No].style.transition="1s "+(0.4-No*0.1)+"s";
   });
  }
  flag =!flag;
  }

  var getLocation =function(r,deg){
  var x =Math.round(r*Math.sin(deg));
  var y =Math.round(r*Math.cos(deg));
  return{left:x,top:y};
  }

 }

 </script>
</html>
以上是js+css實現扇形導航效果的方法的所有內容,感謝各位的閱讀!希望分享的內容對大家有幫助,更多相關知識,歡迎關注億速云行業資訊頻道!
免責聲明:本站發布的內容(圖片、視頻和文字)以原創、轉載和分享為主,文章觀點不代表本網站立場,如果涉及侵權請聯系站長郵箱:is@yisu.com進行舉報,并提供相關證據,一經查實,將立刻刪除涉嫌侵權內容。