溫馨提示×
您好,登錄后才能下訂單哦!
點擊 登錄注冊 即表示同意《億速云用戶服務條款》
您好,登錄后才能下訂單哦!
spring利用 batch實現讀取多個文件并將文件導入數據庫?很多新手對此不是很清楚,為了幫助大家解決這個難題,下面小編將為大家詳細講解,有這方面需求的人可以來學習下,希望你能有所收獲。
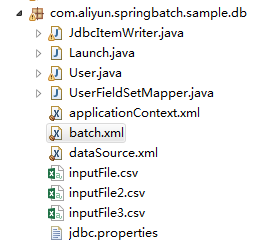
項目的目錄結構

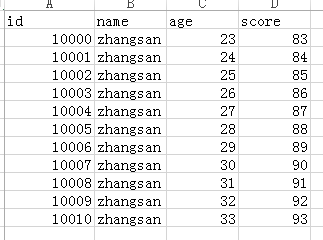
需要讀取文件的的數據格式

applicatonContext.xml的配置
<?xml version="1.0" encoding="UTF-8"?>
<beans xmlns="http://www.springframework.org/schema/beans"
xmlns:xsi="http://www.w3.org/2001/XMLSchema-instance" xmlns:p="http://www.springframework.org/schema/p"
xmlns:tx="http://www.springframework.org/schema/tx" xmlns:aop="http://www.springframework.org/schema/aop"
xmlns:context="http://www.springframework.org/schema/context"
xsi:schemaLocation="http://www.springframework.org/schema/beans
http://www.springframework.org/schema/beans/spring-beans-3.0.xsd
http://www.springframework.org/schema/tx
http://www.springframework.org/schema/tx/spring-tx-3.0.xsd
http://www.springframework.org/schema/aop
http://www.springframework.org/schema/aop/spring-aop-3.0.xsd
http://www.springframework.org/schema/context
http://www.springframework.org/schema/context/spring-context-3.0.xsd"
default-autowire="byName">
<context:component-scan base-package="com.aliyun.springbatch" />
<bean id="jobLauncher" class="org.springframework.batch.core.launch.support.SimpleJobLauncher">
<property name="jobRepository" ref="jobRepository"/>
</bean>
<bean id="jobRepository" class="org.springframework.batch.core.repository.support.MapJobRepositoryFactoryBean">
<property name="transactionManager" ref="transactionManager"></property>
</bean>
<bean id="transactionManager"
class="org.springframework.batch.support.transaction.ResourcelessTransactionManager">
</bean>
<bean id="jdbcTemplate" class="org.springframework.jdbc.core.JdbcTemplate">
<property name="dataSource" ref="dataSource"></property>
</bean>
<!-- 引入外部數據源配置信息 -->
<bean class="org.springframework.beans.factory.config.PropertyPlaceholderConfigurer">
<property name="locations">
<value>classpath:com/aliyun/springbatch/sample/db/jdbc.properties</value>
</property>
</bean>
<!-- 配置數據源 -->
<bean id="dataSource" class="org.springframework.jdbc.datasource.DriverManagerDataSource">
<property name="driverClassName" value="${jdbc.driver}"></property>
<property name="url" value="${jdbc.url}"></property>
<property name="username" value="${jdbc.username}"></property>
<property name="password" value="${jdbc.password}"></property>
</bean>
</beans>batch.xml的配置
<?xml version="1.0" encoding="UTF-8"?>
<bean:beans xmlns="http://www.springframework.org/schema/batch"
xmlns:bean="http://www.springframework.org/schema/beans" xmlns:xsi="http://www.w3.org/2001/XMLSchema-instance"
xmlns:p="http://www.springframework.org/schema/p" xmlns:tx="http://www.springframework.org/schema/tx"
xmlns:aop="http://www.springframework.org/schema/aop" xmlns:context="http://www.springframework.org/schema/context"
xmlns:util="http://www.springframework.org/schema/util"
xsi:schemaLocation="http://www.springframework.org/schema/beans
http://www.springframework.org/schema/beans/spring-beans-3.0.xsd
http://www.springframework.org/schema/tx
http://www.springframework.org/schema/tx/spring-tx-3.0.xsd
http://www.springframework.org/schema/aop
http://www.springframework.org/schema/aop/spring-aop-3.0.xsd
http://www.springframework.org/schema/context
http://www.springframework.org/schema/context/spring-context-3.0.xsd
http://www.springframework.org/schema/batch
http://www.springframework.org/schema/batch/spring-batch-3.0.xsd
http://www.springframework.org/schema/util http://www.springframework.org/schema/util/spring-util.xsd">
<!-- <bean:import resource="dataSource.xml" /> -->
<bean:import resource="applicationContext.xml" />
<!-- Job的配置信息 -->
<!-- commit-interval="1" 表示每處理完1條數據提交一次事務 -->
<job id="dbJob">
<step id="dbReadAndWriterStep" >
<tasklet>
<chunk reader="userReader" writer="jdbcItemWriter"
commit-interval="1">
</chunk>
</tasklet>
</step>
</job>
<!-- <bean:bean id="jdbcItemReader" class="org.springframework.batch.item.database.JdbcCursorItemReader"
scope="step"> <bean:property name="dataSource" ref="dataSource" /> <bean:property
name="sql" value="select id,name,age,score from t_user" /> <bean:property
name="rowMapper"> <bean:bean class="org.springframework.jdbc.core.BeanPropertyRowMapper">
<bean:property name="mappedClass" value="com.aliyun.springbatch.sample.db.User"
/> </bean:bean> </bean:property> </bean:bean> -->
<!-- 讀文件 多文件上傳-->
<bean:bean id="userReader" class="org.springframework.batch.item.file.MultiResourceItemReader"
scope="step">
<!-- 單個文件讀取 -->
<!-- <property name="resource" value="file:./sample.csv" /> -->
<!-- 多個文件讀取 讀取文件的位置 -->
<bean:property name="resources" value="file:#{jobParameters['inputFile']}" />
<!-- 引入單個文件的讀取對象 -->
<bean:property name="delegate" ref="flatFileItemReader" />
</bean:bean>
<!-- 單個文件的讀取對象 -->
<bean:bean id="flatFileItemReader"
class="org.springframework.batch.item.file.FlatFileItemReader">
<!-- 跳過讀取文件的第一行 因為第一行是列名-->
<bean:property name="linesToSkip" value="1"/>
<!-- 文件的行映射 -->
<bean:property name="lineMapper">
<bean:bean class="org.springframework.batch.item.file.mapping.DefaultLineMapper">
<!-- 行的字段映射 -->
<bean:property name="lineTokenizer">
<!-- 映射的字段以下面names屬性,以,隔開 -->
<bean:bean
class="org.springframework.batch.item.file.transform.DelimitedLineTokenizer">
<bean:property name="names" value="id,name,age,score" />
</bean:bean>
</bean:property>
<!-- 設置 讀取的字段映射給實體對象 -->
<bean:property name="fieldSetMapper">
<bean:bean
class="org.springframework.batch.item.file.mapping.BeanWrapperFieldSetMapper">
<bean:property name="prototypeBeanName" value="user" />
</bean:bean>
</bean:property>
</bean:bean>
</bean:property>
</bean:bean>
<bean:bean id="user" class="com.aliyun.springbatch.sample.db.User"></bean:bean>
<!-- db數據的寫 -->
<!-- <bean:bean id="jdbcItemWriter"
class="org.springframework.batch.item.database.JdbcBatchItemWriter">
<bean:property name="dataSource" ref="dataSource" />
<bean:property name="sql"
value="insert into T_DESTUSER (ID,USERID,USERNAME,PASSWORD,UPDATETIME,UPDATEUSER)
values
(:id,:userId,:userName,:password,:updateDate,:updateUser)" />
<bean:property name="itemSqlParameterSourceProvider">
<bean:bean
class="org.springframework.batch.item.database.BeanPropertyItemSqlParameterSourceProvider" />
</bean:property>
</bean:bean> -->
<!-- 這是自定義的實現ItemWriter接口的ItemWriter的實現類 -->
<bean:bean id="jdbcItemWriter" class="com.aliyun.springbatch.sample.db.JdbcItemWriter">
</bean:bean>
</bean:beans>jdbc.properties mysql數據源配置文件
#Oracle
#hibernate.dialect=org.hibernate.dialect.OracleDialect
#validationQuery.sqlserver=SELECT 1 FROM DUAL
#jdbc.driver=oracle.jdbc.driver.OracleDriver
#jdbc.url=jdbc:oracle:thin:@localhost:1521:orcl
#jdbc.username=activitproject
#jdbc.password=activitproject
#Mysql
jdbc.driver=com.mysql.jdbc.Driver
jdbc.url=jdbc:mysql://127.0.0.1:3306/spring_batch_demo
jdbc.username=root
jdbc.password=root
封裝數據的實體類就自己寫吧
測試主方法:
 public static void main(String[] args) {
    ApplicationContext context = new ClassPathXmlApplicationContext(
        "com/aliyun/springbatch/sample/db/batch.xml");
    JobLauncher launcher = (JobLauncher) context.getBean("jobLauncher");
    Job job = (Job) context.getBean("dbJob");

    try {

      // JOB執行,設置參數添加讀取文件的路徑
      JobExecution result = launcher.run(
          job,
          //添加job參數時,將讀取的文件目錄加入到job的參數中
          new JobParametersBuilder()
              .addString("inputFile",
                  "src/main/java/com/aliyun/springbatch/sample/db/inputFile*.csv")
              .toJobParameters());
      // 運行結果輸出
      System.out.println(result.toString());
    } catch (Exception e) {
      e.printStackTrace();
    }
  }
看完上述內容是否對您有幫助呢?如果還想對相關知識有進一步的了解或閱讀更多相關文章,請關注億速云行業資訊頻道,感謝您對億速云的支持。
免責聲明:本站發布的內容(圖片、視頻和文字)以原創、轉載和分享為主,文章觀點不代表本網站立場,如果涉及侵權請聯系站長郵箱:is@yisu.com進行舉報,并提供相關證據,一經查實,將立刻刪除涉嫌侵權內容。