您好,登錄后才能下訂單哦!
您好,登錄后才能下訂單哦!
本篇文章為大家展示了spring boot如何實現對RabbitMQ整合,內容簡明扼要并且容易理解,絕對能使你眼前一亮,通過這篇文章的詳細介紹希望你能有所收獲。
1.Fanout Exchange介紹
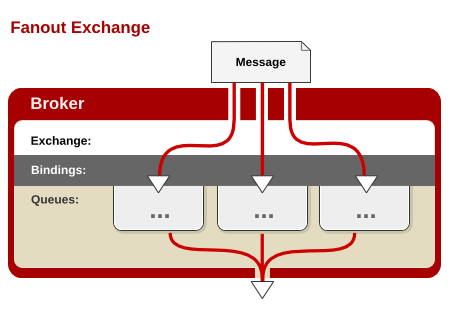
Fanout Exchange 消息廣播的模式,不管路由鍵或者是路由模式,會把消息發給綁定給它的全部隊列,如果配置了routing_key會被忽略。

如上圖所示,即當使用fanout交換器時,他會將消息廣播到與該交換器綁定的所有隊列上,這有利于你對單條消息做不同的反應。
例如存在以下場景:一個web服務要在用戶完善信息時,獲得積分獎勵,這樣你就可以創建兩個對列,一個用來處理用戶信息的請求,另一個對列獲取這條消息是來完成積分獎勵的任務。
2.代碼示例
1).Queue配置類
FanoutRabbitConfig.java類:
package com.example.rabbitmqfanout;
import org.springframework.amqp.core.Binding;
import org.springframework.amqp.core.BindingBuilder;
import org.springframework.amqp.core.FanoutExchange;
import org.springframework.amqp.core.Queue;
import org.springframework.context.annotation.Bean;
import org.springframework.context.annotation.Configuration;
@Configuration
public class FanoutRabbitConfig {
  //創建隊列
  @Bean
  public Queue AMessage() {
    return new Queue("fanout.A");
  }
  //創建隊列
  @Bean
  public Queue BMessage() {
    return new Queue("fanout.B");
  }
  //創建隊列
  @Bean
  public Queue CMessage() {
    return new Queue("fanout.C");
  }
  //創建Fanout交換器
  @Bean
  FanoutExchange fanoutExchange() {
    return new FanoutExchange("fanoutExchange");
  }
  //將對列綁定到Fanout交換器
  @Bean
  Binding bindingExchangeA(Queue AMessage,FanoutExchange fanoutExchange) {
    return BindingBuilder.bind(AMessage).to(fanoutExchange);
  }
  //將對列綁定到Fanout交換器
  @Bean
  Binding bindingExchangeB(Queue BMessage, FanoutExchange fanoutExchange) {
    return BindingBuilder.bind(BMessage).to(fanoutExchange);
  }
  //將對列綁定到Fanout交換器
  @Bean
  Binding bindingExchangeC(Queue CMessage, FanoutExchange fanoutExchange) {
    return BindingBuilder.bind(CMessage).to(fanoutExchange);
  }
}
2).消息生產者
FanoutSender.java類:
package com.example.rabbitmqfanout.rabbitmq;
import org.springframework.amqp.core.AmqpTemplate;
import org.springframework.beans.factory.annotation.Autowired;
import org.springframework.stereotype.Component;
@Component
public class FanoutSender {
  @Autowired
  private AmqpTemplate rabbitTemplate;
  public void send() {
    String context = "hi, fanout msg ";
    System.out.println("Sender : " + context);
    this.rabbitTemplate.convertAndSend("fanoutExchange","", context);
  }
}
3).消息消費者
FanoutReceiverA.java類:
package com.example.rabbitmqfanout.rabbitmq;
import org.springframework.amqp.rabbit.annotation.RabbitHandler;
import org.springframework.amqp.rabbit.annotation.RabbitListener;
import org.springframework.stereotype.Component;
@Component
@RabbitListener(queues = "fanout.A")
public class FanoutReceiverA {
   @RabbitHandler
   public void process(String message) {
     System.out.println("fanout Receiver A : " + message);
  }
}
FanoutReceiverB.java類:
package com.example.rabbitmqfanout.rabbitmq;
import org.springframework.amqp.rabbit.annotation.RabbitHandler;
import org.springframework.amqp.rabbit.annotation.RabbitListener;
import org.springframework.stereotype.Component;
@Component
@RabbitListener(queues = "fanout.B")
public class FanoutReceiverB {
  @RabbitHandler
  public void process(String message) {
    System.out.println("fanout Receiver B: " + message);
  }
}
FanoutReceiverC.java類:
package com.example.rabbitmqfanout.rabbitmq;
import org.springframework.amqp.rabbit.annotation.RabbitHandler;
import org.springframework.amqp.rabbit.annotation.RabbitListener;
import org.springframework.stereotype.Component;
@Component
@RabbitListener(queues = "fanout.C")
public class FanoutReceiverC {
  @RabbitHandler
  public void process(String message) {
    System.out.println("fanout Receiver C: " + message);
  }
}
4).測試
FanoutTest.java類:
package com.example.rabbitmqfanout.rabbitmq;
import org.junit.Test;
import org.junit.runner.RunWith;
import org.springframework.beans.factory.annotation.Autowired;
import org.springframework.boot.test.context.SpringBootTest;
import org.springframework.test.context.junit4.SpringRunner;
@RunWith(SpringRunner.class)
@SpringBootTest
public class FanoutTest {
  @Autowired
  private FanoutSender sender;
  @Test
  public void fanoutSender() throws Exception {
    sender.send();
  }
}
上述內容就是spring boot如何實現對RabbitMQ整合,你們學到知識或技能了嗎?如果還想學到更多技能或者豐富自己的知識儲備,歡迎關注億速云行業資訊頻道。
免責聲明:本站發布的內容(圖片、視頻和文字)以原創、轉載和分享為主,文章觀點不代表本網站立場,如果涉及侵權請聯系站長郵箱:is@yisu.com進行舉報,并提供相關證據,一經查實,將立刻刪除涉嫌侵權內容。